Umbraco Cashier
Cashier is an agnostic payment gateway solution for taking Card Payments and setting up Direct Debits in sites built with Umbraco. The aim of this project is to be able to write payment solutions once that can be reused in any project, and provide a constistent code pattern for taking payments, no matter what Payment Provider is being used.
During my time as a web developer, I have found most people don't want full fledged e-commerce systems. More often than not, people want to be able to take donations, or pay for something that is pushed into an already-existing system they use to manage orders. As a result, each implementation is unique but the payment integration stays the same. Hence this package.
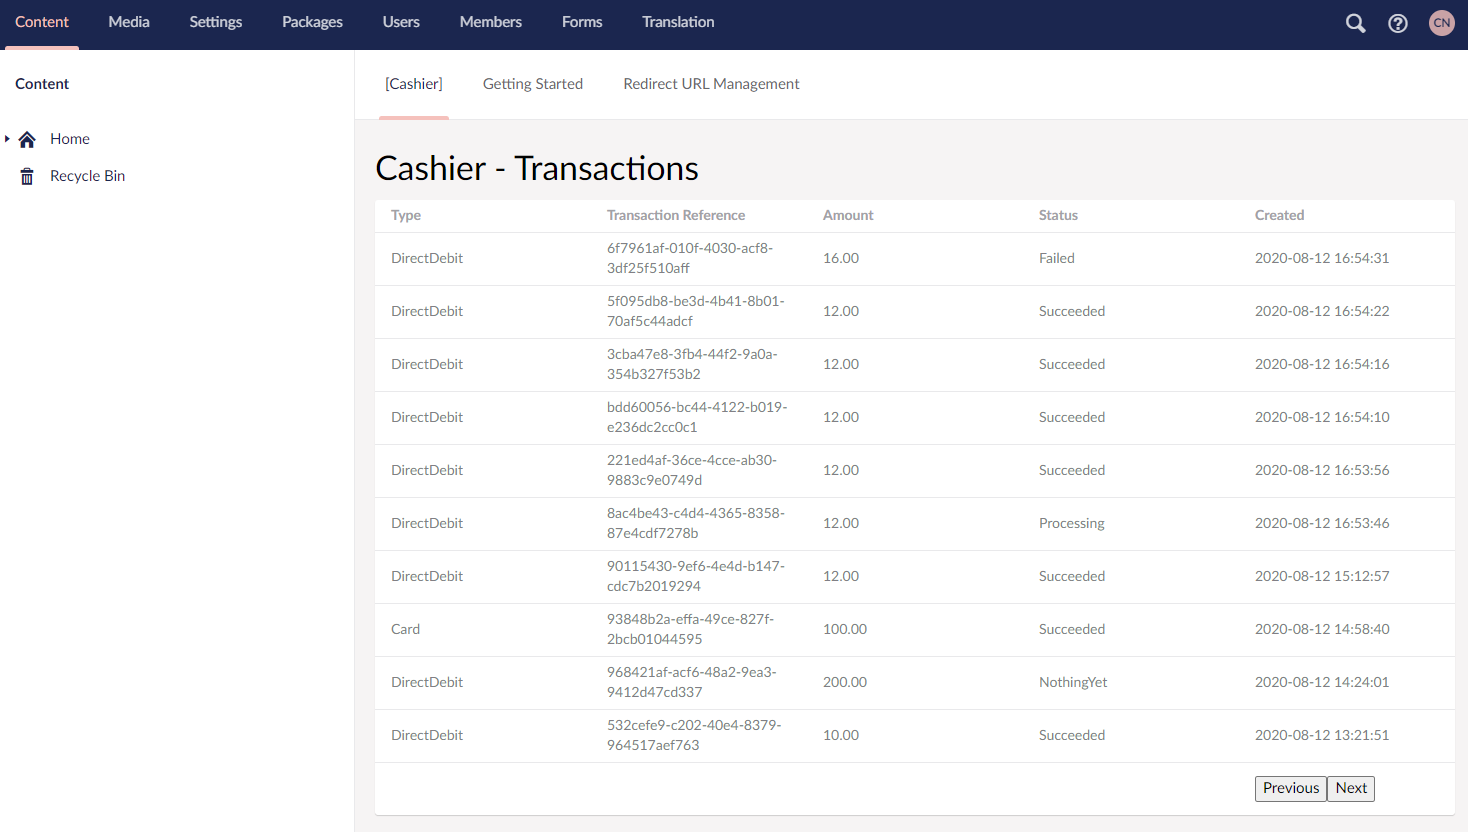
Cashier also provides a very handy Dashboard to view all Payments requested by code, so it's possible to view transaction successes or failures.
Contents:
- Installing and example of taking a Card payment
- How to set up Direct Debits
- Dashboard UI
- Conceptual flow diagram
- Contributing
- Available Cashier Payment Providers
- Running this project locally
Installation and example of taking Card Payment
Step 1
Install via Nuget:
install-packge Our.Umbraco.CashierStep 2
Payment Intents are stored in a database. This can point to your Umbraco database. A table called PaymentIntents will be created.
<add name="CashierDb" connectionString="{{CONNECTION STRING HERE}}" providerName="System.Data.SqlServerCe.4.0" />Step 3
Install a Cashier Payment Provider solution package: (currently only stripe exists)
install-package Our.Umbraco.Cashier.StripeFor instructions on how to finish the Stripe setup (configure keys etc.), click here.
Step 4
Create an Umbraco Composition to register your selected payment gateway. You only need to register what your are planning to use.
public class RegisterPaymentGatewayComposer : IUserComposer
{
    public void Compose(Composition composition)
    {
        composition.RegisterCardPaymentGateway<StripeCardPaymentGateway>();
        composition.RegisterDirectDebitPaymentGateway<StripeDirectDebitPaymentGateway>();
    }
}
Step 5
Now you are ready to take payment. First of all, set up a controller that injects ICashier
public class DonationFormSurfaceController : SurfaceController
{
    public ICashier Cashier { get; }

    public DonationFormSurfaceController(ICashier cashier)
    {
        Cashier = cashier;
    }

    public ActionResult HandleDonation(DonationFormModel model)
    {
        //<---- we will take payment here
    }
}
Now we have a controller, all we need to do is arrange for payment to be taken. To do this, all we do is:
var paymentIntentRequest = PaymentIntentRequest.CreateCardPayment(
                                transactionReference: transactionReference,
                                description: "Donation",
                                amount: model.Amount,
                                customerEmail: model.Email,
                                confirmationPageUrl: CurrentPage.Url,
                                failurePageUrl: Umbraco.Content(1148).Url,
                                callbackUrl: "/umbraco/surface/DonationFormSurface/HandleCallback",
                                additionalData: ""
                          );

//here I am going to store the donation model against the PaymentIntent so that I can load it later to complete the process
paymentIntentRequest.AdditionalData = JsonConvert.SerializeObject(model);

var paymentIntentCreated = Cashier.CreateNewPaymentIntent(paymentIntentRequest);

return paymentIntentCreated.ActionResult;
At this point, we have now returned the ActionResult returned from the Payment Provider implementation. We will need to write the callback method so that Cashier can tell us whether the payment was successful or not. This callback is asynchronous and will happen in the background.
You will see that we have already set the callbackUrl to /umbraco/surface/DonationFormSurface/HandleCallback. Let's write it.
The success page, failure page and callback url will recieve two querystring parameters tr and hs. The tr parameter is the Transaction Reference and the hs parameter is handshake.
We will need to get the PaymentIntent from Cashier using the Transaction Reference and validate the Handshake is correct. The Handshake is secret and only known by Cashier.
public ActionResult HandleCallback(string tr, string hs)
{
    var paymentIntent = Cashier.GetPaymentIntentByTransactionRef(tr);

    //validate the handshake matches
    if(paymentIntent.HandShake != hs)
    {
        return new HttpStatusCodeResult(400);
    }

    //now we can load our donation model out
    var model = JsonConvert.DeserializeObject<DonationFormModel>(paymentIntent.AdditionalData);

    if(paymentIntent.PaymentStatus == PaymentStatus.Succeeded)
    {
        //do whatever here: register in CRM, send email, etc.
    }
}
Remember! The success page should validate the PaymentIntent handshake in the exact same way.
How to set up Direct Debits
For Direct Debits, the code and process is exactly the same, except you create the PaymentIntentRequest like this:
var paymentIntentCreated = Cashier.CreateNewPaymentIntent(PaymentIntentRequest.CreateDirectDebit(
                                transactionReference: transactionReference,
                                description: "Donation Direct Debit",
                                amount: model.Amount,
                                customerEmail: model.Email,
                                confirmationPageUrl: CurrentPage.Url,
                                failurePageUrl: Umbraco.Content(1148).Url,
                                callbackUrl: "/umbraco/surface/DonationFormSurface/HandleCallback",
                                additionalData: jsonDonation,
                                customerUniqueReference: model.Email,
                                directDebitStartDate: FirstDayOfNextMonth(DateTime.UtcNow), //start date
                                customerAddress: new CustomerAddress
                                {
                                    AddressLines = model.AddressLines,
                                    City = model.Town,
                                    Country = "United Kingdom",
                                    Postcode = model.Postcode
                                }
                          ));
Dashboard UI
The Dashboard allows users to view all Payment Requests made by code and see the current status of those.
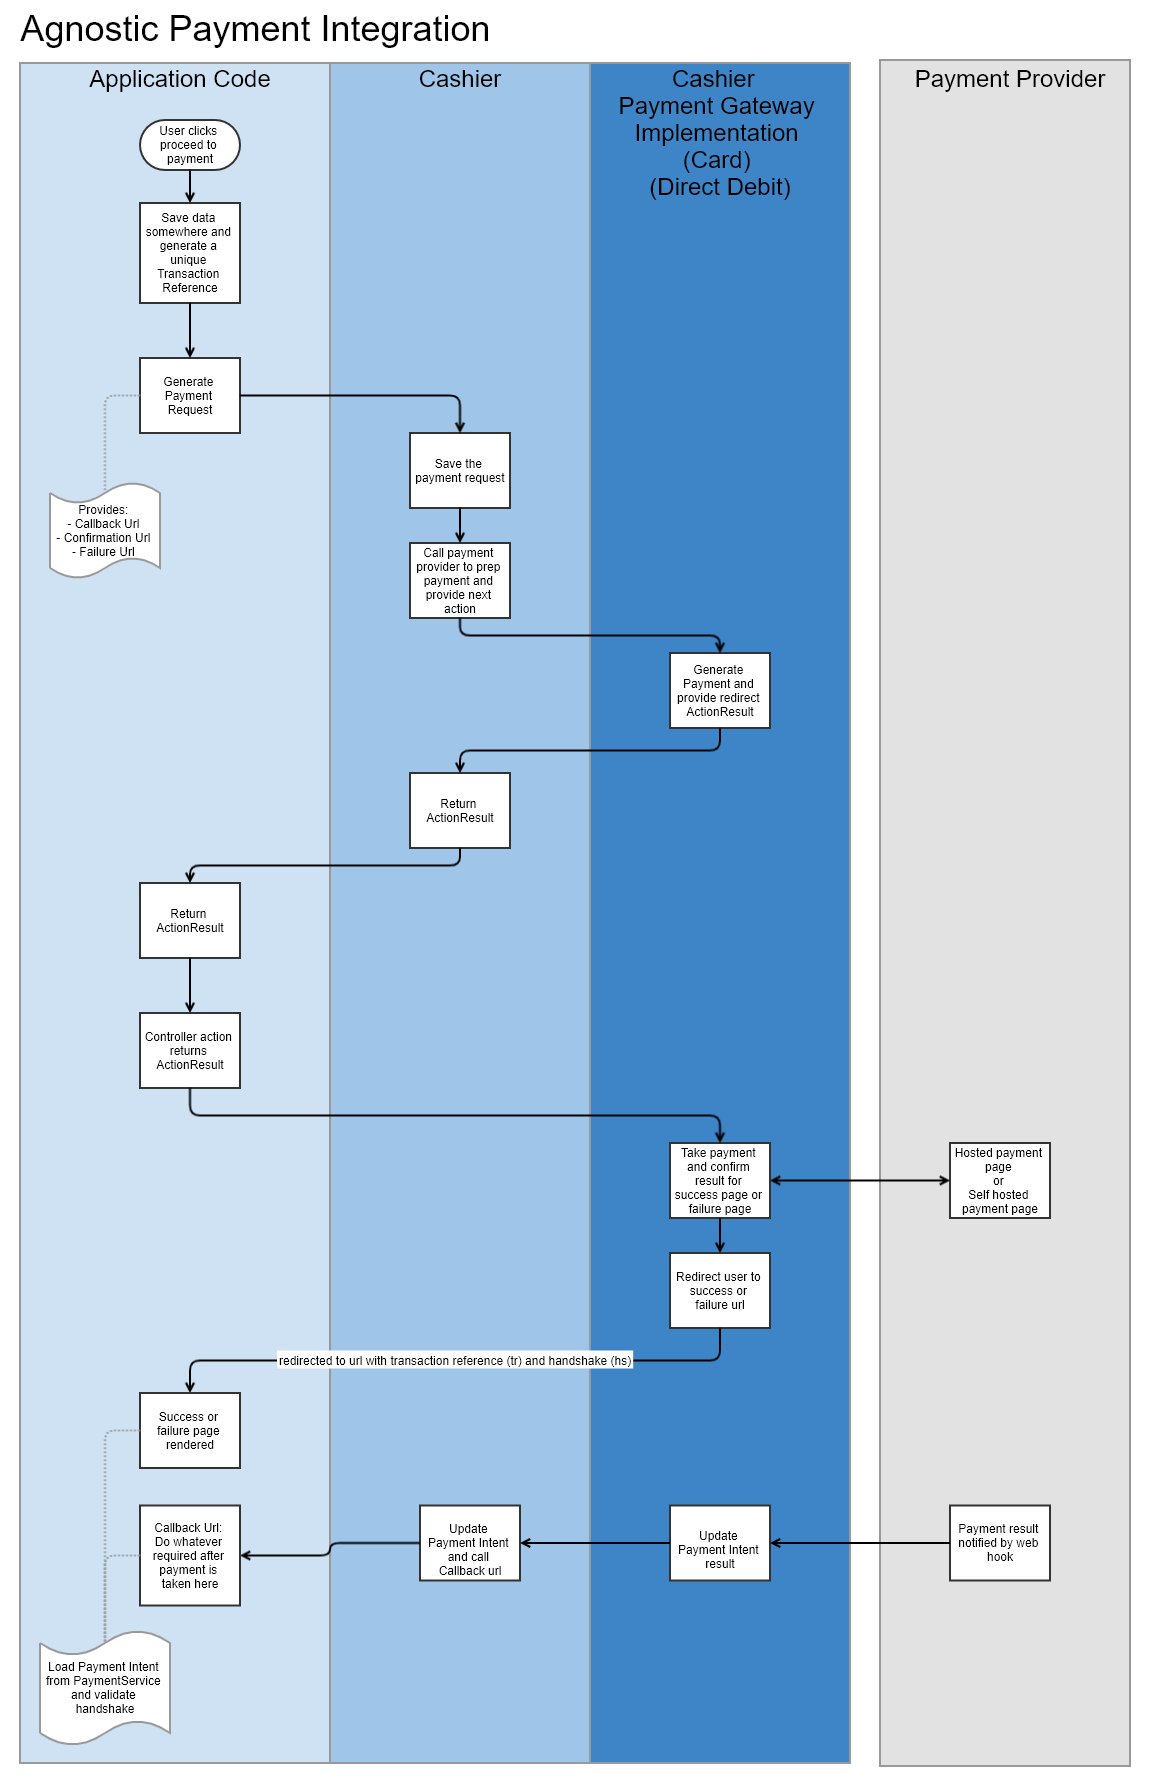
Conceptual flow diagram
Contributing
I really hope the community will contribute to make this package better for everyone who hates spending so much time writing payment providers over and over again!
Please feel free to contribute in the following ways:
- Extend the Cashier core system to support more types of Payment Providers
- Implement and submit Pull Requests for new Payment Providers
I would really like to see implementations for the following:
- SagePay
- Worldpay
- PayPal
- BitPay
- ... basically as many as we can Implement!
In summary, I would like this to be a community owned project to simplify the codebases we support every day and to allow for more time making the CMS experience better.
Running this project locally
Run the Cashier.TestBed project.
Username: admin@admin.com Password: qwe1234567
Available Cashier Payment Providers
- Stripe
Stripe
Install the package:
install-package Our.Umbraco.Cashier.StripeRegister the card and direct debit payment gateways with Cashier
public class RegisterPaymentGatewayComposer : IUserComposer
{
    public void Compose(Composition composition)
    {
        composition.Register(typeof(ICardPaymentGateway), typeof(StripeCardPaymentGateway), Lifetime.Request);
        composition.Register(typeof(IDirectDebitPaymentGateway), typeof(StripeDirectDebitPaymentGateway), Lifetime.Request);
    }
}
Stripe requires a public key and secret key. Get these from the Stripe dashboard. The Stripe Payment provider sets up a virtual routed Card and Direct Debit url that can be changed in the app settings.
Configure the AppSettings:
<add key="Cashier:Stripe:Public" value="{{INSERT STRIPE PUBLIC KEY HERE}}" />
<add key="Cashier:Stripe:Secret" value="{{INSERT STRIPE SECRET KEY HERE}}" />
<add key="Cashier:Stripe:CardPaymentUrl" value="pay-by-card" />
<add key="Cashier:Stripe:CardPaymentPageVirtualNode" value="{{INSERT Payment Page virtual node ID}}" />
<add key="Cashier:Stripe:DirectDebitPaymentUrl" value="set-up-direct-debit" xdt:Transform="InsertIfMissing" />
<add key="Cashier:Stripe:DirectDebitPaymentPageVirtualNode" value="{{INSERT Payment Page virtual node ID}}" />
<add key="Cashier:Stripe:LiveMode" value="false" />
You can customise the views installed in the Views directory.

