In this article, we walk through a set up using Power BI Service and Azure Devops to deploy a Power BI Report (.pbix file) to different workspaces; each with a different data source.
- Each Power BI Service workspace represents a separate environment.
- Each workspace points to a separate data source.
- Each data source is based on the same schema.
- The same Power BI report is deployed to different workspaces.
For this sample, we assume a workspace-per-customer approach and create three databases and three Power BI Service workspaces. The default My workspace represents the development envirionment to build and test the report while the workspaces X and Y represents the production environments for customer X and Y respectively.
| Workspace | Datasoure |
|---|---|
| My workspace | customerdevdbsvr; customerdevdb |
| customerX | customerxdbsvr; customerxdb |
| customerY | customerydbsvr; customerxdb |
- Sign into your Azure portal, and create a new Azure sql database server, customerdevdbsvr with a database, customerdevdb.
- Connect to the customerdevdb database and execute the customerdevdb.sql script to create a populated Customer table.
- Repeat steps 1 and 2 to create a customer X database (server: customerXdbsvr, database: customerxdb) and run the customerXdb.sql script.
- Lastly, repeat steps 1 and 2 to create a customer Y database(server: customerydbsvr, database: customerydb) and run the customerYdb.sql script.
As a quick check, query the customer tables of all three databases and you will notice the dev database holds customers Customers A, B, C..., while databases customer X and Y contain males and females names respectively.
- Sign into your Azure Devops instance and create a new devops project called pbi-devops.
- Add the customer-report.pbix to the project's repo.
- Add the Power BI Action task to your Azure Devops instance (https://marketplace.visualstudio.com/items?itemName=maikvandergaag.maikvandergaag-power-bi-actions).
- Create a new Build Pipeline in Azure Devops that copies and publishes the .pbix file using YAML.
trigger:
- master

pool:
  vmImage: 'ubuntu-latest'

steps:
- task: CopyFiles@2
  displayName: 'Copy Files to: Staging Artifact'
  inputs:
    Contents: '*.pbix'
    TargetFolder: '$(Build.ArtifactStagingDirectory)'
    OverWrite: true
- task: PublishBuildArtifacts@1
  displayName: 'Publish Artifact: drop'

For this sample, we will be using a Master Account to access the underlying Power BI APIs required by the DevOps Release Pipeline Tasks. To setup a Service Principal (SPN) instead, refer to this MS Doc.
Important: Make sure to create the App Registration in the same Azure AD tenant/organization of the Power BI Service Workspace. As a quick test, login to Power BI Service with the account you intend to use as the Master Account.
- Sign in to your Azure Portal.
- Register an Azure AD application as documented here and capture the Application/Client ID.
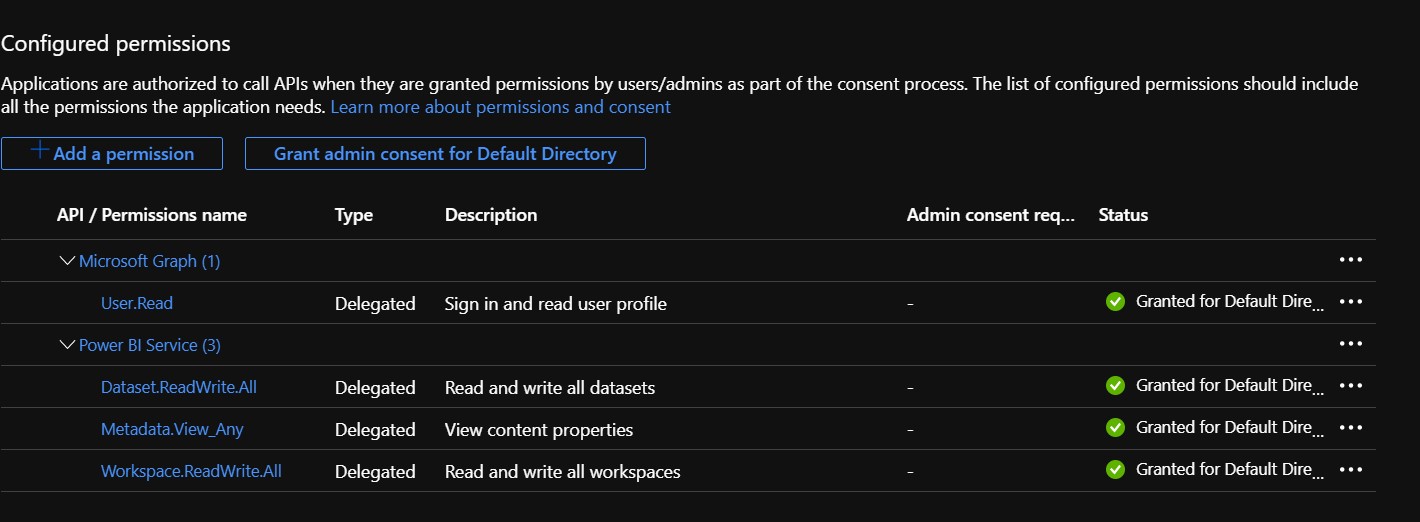
- Click API Permissions, click + Add a permission, select the Power BI Service from the list of Microsoft APIs.
- Select Delegated Permissions and select the Dataset.ReadWrite.All, Workspace.ReadWrite.All and Metadata.View_Any.
- Click Grant admin consent for Default Directory and click Yes.

-
Create a new Release pipeline.
-
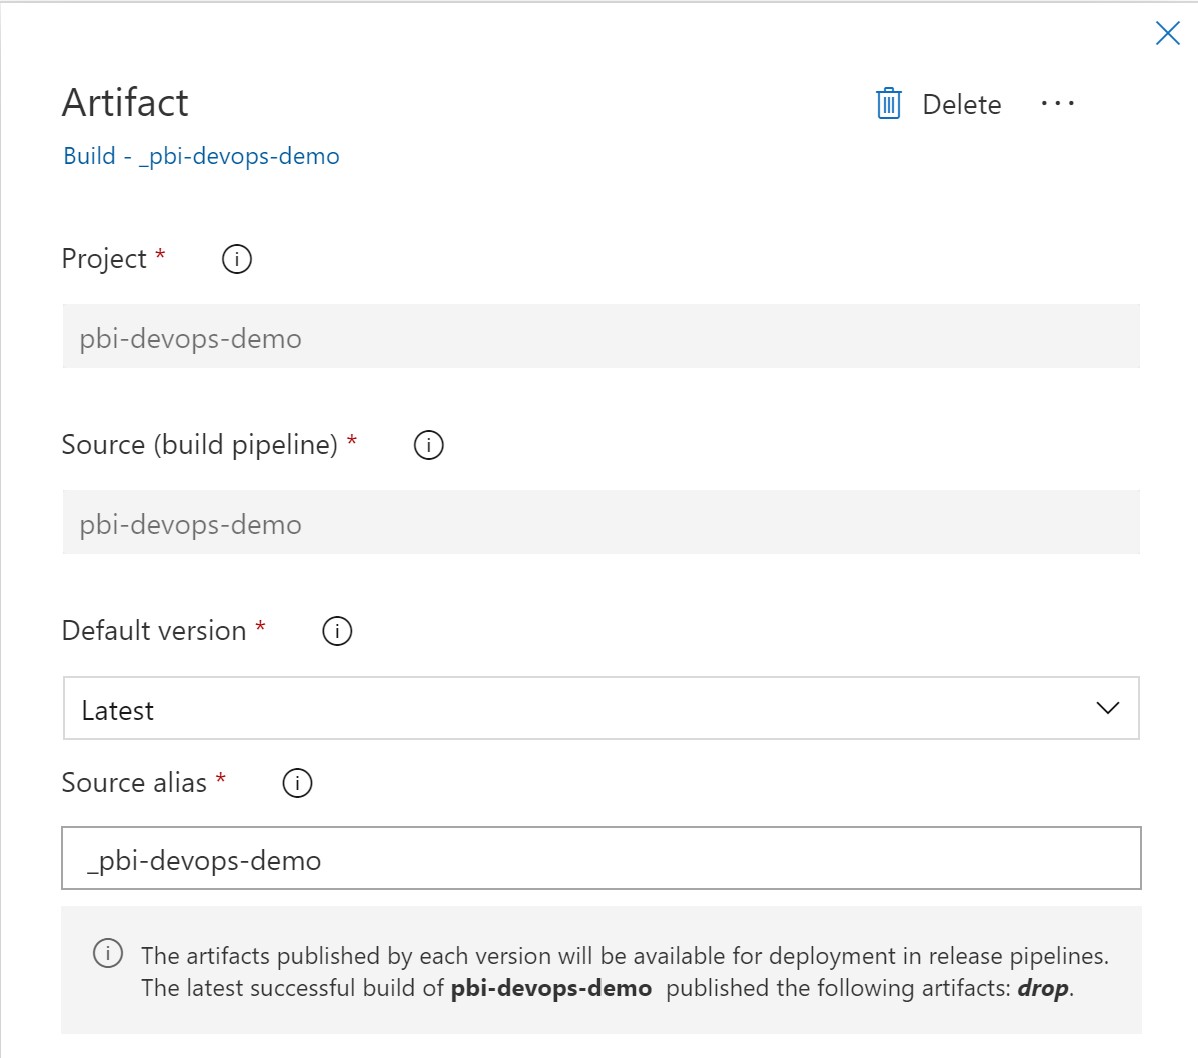
Add an artifact using the build pipeline source.
-
Add a new Stage with an Empty Job and name it Publish Customer X PBI Reports.
-
Click on the Tasks links of the Stage and click on the "+" to add new Task to the Agent.

-
Search for the Power BI Actions in the Task search bar and add it to your Azure Devops.

-
Enter the following for the Task to upload the report to the workspace:


- Display Name: Deploy Customer X PBI Report
- Authenication: User (if using SPN, than select Service Principal)
- Power BI service connection:
- Select + New
- Enter the client Id from step 12,
- Enter a username and password of your Master Account
- Enter Service connection name: PBI Connection
- Action: Upload PowerBI Report
- Workspace: customerX
- Source file: Browse and select the customer-report.pbix file in the Linked artifacts
 18. Save the Pipeline and add another Power BI Actions Task to update the report's datasource:
- Display Name: Update Datasource to Customer X
- Authenication: User (if using SPN, than select Service Principal)
- Power BI service connection: PBI Connection
- Action: Update DataSource connection
- Workspace: customerX
- Dataset name: customer-report
- Datasource type: Sql
- Old server: customerdevdbsvr.database.windows.net
- New server: customerxdbsvr.database.windows.net
- Old database: customerdevdb
- New database: customerxdb

Important At the time of writing this article (Aug 2020), the Power BI Actions extension has a limitation where datasource credentials are not updatable; they have to manually configured on the PowerBI Servic portal. To overcome this limitation (and others), use Powershell scripting instead (see example).
- Save the Pipeline and add another Power BI Actions Task to refresh the report's dataset:
- Display Name: Refresh Dataset
- Authenication: User (if using SPN, than select Service Principal)
- Power BI service connection: Select the Service Connection configured above
- Action: Refresh a Dataset
- Workspace: customerX
- Dataset name: customer-report

-
Save the Pipeline.
-
Finally, run the Build and Release pipelines.
-
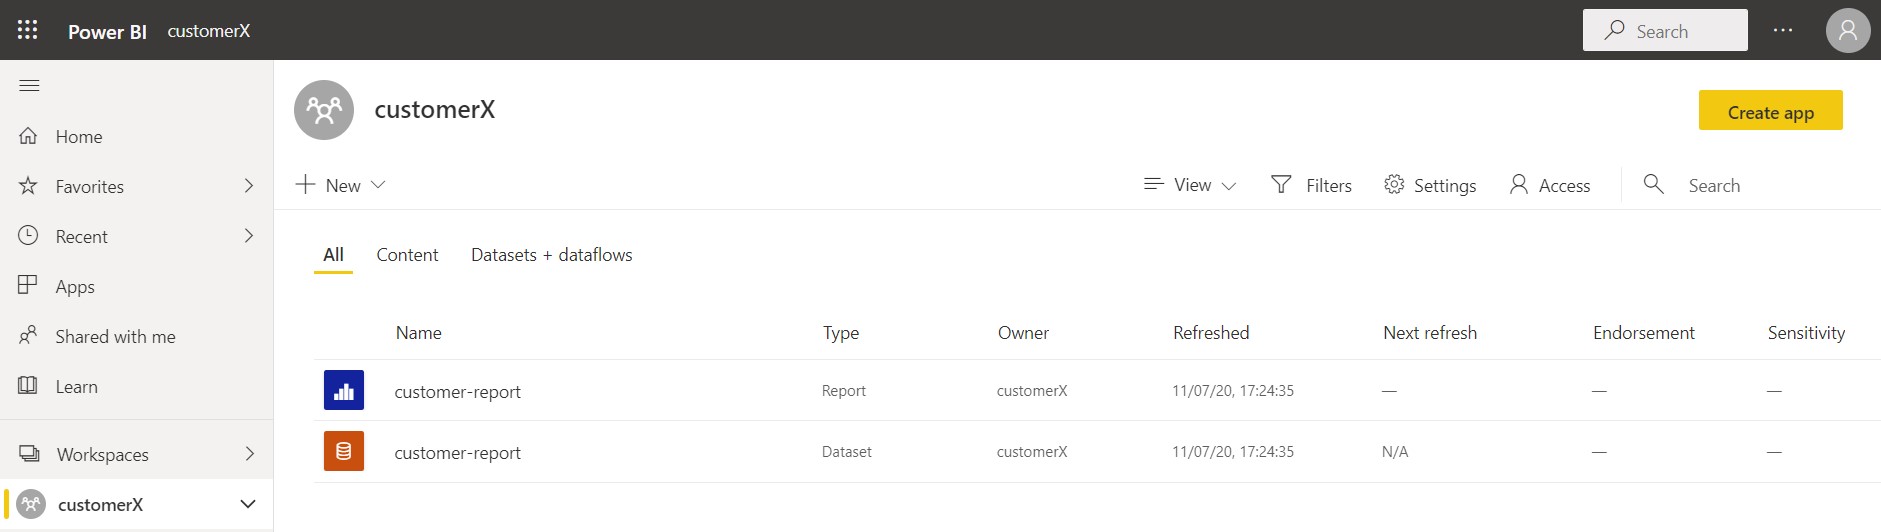
If pipelines were succesful, sign in to your Power BI Workspace and verify the report and its dataset.
-
Repeat steps 13 through 21 but for Customer Y with the following values:
- Display Name: Change "Customer X" to "Customer Y"
- Workspace: customery
- New server: customerydbsvr.database.windows.net
- New database: customerydb
-
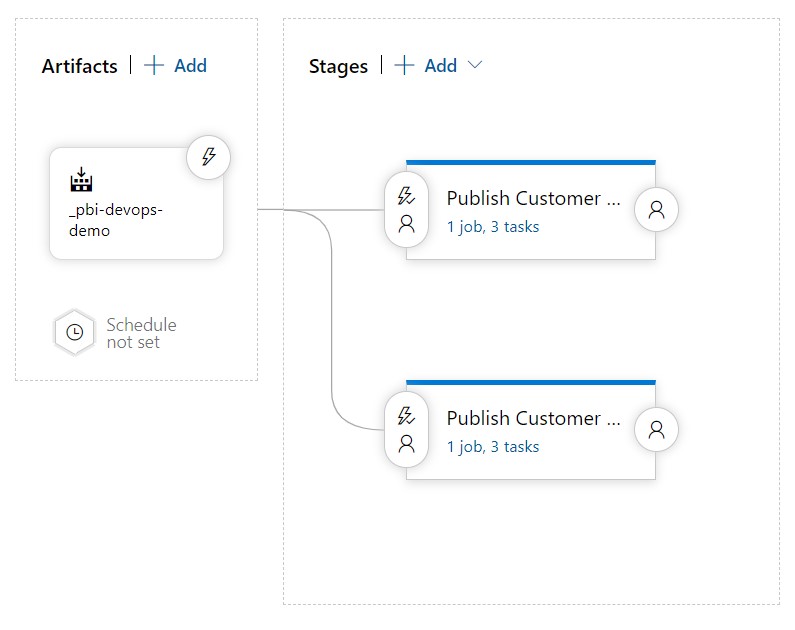
The final Release pipeline should look similar to this.


- PowerBI - CICD using Azure DevOps (https://community.powerbi.com/t5/Community-Blog/PowerBI-CICD-using-Azure-DevOps/ba-p/769244)