OCP CAD Viewer for VS Code is an extension to show CadQuery and build123d objects in VS Code via the three-cad-viewer viewer component.
- A fairly recent version of Microsoft VS Code, e.g. 1.85.0 or newer
- The Python extension installed in VS Code
- Necessary tools:
pythonandpipavailable in the Python enviroment that will be used for CAD development- The command
gitneeds to be available - On a Silicon Apple computer the command
mambaneeds to be available. You might want to consider using Mambaforge.
Notes:
- To use OCP CAD Viewer, start VS Code from the commandline in the Python environment you want to use or select the right Python interpreter in VS Code first. OCP CAD Viewer depends on VS Code using the right Python interpreter (i.e. mamba / conda / pyenv / poetry / ... environment).
- For VSCodium, the extension is not available in the VS code market place. You need to download the the vsix file from the release folder and install it manually.
- Currently, on a Silicon Mac (ARM CPU), OCP and CadQuery can only be installed via
mamba, see 3. below.
-
Open the VS Code Marketplace, and search and install OCP CAD Viewer 2.6.0.
Afterwards the OCP viewer is available in the VS Code sidebar:
-
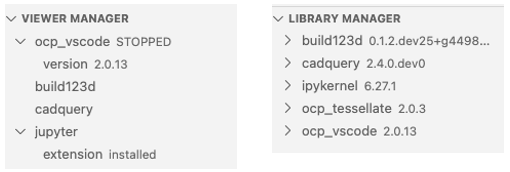
Clicking on it shows the OCP CAD Viewer UI with the viewer manager and the library manager:
You have 3 options:
-
Prepare OCP CAD Viewer for working with build123d: Presse the Quickstart build123d button.
This will install OCP, build123d, ipykernel (jupyter_client), ocp_tessellate and ocp_vscode via
pip(except for Apple Silicon machines that requiremambaand will also install cadquery) -
Prepare OCP CAD Viewer for working with CadQuery: Presse the Quickstart CadQuery button.
This will install OCP, CadQuery, ipykernel (jupyter_client), ocp_tessellate and ocp_vscode via
pip(except for Apple Silicon machines that requiremamba) -
Ignore the quick starts and use the "Library Manager" to install the libraries. Doing so, OCP CAD Viewer let's you select whether to use
pip,mamba,condaorpoetry. Install the needed library by pressing the down-arrow behind the library name (hover over the library name to see the button) in the "Library Manager" section of the OCP CAD Viewer sidebar. For more details, see here
The Quickstarts will also
- (optionally) install the the Jupyter extension for VS Code from Microsoft
- start the OCP viewer
- create a demo file in a temporary folder to quickly see a simple usage example
-
-
On Silicon Macs (ARM CPU)
- Install Miniforge
- Option 1: Download and install from the Miniforge github page
- Option 2: Use
homebrew:brew install miniforge
- Initialize your shell for
mamba:mamba init $(basename "$SHELL") - Create an environment, e.g named
code_cadwith Python 3.10:mamba create -n code_cad python=3.10 - Activate the environment:
mamba activate code_cad - Start VS Code from your working folder:
code . - Install the Python extension in VS Code
- Continue with 1. above
- Install Miniforge
Note: Do not use the OCP CAD Viewer logo to verify your OCP CAD Viewer settings! The logo overwrites all your settings in VS Code with its own settings to always look the same on each instance. Use a simple own model for checking your conmfiguration
- Start the OCP CAD Viewer by pressing the box-arrow button in the "Viewer Manager" section of the OCP CAD Viewer sidebar (hover over the
ocp_vscodeentry to see the button). - Import ocp_vscode and the CAD library by using the paste button behing the library names in the "Viewer Manager" section
- Use the usual Run menu to run the code
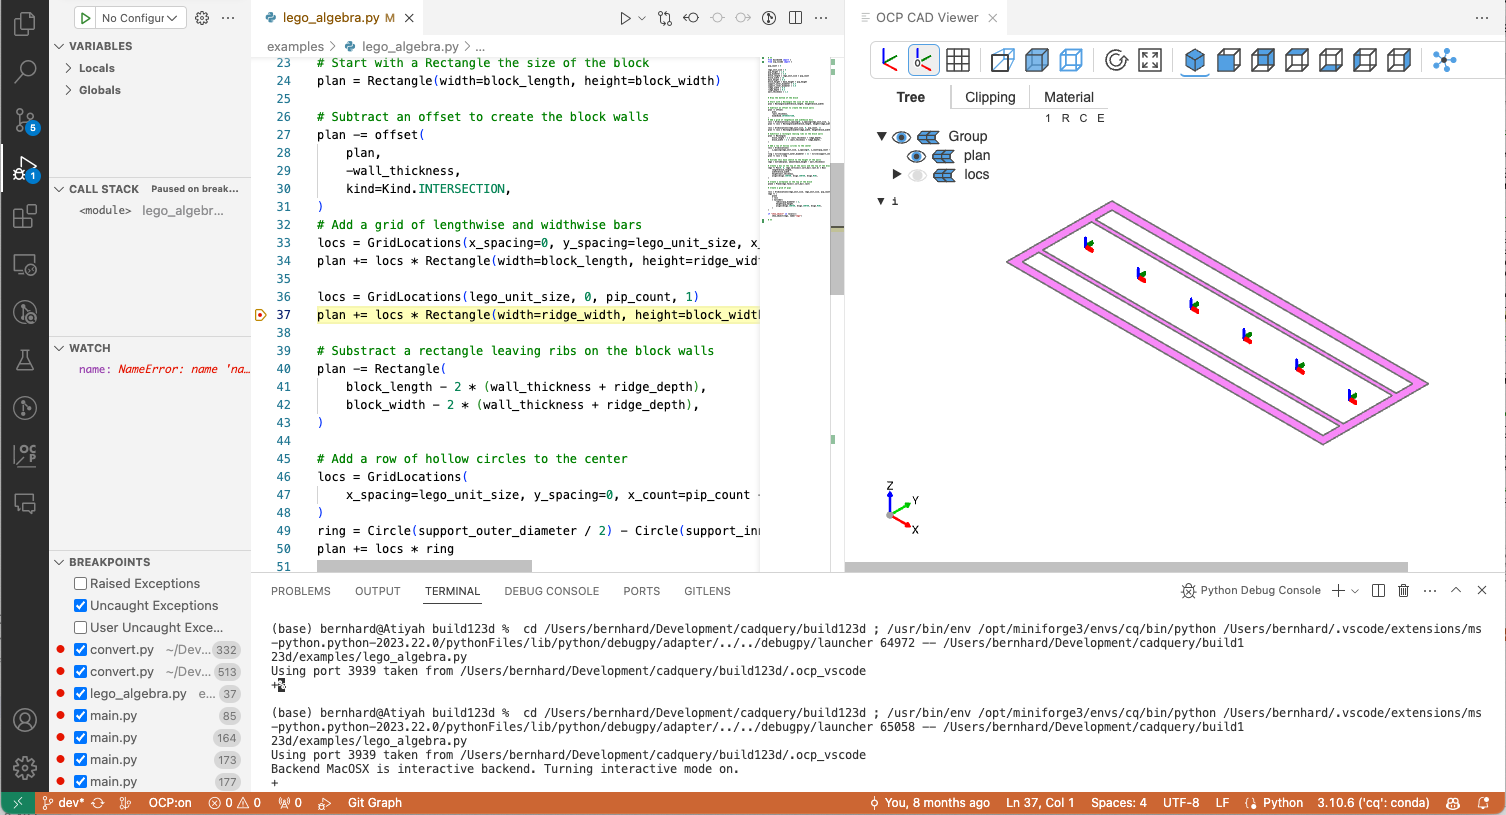
After each step, the debugger checks all variables in locals() for being CAD objects and displays them with their variable name.
Note:
- Check that
OCP:onis visible in the status bar - It also shows planes, locations and axis, so name your contexts
- It remembers camera position and unselected variables in the tree
- during debugging,
showandshow_objectare disabled. They interfere with the visual debugging
You can also use "Library Manager" in the OCP CAD Viewer sidebar to manage the Python libraries for build123d, cadquery, ipython and ocp_tessellate (Presse the down-arrow when hovering over a library name to install/upgrade it)
- Quickstart experience on Windows
- Use Jupyter to execute code
- Debug code with visual debugging
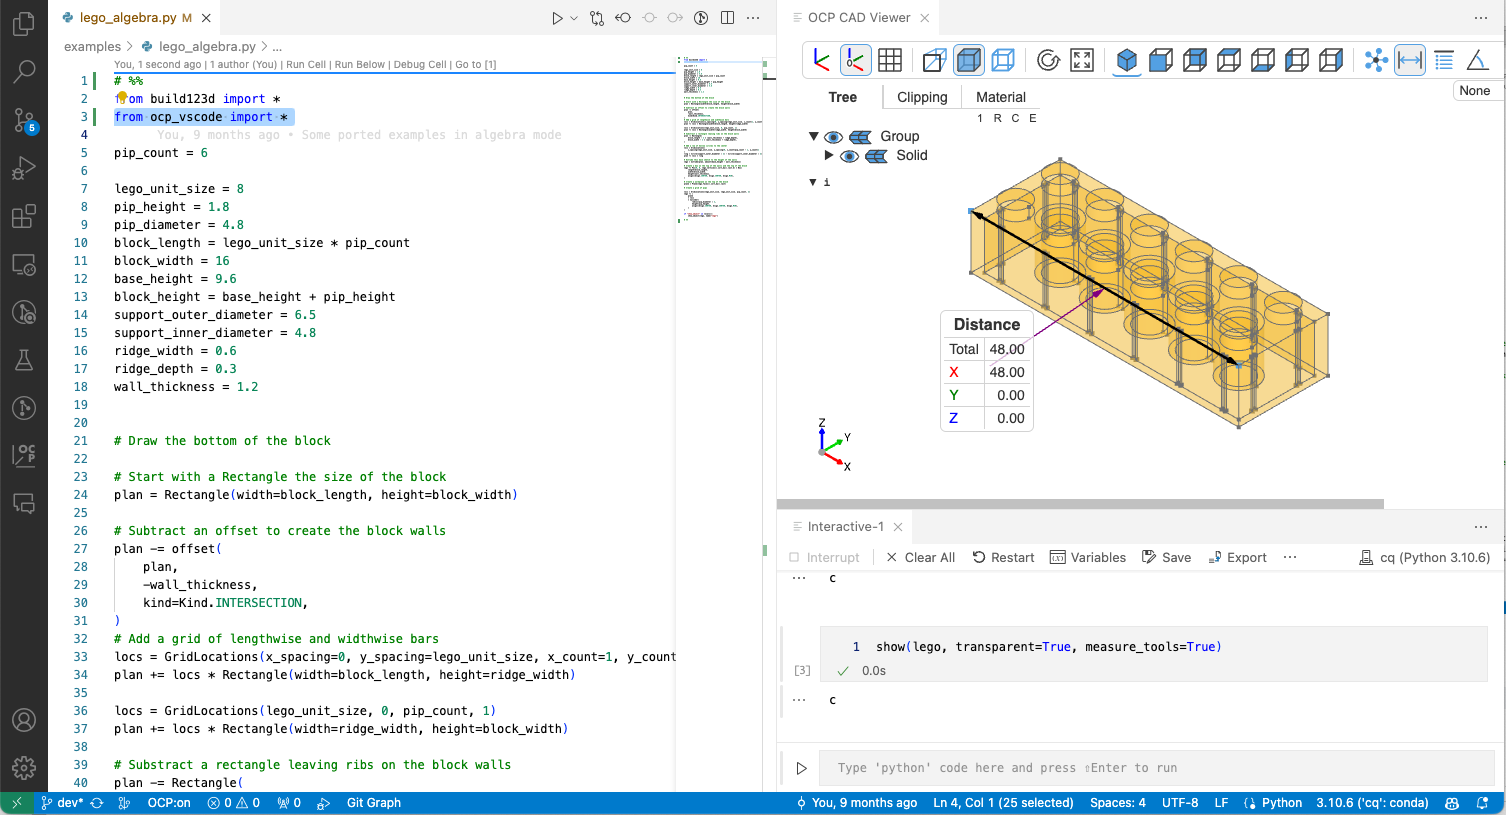
- Measure mode
- Use the
showcommand - Use the
show_objectcommand - Use the
set_viewer_configcommand - Download examples for build123d or cadquery
- Use the build123d snippets
Standalone mode allows to use OCP CAD Viewer without VS Code: python -m ocp_vscode. This will start a Flask server and the viewer can be reached under http://127.0.0.1/viewer. All client side feature of the VS Code variant (i.e. show* features) should be available (including measurement mode) except visual debugging (see above) which relies on VS Code.
Use python -m ocp_vscode --help to understand the command line args:
Usage: python -m ocp_vscode [OPTIONS]

Options:
  --create_configfile            Create the configlie .ocpvscode_standalone in
                                 the home directory
  --host TEXT                    The host to start OCP CAD with
  --port INTEGER                 The port to start OCP CAD with
  --debug                        Show debugging information
  --timeit                       Show timing information
  --tree_width TEXT              OCP CAD Viewer navigation tree width
                                 (default: 240)
  --no_glass                     Do not use glass mode with transparent
                                 navigation tree
  --theme TEXT                   Use theme 'light' or 'dark' (default:
                                 'light')
  --no_tools                     Do not show toolbar
  --tree_width INTEGER           Width of the CAD navigation tree (default:
                                 240)
  --control TEXT                 Use control mode 'orbit'or 'trackball'
  --up TEXT                      Provides up direction, 'Z', 'Y' or 'L'
                                 (legacy) (default: Z)
  --rotate_speed INTEGER         Rotation speed (default: 1)
  --zoom_speed INTEGER           Zoom speed (default: 1)
  --pan_speed INTEGER            Pan speed (default: 1)
  --axes                         Show axes
  --axes0                        Show axes at the origin (0, 0, 0)
  --black_edges                  Show edges in black
  --grid_xy                      Show grid on XY plane
  --grid_yz                      Show grid on YZ plane
  --grid_xz                      Show grid on XZ plane
  --center_grid                  Show grid planes crossing at center of object
                                 or global origin(default: False)
  --collapse INTEGER             leaves: collapse all leaf nodes, all:
                                 collapse all nodes, none: expand all nodes,
                                 root: expand root only (default: leaves)
  --perspective                  Use perspective camera
  --ticks INTEGER                Default number of ticks (default: 10)
  --transparent                  Show objects transparent
  --default_opacity FLOAT        Default opacity for transparent objects
                                 (default: 0.5)
  --explode                      Turn explode mode on
  --angular_tolerance FLOAT      Angular tolerance for tessellation algorithm
                                 (default: 0.2)
  --deviation FLOAT              Deviation of for tessellation algorithm
                                 (default: 0.1)
  --default_color TEXT           Default shape color, CSS3 color names are
                                 allowed (default: #e8b024)
  --default_edgecolor TEXT       Default color of the edges of shapes, CSS3
                                 color names are allowed (default: #707070)
  --default_thickedgecolor TEXT  Default color of lines, CSS3 color names are
                                 allowed (default: MediumOrchid)
  --default_facecolor TEXT       Default color of faces, CSS3 color names are
                                 allowed (default: Violet)
  --default_vertexcolor TEXT     Default color of vertices, CSS3 color names
                                 are allowed (default: MediumOrchid)
  --ambient_intensity INTEGER    Intensity of ambient light (default: 1.00)
  --direct_intensity FLOAT       Intensity of direct light (default: 1.10)
  --metalness FLOAT              Metalness property of material (default:
                                 0.30)
  --roughness FLOAT              Roughness property of material (default:
                                 0.65)
  --help                         Show this message and exit.
-
Use the Jupyter extension for a more interactive experience. This allows to have one cell (separated by
# %%) at the beginning to import all libraries# %% from build123d import * from ocp_vscode import * # %% b = Box(1,2,3) show(b) # %%
and then only execute the code in the cell you are currently working on repeatedly.
-
The config system of OCP CAD Viewer
There are 3 levels:
- Workspace configuration (part of the VS Code settings, you can access them e.g. via the gear symbol in OCP CAD Viewer's "Viewer Manager" when you hover over the label "VIEWER MANAGER" to see the button)
- Defaults set with the command
set_defaultsper Python file - Parameters in
showorshow_objectper command
set_defaultsoverrides the Workspace settings and parameters inshowandshow_configoverride the other two.Note that not all parameters are available in the global Workspace config, since they don't make sense globally (e.g.
helper_scalewhich depends on the size of the boundary box of the currently shown object)A common setup would be
# %%
from build123d import *
import cadquery as cq

from ocp_vscode import *
set_port(3939)

set_defaults(reset_camera=False, helper_scale=5)

# %%
...
Explanation
- The first block imports build123d and CadQuery (omit what you are not interested in).
- The second block imports all commands for OCP CAD Viewer.
set_portis only needed when you have more than one viewer open and can be omitted for the first viewer) - The third block as an example sets helper_scale and reset_camera as defaults. Then every show_object or show command will respect it as the default
-
Debugging build123d with
show_alland the visual debugger-
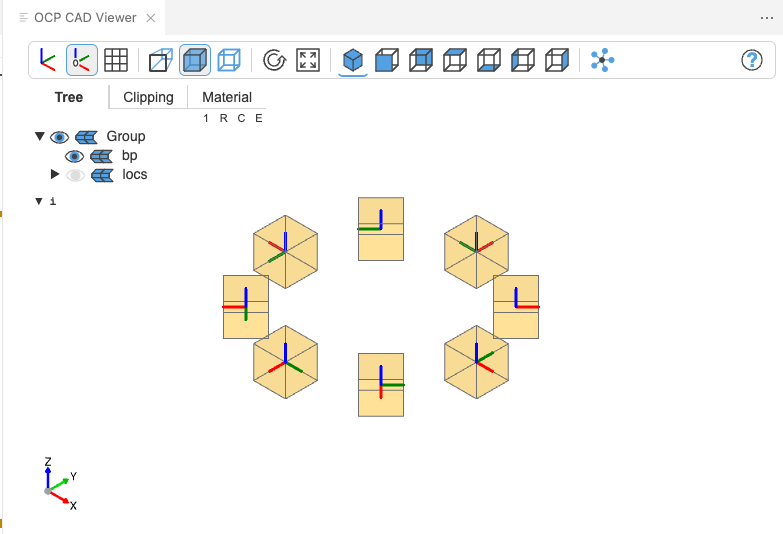
If you name your contexts (including
Locationcontexts), the visual debugger will show the CAD objects assigned to the context. -
Use
show_allto show all cad objects in the current scope (locals()) of the Python interpreter (btw. the visual debugger usesshow_allat each step)# %% from build123d import * set_defaults(helper_scale=1, transparent=True) with BuildPart() as bp: with PolarLocations(3,8) as locs: Box(1,1,1) show_all() # %%
-
-
Keep camera orientation of an object with
reset_cameraSometimes it is helpful to keep the orientation of an object across code changes. This is what
reset_cameradoes:reset_camera=Camera.Centerwill keep position and rotation, but ignore panning. This means the new object will be repositioned to the center (most robust approach)reset_camera=Camera.KEEPwill keep position, rotation and panning. However, panning can be problematic. When the next object to be shown is much larger or smaller and the object before was panned, it can happen that nothing is visible (the new object at the pan location is outside of the viewer frustum). OCP CAD Viewer checks whether the bounding box of an object is 2x smaller or larger than the one of the last shown object. If so, it falls back toCamera.CENTER. A notification is written to the OCP CAD Viewer output panel.reset_camera=Camera.RESETwill ensure that position, rotation and panning will be reset to the initial default
Testing:
Native tessellator can be set via NATIVE_TESSELLATOR=1and Python tessellator via NATIVE_TESSELLATOR=0.
When OCP_VSCODE_PYTEST=1 is set, show will not send the tessellated results to the viewer, but return it to the caller for inspection.
A full test cycle consist of:
NATIVE_TESSELLATOR=0 OCP_VSCODE_PYTEST=1 pytest -v -s pytests/
NATIVE_TESSELLATOR=1 OCP_VSCODE_PYTEST=1 pytest -v -s pytests/-
CAD Models almost always are invisible in the OCP viewer window
three-cad-viewer.esm.js:20276 THREE.WebGLProgram: Shader Error 0 - VALIDATE_STATUS false

Material Name:
Material Type: LineBasicMaterial

Program Info Log: Program binary could not be loaded. Binary is not compatible with current driver/hardware combination. Driver build date Mar 19 2024. Please check build information of source that generated the binary.
Location of variable pc_fragColor conflicts with another variable.
VS Code internal browser that renders the viewer component uses a cache for code and other artifacts. This includes WebGL artefacts like compiled shaders. It can happen that e.g. due to a graphic driver update the compiled version in the cache does not fit to the new driver. Then this error message appears.
Solution: Delete the VS Code browser cache on Linux (go to the section for your operating system)
v2.6.0
New features
- Standalone mode without VS Code:
python -m ocp_vscode. This will start a Flask server and the viewer can be reached underhttp://127.0.0.1/viewer.
Fixes:
- Fix that
show_alldoesn't ignore_123and similar variable names


