Extend the Angular CLI's default build behavior without ejecting:
- 📦 Build a single bundle (e. g. for Angular Elements)
- 📄 Extend the default behavior by providing a partial config that just contains your additional settings
- 📄 Alternative: Extend the default behavior by providing a custom function
- ☑️ Inherits from the default builder, hence you have the same options
- 🍰 Simple to use
⏏️ No eject needed
The original use case for this was to create a bundle for Angular Elements by extending the CLI's default builder. Besides this,ngx-build-plus is also usable when you want to enhance other build setups with a partial webpack config.
It allows you to provide a single bundle that can be distributed easily.
Using an partial webpack config, you could e. g. define packages as externals. They can be loaded separately into the shell (hosting application). This allows several individually loaded Custom Elements sharing common packages like @angular/core etc.
Big thanks to Rob Wormald and David Herges!
This package has been created and tested with Angular CLI 6.x. and CLI 7.0.x. If the CLI's underlying API changes in future, I'll provide an respective update for this version too until the CLI has build-in features for the covered use cases.
- The switch
single-bundlenow defaults to false to align with the CLI's default behavior.
https://github.com/manfredsteyer/ngx-build-plus
The next steps guides you through getting started with ngx-build-plus by an example that uses Angular Elements. The result of this description can be found in the repository's sample directory.
-
Create a new Angular CLI based project and install
@angular/elementsas well as@webcomponents/custom-elementswhich provides needed polyfills:ng add @angular/elements npm install @webcomponents/custom-elements --save -
Expose a component as an Custom Element:
import { BrowserModule } from '@angular/platform-browser';
import { NgModule, Injector } from '@angular/core';
import { createCustomElement } from '@angular/elements';

import { AppComponent } from './app.component';

@NgModule({
    imports: [
        BrowserModule
    ],
    declarations: [
        AppComponent
    ],
    providers: [],
    bootstrap: [],
    entryComponents:[AppComponent]
})
export class AppModule {

    constructor(private injector: Injector) {
    }

    ngDoBootstrap() {
        const elm = createCustomElement(AppComponent, { injector: this.injector });
        customElements.define('custom-element', elm);
    }

}
-
Install
ngx-build-plus:npm install ngx-build-plus --save-dev -
Open your
angular.jsonand tell the CLI to usengx-build-plusinstead of the default one:[...] "architect": { "build": { "builder": "ngx-build-plus:build", [...] } } [...] -
Create a file
webpack.extra.jswith a partial webpack config that tells webpack to exclude packages like@angular/core:module.exports = { "externals": { "rxjs": "rxjs", "@angular/core": "ng.core", "@angular/common": "ng.common", "@angular/platform-browser": "ng.platformBrowser", "@angular/elements": "ng.elements" } }
-
Build your application:
ng build --prod --extraWebpackConfig webpack.extra.js --output-hashing none --single-bundle true -
You will see that just one bundle (besides the
script.jsthat could also be shared) is built. The size of themain.jstells you, that the mentioned packages have been excluded.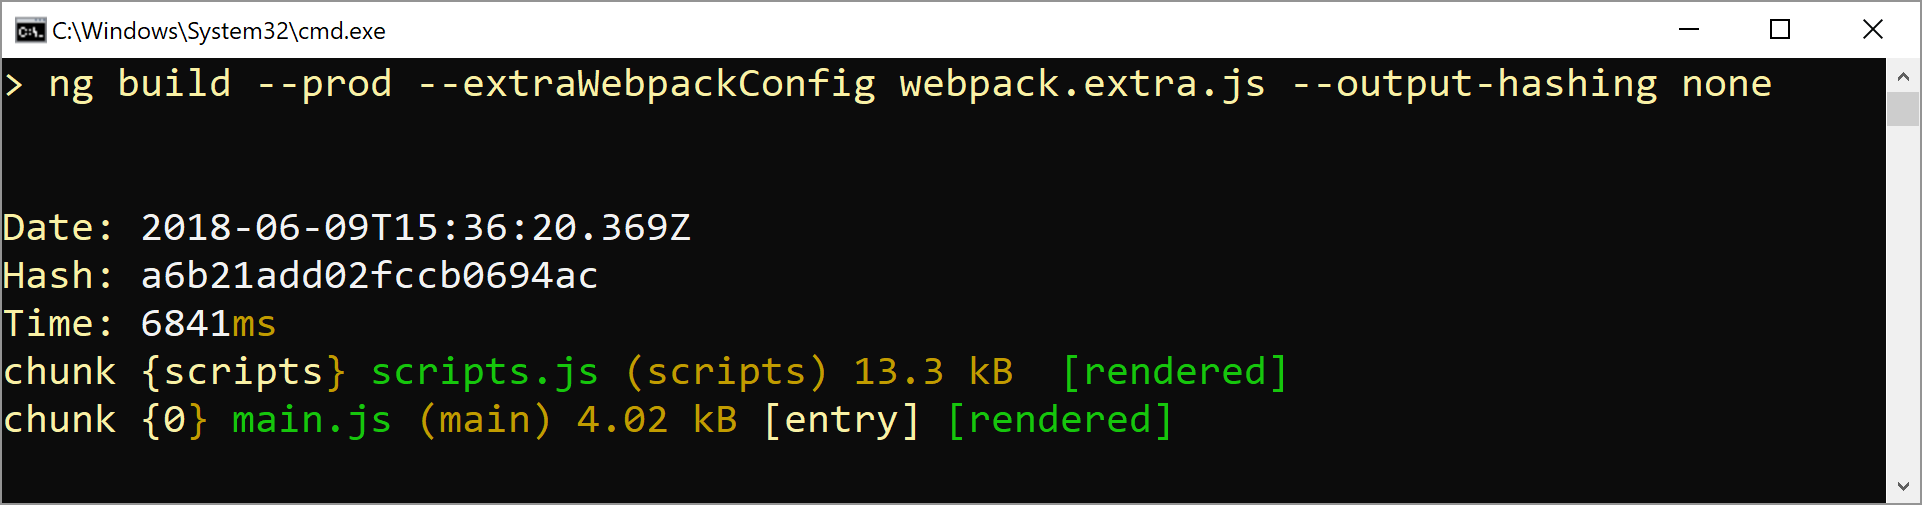
-
Copy the bundle into a project that references the UMD versions of all external libraries and your
main.ts. You can find such a project with all the necessary script files in thedeployfolder of the sample.<html> <body> <!-- Polyfills for Browsers supporting Custom Elements. Needed b/c we downlevel to ES5. See: @webcomponents/custom-elements --> <script src="./native-shim.js"></script> <!-- Polyfills for Browsers not supporting Custom Elements. See: @webcomponents/custom-elements --> <script src="./custom-elements.min.js"></script> <!-- Zone.js --> <!-- Consider excluding zone.js when creating Custom Elements by using the noop zone. --> <script src="./zone.js"></script> <!-- Rx --> <script src="./rxjs.umd.js"></script> <!-- Angular Packages --> <script src="./core.umd.js"></script> <script src="./common.umd.js"></script> <script src="./platform-browser.umd.js"></script> <script src="./elements.umd.js"></script> <!-- Custom Element --> <script src="./custom-element.bundle.js"></script> <!-- Calling Custom Element --> <custom-element></custom-element> <!-- Here we could call additional custom elements reusing the loaded packages above. --> </body> </html>
-
Test your solution.

Hint: For production, consider using the minified versions of those bundles. They can be found in the node_modules folder after npm installing them.
This package provides also an builder that allows to specify an additional webpack configuration for ng serve.
To use it, just register the ngx-build-plus:dev-server builder in your angular.json for the serve target:
 "serve": {
          "builder": "ngx-build-plus:dev-server",
          [...]
 }
After that, you can call ng serve with an extraWebpackConfig switch:
ng serve --extraWebpackConfig webpack.serve.extra.js -o
To try this out, you can use the following webpack config as an example:
const webpack = require('webpack');

module.exports = {
    plugins: [
        new webpack.DefinePlugin({
            "VERSION": JSON.stringify("4711")
        })
    ]
}
This config defines a symbol VERSION with a value 4711. Hence, the following code should print out the version 4711.
declare let VERSION: string;
console.debug('VERSION', VERSION);For more advanced modifications you can provide a function that gets the webpack config passed and returns the modified one.
Follow the following steps to try it out:
-
Add a file with a config hook to your project (
hook/hook.ts):export default (cfg) => { console.debug('config', cfg); // mess around with wepback config here ... return cfg; }
-
Compile your solution using
tsc. -
Use the
configHookswitch to point to the compiled version of your hook:ng build --configHook ~dist/out-tsc/hook/hook
The prefix ~ is replaced with your current directory. If you don't use it, it points to a installed node_module.