Table of Contents
- Introduction to TANGO
- Source Tree Structure
- How to build images and run containers
- How to cleanup images and container instances outcomes
- How to run individual component containers
- Developer Guides
- Acknowledgement
Announcement
TANGO (Target Adaptive No-code neural network Generation and Operation framework) is code name of project for Integrated Machine Learning Framework.
It aims to develop automatic neural network generation and deployment framework that helps novice users to easily develop neural network applications with less or ideally no code efforts and deploy the neural network application onto the target device.
The users of TANGO just prepare their labelled datasets to train models and target devices. Then, TANGO analyzes the datasets and target devices characteristics, generates task-specific neural network based on user requirements, trains it with the datasets, creates Docker container images and deploys the container images onto target device.
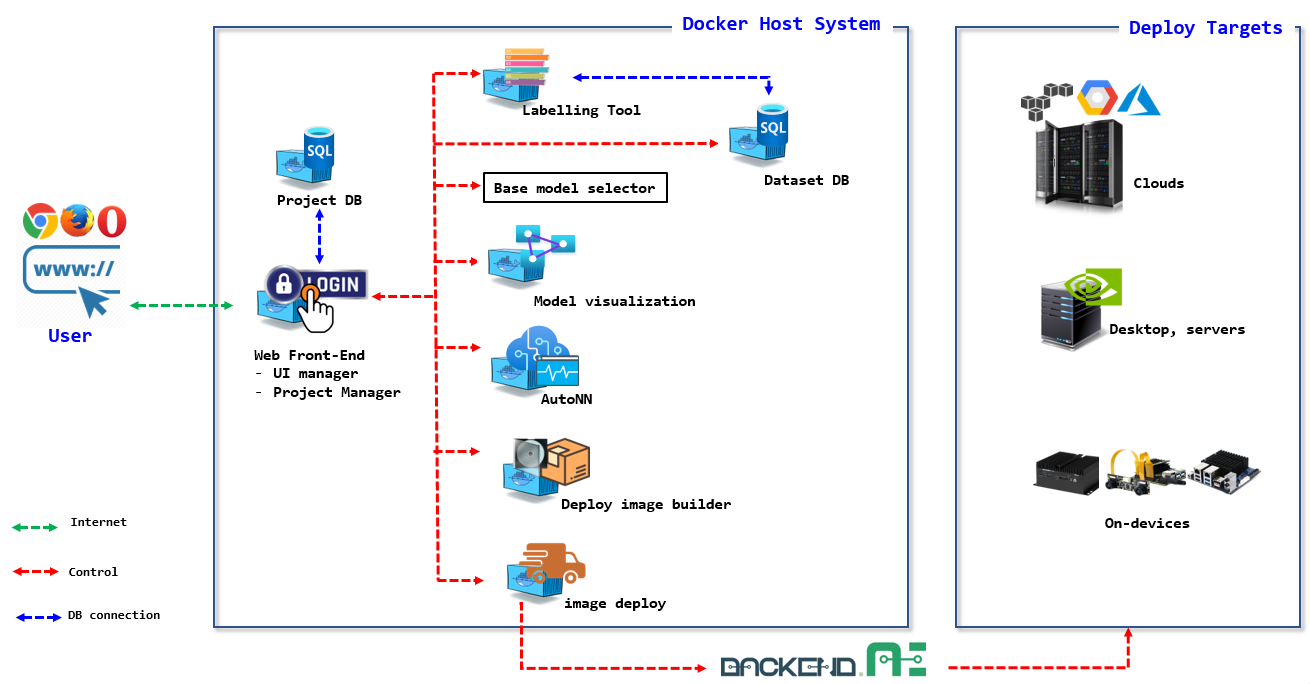
TANGO uses container technology and MSA (Micro Service Architecture). Containers require less system resources than traditional or hardware virtual machine environments because they don't include operating system images. Applications running in containers can be deployed easily to multiple different operating systems and hardware platforms.
Each component of TANGO is self-contained service component implemented with container technology. The component interacts with other component via REST APIs as depicted in the following image;
The source tree is organized with the MSA principles: each subdirectory contains component container source code. Due to the separation of work directory, component container developers just work on their own isolated subdirectory and publish minimal REST API to serve other component containers service request.
$ tree -d -L 2
.
├── project_manager            # front-end server for TANGO
│   ├── backend
│   ├── data
│   ├── tango
│   ├── frontend
│   └── static
│
├── labelling             # data labelling tool
│   ├── backend
│   └── labelling
│
├── base_model_select     # base model selection
│
├── autonn                # automatic neural network
│   ├── autonn
│   └── backend
│
├── target_image_build    # build neural network image to be deployed
│   ├── backend
│   └── target_image_build
│
├── target_deploy         # generated neural network deployment to target
│   ├── backend
│   └── target_deploy
│
├── visualization         # neural network model visualization
│
└── docs                  # project documentation
If you have not installed the docker and docker-compose, please refer to following section.
The descriptions in this sections are based on follow test environments:
- Linux Ubuntu 18.04 and 20.04 LTS
System Prerequisite
sudo apt-get update

sudo apt-get install ca-certificates curl gnupg lsb-release

curl -fsSL https://download.docker.com/linux/ubuntu/gpg | sudo gpg --dearmor -o /usr/share/keyrings/docker-archive-keyring.gpg

echo "deb [arch=$(dpkg --print-architecture) signed-by=/usr/share/keyrings/docker-archive-keyring.gpg] https://download.docker.com/linux/ubuntu \
$(lsb_release -cs) stable" | sudo tee /etc/apt/sources.list.d/docker.list > /dev/null
How to install docker engine
sudo apt-get update
sudo apt-get install docker-ce docker-ce-cli containerd.io
Check the installed docker version.
docker --versionHow to install NVIDIA container toolkit
TANGO can use GPU resources in some containers such as bms, autonn_nk, autonn_bb, etc.
You would consider installing NVIDIA container toolkit.
- Make sure you have installed the NVIDIA driver and Docker 20.10 for your linux machine.
- You do not need to install the CUDA toolkit on the host, but the driver need to be installed.
- With the release of Docker 19.03, usage of nvidia-docker2 packages is deprecated since NVIDIA GPUs are now natively supported as devices in the Docker runtime.
distribution=$(. /etc/os-release;echo $ID$VERSION_ID)

curl -s -L https://nvidia.github.io/nvidia-docker/gpgkey | sudo apt-key add -

curl -s -L https://nvidia.github.io/nvidia-docker/$distribution/nvidia-docker.list | sudo tee /etc/apt/sources.list.d/nvidia-docker.list

sudo apt-get update && sudo apt-get install -y nvidia-container-toolkit

sudo systemctl restart docker- you can check the latest version info at https://github.com/docker/compose/releases/
sudo chmod +x /usr/local/bin/docker-composeCheck the installed docker-compose version.
docker-compose --versionHow to install docker-compose
sudo curl -L "https://github.com/docker/compose/releases/download/v2.6.1/docker-compose-$(uname -s)-$(uname -m)" -o /usr/local/bin/docker-compose- you can check the latest version info at https://github.com/docker/compose/releases/
sudo chmod +x /usr/local/bin/docker-composeCheck the installed docker-compose version.
docker-compose --versionOnce youn installed docker and docker-compose in your local host system, you can clone the GitHub TANGO repository into local host
If you have registered your public key with your github ID, you can use following command
git clone git@github.com:ML-TANGO/TANGO.gitPlease refer to How to Add SSH Keys to Your GitHub Account.
After cloning TANGO repository into your local host, change working directory into local TANGO repository.
cd TANGOBuild docker images and run the containers with docker-compose command.
docker-compose up -d --buildNote
- run above command at directory where
docker-compose.ymlfile is located.docker-compose up -d --buildrequires a lot of times and sometimes it seems do nothing but it does something. Be patient!!
If you're in low bandwith Internet environment or using problematic DNS server, from time to time docker-compose up -d --build command would be interrupted by following errors(Temporary failure in name resolution):
failed to solve: rpc error: code = Unknown desc = failed to solve with frontend dockerfile.v0:
failed to create LLB definition:
failed to do request: Head "https://registry-1.docker.io/al tcp: lookup registry-1.docker.io:
Temporary failure in name resolution
If this is your case, you should repeatedly run docker-compose up -d --build before to get the following message(FINISHED):
[+] Building 1430.5s (114/114) FINISHED
...
...
Use 'docker scan' to run Snyk tests against images to find vulnerabilities and learn how to fix them
[+] Running 9/10
...
Once previouse step completes successfule, following docker container images and containers can be found in your local host system.
Example list of Docker images
$ $ docker image ls
REPOSITORY                 TAG       IMAGE ID       CREATED              SIZE
tango_labelling            latest    08b7e0228997   About a minute ago   11.6GB
tango_viz2code             latest    0ba930ceb8e0   17 minutes ago       7.6GB
tango_autonn_nk            latest    ae9abca17942   32 minutes ago       10.9GB
tango_project_manager      latest    a1f70db5ce71   34 minutes ago       1.15GB
tango_target_deploy        latest    cc61506c133e   34 minutes ago       952MB
tango_target_image_build   latest    4e383c2f8344   34 minutes ago       957MB
postgres                   latest    901a82b310d3   7 days ago           377MB
mariadb 10 14f1097913ec 2 weeks ago 384MB- Note that the name of the docker images generated based on
docker-compose.ymlis prefixed by its folder name (e.g,'tango_')
Example list of Docker containers
$ docker ps -a --format "table {{.Image}}\t{{.Names}}\t{{.Status}}\t{{.Command}}\t{{.Ports}}"
IMAGE                      NAMES                        STATUS          COMMAND                  PORTS
tango_project_manager      tango-project_manager-1      Up 51 seconds   "sh -c 'chmod 777 ./…"   0.0.0.0:8085->8085/tcp, :::8085->8085/tcp
tango_labelling            tango-labelling-1            Up 51 seconds   "./start.sh"             0.0.0.0:8086->80/tcp, :::8086->80/tcp, 0.0.0.0:8095->10236/tcp, :::8095->10236/tcp
tango_viz2code             tango-viz2code-1             Up 51 seconds   "sh -c 'cd ./visuali…"   0.0.0.0:8091->8091/tcp, :::8091->8091/tcp
postgres:latest            tango-postgresql-1           Up 52 seconds   "docker-entrypoint.s…"   5432/tcp
tango_target_image_build   tango-target_image_build-1   Up 52 seconds   "sh -c 'python manag…"   0.0.0.0:8088->8088/tcp, :::8088->8088/tcp
tango_autonn_nk            tango-autonn_nk-1            Created         "sh -c 'python manag…"
mariadb:10                 mariadb                      Up 51 seconds   "docker-entrypoint.s…"   0.0.0.0:3306->3306/tcp, :::3306->3306/tcp
tango_target_deploy        tango-target_deploy-1        Up 52 seconds   "sh -c 'python manag…"   0.0.0.0:8089->8089/tcp, :::8089->8089/tcp
- Note that the name of the docker containers genrated based on
docker-compose.ymlis prefixed by its folder name (e.g,'tango_') and suffixed by the its instance ID (e.g,'_1').
TANGO in Web-browser
Now you can launch web browser and open URL http://localhost:8085 or http://aaa.bbb.ccc.ddd:8085.
aaa.bbb.ccc.dddis your host's DNS address or IP address.8085is published port fromTANGO_web_1container, which acts as front-end server of TANGO.
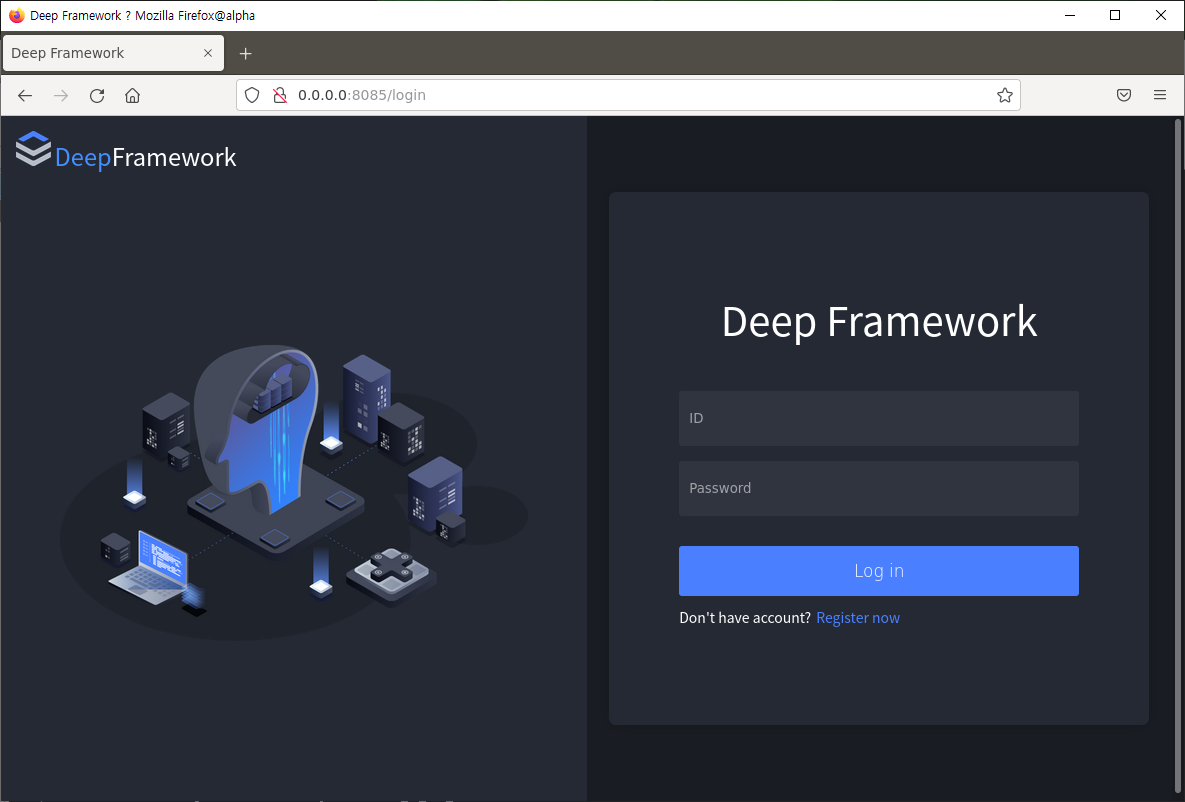
Then you can see the login page of TANGO as follows:
Once you can find the login page in the web browser, register new account and password and use the newly created account and password to login.
When you want remove all the images and containers prviously built and run, you can use following commands;
# tear down all containers and remove all docker images created and volumes.
$ docker-compose down --rmi all --volumes

#or tear down all containers and remove all docker images created except for volumes.
$ docker-compose down --rmi all

# remove all images in the local docker host for preventing cached image layers side effect
# when you are to build from the zero base.
docker system prune -a

# remove labelling dataset related folder if you want to start from the empty datasets
$ sudo rm -rf ./labelling/data/
$ sudo rm -rf ./labelling/datadb/
$ sudo rm -rf ./labelling/dataset/
Note
- Run above command at project root directory (e.g
'TANGO') wheredocker-compose.ymlfile is.- Ater running of above commands, your account on project manager as well as datasets prepared with
labellingtool are removed, due to--volumesoption.- Hence, you recreate account for project manager and dataset from the scratch.
Currently we have following component containers;
- labelling : dataset labelling authoring tool:
- autonn: automatic neural network creation:
- target_image_build: target deployment image build
- target_deploy: image deployment to target:
For testing or debugging of the individual component container, you want to run container individually.
First of all, check your current working branch is main.
$ git branch -a
* main
  remotes/origin/HEAD -> origin/main
  remotes/origin/main
  remotes/origin/sub
labelling: container for labelling tool
Change current working directory into labelling and image build with Dockerfile
cd labelling
docker build -t labelling .
labelling container run
docker run -d --name labelling -p 8086:80 labelling:latestautonn: container for automatic neural network creationn
Change current working directory into autonn and image build with Dockerfile
cd ../autonn/
docker build -t autonn .
autonn container run
docker run -d --name autonn -p 8087:8087 autonn:latesttarget_image_build: container for target deployment image build
Change current working directory into target_image_build and image build with Dockerfile
cd ../target_image_build/
docker build -t target_image_build .
target_image_build container run
docker run -d --name target_image_build -p 8088:8088 target_image_build:latesttarget_deploy: container for image deployment to target
Change current working directory into target_deploy and image build with Dockerfile
cd ../target_deploy/
docker build -t target_deploy .
target_deploy container run
docker run -d --name target_deploy -p 8089:8089 target_deploy:latest- TANGO Architecture Overview
- TANGO Container Port Mapping guide
- Exchanging Data among Containers
- TANGO REST API Guide
This work was supported by Institute of Information & communications Technology Planning & Evaluation (IITP) grant funded by the Korea government(MSIT) (No. 2021-0-00766, Development of Integrated Development Framework that supports Automatic Neural Network Generation and Deployment optimized for Runtime Environment).

