Instead of buying, owning, and maintaining physical data centers and servers, you can access technology services (such as computing power, storage, and databases) from a cloud provider like Amazon Web Services (AWS), Microsoft Azure, Google Cloud, ...
This git help you achieve single machine computation and distributed (multiple) machine computation on AWS, with both CPU and GPU execution. Here is a table of contents including all applications we have.
- Because cloud computing is charges by usage, please make sure to terminate or stop your virtual instances after you are done with them.
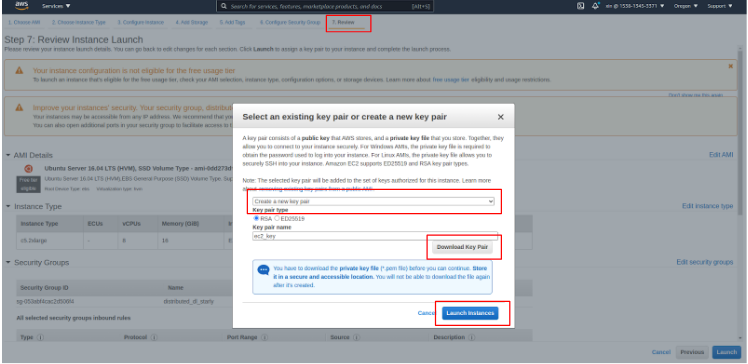
- Because a cloud computing resource is often shared among many users, please include your name in your key file name, such as jianwu-key, so we know the creator of each virtual instance.
- See different versions of this repository in Tags.
- CPU Executions: The machine learning application in following pages uses a decision tree based cloud property retrieval from remote sensing data. Involved software packages include Python 3.6, scikit-learn and Dask.
- Web-based
- Boto-based
- Boto based approach to run the example on a single CPU without docker (To be updated)
- Boto based approach to run the example on multi-CPUs without docker (To be updated)
- Boto based approach to run the example on a single CPU with docker
- Boto based approach to run the example on multi-CPUs with docker (To be updated)
- GPU Executions: Involved software packages include Python 3.6, CUDA 10.1, cuDNN 7, Pytorch and Horovod with MPI.
- Web-based: The machine learning application in following pages uses a deep unsupervised domain adaptation (UDA) model to transfer the knowledge learned from a labeled source domain to an unlabeled target domain.
- SageMaker-based: Ocean Eddy Application.
- Lambda Function based Executions: AWS Lambda Function and API Gateway Services provide another way to do data analytics.
The following is an overall instruction for all our implementations. For detailed instructions of CPU executions and GPU exectutions, please go to folders cpu-example and gpu-example.
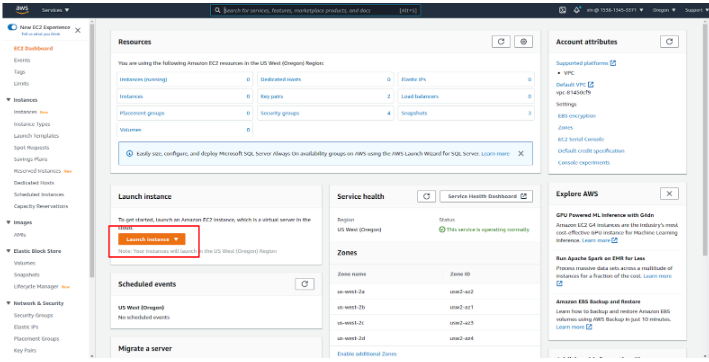
- Launch instances on EC2 console:
- Choose an Amazon Machine Image (AMI)
An AMI is a template that contains the software configuration (operating system, application server, and applications) required to launch your instance. For CPU applications, we use Ubuntu Server 20.04 LTS (HVM), SSD Volume Type; for GPU case, we use Deep Learning Base AMI (Ubuntu 16.04) Version 40.0.
- Choose an Instance Type
Based on your purpose, AWS provides various instance types on https://aws.amazon.com/ec2/instance-types/. For CPU application, we recommand to use c5.2xlarge instance; For GPU application, we recommand to use p3.2xlarge instance.
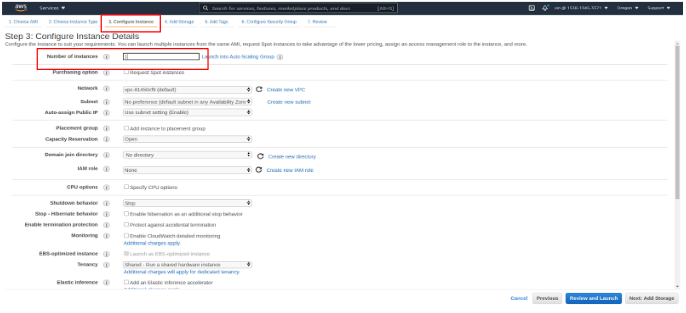
- Configure Number of instances
We use 1 instance for single machine computation, and 2 instances for distributed computation.
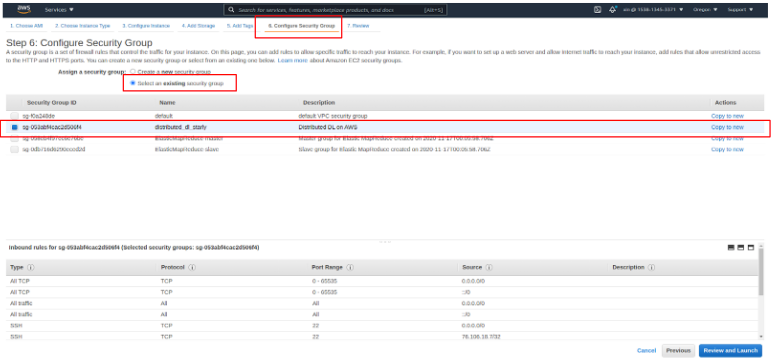
- Configure Security Group
- Review, Create your SSH key pair, and Launch
- View your Instance and wait for Initialing
- SSH into your instance
- Install Docker
curl -fsSL https://get.docker.com -o get-docker.sh
sudo sh get-docker.sh
sudo service docker start
sudo usermod -a -G docker ubuntu
sudo chmod 666 /var/run/docker.sock- Download Docker imagesor build images by Dockerfile.
- CPU example:
docker pull starlyxxx/dask-decision-tree-example- GPU example:
docker pull starlyxxx/horovod-pytorch-cuda10.1-cudnn7- or, build from Dockerfile:
docker build -t <your-image-name> .- Download ML applications and data on AWS S3.
- For privacy, we store the application code and data on AWS S3. Install aws cli and set aws credentials.
curl 'https://awscli.amazonaws.com/awscli-exe-linux-x86_64.zip' -o 'awscliv2.zip'
unzip awscliv2.zip
sudo ./aws/install
aws configure set aws_access_key_id your-access-key
aws configure set aws_secret_access_key your-secret-key-
Download ML applications and data on AWS S3.
-
CPU example:
Download:
aws s3 cp s3://kddworkshop/ML_based_Cloud_Retrieval_Use_Case.zip ./
or
(wget https://kddworkshop.s3.us-west-.amazonaws.com/ML_based_Cloud_Retrieval_Use_Case.zip)
Extract the files:
unzip ML_based_Cloud_Retrieval_Use_Case.zip
-
GPU example:
Download:
aws s3 cp s3://kddworkshop/MultiGpus-Domain-Adaptation-main.zip ./
aws s3 cp s3://kddworkshop/office31.tar.gz ./
or
wget https://kddworkshop.s3.us-west-2.amazonaws.com/MultiGpus-Domain-Adaptation-main.zip
wget https://kddworkshop.s3.us-west-2.amazonaws.com/office31.tar.gz
Extract the files:
unzip MultiGpus-Domain-Adaptation-main.zip
tar -xzvf office31.tar.gz
-
- Run docker containers for CPU applications.
- Single CPU:
docker run -it -v /home/ubuntu/ML_based_Cloud_Retrieval_Use_Case:/root/ML_based_Cloud_Retrieval_Use_Case starlyxxx/dask-decision-tree-example:latest /bin/bash- Multi-CPUs:
docker run -it --network host -v /home/ubuntu/ML_based_Cloud_Retrieval_Use_Case:/root/ML_based_Cloud_Retrieval_Use_Case starlyxxx/dask-decision-tree-example:latest /bin/bash- Run docker containers for GPU applications
- Single GPU:
nvidia-docker run -it -v /home/ubuntu/MultiGpus-Domain-Adaptation-main:/root/MultiGpus-Domain-Adaptation-main -v /home/ubuntu/office31:/root/office31 starlyxxx/horovod-pytorch-cuda10.1-cudnn7:latest /bin/bash-
Multi-GPUs:
- Add primary worker’s public key to all secondary workers’ <~/.ssh/authorized_keys>
sudo mkdir -p /mnt/share/ssh && sudo cp ~/.ssh/* /mnt/share/ssh
- Primary worker VM:
nvidia-docker run -it --network=host -v /mnt/share/ssh:/root/.ssh -v /home/ubuntu/MultiGpus-Domain-Adaptation-main:/root/MultiGpus-Domain-Adaptation-main -v /home/ubuntu/office31:/root/office31 starlyxxx/horovod-pytorch-cuda10.1-cudnn7:latest /bin/bash
- Secondary workers VM:
nvidia-docker run -it --network=host -v /mnt/share/ssh:/root/.ssh -v /home/ubuntu/MultiGpus-Domain-Adaptation-main:/root/MultiGpus-Domain-Adaptation-main -v /home/ubuntu/office31:/root/office31 starlyxxx/horovod-pytorch-cuda10.1-cudnn7:latest bash -c "/usr/sbin/sshd -p 12345; sleep infinity"
-
Run ML CPU application:
- Single CPU:
cd ML_based_Cloud_Retrieval_Use_Case/Code && /usr/bin/python3.6 ml_based_cloud_retrieval_with_data_preprocessing.py
-
Multi-CPUs:
-
Run dask cluster on both VMs in background:
- VM 1:
dask-scheduler & dask-worker <your-dask-scheduler-address> &
- VM 2:
dask-worker <your-dask-scheduler-address> &
-
-
One of VMs:
cd ML_based_Cloud_Retrieval_Use_Case/Code && /usr/bin/python3.6 dask_ml_based_cloud_retrieval_with_data_preprocessing.py <your-dask-scheduler-address>
-
Run ML GPU application
- Single GPU:
cd MultiGpus-Domain-Adaptation-mainhorovodrun --verbose -np 1 -H localhost:1 /usr/bin/python3.6 main.py --config DeepCoral/DeepCoral.yaml --data_dir ../office31 --src_domain webcam --tgt_domain amazon
-
Multi-GPUs:
- Primary worker VM:
cd MultiGpus-Domain-Adaptation-mainhorovodrun --verbose -np 2 -H <machine1-address>:1,<machine2-address>:1 -p 12345 /usr/bin/python3.6 main.py --config DeepCoral/DeepCoral.yaml --data_dir ../office31 --src_domain webcam --tgt_domain amazon
-
Terminate all VMs on EC2 when finishing experiments.
Follow steps below for automating single machine computation. For distributed machine computation, see README on each example's sub-folder.
pip3 install boto fabric2 scanf IPython invoke
pip3 install Werkzeug --upgrade- Configuration
Use your customized configurations. Replace default values in <./config/config.ini>
- Start IPython
python3 run_interface.py- Launch VMs on EC2 and wait for initializing
LaunchInstances()- Install required packages on VMs
InstallDeps()- Automatically run Single VM ML Computing
RunSingleVMComputing()- Terminate all VMs on EC2 when finishing experiments.
TerminateAll()For a closer look, please refer to our slides or presentation.


