NOTE: This is the backend project For the client python project see opennem/opennempy
The OpenNEM project aims to make the wealth of public National Electricity Market (NEM) data more accessible to a wider audience.
This toolkit enables downloading, mirroring and accessing energy data from various networks
Project homepage at https://opennem.org.au
Available on Docker at https://hub.docker.com/r/opennem/opennem
Currently supports:
- Australian NEM: https://www.nemweb.com.au/
- West Australia Energy Market: http://data.wa.aemo.com.au/
- Python 3.7+ (see
.python-versionwithpyenv) - Docker and
docker-composeif you want to run the local dev stack
With poetry:
$ poetry install
$ source .venv/bin/activate
$ ./init.sh
With pip + venv:
$ pip -m venv .venv
$ pip install -r requirements.txt
$ source .venv/bin/activate
$ ./init.shYou can install this project with python pip:
$ pip install opennemOr alternatively with docker:
$ docker pull opennem/opennem
Bundled with sqlite support. Other database drivers are optional and not installed by default. Install a supported database driver:
Postgres:
$ pip install psycopg2The package contains extra modules that can be installed:
$ poetry install -E postgresThe list of extras are:
postgres- Postgres database driversserver- API server
List the crawlers
$ scrapy listCrawl
$ scrapy crawl au.nem.current.dispatch_scadaThis project uses the new pyproject.toml project and build specification file. To make use of it use the poetry tool which can be installed on Windows, MacOS and Linux:
https://python-poetry.org/docs/
Installation instructions for Poetry are at:
https://python-poetry.org/docs/#installation
By default poetry will install virtual environments in your home metadata directory. A good alternative is to install the venv locally for each project with the following setting:
$ poetry config virtualenvs.in-project trueThis will create the virtual environment within the project folder in a folder called .venv. This folder is ignored by git by default.
Setting up a virtual environment and installing requiements using Poetry:
$ poetry installTo activate the virtual environment either run:
$ poetry shellOr you can just activate the standard venv
$ source .venv/bin/activateSettings are read from environment variables. Environment variables can be read from a .env file in the root of the folder. Setup the environment by copying the .env.sample file to .env. The defaults in the sample file map to the settings in docker-compose.yml
There is a docker-compose file that will bring a local database:
$ docker-compose up -dBring up the database migrations using alembic:
$ alembic upgrade headRun scrapy in the root folder for options:
$ scrapyThe opennem cli interface provides other options and settings:
$ opennem -hSettings for Visual Studio Code are stored in .vscode. Code is kept formatted and linted using pylint, black and isort with settings defined in pyproject.toml
Tests are in tests/
Run tests with:
$ pytestRun background test watcher with
$ ptwThe script build-release.sh will tag a new release, build the docker image, tag the git version, push to GitHub and push the latest
release to PyPi
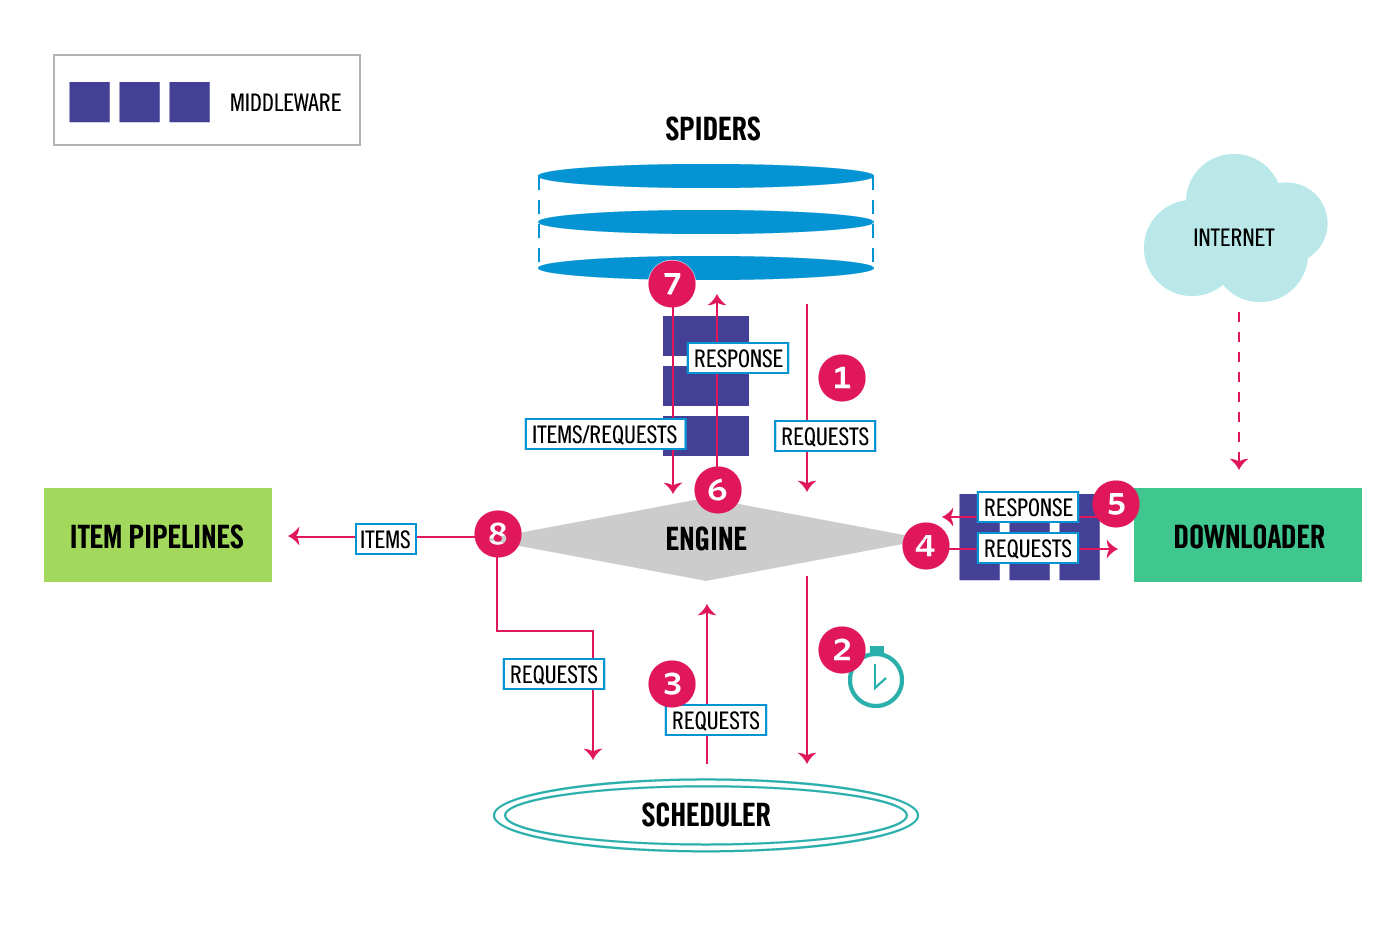
This project uses Scrapy to obtain data from supported energy markets and SQLAlchemy to store data, and Alembic for database migrations. Database storage has been tested with sqlite, postgres and mysql.
Overview of scrapy architecture:
- Spider definitions in
opennem/spiders - Processing pipelines for crawls in
opennem/pipelines - Database models for supported energy markets are stored in
opennem/db/models
You can deploy the crawlers to the scrapyd server with:
$ scrapyd-deployIf you don't have that command and it isn't available install it with:
$ pip install scrapyd-clientWhich installs the scrapyd-client tools. Project settings are read from scrapy.cfg
The OpenNEM project is packaged with a number of example Jupyter notebooks demonstrating use of the API and library. The dependancies to run notebooks are found in requirements_notebooks.txt in the root folder. The example notebooks are contained in notebooks and there is a configured Jupyter profile in .jupyter.
To set it up first install the requirements, and then start the Jupyter server
$ source .venv/bin/activate
$ pip install -r requirements_notebooks.txt
$ jupyter notebook