This document is a cheat sheet I created for myself but perhaps it will be useful to others. I will continue to work on it as I learn more about Git. If you see mistakes or have suggestions, please feel free to contact me at masood@masoodkamandy.com.a
- Getting Started
- [Basic Process to Follow When a File has Changed](#Basic-Process-to-Follow-When-a File-has-Changed)
- Basic Git Commands
- To Push an Existing Repository to GitHub
- Intermediate Git Commands
- Branching and Branches
- Merging
- Remote Branches
- Resetting a Forked Repository
- Submodules
- Duplicating a Repository of Your Own
- Setting Up an Access Token on GitHub for Terminal or Other Apps
- Global .gitignore
- Vocabulary
- Basic Shell Command Refresher
You have to set your username and email address before being able to use git.
git config --global user.name "Your Name"
git config --global user.email "youremail@yourdomain.com"
To confirm that these are set run:
git config --list
- Stage the file with
git add <file> - Commit the file with a message with
git commit -m <message>
Note: It is not advised to make commits to the main branch. If you want to create a new branch before you stage and commit, add this before step 1 above:
git checkout -b <branch-name>
git init – Initialize git in current directory
Note: If you are using GitHub, after you create a local repository, if it is local it may not adhere to GitHub's new nomenclature. To change master to main, after you make your first commit, type the following: git branch -m master main and this will change the name of your primary branch to main from the older master. If you'd like to globally change master to main so that you don't have to continually do this step, use the following: git config --global init.defaultBranch main.
git status – Check status of git repository
git add – Stage a file for version tracking.
git commit -m “Message” – Commit a file to the “main” branch.
git diff – Show changes.
git diff --staged – Show changes that include staged changes.
git log – See all changes listed.
git log -p – See all changes listed including actual changes to files.
git clone <URL> – clone a repository to your current folder.
git reset <file name> – If you've accidentally staged a file, or would like to unstage a file for a specific reason (like maybe it should be a part of a different commit for clarity) you can use this file to unstage your files.
If you've already created a repository on your computer and decide to push it out/assign it to a repository on GitHub, use the following code:
git remote add origin <repository-url>
git branch -M main
git push -u origin maingit rm <file name> – Delete a file and include the change in the git repository. You must commit these changes.
git mv <file name> – Change a file’s name
git checkout -- <file name> – discard changes (including accidental deletion).
git revert <SHA checksum> – revert a specific commit
git revert HEAD – revert most recent commit
git remote – get a list of the remote repos.
git pull <repo name> – pull changes from remote repo. If you don’t specify a repo name, it just pulls from the origin.
git pull <repo name> <branch name> – pull from a specific branch. This is required if you add a remote that wasn’t there. If it’s origin, it will work without a branch name.
git remote – See which remotes are connected to your current repo. This only shows up if your project is cloned. If it isn’t, you’ll need to add a remot (see below).
git remote add <name of remote repo> <url of remote repository> - add a remote repo if it isn’t already there like the origin.
git push – share changes you’ve made with others.
git push -u <repo name> <branch. Default is main> – the push process for GitHub after you’ve specified a remote repo. (u is for upstream). Once you do this, you can just type git push by itself.
Note: If you started your reposotory on your computer and then began pushing to a remote afterward, it will be necessary to set your default remote repository so that you can just type git push and have it go to your remote. To do this, after you have a remote repository set up, type git config --global push.default current.
It might also be necessary to remove files if you've updated your gitignore file. To remove cached files from your git use git rm --cached file1 and to remove cached directories, you need to do it recursively so use git rm --cached -r folder1. If you've commited a large number of files and you want to just remove everything form the cache and start over, you can type git rm --cached -r .. The . specifies that you want to remove everything recursively (-r) from the current directory and inside it.
Notes:
- When you have a specific task (like fixing a bug) that you want to work on that is not ready for your users, create a branch and work on that instead of main.
- If you are going to merge into the main branch, always branch from the main.
git branch <name-of-branch> – create a new branch. Name should be all lower case and words should be separated by dashes.
git branch – shows you a list of branches and the active branch has a * next to it.
git checkout <name-of-branch> – switch to another branch.
git checkout -b <name-of-new-branch> – create a new branch and then check it out.
git branch -d <branch-name> – delete branch.
git branch -a – get a list of all branches, including all remote branches.
git branch -r – get a list of all remote branches.
git diff <SHA Checksum of earlier commit> <SHA Checksum of later commit> – Compare two different commits.
git diff <name of branch> <name of branch> – compare two branches.
git diff <name of branch> – compare current working directory with branch.
Notes:
- Most commonly used to merge topic branches into the main branch.
- It’s a good idea to delete branches after you test them completely and merge them into the main so they don’t confuse you in the future.
git merge <branch-name> – merges whatever branch you specify into the current branch.
Notes:
- When a file has conflicts, it will add conflict resolution markers to the file:
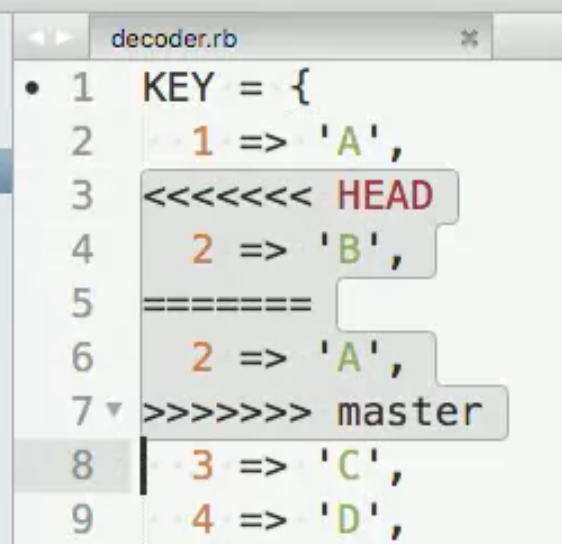
- You can just fix the changes and then remove the conflict resolution markers.
- If you’re unsure of what to do, just type git status.

git merge --abort – Use when you have a merge conflict that you cannot resolve, so you want to abort the merge process.
git add <file> – marks that the file has been resolved when there is a conflict.
git fetch <name of remote repo> – used to fetch changes from the remote branch so that you can check whether you are out of sync. Once you run this, type git status to see if you are out of sync or up to date.
git merge <remote repo> – merges changes from remote repo.
git checkout -b <name of new branch> <name of remote branch to track it to> – this is how you create a tracking/local branch for a remote branch. See next:
git checkout --track <name of remote branch to create/track> – do above but duplicate the name of the remote branch.
Note: You can also just type git checkout <name of remote branch> and git will automatically set up a local/tracking branch to track the remote of the same name.
git pull – retrieve and merge remote changes and incorporate them into your local tracking branch.
git push -u <remote repo> <remote-branch> – push your changes and set up the local branch to track the remote branch. -u stands for upstream. After doing this, you’ll only have to type git push because the local branch will be a tracking branch.
git push --delete <remote-branch-to-delete> – allows you to delete a remote branch. You should do this after merging.
When working on a forked repository (like in open-source projects), it's common to work and make so many changes that it doesn't really make sense to create a pull request for those changes.
You might need to reset your repository or resync your fork and create incremental pull requests that are easy for your colleagues to parse and understand without a significant amount of effort.
First, you'll want to capture all of the changes you made into a new branch to keep them.
-
First you'll need to add the original repository as your upstream.
git remote add upstream <URL>
-
Then you'll need to fetch the code:
git fetch upstream
-
Then you'll need to checkout your main branch:
git checkout main
-
Then you'll reset your main branch to the upstream.
git reset --hard upstream/master -
Then you'll need to push those changes to our fork (aka
origin). Note: Some caution should be used with this command and it should not be used lightly. It can cause great damage to a repository.git push origin master --force
(Source)
Git submodules allows you to incorporate dependencies into your project via the commandline.
git submodule add <remote-repo> <destination-directory>
There are times when you may have a template that you use to start projects and rather than forking, simply duplicating a repo into a new repo is the best solution. This is called mirroring a repository.
(Source)
Steps:
-
Open Terminal.
-
Create a bare clone of the repository. A bare clone just clones the repository as-is independently of the repo it came from. It's frozen in time, which works well for templates.
$ git clone --bare https://github.com/exampleuser/old-repository.git
-
Mirror-push to the new repository.
$ cd old-repository $ git push --mirror https://github.com/exampleuser/new-repository.git -
Remove the temporary local repository you created earlier.
$ cd ..
$ rm -rf old-repository
After this you can clone the newly duplicated project onto your computer and start your work!
GitHub now requires that you use an access token to log onto the website.
To create a personal access token, GitHub's documentation summarizes the process.
If you haven't set up github access on your terminal, go ahead and create an access token, and log in with the access token as your password.
git clone https://github.com/username/repo.git
Username: your_username
Password: your_token(Source)
If you've already entered a password or access token and you need to change it, you can erase your credentials with the following:
$ git credential-osxkeychain erase ⏎
 host=github.com  ⏎
 protocol=https   ⏎
 ⏎
⏎(Source)
There are certain files on the macOS, my primary development environment, that really don't belong in any git repository. I also build in multiple languages that all have their specific needs. Over time I've created my own git ignore file that seems to work quite well.
Here's a copy of the .gitignore file I've created that seems to work well for all of my development projects.
# General
.DS_Store
.AppleDouble
.LSOverride

# Icon must end with two \r
Icon


# Thumbnails
._*

# Files that might appear in the root of a volume
.DocumentRevisions-V100
.fseventsd
.Spotlight-V100
.TemporaryItems
.Trashes
.VolumeIcon.icns
.com.apple.timemachine.donotpresent

# Directories potentially created on remote AFP share
.AppleDB
.AppleDesktop
Network Trash Folder
Temporary Items
.apdisk

# Xcode files
*.xcuserstate

# Build folders
[Bb][Uu][Ii][Ll][Dd]/
x64/

# VS Code
.vscode/

# C++ Standard
# Source: https://github.com/github/gitignore/blob/master/C%2B%2B.gitignore

# Prerequisites
*.d

# Compiled Object files
*.slo
*.lo
*.o

# Precompiled Headers
*.gch
*.pch

# Compiled Dynamic libraries
*.so
*.dylib
*.dll

# Fortran module files
*.mod
*.smod

# Compiled Static libraries
*.lai
*.la
*.a
*.lib

# Executables
*.exe
*.out
*.app

# CMake Git Ignore
# Source: https://github.com/github/gitignore/blob/master/CMake.gitignore

CMakeLists.txt.user
CMakeCache.txt
CMakeFiles
CMakeScripts
Testing
Makefile
cmake_install.cmake
install_manifest.txt
compile_commands.json
CTestTestfile.cmake
_deps
In order to make this file apply to all projects init'd on your computer, you'll need to set it in your git configuration. (Source)
-
Create a new global .gitignore file in your home directory:
touch ~/.gitignore_global -
Open this file with TextEdit (I find this easiest, but you can really use any text editor):
open -a TextEdit ~/.gitignore_global -
Paste in or write whatever values you'd like to add to your .gitignore file. A good resource for the syntax is in the git documentation. Github also hosts a collection of useful gitignore examples.
-
Save the file and close out of it.
-
Run the following command to make all the patterns in your .gitignore_global file ignored in all situations.
git config --global core.excludesfile ~/.gitignore_global
SHA Checksum – Simple Hashing Algorithm
Note: Every commit creates an SHA that is a unique identifier for every commit. If you need to revert to a specific commit you can use this checksum to identify which commit you want.
HEAD – Shorthand for “Most recent commit”
Local Repo – The repo on your machine.
Remote Repo – The repos on other people’s machines that are linked to your project. origin is automatically added as the repo you’ve cloned from.
Central Repo – A centralized “main” repo that developers work from (like GitHub repos).
Pulling commits – Pull the changes other developers have made directly from their computers or from the central repo to their repos so you have latest version of code.
Pushing commits – Push changes to the central repo.
Clone – Make a copy of a repo.
Detached HEAD – Happens when you checkout a specific commit using an SHA checksum as opposed to a branch. You can lose data with a detached HEAD so it’s not recommended to checkout specific commits.
Tracking Branch – A branch that is designed to track changes to remote branches.
upstream generally refers to the original repo that you have forked
(see also "Definition of “downstream” and “upstream”" for more on upstream term)
origin is your fork: your own repo on GitHub, clone of the original repo of GitHub
(Source)
ls -a – Show files including hidden files.
cd .. – Go up a directory
cd ../<directory> – Go to the parent and then a different subdirectory in that.
clear – clear terminal
Ctrl + L – clear terminal
cat – look at file’s contents.