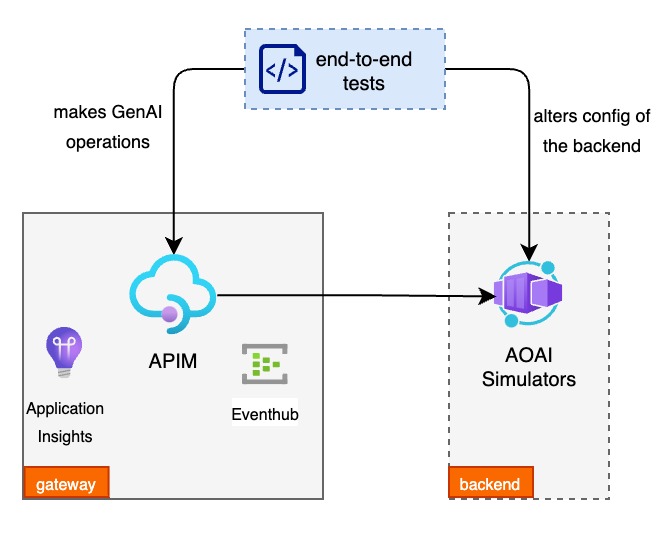
The aim of this toolkit is to provide a quick start for deploying a GenAI Gateway using Azure API Management (APIM), and to demonstrate some of the GenAI capabilities in a controlled environment.
The APIM gateway that's provisioned by this toolkit contains policies that demonstrate different GenAI Gateway capabilities and the end-to-end tests allows to simulate different scenarios and demonstrate the capabilities by adjusting the configuration of the OpenAI API simulator that's used as a backend.
demo.mp4
A "GenAI Gateway" serves as an intelligent interface/middleware that dynamically balances incoming traffic across backend resources to achieve optimizing resource utilization. In addition to load balancing, GenAI Gateway can be equipped with extra capabilities to address the challenges around billing, monitoring etc.
To read more about considerations when implementing a GenAI Gateway, see this article.
At a high level the toolkit contains 3 main components,
- APIM Gateway - The API Management Gateway that will host the GenAI Gateway policies.
- OpenAI API Simulator - A simple API that simulates the OpenAI API. The simulator will allow to control the latency, and response to simulate different scenarios.
- End-to-End Tests - A set of tests that will demonstrate the GenAI Gateway capabilities in action. These are python scripts written on top of locust.io to simulate the traffic and demonstrate the capabilities.
To see the policies in action you need to set up your environment (you will need an Azure Subscription to deploy into).
For this you can either install the pre-requisites on your local machine or use the Visual Studio Code Dev Containers to set up the environment.
Follow the Dev Containers Getting Started Guide to set up Visual Studio Code for using Dev Containers.
Once that is done, open the repository in Visual Studio Code and select Dev Containers: Reopen in Container from the command palette.
This will create an environment with all the pre-requisites installed.
NOTE: When the container is built Visual Studio Code will automatically install the python dependencies required for the end-to-end capability tests. If you pull a later version of the code, you make need to run pip install -r end_to_end_tests/requirements.txt to install the dependencies (or rebuild the dev container).
If you are manually installing the pre-requisites, you will need the following:
- Azure CLI
- including the
application-insightsextension (az extension add --name application-insights)
- including the
- Docker (if using the OpenAI API simulator)
- Python 3 (to run end-to-end tests)
jq(to parse JSON responses in bash scripts)- a bash terminal (see Windows Subsystem for Linux if you are on Windows)
- Install python dependencies for the end-to-end tests by running
pip install -r end_to_end_tests/requirements.txt
To see the GenAI Gateway capabilities in action, you can deploy the infrastructure using the provided Bicep templates.
-
The templates require parameters set via an .env file and the project contains a
sample.envwith the required environment variables. Renamesample.envto.envand set the values accordingly. -
Sign in with the Azure CLI:
az login- Deploy the Bicep infrastructure:
./scripts/deploy.shThis repo currently contains the policies showing how to implement these GenAI Gateway capabilities:
| Capability | Description |
|---|---|
| Latency based routing | Route traffic to the endpoint with the lowest latency. |
| Load balancing (round-robin) | Load balance traffic across PAYG endpoints using round-robin algorithm. |
| Managing spikes with PAYG | Manage spikes in traffic by routing traffic to PAYG endpoints when a PTU is out of capacity. |
| Adaptive rate limiting | Dynamically adjust rate-limits applied to different workloads |
| Tracking token usage | Record the token consumption for usage tracking and attribution |
The easiest way to see the gateway capabilities in action is to deploy the gateway along with the OpenAI API Simualtor (set the USE_SIMULATOR option in your .env file to true).
Once you have the gateway and simulator deployed, see the README.md in the relevant capability folder for instructions on how to test the capability. (NOTE: currently not all capabilities have tests implemented)
- The rate limiting API's name changed (June 2024), which causes conflicting paths if you deployed prior to the change and want to redeploy. The error message received is
Cannot create API 'aoai-api-rate-limiting' with the same Path 'rate-limiting/openai' as API 'aoai-api-rate-limting' unless it's a part of the same version set. To fix the issue, you'll need to delete the existingaoai-api-rate-limtingAPI and redeploy the project, or freshly redeploy from scratch.
