Tumor Detector 2.0 aims to help the health professionals to spot and localize with a semantic segmentation tumors in tomography images. The main part of this project consist in a neural network (NN) based on U-Net architecture which has the capability to segment image features to localize and show-up the main content extracted from image, which is most of the time used to classify what class the image belongs to.
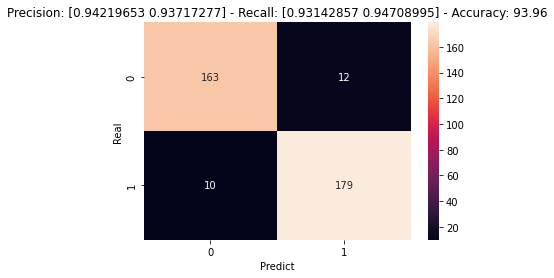
Some of the inference results of U-Net is showed below. We've tested it's ability to classify if an image has either a tumor or not. It is based if exists any semantic segmentation in the output of NN.
- Description:
- 0: No Tumor.
- 1: Tumor.
- Precision: Percetage of hits cosidering all correct preditions divided by all predicted values.
- Recall: Percentage of hits considering all correct preditions divided by all data of that particular class.
- Accuracy: Overall precision. Number of hits divided by number of elements.
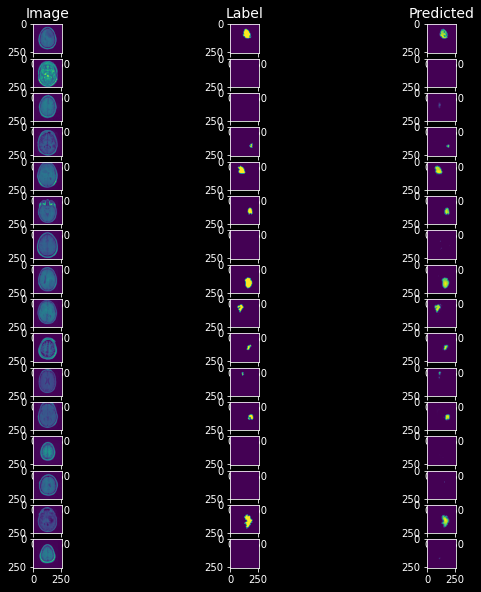
Some of the segmentation predictions is showed below. Here we passed a batch-size of 16 to run the inference.
We've used Binary IoU to estimate the accuracy of over-lapping between the predicted mask and the real mask. Here is the results:
- Binary IoU Results:
- Number of elements: 364
- Mean: 0.816804 (81.68%)
- Standard Deviation: 0.010044
- Min: 0.808381 (80.83%)
- Q1: 0.811199 (81.12%)
- Q2: 0.812790 (81.28%) - Most of the prediction correspond to this accuracy.
- Q3: 0.817353 (81.73%)
- Max: 0.866287 (86.63%)
- Python 3.10
- Tensorflow 2.10
- Scikit-Learn 1.1.3
- TKinter
- Git
- OS:
- Windows 10
- Ubuntu 22.04
First, clone the Tumor Detector 2.0 repository to your computer using the command line below on terminal (prompt).
git clone https://github.com/brain-facens/Tumor-Detector-2.0
It is recommended to use a separeted environment of your computer to install the project. It avoids the project packages to conflict with external packages of your computer. To do it, make sure you have either Anaconda installed in your computer or Env from Python to create a virtual environment.
To create an environment using Anaconda, use the command below on terminal.
conda create --name tumor python=3.10.6
It will create a virtual environment called 'tumor' with Python 3.10.6 installed. To activated it, use the command below on terminal.
conda activate tumor
To create an environment using Python Env, use the command below on terminal.
python3 -m venv tumor --python="path/to/python3.9" "path/to/tumor"
In this case, you'll need to specify the path of Python 3.9 in your computer and the path of the virtual environment that you're creating using the command '--python' to specify the Python version of your virtual environment.
To activated it, use the command below on terminal.
(Windows): tumor\Scripts\activate
(Linux): source tumor/bin/activate
To install the project, run the command below on your terminal.
cd Tumor-Detector-2.0/ # to go inside of project folder
pip install .
To run the application, run the command below on terminal.
python run.py
# or
python3 run.py
python run.py --device cpu
# or
python3 run.py --device cpu

