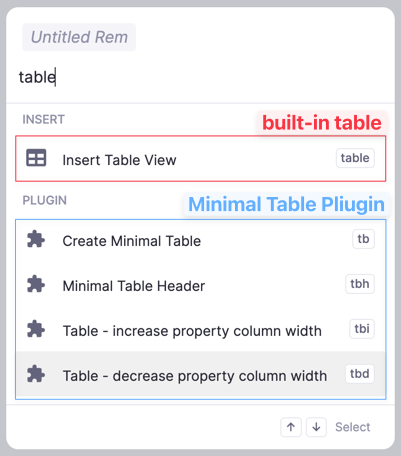
Create your Rem Table with simple tags!
This is not the built-in RemNote table feature. The built-in RemNote table can be created via
/tablecommand
Due to performance issues, property widths exceeding 600px will no longer be supported.
- It provides a lightweight, basic-level table for logging simple, static information with hierarchy without sorting or filtering capabilities.
- The plain Outliner format and keyboard-driven experience allow for fast table entry and configuration.
-
Create a Rem hierarchy like in this image:
-
Place your cursor where the Table Title exists.
-
Open the command list via the omnibar (⌘+/) or slash (/).
-
Type
tbto see the options for modern table rows. -
With a simple keyboard shortcut, you can create the table without any cumbersome procedures. Find the shortcut in the keyboard shortcut config page.
All the table controls begin with title bar tagging.
- After creating the table, you'll notice the left column's width is set to 150px.
- You can easily resize the property column width.
- Simply adjust the width using the omnibar/slash command or the provided keyboard shortcut. The shortcut is a convenient way to do this when using a computer.

-
Select one of the available widths to control the global column width.
-
Available widths range from 90px to 1200px, with a 30px interval.
-
A 100px interval is also available, which makes it easier to remember.
-
Here's the list of available widths and their corresponding tags for tuning the global width:
Global Column Width Tag Name for Tuning Global Width 100px W100200px W200300px W300400px W400500px W500600px W600700px W700800px W800900px W9001000px W1000
-
Example Usage:
c1means column 1 /w400means 400px -->c1w400c2means column 2 /w600means 600px -->c1w600- ...
-
Here's a list of available column widths and their corresponding tags for fine-tuning the width of local columns with 100px intervals:
Available Column Width Tags for Fine-Tuning Local Column Width 100px c1w100,c2w100,c3w100,c4w100,c5w100, ... ,c9w100200px c1w200,c2w200,c3w200,c4w200,c5w200, ... ,c9w200300px c1w300,c2w300,c3w300,c4w300,c5w300, ... ,c9w300400px c1w400,c2w400, ... ,c9w400500px c1w500,c2w500, ... ,c9w500600px c1w600,c2w600, ... ,c9w600700px c1w700,c2w700, ... ,c9w700800px c1w800,c2w800, ... ,c9w800900px c1w900,c2w900, ... ,c9w9001000px c1w1000,c2w1000, ... ,c9w1000


