This project focuses on understanding the language ecosystem, not getting into programming details.
🌄 Python's Habitat
This topic describes how to set up the environment for Python development.
- Preparing the Environment for the Python
- Check Python Configuration
- Advanced settings of Python
- What is a virtual environment and how it works
🐍 Python's Taxonomy
This topic describes features of the pattern of Python projects.
💢 Python's Behavior
This topic describes how the language is designed and how it works.
- Compiler and interpreter
- How Python runs a program
- How Python search path module
- How Python manages process and threads
- How Python manages memory
- How to deeply understand Python code execution (debug)
🐛 Python's Feeding
This topic describes static code analysis, formatting patterns and style guides.
🔍 Python's Other Features
Extra topics.
 Linux
Linux
Python needs a set of tools that are system requirements. If necessary, install these requirements with this command:
sudo apt update

sudo apt install\
  software-properties-common\
  build-essential\
  libffi-dev\
  python3-pip\
  python3-dev\
  python3-venv\
  python3-setuptools\
  python3-pkg-resources
Now, the environment is done to install Python
sudo apt install python  Windows
On Windows, I recommend using the package manager chocolatey and setting your Powershell to work as admin. See this tutorial.
Now, install Python
choco install python 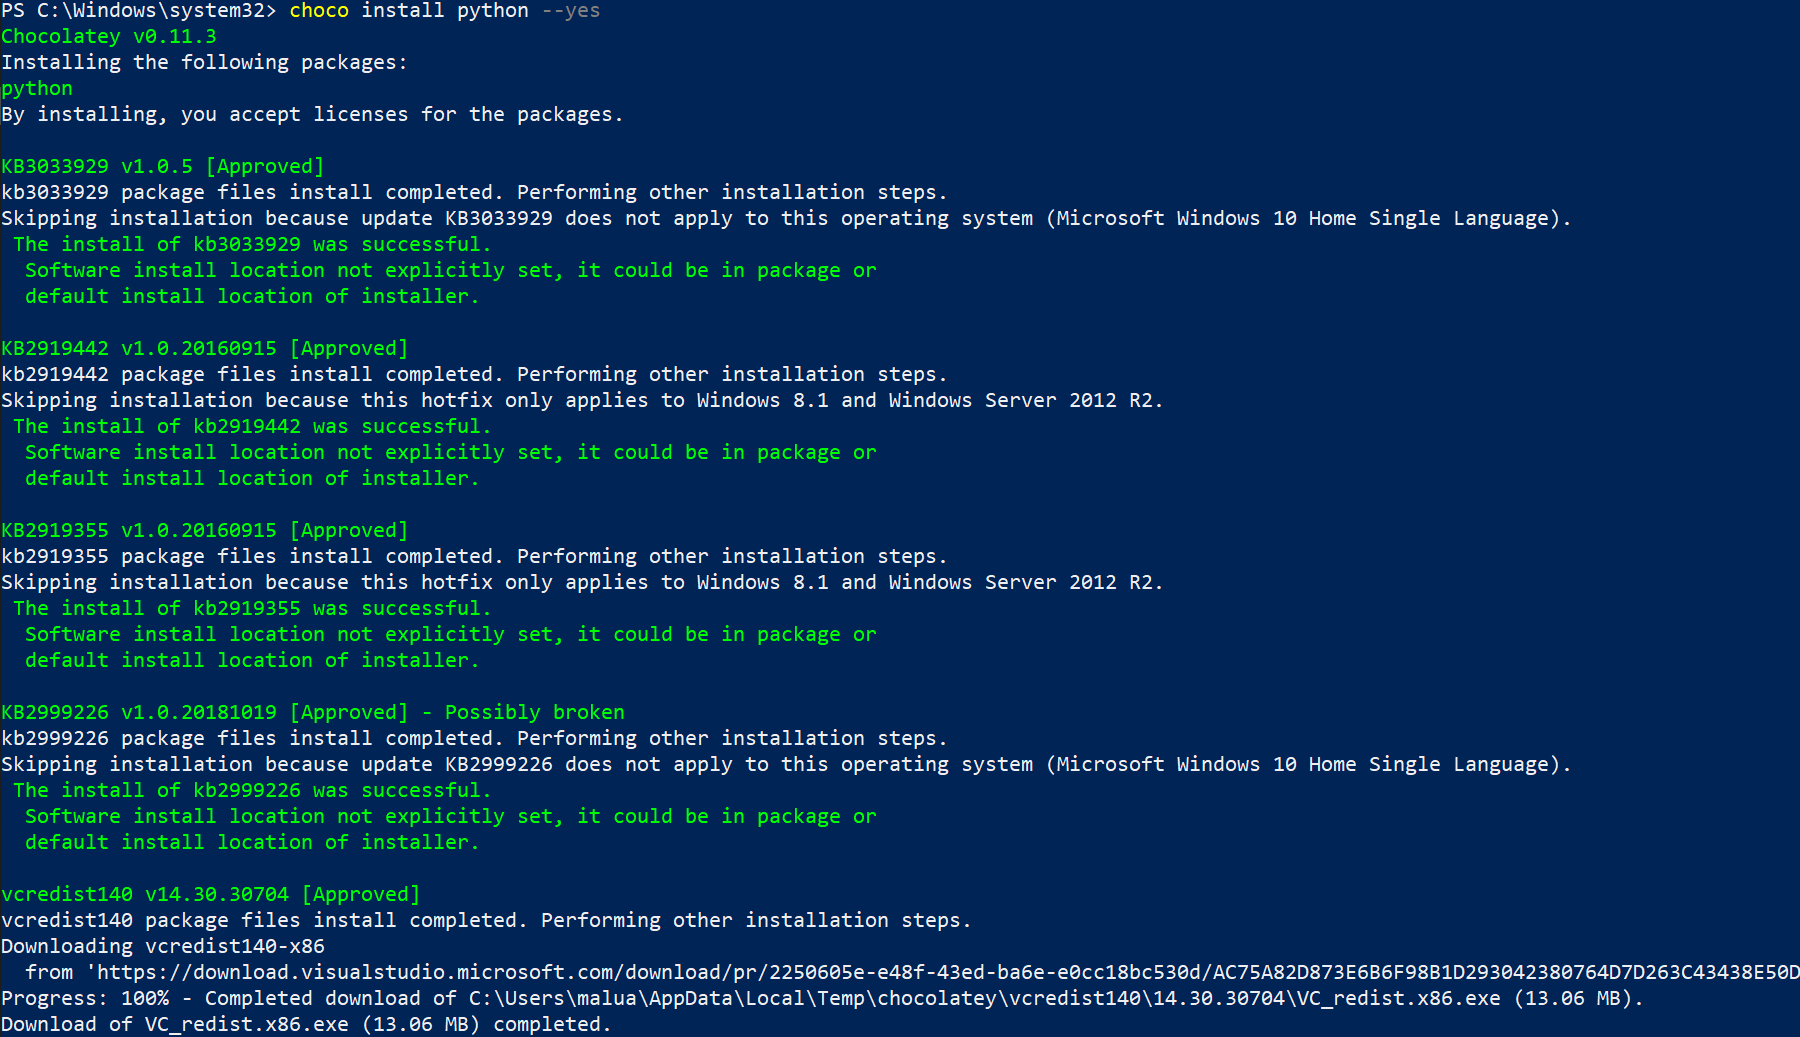
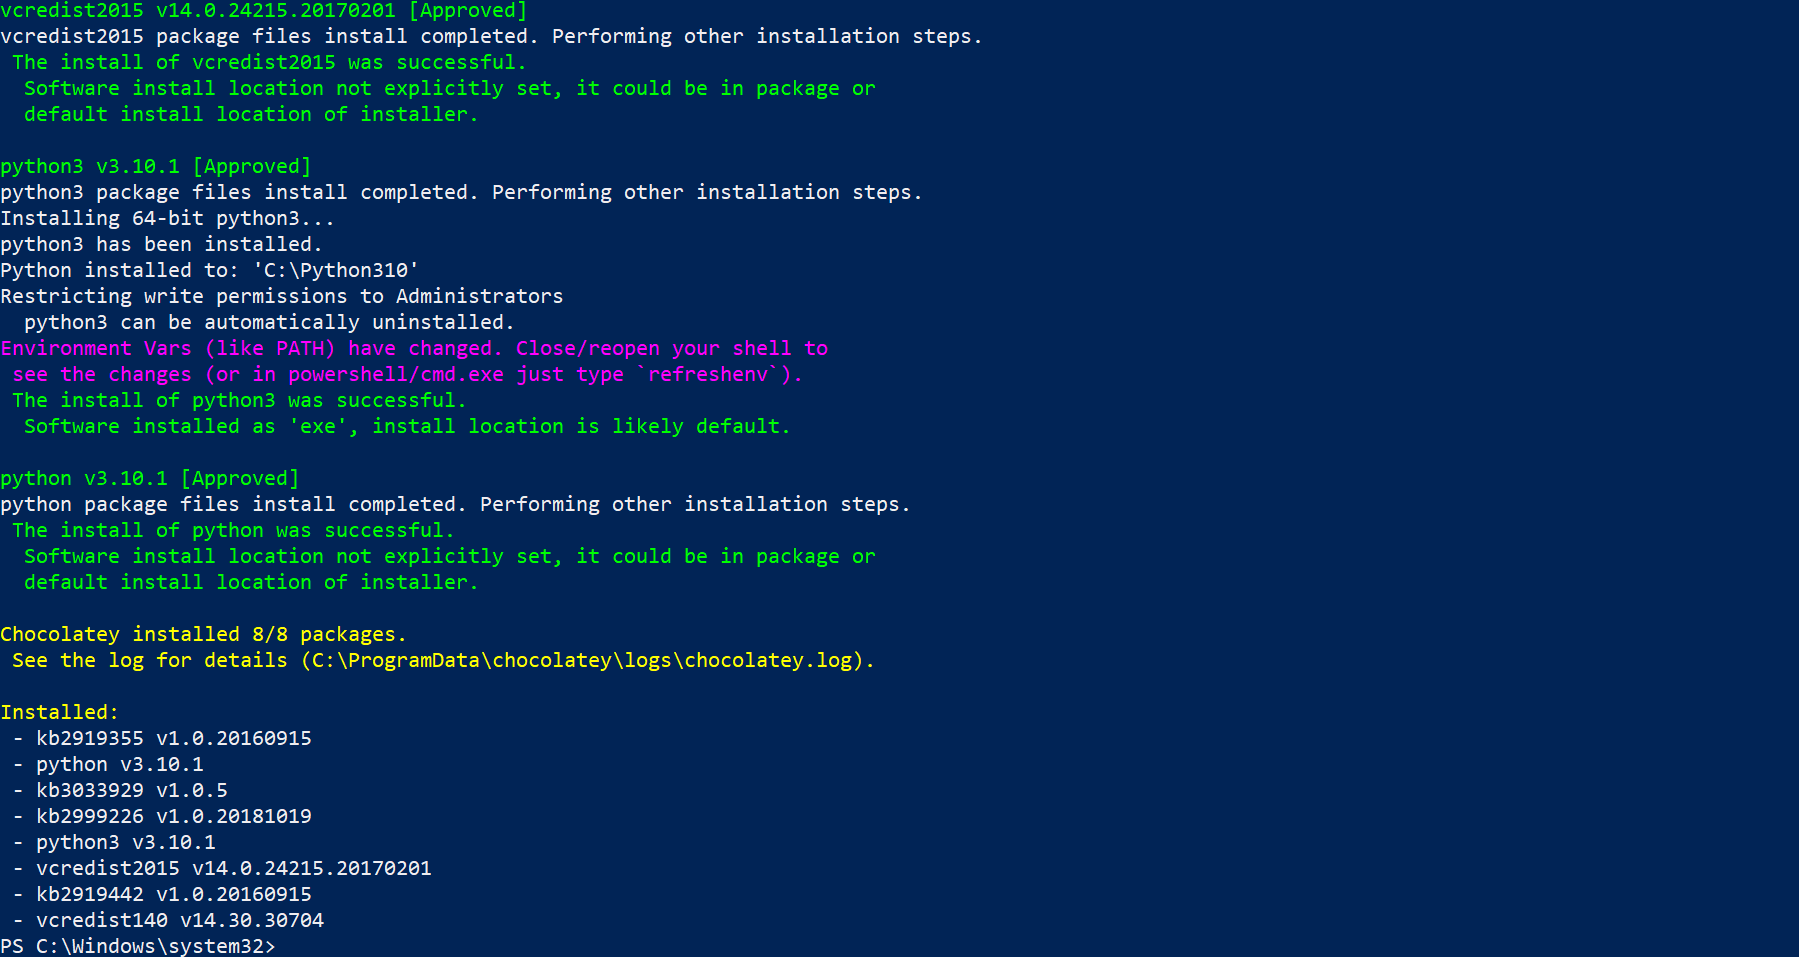
Test
python --version 
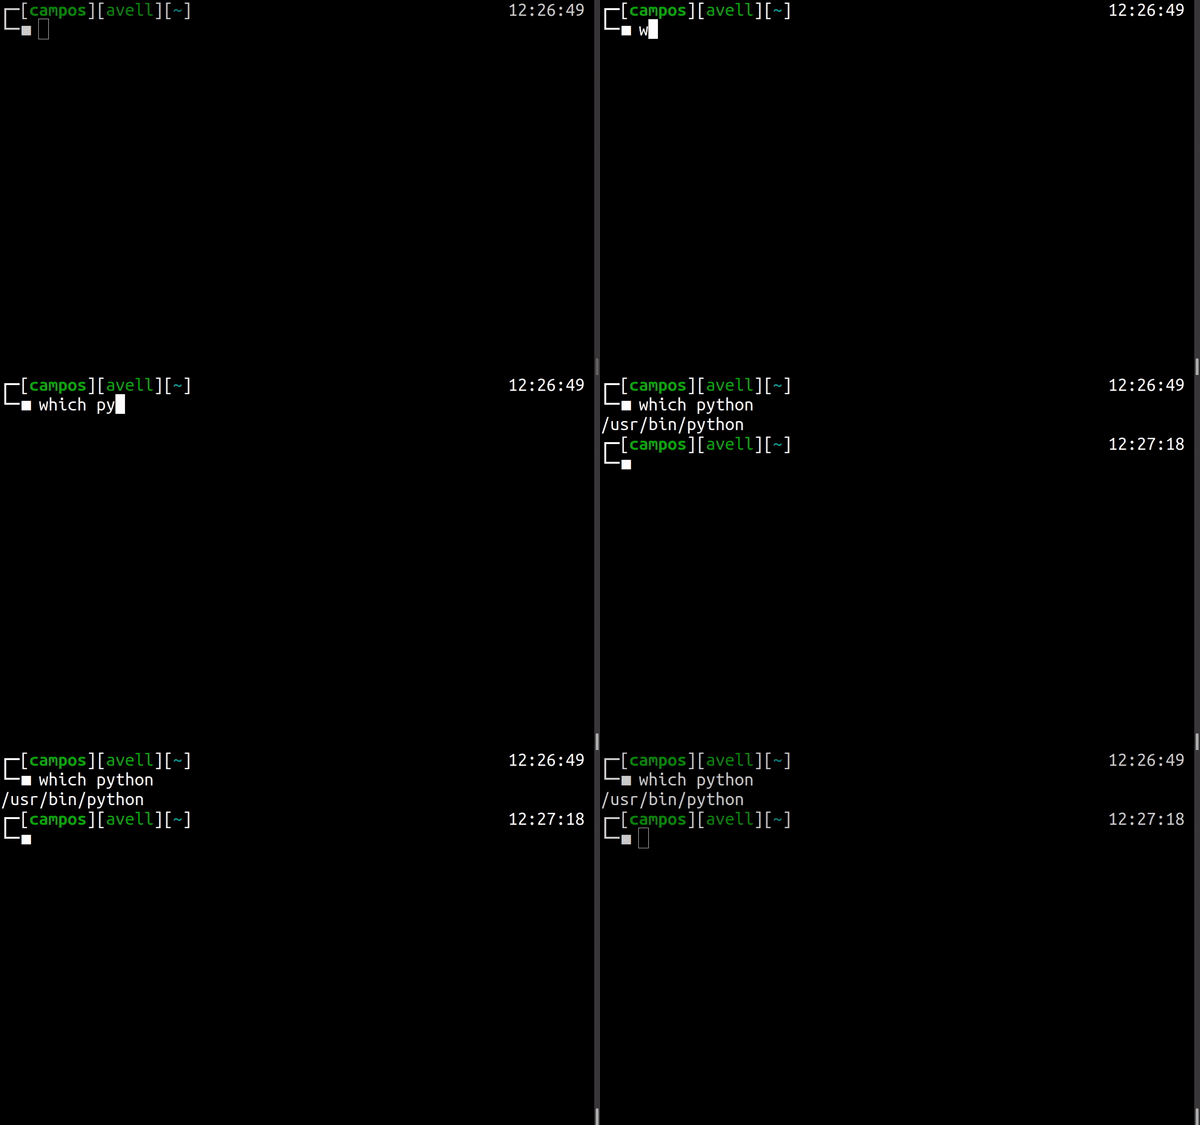
python --versionwhich pythonsudo update-alternatives --list pythonInstall multiples Python versions
Sometimes you might work on different projects simultaneously with different versions of Python. Normally using Anaconda is the easiest solution, however, there are restrictions.-
Add repository
This PPA contains more recent Python versions packaged for Ubuntu.
sudo add-apt-repository ppa:deadsnakes/ppa -y
-
Update packages
sudo apt update -y
-
Check which Python version is installed
python --version
-
Install Python
sudo apt install python3.<VERSION>
Install multiples Python versions Using Pyenv
-
Add dependencies
sudo apt install curl -y
-
Update packages
sudo apt update -y
-
Install pyenv
curl https://pyenv.run | bash -
Add these three lines from .bashrc or .zhshrc
export PATH="$HOME/.pyenv/bin:$PATH"
eval "$(pyenv init --path)"
eval "$(pyenv virtualenv-init -)"
-
Open a new terminal and execute
exec $SHELL
pyenv --version
Change system's Python
Before installing other versions of Python it's necessary to set which system's Python will be used.
-
Use
update-alternativesIt's possible use the
update-alternativescommand to set priority to different versions of the same software installed in Ubuntu systems. Now, define priority of versions:sudo update-alternatives --install /usr/bin/python python /usr/bin/python3.11 1 sudo update-alternatives --install /usr/bin/python python /usr/bin/python3.10 2 sudo update-alternatives --install /usr/bin/python python /usr/bin/python3.8 3 sudo update-alternatives --install /usr/bin/python python /usr/bin/python3.6 4
In directory
/usr/binwill be create simbolic link:/usr/bin/python -> /etc/alternatives/python* -
Choose version
sudo update-alternatives --config python
-
Test
python --version
Change Python2 to Python3
If return Python 2, try set a alias in /home/$USER/.bashrc, see this example.
alias python=python3NOTE: The important thing to realize is that Python 3 is not backwards compatible with Python 2. This means that if you try to run Python 2 code as Python 3, it will probably break.
Set Python's Environment Variables
PYTHONPATHis an environment variable which you can set to add additional directories where python will look for modules and packages. Example: Apache Airflow readdag/folder and add automatically any file that is in this directory.- To interpreter
PYTHONHOMEindicate standard packages.
Set PYTHONPATH
-
Open profile
sudo vim ~/.bashrc -
Insert Python PATH
export PYTHONHOME=/usr/bin/python<NUMER_VERSION>
-
Update profile/bashrc
source ~/.bashrc
-
Test
>>> import sys
>>> from pprint import pprint
>>> pprint(sys.path)
['',
 '/usr/lib/python311.zip',
 '/usr/lib/python3.11',
 '/usr/lib/python3.11/lib-dynload',
 '/usr/local/lib/python3.11/dist-packages',
 '/usr/lib/python3/dist-packages']
Example with Apache Airflow
>>> import sys
>>> from pprint import pprint
>>> pprint(sys.path)
['',
 '/home/project_name/dags',
 '/home/project_name/config',
 '/home/project_name/utilities',
 ...
 ]
Python can run in a virtual environment with isolation from the system.
Arquitecture of Execution
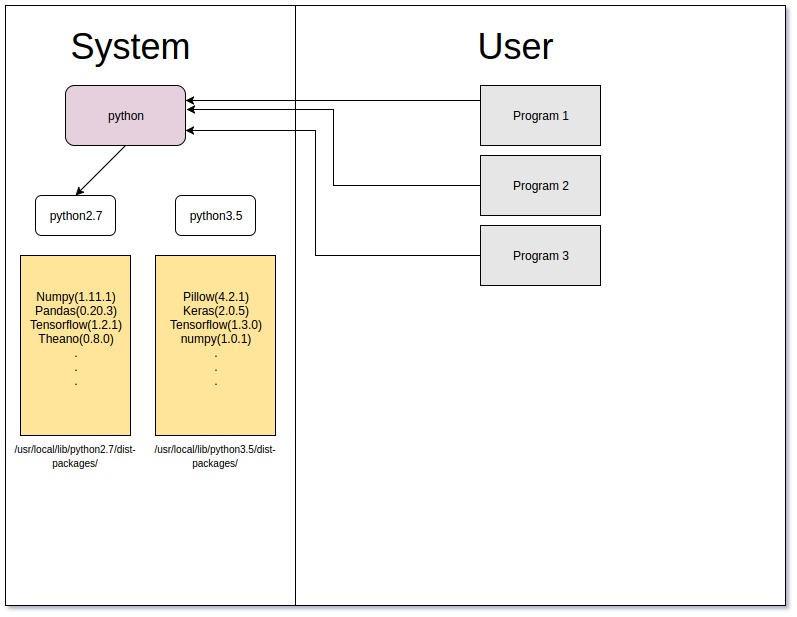
Virtualenv enables us to create multiple Python environments which are isolated from the global Python environment as well as from each other.
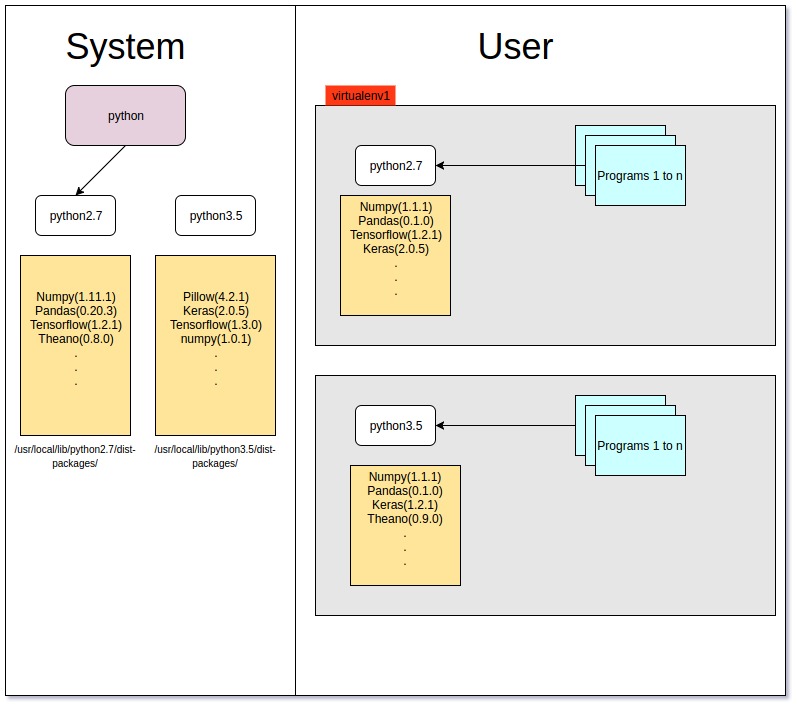
When Python is initiating, it analyzes the path of its binary. In a virtual environment, it's actually just a copy or Symbolic link to your system's Python binary. Next, set the sys.prefix location which is used to locate the site-packages (third party packages/libraries)
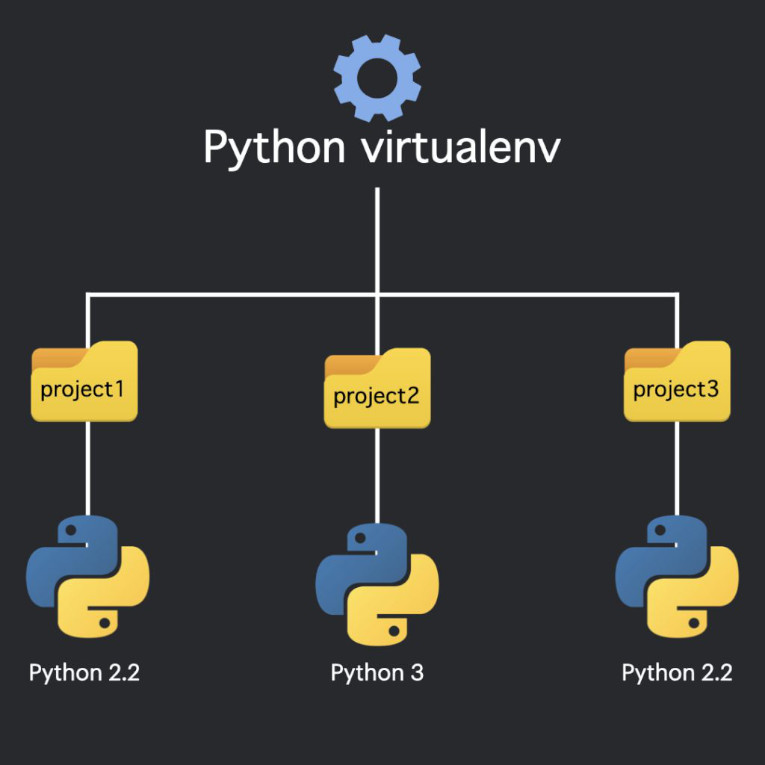
sys.prefixpoints to the virtual environment directory.sys.base.prefixpoints to the non-virtual environment.
ll

# random.py -> /usr/lib/python3.6/random.py
# reprlib.py -> /usr/lib/python3.6/reprlib.py
# re.py -> /usr/lib/python3.6/re.py
# ...
tree
├── bin
│ ├── activate
│ ├── activate.csh
│ ├── activate.fish
│ ├── easy_install
│ ├── easy_install-3.8
│ ├── pip
│ ├── pip3
│ ├── pip3.8
│ ├── python -> python3.8
│ ├── python3 -> python3.8
│ └── python3.8 -> /Library/Frameworks/Python.framework/Versions/3.8/bin/python3.8
├── include
├── lib
│ └── python3.8
│ └── site-packages
└── pyvenv.cfgCreate Virtual Environment
Create virtual environment
virtualenv -p python3 <NAME_ENVIRONMENT>Activate
source <NAME_ENVIRONMENT>/bin/activatePipenv
Create and manage automatically a virtualenv for your projects, as well as adds/removes packages from your Pipfile as you install/uninstall packages. It also generates the ever-important Pipfile.lock, which is used to produce deterministic builds.
- Deterministic builds
- Separates development and production environment packages into a single file
Pipefile - Automatically adds/removes packages from your
Pipfile - Automatically create and manage a virtualenv
- Check PEP 508 requirements
- Check installed package safety
# Pipfile

[[source]]
name = "pypi"
url = "https://pypi.org/simple"
verify_ssl = true

[dev-packages]

[packages]
requests = "*"
numpy = "==1.18.1"
pandas = "==1.0.1"
wget = "==3.2"

[requires]
python_version = "3.8"
platform_system = 'Linux'
# requirements.txt
requests
matplotlib==3.1.3
numpy==1.18.1
pandas==1.0.1
wget==3.2pip3 install --user pipenv-
Create environment
pipenv --python 3
-
See where virtual environment is installed
pipenv --venv
-
Activate environment
pipenv run
-
Install packages with Pipefile
pipenv install flask # or pipenv install --dev flask -
Create lock file
pipenv lock
Python Package Index
Poetry
Conda
Requirements.txt is file containing a list of items to be installed using pip install.
Principal Comands
- Visualize instaled packages
pip3 freeze- Generate file
requirements.txt
pip3 freeze > requirements.txt- Test
cat requirements.txt- Install packages in requirements
pip3 install -r requirements.txtUsing pip and requirements.txt file, have a real issue here is that the build isn’t deterministic. What I mean by that is, given the same input (the requirements.txt file), pip does not always produce the same environment.
A set of command line tools to help you keep your pip-based packages fresh and ensure the deterministic build.
- Distinguish direct dependencies and versions
- Freeze a set of exact packages and versions that we know work
- Make it reasonably easy to update packages
- Take advantage of pip's hash checking to give a little more confidence that packages haven't been modified (DNS attack)
- Stable
Principal Comands
- Install
pip install pip-tools
- Get packages's version
pip3 freeze > requirements.in- Generate hashes and list dependeces
pip-compile --generate-hashes requirements.inoutput: requirements.txt
- Install packages and hash checking
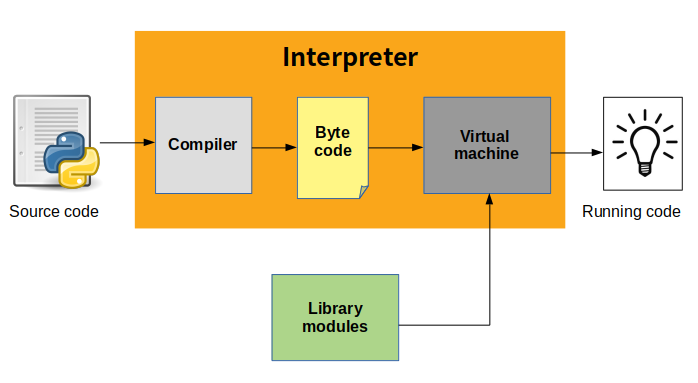
pip-compile --generate-hashes requirements.inCPython can be defined as both an interpreter and a compiler.
- The compiler converts the
.pysource file into a.pycbytecode for the Python virtual machine. - The interpreter executes this bytecode on the virtual machine.
The principal feature of CPython, is that it makes use of a global interpreter lock (GIL). This is a mechanism used in computer-language interpreters to synchronize the execution of threads so that only one native thread can execute at a time.
Therefore, for a CPU-bound task in Python, single-process multi-thread Python program would not improve the performance. However, this does not mean multi-thread is useless in Python. For a I/O-bound task in Python, multi-thread could be used to improve the program performance.
Multithreading in Python
The Python has multithreads despite the GIL. Using Python threading, we are able to make better use of the CPU sitting idle when waiting for the I/O bound, how memory I/O, hard drive I/O, network I/O.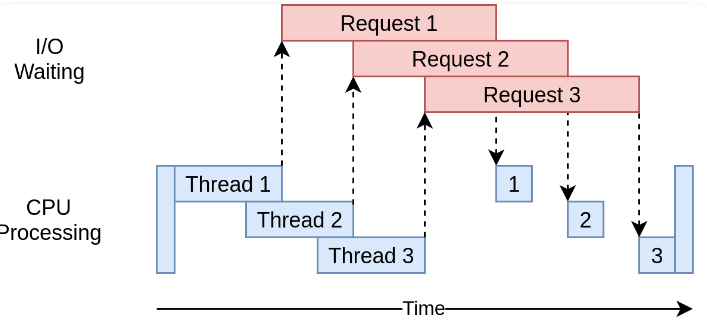
This can happen when multiple threads are servicing separate clients. One thread may be waiting for a client to reply, and another may be waiting for a database query to execute, while the third thread is actually processing Python code or other example is read multiples images from disk.
NOTE: we would have to be careful and use locks when necessary. Lock and unlock make sure that only one thread could write to memory at one time, but this will also introduce some overhead.
Community Consensus
Removing the GIL would have made Python 3 slower in comparison to Python 2 in single-threaded performance. Other problem if remove the GIL it's would broke the existing C extensions which depend heavily on the solution that the GIL provides.
Although many proposals have been made to eliminate the GIL, the general consensus has been that in most cases, the advantages of the GIL outweigh the disadvantages; in the few cases where the GIL is a bottleneck, the application should be built around the multiprocessing structure.
- Tokenize the source code:
Parser/tokenizer.c - Parse the stream of tokens into an Abstract Syntax Tree (AST):
Parser/parser.c - Transform AST into a Control Flow Graph:
Python/compile.c - Emit bytecode based on the Control Flow Graph:
Python/compile.c
When Python executes this statement:
import my_libThe interpreter searches my_lib.py a list of directories
assembled from the following sources:
- Current directory
- The list of directories contained in the PYTHONPATH environment variable
- In directory which Python was is installed. E.g.
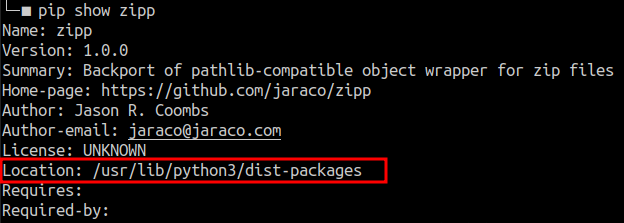
The resulting search can be accessed using the sys module:
import sys

sys.paths
# ['', '/usr/lib/python38.zip',
# '/usr/lib/python3.8',
# '/usr/lib/python3.8/lib-dynload',
# '/home/campos/.local/lib/#python3.8/site-packages',
# '/usr/local/lib/python3.8/dist-packages',
# '/usr/lib/python3/dist-packages']
Now, to see where a packeage was imported from you can use the attribute __file__:
import zipp

zipp.__file__
# '/usr/lib/python3/dist-packages/zipp.py'
NOTE: you can see that the
__file__directory is in the list of directories searched by the interpreter.
TODO
TODO
TODO
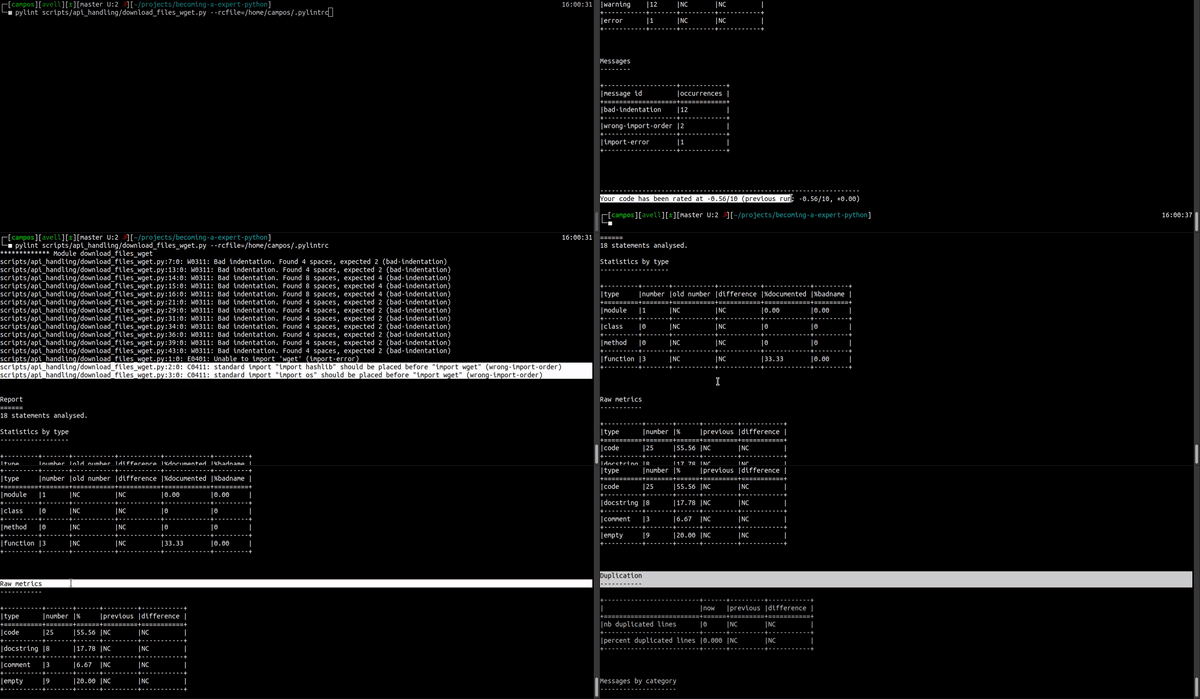
The static code analysis serves to evaluate the coding. This analysis must be done before submitting for a code review. The static code analysis can check:
- Code styling analysis
- Comment styling analysis
- Error detection
- Duplicate code detection
- Unused code detection
- Complexity analysis
- Security linting
The characteristics of a static analysis are:
- Provides insight into code without executing it
- Can automate code quality maintenance
- Can automate the search for bugs at the early stages
- Can automate the finding of security problems
A lint, is a static code analysis tool.
Pylint
Pylint is a lint that checks for errors in Python code, tries to enforce a coding standard and looks for code smells. The principal features is:
- Pylint follow the PEP8 style guide.
- It's possible automate with Jenkins.
- It is fully customizable through a
.pylintrcfile where you can choose which errors or agreements are relevant to you. - Usage
# Get Errors & Warnings
pylint -rn <file/dir> --rcfile=<.pylintrc>

# Get Full Report
pylint <file/dir> --rcfile=<.pylintrc>
Pyflakes
Mypy
Prospector
Isort
isort is a Python tool/library for sorting imports alphabetically, automatically divided into sections. It is very useful in projects where we deal with a lot of imports [6].
# sort the whole project
isort --recursive ./src/

# just check for errors
isort script.py --check-only
Unify
Someone likes to write them in single quotes, someone in double ones. To unify the whole project, there is a tool that allows you to automatically align with your style guide — unify [6].
unify --in-place -r ./src/Work recursively for files in the folder.
docformatter
Docformater is utility helps to bring your docstring under the PEP 257 [6]. The agreement specifies how documentation should be written.
docformatter --in-place example.pyAutoformatters
There are also automatic code formatters now, here are the popular one [6]:
- yapf (here you can make a align with your own style guide)
- black (you don't need a style guide because you don't have a choice)
- autopep8 (makes your python script to conform PEP8 style guide)
Settings files to text editor and IDE
- EditorConfig
- Gitattributes
To make the code consistent and make sure it's readable the style guides can help.
- Google style guide: THE BETTER
- Real Python: Naming Conventions
- PEP 08: Style Guide
- PEP 257: Docstrings
- PEP 484: Type Hints
Identation and Length
- 4 spaces
- Limit all lines to a maximum 72 characteres to docstring or comments
- Limit all lines to a maximum 79 characteres to code
Naming Convention
- Class Name (camelCase):
CapWords() - Variables (snack_case):
cat_words - Constants:
MAX_OVERFLOW
Exception
Limit the clausule try: minimal code necessary.
Yes:
try:
    value = collection[key]
except KeyError:
    return key_not_found(key)
else:
    return handle_value(value)
No:
try:
    # Too broad!
    return handle_value(collection[key])
except KeyError:
    # Will also catch KeyError raised by handle_value()
return key_not_found(key)- The goal to answer the question "What went wrong?" programmatically rather than just claiming that "There was a problem"
Return
"Should explicitly state this as return None"
- Be consistent in return statements.
- Todas as instruções de retorno em uma função devem retornar uma expressão ou nenhuma delas deve.
Yes:
def foo(x):
    if x >= 0:
        return math.sqrt(x)
    else:
        return None
No:
def foo(x):
    if x >= 0:
        return math.sqrt(x)
Docstrings must have:
- Args
- Returns
- Raises
Example Google Style Guide
def fetch_bigtable_rows(big_table, keys, other_silly_variable=None):
    """Fetches rows from a Bigtable.

    Retrieves rows pertaining to the given keys from the Table instance
    represented by big_table.  Silly things may happen if
    other_silly_variable is not None.

    Args:
        big_table: An open Bigtable Table instance.
        keys: A sequence of strings representing the key of each table row
            to fetch.
        other_silly_variable: Another optional variable, that has a much
            longer name than the other args, and which does nothing.

    Returns:
        A dict mapping keys to the corresponding table row data
        fetched. Each row is represented as a tuple of strings. For
        example:

        {'Serak': ('Rigel VII', 'Preparer'),
         'Zim': ('Irk', 'Invader'),
         'Lrrr': ('Omicron Persei 8', 'Emperor')}

        If a key from the keys argument is missing from the dictionary,
        then that row was not found in the table.

    Raises:
        IOError: An error occurred accessing the bigtable.Table object.
    """
    return None
References
- 1: Python 3 Installation & Setup Guide
- 2: An Effective Python Environment: Making Yourself at Home
- 3: Import Scripts as Modules
- 4: Python Modules and Packages – An Introduction
- 5: What Is the Python Global Interpreter Lock (GIL)?
- 6: 7 tips to make an effective python style guide
- 7: Python Static Analysis Tools
- 8: My unpopular opinion about black code formatter
