IBM Secure Landing Zone
Table of Contents
- Prerequisites
- Getting Started
- Customizing Your Environment
- (Optional) F5 BIG-IP
- (Optional) Bastion host using Teleport
- Module Recommendations for Additional Features
- Versions
- Upgrading
- Sample Applications
- Creating an Issue
- FAQ
Prerequisites
To ensure that Secure Landing Zone can be deployed, esure that the following steps have been completed before deployment.
Setup an IBM Cloud Account
An IBM Cloud account is required. An Enterprise account is recommended but Pay as you Go account suffices to deploy secure landing zone cloud resources.
If you do not already have an account, follow instructions to create the account and upgrade to Pay-as-you-Go
- Have access to an IBM Cloud account. An Enterprise account is recommended but a Pay as you Go account should also work with this automation.
Setup IBM Cloud Account for Secure Landing Zone
-
Log into IBM Cloud console using the IBMid you used to setup the account. This IBMid user is the account owner and has all the IAM accesses.
-
Complete the company profile and contacts information for the account. This is required to stay in compliance with IBM Cloud Financial Service profile.
-
Enable the flag to designate your IBM Cloud account to be Financial Services Validated.
-
Enable VRF and Service Endpoints. This requires creating a support case. Follow instructions carefully.
Setup Account Access (Cloud IAM)
-
Create an IBM Cloud API Key. User owning this key should be part of admins group. Necessary if manually provisioning
-
Setup Cloud IAM Access Groups. User access to cloud resources will be controlled using the Access Policies assigned to Access Groups. IBM Cloud Financial Services profile requires that all IAM users do not get assigned any accesses directly to any cloud resources. When assigning Access policies, Click "All Identity Access Enabled Services" from drop down menu.
Setup Repository Authorization
The toolchain requires authorization to access your repository. If it does not have access, the toolchain will request that you authorize access. Below shows you how you can create a personal access token for your repository
You can manage your authorizations via Manage Git Authorizations
(Optional) Setup Hyper Protect Crypto Services
For Key Management services, user can optionally use Hyper Protect Crypto Services. This instance will need to be created before creating the Secure Landing Zone.
Hyper Crypto Service and Initialization
Creating HPCS Using the IBM Cloud CLI
To provision an instance of Hyper Protect Crypto Services IBM Cloud Console, complete the following steps:
- Log in to your IBM Cloud account.
- (Optional) Create a resource group for your HPCS instance
- Click Catalog to view the list of services that are available on IBM Cloud.
- From the Catalog navigation pane, click Services. And then, under Category, select Security.
- From the list of services displayed, click the Hyper Protect Crypto Services tile.
- On the service page, select the pricing plan of choice.
- Fill in the form with the details that are required.
Initializing HPCS
To initialize the provisioned Hyper Protect Crypto Service instance, we recommend to follow the product docs to perform the quick initialization.
Hyper Protect Cyrpto Service Documentation
For proof of technology environments we recommend using the auto-init feature. Auto Init Documentation
Getting Started
Select your Pattern
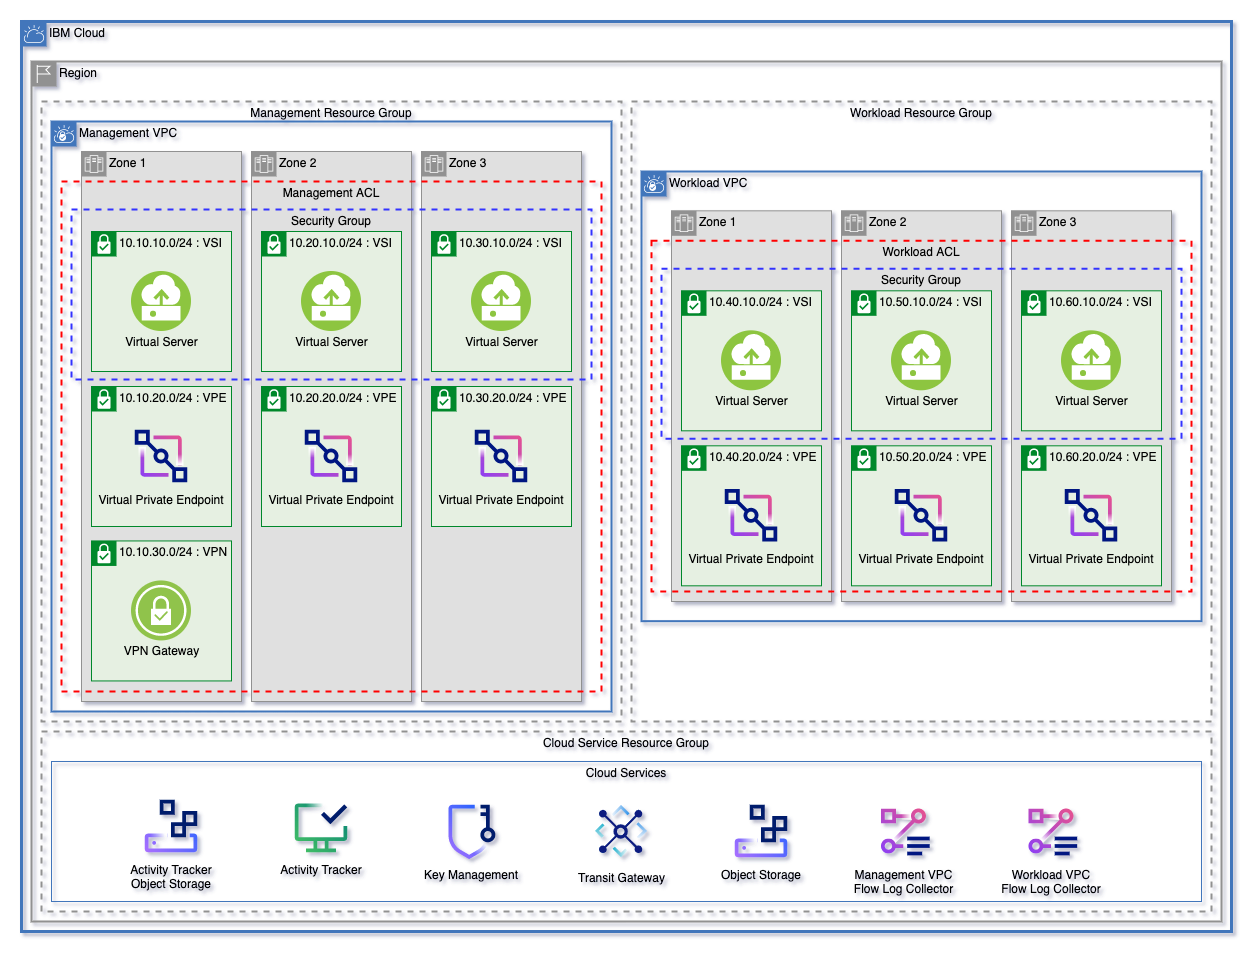
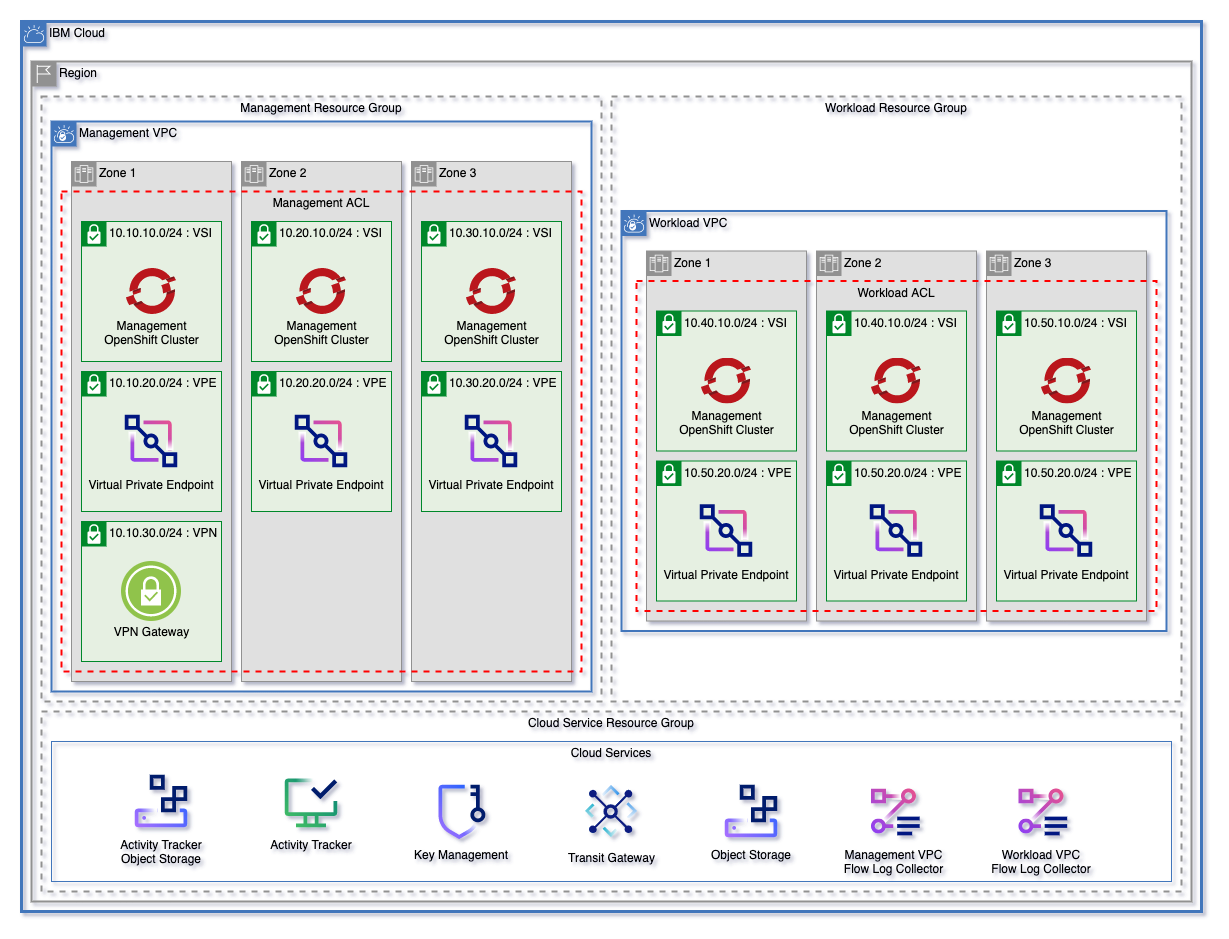
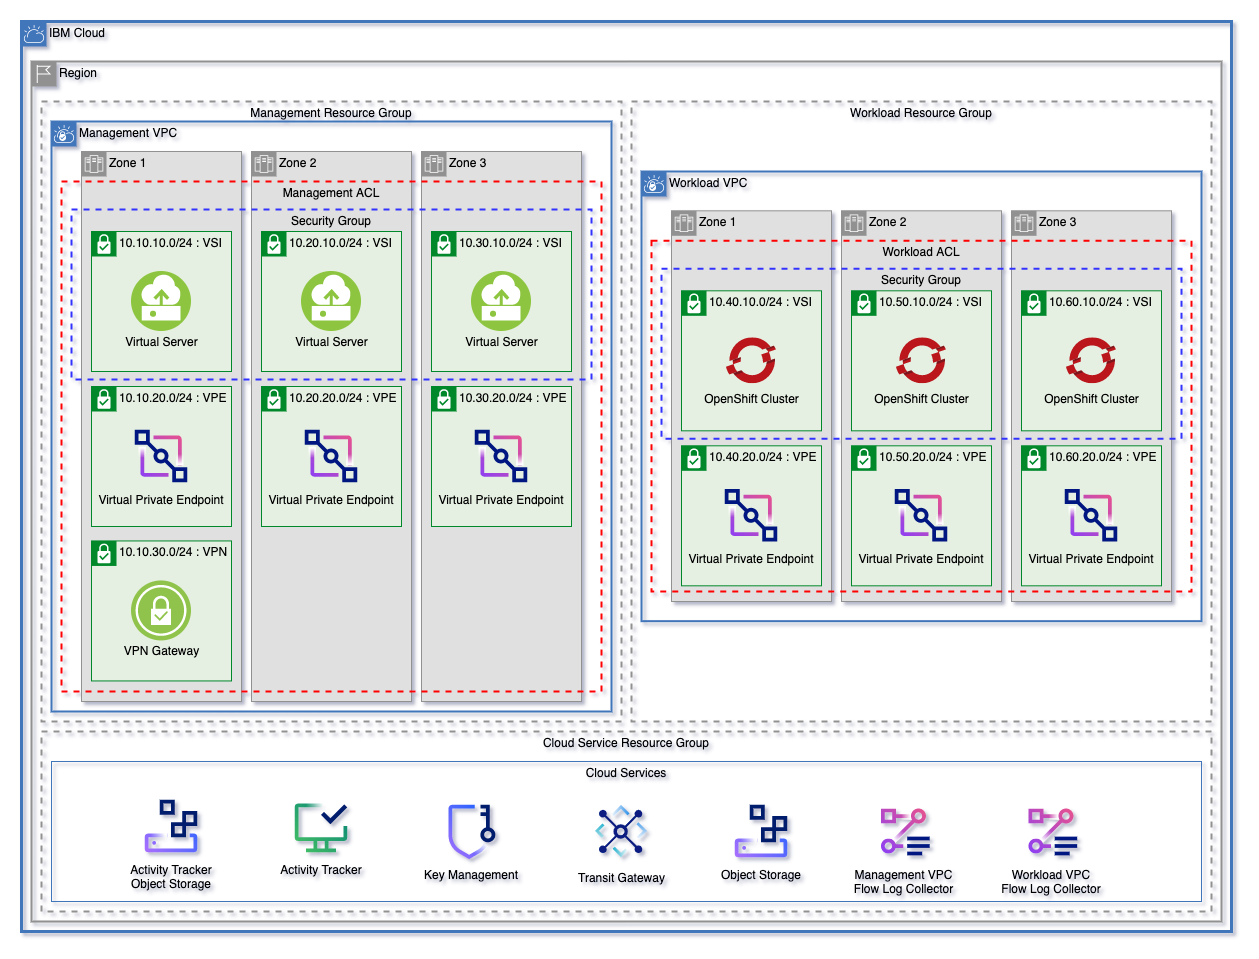
The landing zone module can be used to create a fully customizable VPC environment. The three patterns below are each starting templates that can be used to quickly get started with Landing Zone. These patterns can be found in the patterns directory.
Each of these patterns creates:
- A resource group for cloud services and for each VPC.
- Object storage instances for flow logs and activity tracker
- Encryption keys in either a Key Protect or Hyper Protect Crypto Services instance
- A management and workload VPC connected by a transit gateway
- A flow log collector for each VPC
- All necessary networking rules to allow communication
- Virtual Private endpoints for Cloud Object storage in each VPC
- A VPN Gateway in the Management VPC
Each pattern will create an identical deployment on the VPC
- Virtual Server (VSI) Pattern will deploy identical virtual servers across the VSI subnet tier in each VPC
- Red Hat OpenShift Kubernetes (ROKS) Pattern will deploy identical clusters across the VSI subnet tier in each VPC
- The Mixed pattern will provision both of the above
To read more detailed documentation about the default configuration, read the pattern defaults here.
| Virtual Server Pattern | Red Hat Openshift Pattern | Mixed Pattern |
|---|---|---|
 |
 |
 |
Select your Provision Method
You can provision with IBM Cloud Toolchain or you can run the scripts locally.
Provisioning with the IBM Cloud Toolchain
You can provision an IBM Cloud Toolchain utilizing the template to create a CI/CD pipeline of executing Secure Landing zone.
To get started, create the toolchain:
- Log into IBM Cloud.
- Click the Navigation Menu in the top left and click DevOps -> Toolchains.
- Click Create Toolchain.
- Click the tile titled Deploy infrastructure as code for the IBM Cloud for Financial Services to open up the template.
- See IBM Cloud Toolchain Template for Secure Landing Zone for instructions on working with the toolchain template.
Once the toolchain is created:
- Click the repository tile under the section titled Repositories. This will bring you to the cloned repository.
- Access the patterns directory.
- Choose the appropriate pattern (vsi/roks/mixed) that you chose in the template and edit
terraform.tfvarsfile and commit. - Please read Working with IBM Cloud Toolchains for configuration and how to run the Toolchain
Running the scripts locally
To run the scripts locally, follow these steps:
- Install Terraform CLI and IBM Cloud Provider plug-in with these steps. Note: version >= 1.0 is required
- Install Python.
- Select the pattern that you want to provision (vsi/mixed/roks) within the patterns directory.
- Provide your
tfvarsfile with required variables, such as prefix, region, etc. - Provide your IBM Cloud API key through an environment variable (ex: export TF_VAR_ibmcloud_api_key=")
- Run
terraform initto initialize the working directory and configuration. - Run
terraform planto preview the changes that Terraform plans to make to your infrastructure. - Run
terraform applyto execute the plan to create or modify your infrastructure. - Once you no longer need the infrastructure, you can run
terraform destroyto delete the resources.
Customizing Your Environment
There are two ways of customizing your environment with Secure Landing Zone.
Both require editing terraform.tfvars with required variables noted by "< add user data here >"
Using terraform.tfvars
The first route is to utilize the fast path method where you edit a couple of required variables noted by "< add user data here >" within the terraform.tfvars file of your respective pattern and then provision the environment. You will always be able to edit and be more granular after you use this method since after the run, it will output a json based file which you can use in override.json.
For example, additional VPC's can be added using the terraform.tfvars file by adding the name of the new VPC as a string to the end of the list.
vpcs = ["management", "workload", "<ADDITIONAL VPC>"]
Provisioned VPC components
Using override.json
The second route is to use the override.json to create a fully customized environment based on the starting template. By default, each pattern's override.json is set to contain the default environment configuration. Users can use the override.json in the respective pattern directory by setting the template override variable to true. Each value in override.json corresponds directly to a variable value from the Landing Zone Module which each pattern uses to create your environment.
Supported Variables
The override.json allows users to pass any variable or supported optional variable attributes from the Landing Zone Module, which each pattern uses to provision infrastructure. For a complete list of supported variables and attributes see the Landing Zone Module variables file.
Overriding Variables
After every execution of terraform apply either locally or through the pipeline, a JSON encoded definition of your environment based on the defaults for Landing Zone and any variables changed using override.json will be outputted so that you can then use it in the override.json file.
-
For pipeline runs, you can get the contents within the step labeled
workspace-applyunder the output line Results for override.json: -
For locally executed runs, you can get the contents between the output lines of:
config = <<EOT
EOT
After replacing the contents of override.json with your configuration, you will be able to then edit the resources within. Please make use you set the template override variable to true with the terraform.tfvars file.
Locally executed run configurations do not require an apply to for override.json to be generated. To view your current configuration use the command terraform refresh.
Overriding Only Some Variables
override.json does not need to contain all elements. As an example override.json could be:
{
  "enable_transit_gateway": false
}
(Optional) F5 BIG-IP
The F5 BIG-IP Virtual Edition will enable you to setup a client-to-site full tunnel VPN to connect to your management/edge VPC and/or a web application firewall (WAF) to enable consumers to connect to your workload VPC over the public internet.
Through Secure Landing Zone, users can optionally provision the F5 BIG-IP so that one can either setup the implemented solution of a client-to-site VPN or web application firewall (WAF) which is described here
For more information, please visit provisioning a F5 BIG-IP.
(Optional) Bastion host using Teleport
Teleport allows you to configure a virtual server instance in a VPC as a bastion host. Some of Teleport features include Single sign-on to access the SSH server, auditing, and recording of your interactive sessions. To learn more about teleport, see the following documentation.
Through Secure Landing Zone, users can optionally provision the implemented solution described here which configures a bastion host in your VPC using Teleport Enterprise Edition, along with provisioning a Object Storage bucket and App ID for enhanced security. App ID will be used to authenticate users to access teleport. Teleport session recordings will be stored in the Object Storage bucket. This cloud-init file will install teleport, and configure App ID and the Object Storage. These variables will be used for the configuration.
For more information, please visit provisioning a bastion host using Teleport.
Module Recommendations for Additional Features
| Feature | Description | Module | Version |
|---|---|---|---|
| Logging and Monitoring | Configure logging and/or monitoring for an existing Openshift cluster | slzone/terraform-logmon-module | v1.0.0 |
Versions
You can see the version of Secure Landing Zone that you are on through the file manifest.json.
| Version | Date | Comments |
|---|---|---|
| 1.0.0 | 04/06/2022 | Initial release |
| 1.0.1 | 06/01/2022 | Bastion with Teleport and F5 BIG-IP provision |
Upgrading
If you run your provision through the IBM Toolchain, it will verify if there is a new version available and try to perform a merge and push it to a new branch of your code repository. If there are any merge conflicts, you will need to perform the merge manually.
To merge manually, issue the following commands:
These commands are executed within your local directory of your repository
git remote add landing-zone https://github.ibm.com/open-toolchain/landing-zone.git
git fetch landing-zone
git checkout -b <new branch name>

git merge remotes/landing-zone/main --no-edit

git push --set-upstream origin <branch name from command git checkout above>
This will only create a new branch within your source code repository. You will need to create pull/merge request to push it into your main branch
Sample Applications
Secure Landing Zone provides sample applications that can be used to deploy into your infrastructure. These can be tied into your infrastructure provision pipeline via the application deploy task within. Please see IBM Cloud Toolchain for Secure Landing Zone on the environment variables needed to deploy the sample application using the infrastructure pipeline.
The following sample applications are currently available:
Creating an Issue
As we develop the SLZ template, issues are bound to come up. When an issue comes up the following are required. Issues that do not have complete information will be closed immediately.
Enhancement Feature
- A detailed title that is either the source of a bug, or a user story for the feature that needs to be added.
- example
As a user, I want to be able to provision encryption keys using either HPCS or Key Protect
- example
- Any additional information about the use case is helpful, so please be sure to include it.
Bug Fixes
- A detailed title that is either the source of a bug
- example
When provisioning ROKS, network ALBs cannot be provisioned.
- example
- If you are creating an issue related to a bug, a list of non-sensitive variables in code block format being used to create the architecture must be added to the issue description. This will enable us to recreate the issue locally and diagnose any problems that occur
- Additionally, if there are any logging errors, please include those as text or as part of a code block.
FAQ
Check the FAQ Boxnote for answers to common questions.