This studio focuses on using state in your components. You'll also work with props a little bit. It is recommended to view these instructions from the main repository page where the markdown formatting and images are displayed.
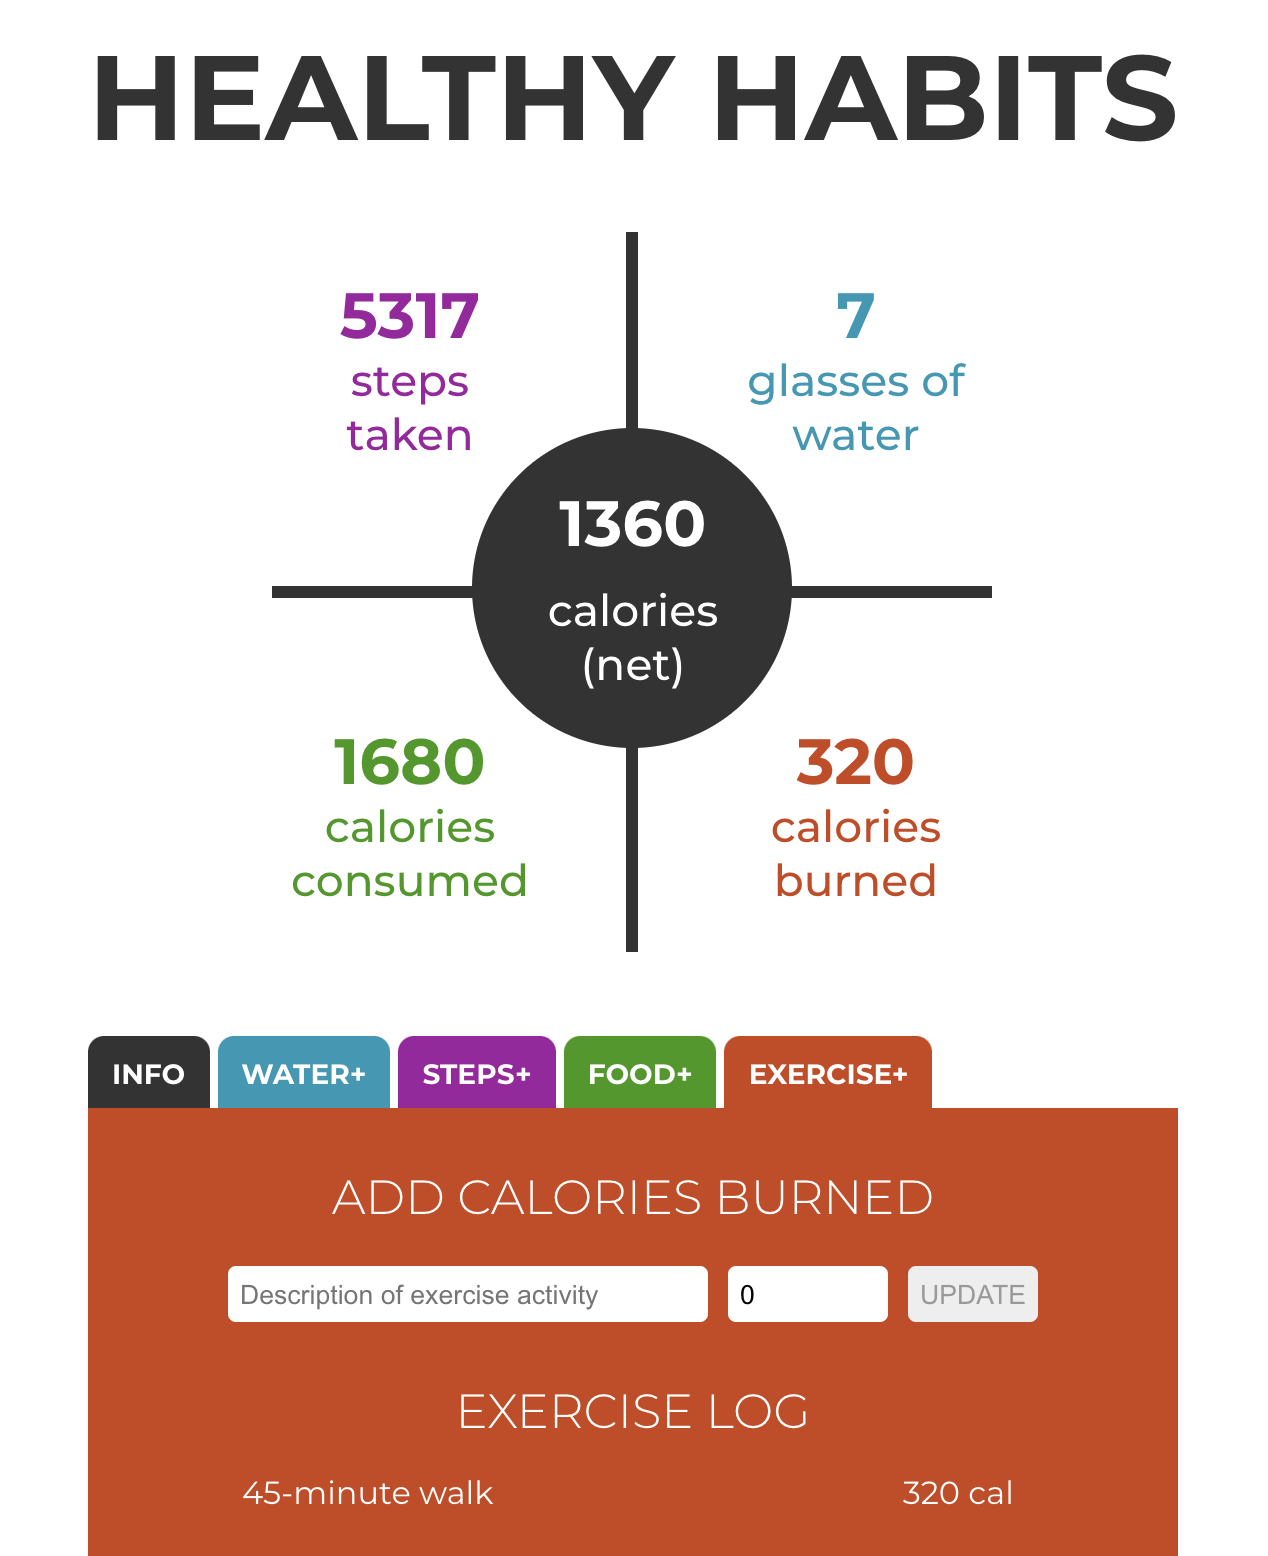
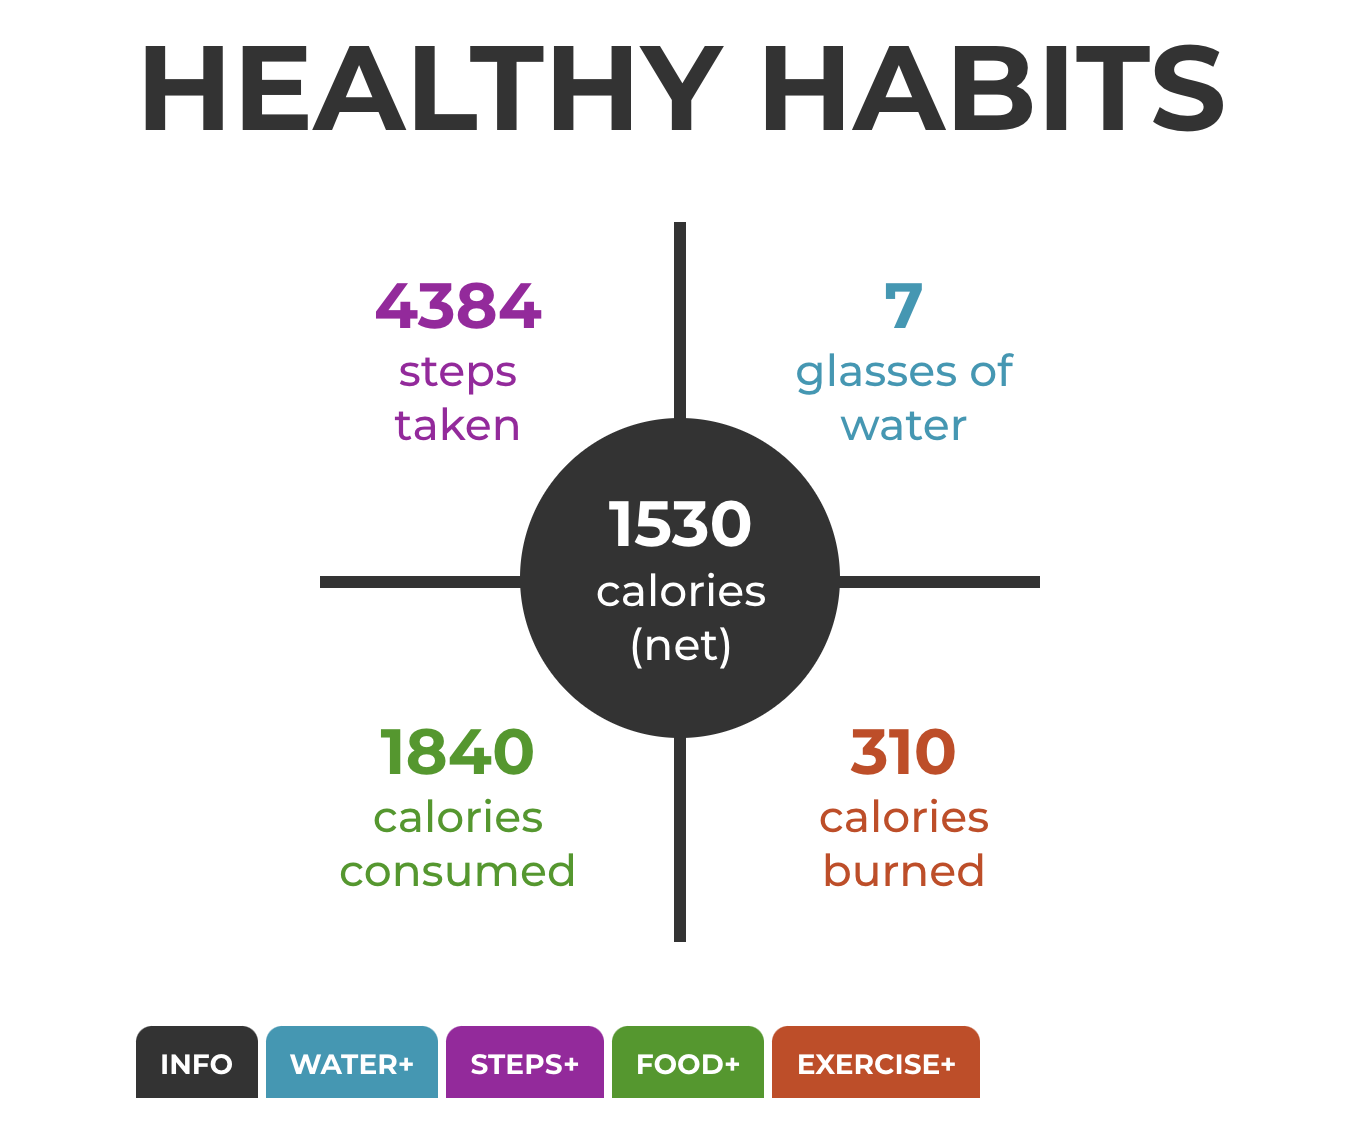
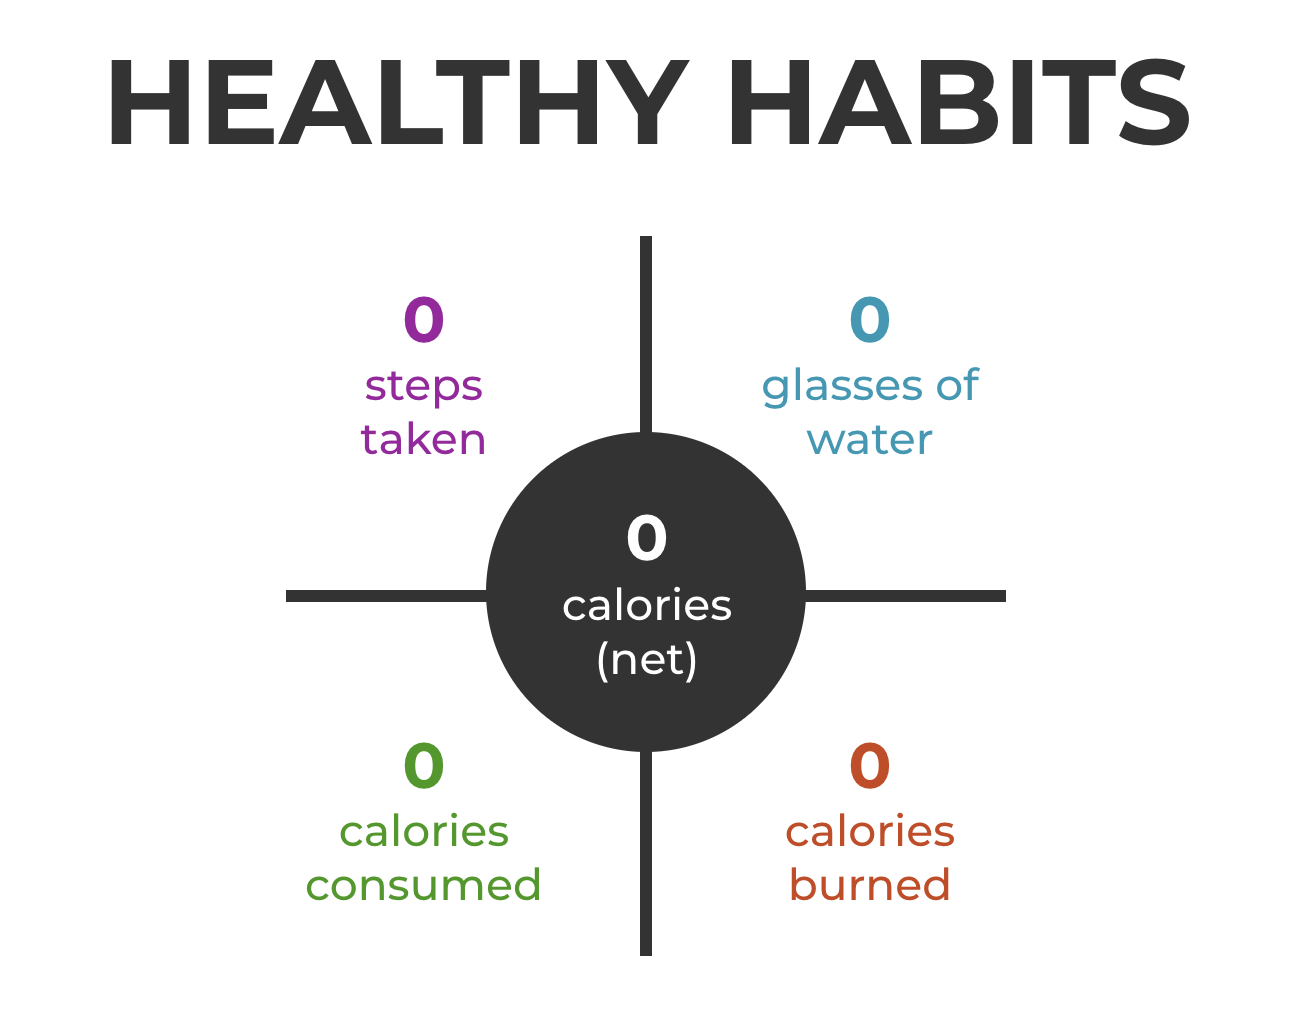
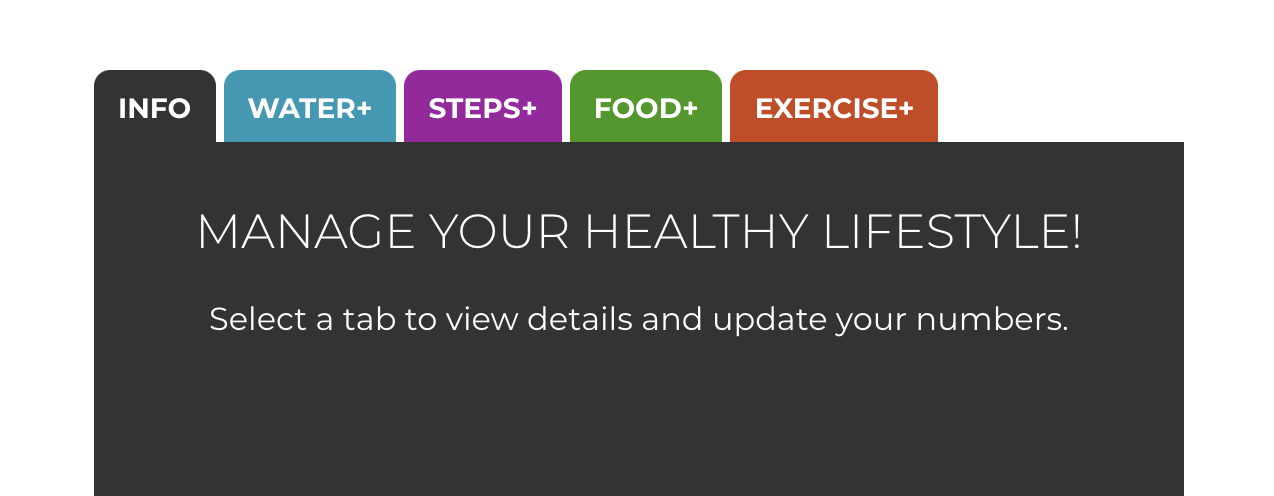
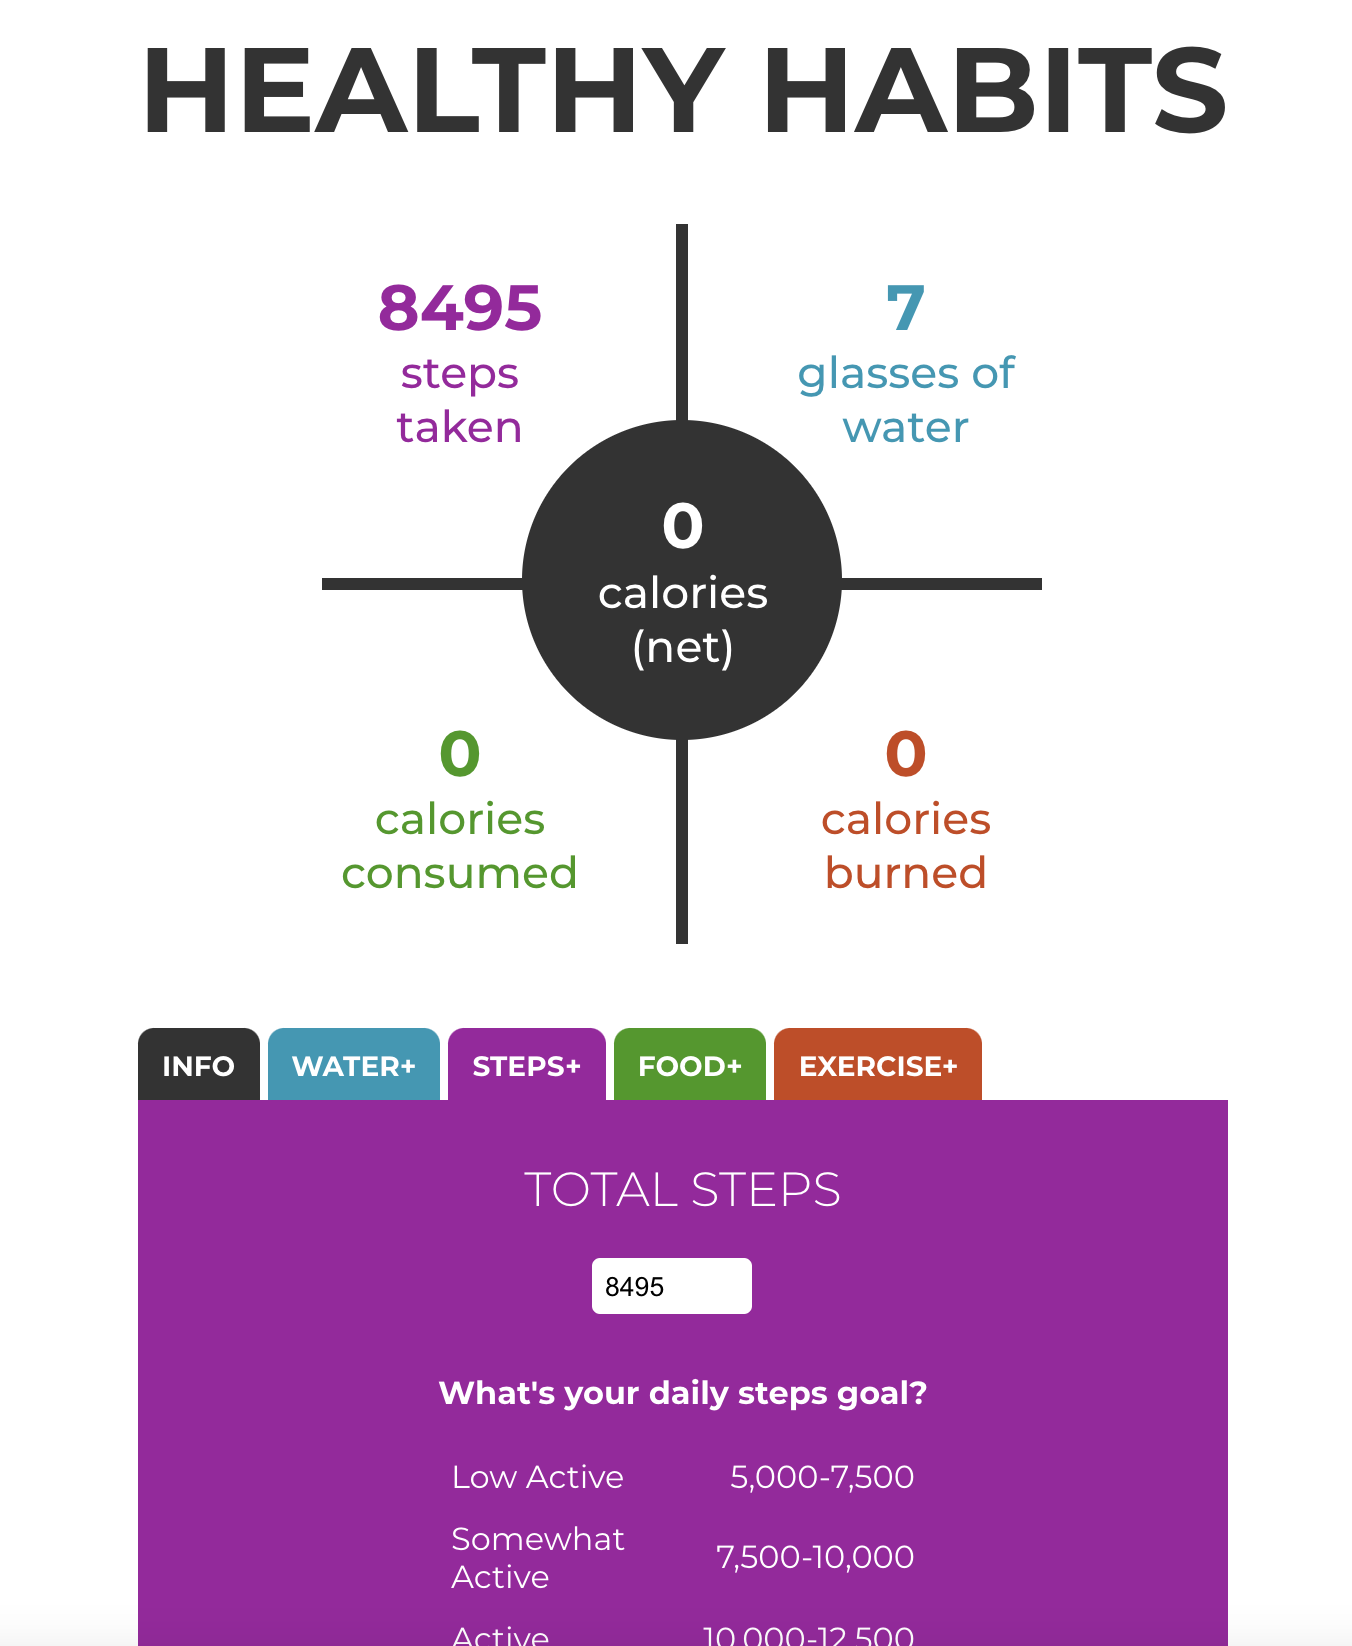
You're going to finish an app that lets a user track their daily steps, water intake, calories consumed from food, and calories burned from exercise. It will also display the net calories (consumed minus burned). Below the chart there will be details panels with built-in forms to update the values. Most of this code has already been written for you. It will just be your job to make sure the data can be received from the user in the Details component, passed up to the parent App component, and then passed down to the child component Chart. You will also use two-way binding and display lists of entered food and exercise in the details sections. You'll accomplish all this with a combination of state variables, props, and lifting state by passing functions as props. Ready?
- Navigate to the studio 04 project repository.
- Fork the repository to your own account, then grab the link from the green Code dropdown.
- In your terminal, go to the folder where you want your project to be. Use
git cloneto create your local copy.
- Still in your terminal, navigate to
/LC-React-Studio04/healthy-habitsand use the commandnpm installto download any required dependencies. - Now use the command
npm startto serve the project to your browser. The page is partially there - but don't worry - as soon as you make a few of the first changes in Part 2, it will shape up quickly.
- In VSCode (or the IDE of your choice), open the project so you can view the code. You should already be in the
mainbranch, which is where the starter code resides. Now you're ready to go!
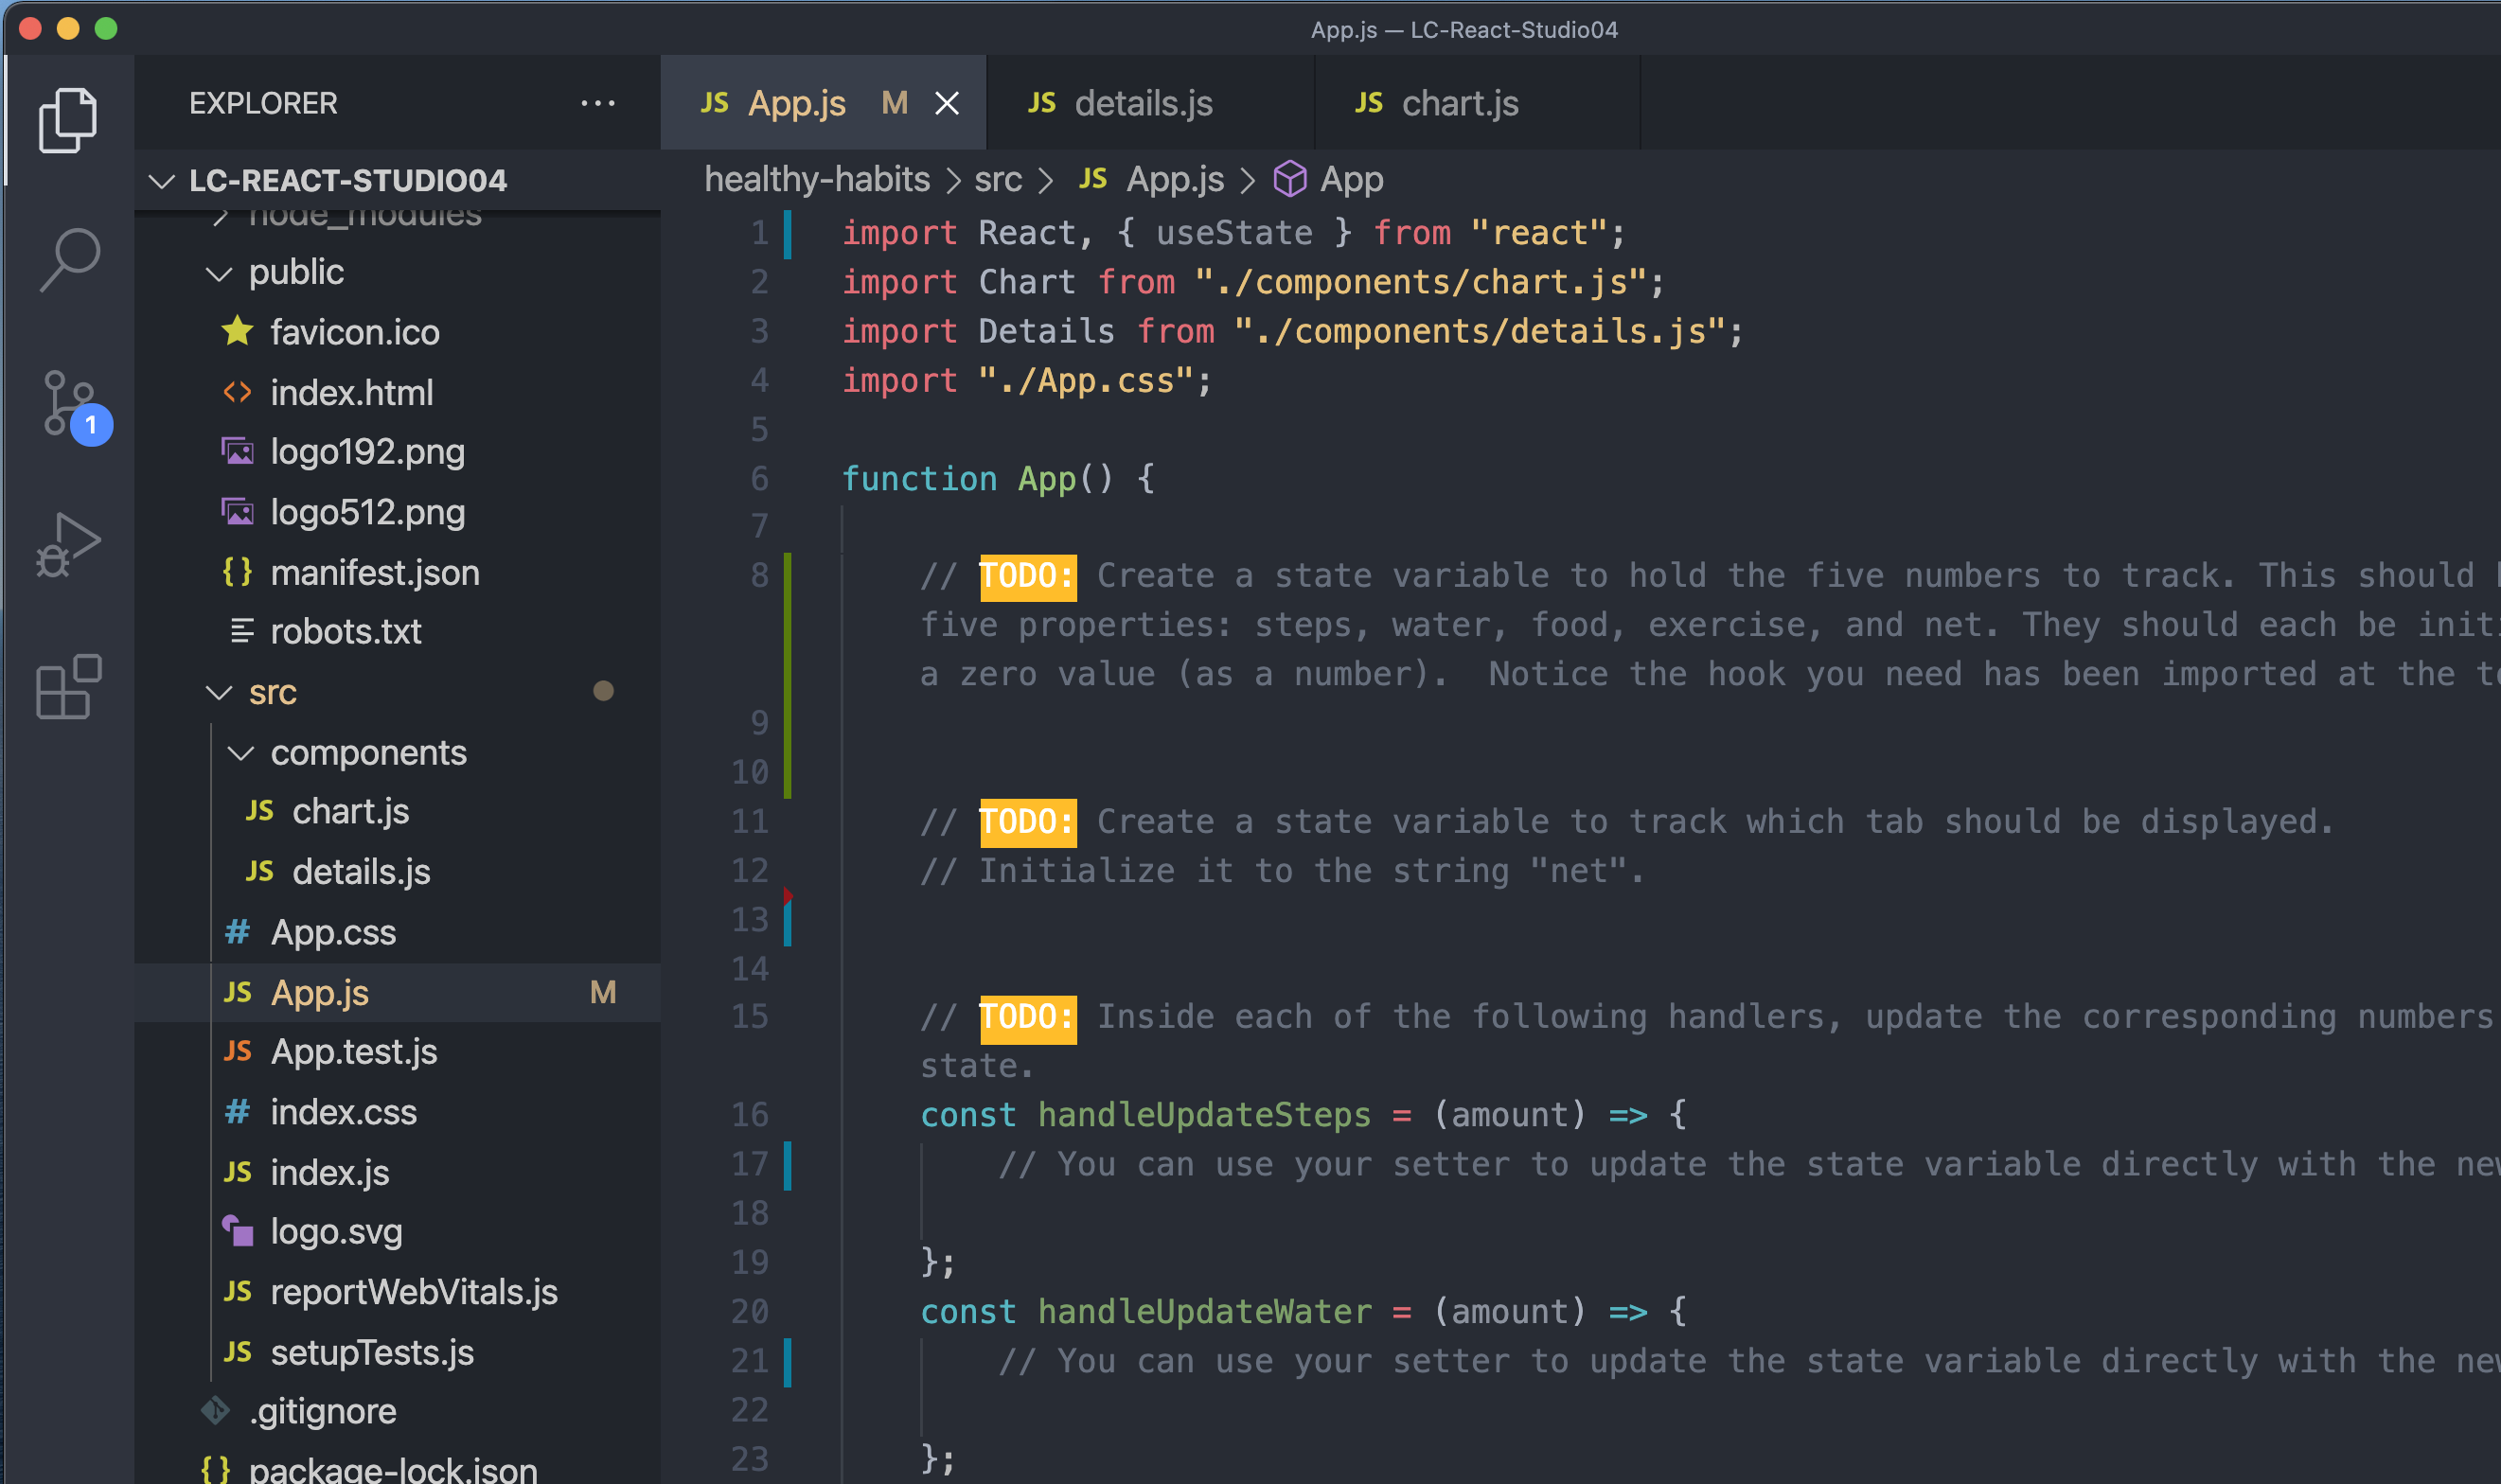
- In the
Appcomponent, look at the firstTODO. Using destructuring, create a state variable to hold the five numbers to track. This should be an object with five properties:steps,water,food,exercise, andnet. They should each be initialized with with a zero value (as a number). Notice that the hook you need is already imported at the top. - Find where the
<Chart />component is included in the JSX in the return statement below. Add an attribute callednumbersand set it equal to your state variable so that the object will be passed into the child component as a prop.
- Go to the
Chartcomponent. Get familiar with the JSX structure for the display of the chart and take note of the five hard-coded numbers. - Scroll down to the bottom and notice the propTypes object. This is how type validation is done, and it's a great way to see the list of all props that are used throughout the rest of the code in the component. In this case, there is only one prop - the
numbersobject with five properties that is passed down from theAppcomponent. - Replace each of the five hardcoded numbers in the JSX with the corresponding value from
props.numbers. - Save all changes, then go to the browser (refresh if necessary) and notice that the numbers are now all zero, which is expected since those are the initial values in your state variable in the
Appcomponent.
Great job! You're all done with the Chart component.
- In the
Appcomponent, look at the secondTODO. Use destructuring to create a state variable to track which tab should be displayed. Initialize it to the string "net". - Go to the very bottom and pass your new state variable into the
<Details />component using an attribute calledtype. This makes it a prop accessible in theDetailscomponent. - Save all changes, then go to the browser (refresh if necessary) and you should see the default details panel below the tabs.
If you tried to click on the tabs and nothing happened, that's because the event handler isn't finished yet. Let's change that!
- In the
Appcomponent, look at each tab<div>in the JSX. There is already anonClickattribute for each one to pass its corresponding type into a function calledhandleCurrTypeChange. - Just above the JSX in the
Appcomponent, find thehandleCurrTypeChangefunction. - Use your state variable's setter to update it with the
typethat has been passed into the function. - Save your changes, then go to the browser (refresh if necessary) and click on each of the tabs. You should see the panels change as expected.
You may have already tried to use one of the forms on the details panels. The page broke, didn't it? Let's fix it.
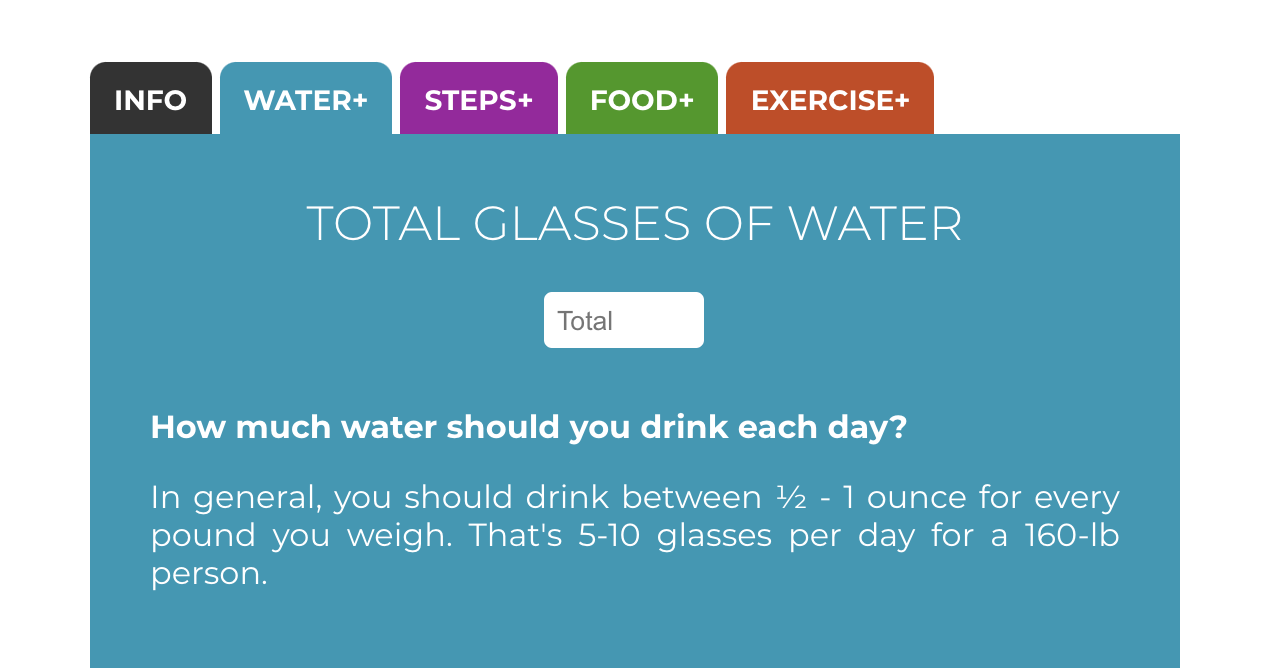
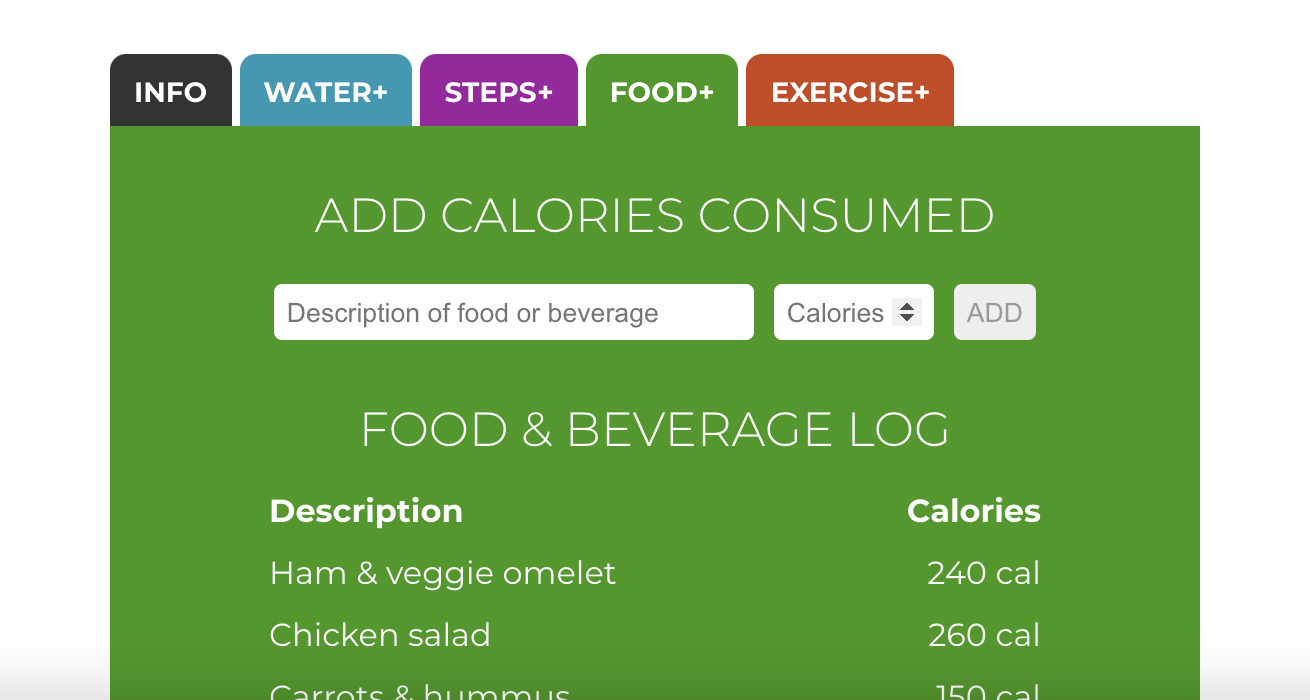
- Go to the UI in the browser. If you switch between all the tabs, you can see there are a total of six input fields: water, steps, food description, food calories, exercise description, and exercise calories.
- Go to the
Detailscomponent and look at the firstTODO. Create 6 state variables to hold the values of the form input fields, and initialize each as an empty string. Don't forget to import the hook you need (the same way it's done in theAppcomponent). - Look at each of the
<input />elements in the JSX below. Let's implement one half of the two-way binding by adding avalueattribute to each one and setting it equal to its corresponding state variable above.
B. Let's review what needs to happen now in order to get the numbers from the forms in Details up to App so they can then be displayed in Chart.
There are multiple aspects to this and we'll take them one by one.
- First we will add events to the
<input />and<button>elements. - Then we will complete the handlers in the
Detailscomponent that will update state and also pass the new input value up to the parent component,App, via props. - Next we will go to the
Appcomponent and complete the update handler functions. - Then, to tie it all together, we will pass these update handlers down to the
Detailscomponent so they can pull in the values that are submitted through the forms.
- Go to the
Appcomponent and look at the four empty handler functions. Notice how each one has a parameter calledamount. These will be used to update the numbers in state above, which will in turn be passed down to theChartcomponent. But first we have to receive those amounts from theDetailscomponent, right? You'll do that in a little bit using props. - Go back to the
Detailscomponent. Revisit your<input />elements. In order to complete the two-way binding, you need to addonChangeevents. Set each one equal to the name of the change handlers above. Remember that these are just references to the functions, so you don't use parentheses after the name. - Look at the
<button>components for the food and exercise details. You need to addonClickevents here and set them equal to their respective click handlers above.
If you look at the change and click handlers just below your state variables, you'll notice they each automatically receive an event object, which we are calling e. In the DOM you can get the value by accessing event.target.value, and these have already been stored in a local variable for you (and converted to number types).
You'll see there are a few TODOs that need to be completed. Let's start with the handler for steps since it's pretty simple.
- Use the setter to update your state variable with the new amount coming from the
onChangeevent. This will ensure that next time your user returns to the steps form it will already have the most current value displayed in the input field. - Now call
props.updateSteps(see the list in the propTypes object at the very bottom?) and pass in theamount. This is how we'll get it up to the parent component. - Go over to
Appand look at where the<Details />component is placed in the JSX. You need to add an attribute matching the prop name you were just referencing inDetails. Set it equal to the update handler function for steps toward the top ofApp. Now go up to that function and use your setter fornumbersto save the newamountin state. - That's it! Save your changes and go test it out in the browser. You should see your steps updating in the chart as you enter them into the form below.
- Repeat this same sequence for the water value.
Because there are two input fields for each of these categories, we need to make use of an object instead of just a single string. Let's start with the handler for food.
- Use setters to update your food description and calories state variables with the new data coming from the
onChangeevents. This will ensure that next time your user returns to the food form it will already have the most current values displayed in the input fields. - In the third function,
handleSubmitFood, add two more properties just after theidproperty and call themdescandcal. Set them equal to the values currently stored in state above. - Skip the
TODOabout the list for now. - Now call
props.updateFoodand pass in just the calories. - Use your setters to reset the values of the inputs for description and calories back to empty strings.
- Go over to
Appand look at where the<Details />component is placed in the JSX. You need to add an attribute matching the prop name you were just referencing inDetails. Set it equal to the update handler function for steps toward the top ofApp. - Now go up to that function and use your setter for
numbersto update both the food and net cal values in state. Make sure to useprevStateto ensure you're adding new values to existing values. - That's it! Save your changes and go test it out in the browser. You should see both your food and net calories update in the chart after you enter and submit them.
- Repeat this same sequence for the exercise values.
- At the top of the
Detailscomponent, look at the secondTODO. Create two state variables to hold the lists of food and exercise objects (each object havingid,desc, andcalproperties). Initialize them as empty arrays.
- In the
handleSubmitFoodandhandleSubmitExercisefunctions, go back and look at thoseTODOs you skipped earlier. For each one, useprevStateto to add the new entry object you just created in the previous step to the corresponding list state variable. Hint: with the spread operator and some brackets, you can set a new array with all previous values and the new value together
- Go to the middle of the file, just between the handlers and the JSX. You'll see a helper component called
DetailsTable. This accepts a single parameter,params, which functions the same way thatpropsdoes for the main component. We just can't use that variable twice sinceDetailsTableis nested insideDetails. This will accept a list (either food entries or exercise entries) and generate the JSX needed to display each table. - Now go to the very last
TODOin each of the food and exercise sections in the JSX. Add an instance of the<DetailsTable />component to each section, then create an attribute calledlistand set it equal to the list state variable you created for that section. If you go back to theDetailsTablefunction you see thatlistis accessed throughparamsasparams.list, just as other attributes are accessed throughpropson primary components. - Save your work and head over to the browser (refresh if necessary). Add some food and exercise entries, and watch the information being added to the tables on each tab!
In the Details component, both the food and exercise tabs have submission buttons.
- Remember that the
disabledattribute exists in the browser for<button>elements. - Come up with a way to disable each button if one or both input fields are empty.
Hint: JavaScript has an abbreviated way to say "if this is true, do this" when a ternary can't be used because there is no "else" value. In React, if you use it inside JSX, you use the same curly braces you do for other bits of JS:
{ booleanValue && doAThing }The
booleanValuecan be a single boolean variable or an expression as long as it evaluates totrueorfalse. The second part,doAThing, can be a variable, function, or other command depending on the context. But essentially it just means that the second thing won't be taken into consideration unless the first thing evaluates to true.
They should display only after the first entry has been submitted through the form. What value can you base your boolean expression on?
Hint: This can be accomplished the same way as the previous bonus mission, but instead of
doAThingyou would just put the HTML element or React component element!