installer is a tool to help users to work with multiple Git repositories from the initial clone to getting updates.
Where does it fit?
I worked in a Java development team, we had about 15 repositories. I needed a simple tool which is
- Self-contained and updateable
- Configuration based
- Supports development
streams(for example parallel tooling for java17, java21 etc.) - Git only (minimal platform specific code)
and nothing more.
💡 I use the word project interchangeably with repository
- installer - a configuration based repository installer
For easier understanding of the initial steps, the following diagram provides an overview
To get started, you will need the following
- Configuration file aka
projects.json(see Configuration file)
And these environment variables pointing to your configuration
INSTALLER_CONFIG_URL- URL of the configurationprojects.jsonINSTALLER_CONFIG_SCM- type of SCM (GitHub etc.) used for the configuration
If you are using GitHub, only INSTALLER_CONFIG_URL is needed.
📝 For the best user experience, I recommend forking installer and set defaults according to your environment
installer needs to know how to get the configuration file form the SCM without actually cloning it. This means assembling a URL used by curl to get the configuration. The following SCM types are supported:
- github - GitHub [default]
- bitbucket_server - Bitbucket Enterprise (server/data center)
- plain - Plain HTTP
💡 This is only used for configuration file discovery, you can use any Git platform later for your projects. Authentication for Git commands are based on your Git configuration.
To get the configuration file the following URL format is used:
https://#token#@raw.githubusercontent.com/<user or organization>/<repo name>/#branch#/<path to file>/<file name>
The following variables are used in the URL:
#token#is replaced withINSTALLER_CONFIG_TOKENenv. variable which holds your Personal access token or PAT#branch#is replaced with the current branch (this done automatically)
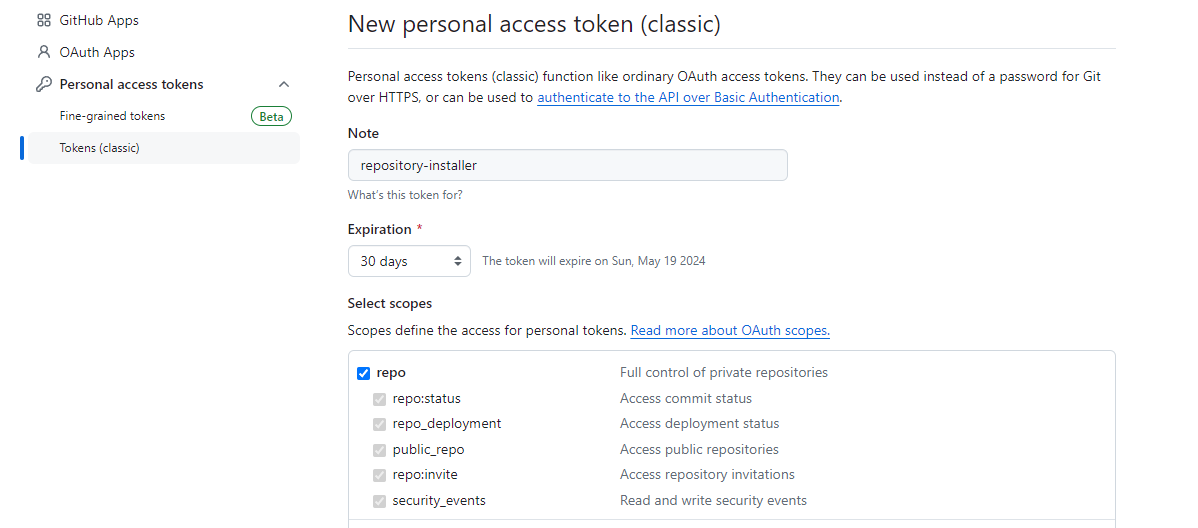
To create token or PAT follow the official guide Creating a personal access token (classic)
Make sure you set repo scope (and nothing more) when creating the PAT.
💡 Token is needed for private repositories only
For example, using your private repositories would need the following settings:
export INSTALLER_CONFIG_URL=https://#token#@raw.githubusercontent.com/user/repo/#branch#/projects.json
export INSTALLER_CONFIG_TOKEN=1bacnotmyrealtoken123beefbeaSince Bitbucket uses the URL's query string to specify the branch, there is no need to use special URL variables. The format is the following:
https://<server url>/projects/<project name>/repos/<repo name>/raw/<path to file>/<file name>?<branch>
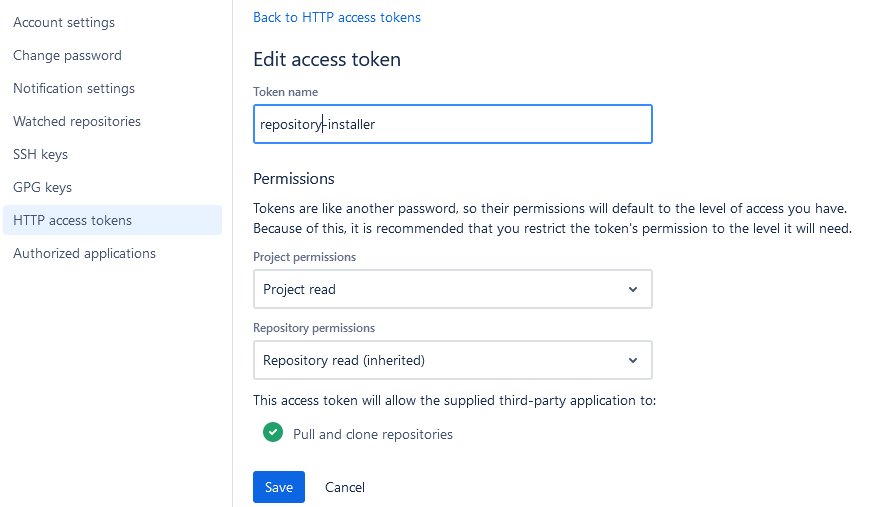
To create token or HTTP access token follow the official guide HTTP access tokens
Make sure you set Project read and Repository read permissions (and nothing more) when creating the token.
Token is inserted in the header using curl
-H Authorization: Bearer ${token}
💡 Token is needed for private repositories only
For example, using your private repositories would need the following settings:
export INSTALLER_CONFIG_URL=https://contoso/projects/project/repos/repo/raw/projects.json
export INSTALLER_CONFIG_SCM=bitbucket_server
export INSTALLER_CONFIG_TOKEN=1bacnotmyrealtoken123beefbeaThis type is mainly used for testing and it's very similar to GitHub's format, only that token or any other authentication is not supported.
To get the configuration file the following URL format is used:
https://<server url>/<server path>/#branch#/<path to file>/<file name>
The following variables are used in the URL:
#branch#is replaced with the current/working branch (this done by the script)
For example, using your localhost server for configuration:
export INSTALLER_CONFIG_URL=https://localhost:8080/folder/#branch#/projects.json
Branches are simply folders like main, master etc.
📝 You can set these variables in ~/.profile or ~/.bashrc to make them permanent
Next get the installer with curl for the first time:
curl -L https://raw.githubusercontent.com/bvarnai/respository-installer/main/src/installer.sh -o installer.sh && chmod +x installer.shFinally run installer in the current working directory:
./installer.sh🎉 Once downloaded installer will upgrade itself, no need to run curl again.
Following tools are required and must be installed:
gitcurljqsedunameawkgrepbash>= 4.0.0
Workspace is the directory where your repositories/projects are cloned. It's also the current working directory where installer runs. Projects in the configuration are specified relative to this directory.
Example layout with installer.sh present:
workspace-root
  project1
  project2
  subfolder/project3
  installer.sh
projects.jsonThe configuration file is called projects.json and it's downloaded using the INSTALLER_CONFIG_URL environment variable. It contains information about all your Git projects, including setup instructions.
{
  "bootstrap": "myproject",
  "projects": [
    {
      "name": "myproject",
      "category": "development",
      "default": "true",
      "urls": {
        "fetch": "https://github.com/octocat/Hello-World.git",
        "push": "git@github.com:octocat/Hello-World.git"
      },
      "options": {
        "clone": "--depth 1"
      },
      "configuration": [
        "core.autocrlf false",
        "core.safecrlf false"
      ],
      "branch": "master",
      "update": "true",
      "doLast": [
        "./do_something.sh"
      ]
    }
  ]
}| Elements | Description | ||
|---|---|---|---|
| bootstrap | Bootstrap project is always added implicitly. Referenced by name in projects |
||
| projects | Array of projects | ||
| name | Project name | ||
| path | Project path. Relative to workspace root. If not specified name will be used as path [optional] |
||
| category | Project category. Informal tagging of projects. Displayed during project listing [optional] | ||
| default | Whether to install the project if no project set is specified | ||
| urls | Git repository URLs | ||
| fetch | URL used for fetch |
||
| push | URL used for push. If not specified fetch URL will be used [optional] |
||
| options | Git command options | ||
| clone | Options for clone command. For example --depth 1" would result in a shallow clone [optional] |
||
| configuration | Array of Git configuration config options, repository scope. Add --global for global scope [optional] |
||
| branch | Default branch | ||
| update | Whether to force the repository update and reset to latest on the default branch | ||
| doLast | Array of shell commands to execute after repository update [optional] |
📝 Additional notes
- A bootstrap project is simply a project that is always installed
⚠️ A bootstrap project must be set to defaultdefault==trueas well- Different
fetchandpushURLs can be used to reduce load in Git hosting server, for example usehttpsforfetchandsshforpush - Setting
update==falsemeans repositories are fetched but not updated. This is desirable for development projects, so working branches are felt unchanged ⚠️ Settingupdate==truemeans repositories are fetched, reset and updated. This also means the branch will be switched to the default branch
💡 You can use a bootstrap project to host your DevOps scripts etc. for example doLast scripts
Command syntax is the following:
./installer.sh [options] [<command>] [arguments]Optional elements are shown in brackets []. For example, command may take a list of projects as an argument.
-y, --yes- skip user prompts--link- use symlinks to target directory--branch- overridesbranchsetting in configuration--stream- specifies thestreamof the configuration--fetch-all- fetches all remotes, branches--prune- prune during fetch--git-quiet- pass quite to git commands (not everything is suppressed)--skip-dolast- do not run doLast commends (useful in CI environments where some setup is not wanted)
--skip-self-update- skip the script update step--use-local-config- use a local configuration file
In some cases, you don't want to have a fresh clone of a project to save some time. For example Jenkins multibranch pipeline would create a new workspace and make a fresh clone using installer. This is where link mode can help.
Let see an example Jenkinsfile
pipeline {

    environment {

        // installer configuration
        INSTALLER_SELF_URL = 'https://raw.githubusercontent.com/bvarnai/respository-installer/#branch#/src/installer.sh'
        INSTALLER_CONFIG_URL = 'https://raw.githubusercontent.com/bvarnai/respository-installer/#branch#/src/projects.json'

        // use a directory outside of job's workspace
        SHARED_WORKSPACE = "${WORKSPACE}/../shared_workspace"
    }

    stages {
        stage('Prepare workspace') {
            steps {
                // install dependencies
                sh '''
                mkdir -p ${SHARED_WORKSPACE}

                curl -s -o installer.sh -L ${INSTALLER_SELF_URL} && chmod +x installer.sh
                ./installer.sh --yes --link ${SHARED_WORKSPACE} myproject1 myproject2
                '''
            }
        }
        stage ('Next') {
            steps {
              ...
            }
        }
    }
}
This will create symlinks myproject1 and myproject2 in the job's workspace, pointing to ../shared_workspace/myproject1 and ../shared_workspace/myproject2 directories respectively.
EXECUTOR_NUMBER variable
SHARED_WORKSPACE = "${WORKSPACE}/../shared_workspace/${EXECUTOR_NUMBER}"For example the team is working on a "theoretical" Java update, migrating from Java 8 to Java 17. In the development project repository, they created a branch java17 and started to work. However main development continues on Java 8 until everything is ready. java17 branch needs the Java 17 JDK, tools etc. This means there are two parallel streams of development. There will be two projects.json files on the corresponding branches with default branches set to main or java17.
If a developer works on java17 branch, simply switches tooling to that stream
./installer.sh --stream java17 updateOther developer who remains on main just continues as
./installer.sh --stream main updateIn some cases you want/need to manage your dependencies independently from the environment. For example Git for Windows does not include jq by default.
You can add custom code to installer to bootstrap jq and download it on the fly.
function user_get_dependencies()
{
  # put your code here
  :
}
This function could override the following globals with the location of these executables:
INSTALLER_JQINSTALLER_CURL
An example implementation for jq for Linux/Git Bash
function user_get_dependencies()
{
  if jq --version > /dev/null 2>&1; then
    # jq is available in PATH
    INSTALLER_JQ='jq'
  elif .installer/jq --version > /dev/null 2>&1; then
    # jq is available in local temp
    INSTALLER_JQ='.installer/jq'
  else
    # jq will be downloaded
    local JQSourceURL
    if [[ "${system}" == "Linux" ]]; then
      JQSourceURL='https://github.com/jqlang/jq/releases/download/jq-1.7.1/jq-linux-amd64'
    elif [[ "${system}" =~ ^(MINGW64_NT|MSYS_NT) ]]; then
      JQSourceURL='https://github.com/jqlang/jq/releases/download/jq-1.7.1/jq-windows-amd64.exe'
    else
      err "Unsupported system ${system}"
      exit 1
    fi
    INSTALLER_JQ='.installer/jq'
  fi

  if [[ -n ${JQSourceURL} ]]; then
    log "Getting jq..."
    local httpCode
    httpCode=$(curl_get "${JQSourceURL}" '' "${INSTALLER_JQ}")
    if [[ ${httpCode} -ne 200 ]] ; then
      err "Failed to download jq binary"
      exit 1
    fi

    # set executable permission
    chmod +x "${INSTALLER_JQ}" > /dev/null 2>&1;
  fi
}
📝 I recommend to use .installer directory as a "temp" directory used to store dependencies
Creating symbolic links might be platform specific. It's definitely the case for Windows clients.
There are user functions user_link and user_unlink to handle symbolic links.
The default implementation is tested on the following platforms:
- Linux amd64 - Ubuntu
- Windows amd64 - Git for Windows 64 bit
- 2.41.0+
The following commands are available. For options see Options
./installer.sh helpDisplays the help.
./installer.sh listLists available projects.
./installer.sh install [project...]Installs a project(s). This is the default command, if nothing else is specified.
Arguments:
project- the list of projects to install separated by a whitespace
📝 If you run install without any arguments, all projects marked default==true will be installed
./installer.sh updateUpdates existing projects in the current directory.
To be added. If you have any questions, just create an issue and I will respond.
- I used Google's Shell Style Guide with the help of ShellCheck
- Tests written in Bats-core: Bash Automated Testing System


