SEGS is the Super Entity Game Server. It is a free, open source (under the terms of the BSD License), cross-platform, and object-oriented suite of protocols and services designed to interface with popular super hero themed MMORPG clients. SEGS is written in C++ and facilitates common MMORPG functionality such as account and character storage to a database, account and character retrieval from a database, secure client authentication, client movement in a virtual world, and client chat.
For legal information, please see LICENSE.
For a list of SEGS authors and contributors, please see Authors.txt.
- Our wiki
- The Issue Queue
- Our target coding style
- Join us on Chat!
Basic instructions for compiling SEGS in Linux and Windows are below, however for more detailed visual instructions, visit https://segs.nemerle.eu/developers
- Requirements and Notes
- Install C++ Tool Chain
- Compile SEGS
- Setting up SEGS Server and Playing
- Contribute to Development
- More Information
- FAQs
Below are the utilities and libraries you'll need to compile SEGS in any environment. While it may be possible to use another toolset, the C++ Tool Chain below is the only one officially supported by the SEGS team. These packages are available for both Linux or Windows, via your distro's package manager, or via the links below:
- QT >5.8 - A cross platform application framework utilized heavily by SEGS. https://www.qt.io/download-qt-for-application-development
- CMake >3.6 - CMake is the cross-platform make utility. It generates makefiles for multiple platforms. https://cmake.org/download/
- Git - A version control system for tracking changes in computer files and coordinating work on those files among multiple people. https://git-scm.com/download
- OPTIONAL: PostGreSQL - By default SEGS uses a local SQLite database, but optionally may be configured to use PostGreSQL instead. http://www.postgresql.org/download/
For more detailed version of this guide or forums for help see the links below:
- https://segs.nemerle.eu/
- https://segs.nemerle.eu/developers
- https://segs.nemerle.eu/forumz/index.php
To report any bugs, please visit our github:
Note that all directories mentioned in this document are always relative to the directory of your SEGS installation, and commands are meant to be run from this directory (except for the initial commands that create that directory).
1. Installing in Linux
Install all dependencies and tools by opening a terminal and typing:
Ubuntu
sudo apt-get install build-essential git qt5 qt5-devel
Fedora 26+
sudo dnf install cmake gcc gcc-c++ git-core kernel-devel qt5 qt5-devel
CentOS/RHEL 6/7
yum install git centos-release-scl-rh
yum install devtoolset-6-gcc-c++
source /opt/rh/devtoolset-6/enable
Your distro may come with some or all of these packages pre-installed, and while most versions of these libraries will work, you must have version 5.8+ of Qt installed. CentOS and RHEL are two such distributions that require downloading a more recent version of CMake and Qt and potentially having to build from source.
2. Installing in Windows
Download dependencies and tools by clicking on the links listed in the Requirements section above. Make sure you download the correct version for your installation of Windows. Once downloaded, navigate to your downloads folder and run each installer.
NOTE: for QT, please install mingw 32bit version
3. Installing in FreeBSD 11.x
portsnap fetch update
pkg update
pkg install cmake git
cd /usr/ports/devel/qt5-core && make install clean BATCH=yes && cd ../../databases/qt5-sql && make install clean BATCH=yes && cd ../qt5-sqldrivers-sqlite3 && make install clean BATCH=yes && cd ../../x11-toolkits/qt5-gui && make install clean BATCH=yes && cd ../qt5-widgets && make install clean BATCH=yes && cd ../../graphics/qt5-opengl && make install clean BATCH=yes
FreeBSD should have clang/llvm already installed.
1. Start QTCreator and Clone Git Repository
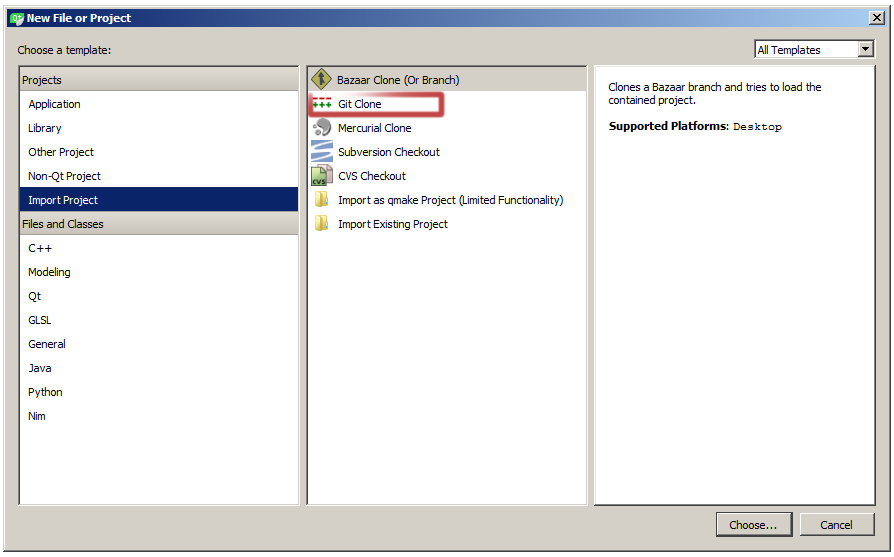
Start QTCreator and select New Project. The New Project dialog box will appear. From the list on the left, select Import Project, and from the middle column Git Clone, then press the Choose... button at the bottom right of the dialog window.
The dialog box will change to show the Git Clone dialog, which contains configuration options for importing a project from Git.
Git is the version control system used by the SEGS Project. SEGS uses the popular Github website to store it's git repository. More information on GitHub and working with git can be found here: https://guides.github.com/
In the new Git Clone dialog box enter in the GitHub repository for SEGS https://github.com/Segs/Segs.git, and select the local folder where you'd like to store your copy of the SEGS repository.
Select Next to clone a copy of the SEGS repo, and when completed select Finish to complete this step.
2. Configure Project
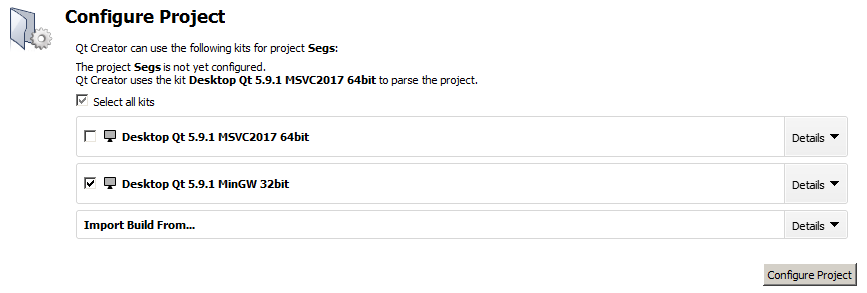
Next, QTCreator will ask you to configuration your project. This is where you'll select which development kit to use and define the paths for temporary build files.
QTCreator uses kits to group various settings for building and running projects.
Begin by selecting MinGW 32bit.
You may select the Details button next to MinGW if you'd like to customize the paths where QTCreator will store temporary build files.
Finally, click Configure Project.
You may change your configuration, or select additional build options by selecting
Projectsidentified by the wrench icon located at the far left of QTCreator. From here you can modify settings to build the COX Map Viewer and enable the scripting engine.
3. Build All
If everything went well, you'll see the SEGS file tree in the Projects Pane of QTCreator.
Now, select Build > Build All from the menu at the top of QTCreator. The bottom half of the window will show compiling output as SEGS builds. The first time you build SEGS it may take several minutes and the output window may show hundreds of warnings, but if compiled successfully, you'll see the following in the Compile Output window.
[100%] Built target authserver
00:00:00: The process 'cmake' exited normally.
Doing it the CLI Way
If you're on a headless Linux or FreeBSD server, run the following commands:
git clone https://github.com/Segs/Segs.git
mkdir Segs/bld
cd Segs/bld
cmake ..
make
After compiling, you'll need to setup your SEGS Server and Databases. You'll also need to download a specific version of the client compatible with SEGS.
IMPORTANT: You can find information on setting up and running your SEGS server by reading the README.md located in your output directory (typically out). You can also read a copy of that README.md here
- Don't forget! You'll need a copy of the required CoH client from Issue 0 (release) version 0.22, which can be found through various sources online, or via magnet link:
magnet:?xt=urn:btih:c2e7e0aa72004594337d73ae6a305242e23d815f
SEGS needs your help! From editing README's like this one, to coding the MapServer, there are tasks that can be tackled by contributors of all skill level!
Please read CONTRIBUTING.md and see the links below to begin:
- Our GitHub: https://github.com/Segs/Segs
- The Issue Queue: https://github.com/Segs/Segs/issues
- Our target coding style)
- Join us on Chat!
Additional information will be available here, including optional steps to take after configuration and where to find additional help.
Frequently asked questions will go here.


