GPIO access and interrupt detection with io.js or Node.js on Linux boards like the BeagleBone, BeagleBone Black, Raspberry Pi, or Raspberry Pi 2.
$ npm install onoff
If you're using io.js v3 or Node.js v4 and seeing lots of compile errors when installing onoff, it's very likely that gcc/g++ 4.8 or higher are not installed. See Node.js v4 and native addons for details.
If you're using Node.js v0.10.29 on the BeagleBone Black and seeing a compile
error saying that ‘REPLACE_INVALID_UTF8’ is not a member of ‘v8::String’
see Node.js v0.10.29 and native addons on the BeagleBone Black.
The mechanisms that enable user pi on Raspbian to access GPIOs without
superuser privileges function correctly in the 2015-05-05 release of Raspbian.
However, if Raspbian is upgraded with sudo apt-get update and
sudo apt-get upgrade, these mechanisms will break. This is a known
Raspbian issue. The issue
also describes how to work around the problem.
User pi on recent versions of Raspbian can access GPIOs without superuser privileges and the techniques for avoiding superuser issues previously described in section "How to handle superuser issues" no longer need to be applied. Section "How to handle superuser issues" has since been removed from the documentation.
One of the techniques for avoiding superuser issues on older versions of Raspbian was titled "Resolving superuser issues with onoff". This technique is no longer supported with onoff v1.0.0 or higher.
For old news and updates see the News & Updates Archive
For an introduction to onoff checkout Node.js Embedded Development on the Raspberry Pi at the Adafruit Learning System.
Assume that there's an LED on GPIO #14 and a momentary push button on GPIO #4.
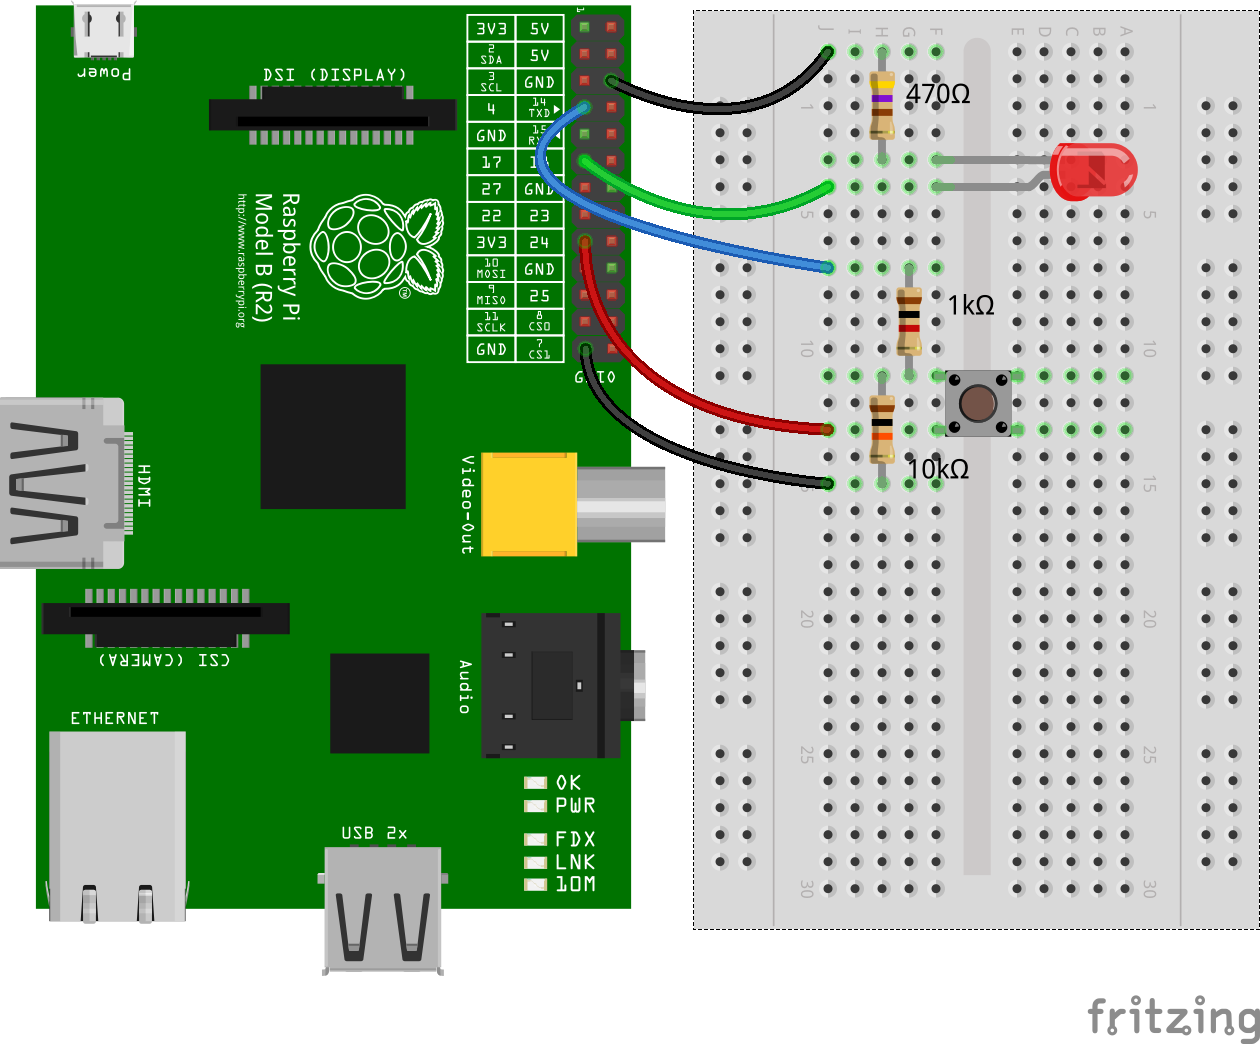
When the button is pressed the LED should turn on, when it's released the LED should turn off. This can be achieved with the following code:
var Gpio = require('onoff').Gpio,
  led = new Gpio(14, 'out'),
  button = new Gpio(4, 'in', 'both');

button.watch(function(err, value) {
  led.writeSync(value);
});
Here two Gpio objects are being created. One called led for the LED on GPIO #14 which is an output, and one called button for the momentary push button on GPIO #4 which is an input. In addition to specifying that the button is an input, the constructors optional third argument is used to specify that 'both' rising and falling interrupt edges should be configured for the button GPIO as both button presses and releases should be handled.
After everything has been setup correctly, the buttons watch method is used to specify a callback function to execute every time the button is pressed or released. The value argument passed to the callback function represents the state of the button which will be 1 for pressed and 0 for released. This value is used by the callback to turn the LED on or off using its writeSync method.
When the above program is running it can be terminated with ctrl-c. However, it doesn't free its resources. It also ignores the err argument passed to the callback. Here's a slightly modified variant of the program that handles ctrl-c gracefully and bails out on error. The resources used by the led and button Gpio objects are released by calling their unexport method.
var Gpio = require('onoff').Gpio,
  led = new Gpio(14, 'out'),
  button = new Gpio(4, 'in', 'both');

function exit() {
  led.unexport();
  button.unexport();
  process.exit();
}

button.watch(function (err, value) {
  if (err) {
    throw err;
  }

  led.writeSync(value);
});

process.on('SIGINT', exit);Internally onoff uses sysfs files located at /sys/class/gpio to access GPIOs and the epoll module to detect hardware interrupts. The Linux GPIO sysfs interface for userspace is documented here. It's a relatively simple interface which can be used to ask the Linux kernel to export control of a GPIO to userspace. After control of a GPIO has been exported to userspace, the GPIO can be configured as an input or output. Thereafter, the state of an input can be read, and the state of an output can be written. Some systems will also allow the state of a output to be read. The GPIO sysfs interface can also be used for interrupt detection. onoff can detect several thousand interrupts per second on both the BeagleBone and the Raspberry Pi.
- Gpio(gpio, direction[, edge]) - Constructor
- read([callback]) - Read GPIO value asynchronously
- readSync() - Read GPIO value synchronously
- write(value[, callback]) - Write GPIO value asynchronously
- writeSync(value) - Write GPIO value synchronously
- watch(callback) - Watch for hardware interrupts on the GPIO
- unwatch([callback]) - Stop watching for hardware interrupts on the GPIO
- unwatchAll() - Remove all watchers for the GPIO
- direction() - Get GPIO direction
- setDirection(direction) - Set GPIO direction
- edge() - Get GPIO interrupt generating edge
- setEdge(edge) - Set GPIO interrupt generating edge
- unexport() - Reverse the effect of exporting the GPIO to userspace
Returns a new Gpio object that can be used to access a GPIO.
- gpio - An unsigned integer specifying the GPIO number.
- direction - A string specifying whether the GPIO should be configured as an input or output. The valid values are: 'in', 'out', 'high', and 'low'. 'high' and 'low' are variants of 'out' that configure the GPIO as an output with an initial level of high or low respectively.
- [edge] - An optional string specifying the interrupt generating edge or edges for the GPIO. The valid values are: 'none', 'rising', 'falling' or 'both'. The default value is 'none' indicating that the GPIO does not generate interrupts. On Linux kernels prior to 3.13 it was possible for both inputs and outputs to generate interrupts. The 3.13 kernel dropped support for interrupt generating outputs, irrespective of whether the underlying hardware supports them or not.
GPIOs on Linux are identified by unsigned integers. These are the numbers that should be passed to the onoff Gpio constructor function when exporting GPIOs to userspace. For example, pin 8 on the Raspberry Pi P1 expansion header corresponds to GPIO #14 in Raspbian Linux. 14 is therefore the number to pass to the onoff Gpio constructor when using pin 8 on the P1 expansion header.
Read GPIO value asynchronously.
- [callback] - An optional completion callback that gets two arguments (err, value), where err is reserved for an error object and value is the number 0 or 1 and represents the state of the GPIO.
Read GPIO value synchronously. Returns the number 0 or 1 to represent the state of the GPIO.
Write GPIO value asynchronously.
- value - The number 0 or 1.
- [callback] - An optional completion callback that gets one argument (err), where err is reserved for an error object.
Write GPIO value synchronously.
- value - The number 0 or 1.
Watch for hardware interrupts on the GPIO. The edge argument that was passed to the constructor determines which hardware interrupts to watch for.
- callback - A callback that gets two arguments (err, value), where err is reserved for an error object and value is the number 0 or 1 and represents the state of the GPIO.
Stop watching for hardware interrupts on the GPIO. If callback is specified, only that particular callback is removed. Otherwise all callbacks are removed.
- [callback] - The callback to remove.
Remove all hardware interrupt watchers for the GPIO.
Returns the string 'in' or 'out' indicating whether the GPIO is an input or output.
Set GPIO direction.
- direction - A string specifying whether the GPIO should be configured as an input or output. The valid values are 'in' and 'out'.
Returns the string 'none', 'falling', 'rising', or 'both' indicating the interrupt generating edge or edges for the GPIO.
Set GPIO interrupt generating edge
- edge - A string specifying the interrupt generating edge or edges for the GPIO. The valid values are: 'none', 'rising', 'falling' or 'both'. On Linux kernels prior to 3.13 it was possible for both inputs and outputs to generate interrupts. The 3.13 kernel dropped support for interrupt generating outputs, irrespective of whether the underlying hardware supports them or not.
Reverse the effect of exporting the GPIO to userspace
Blink the LED on GPIO #14 for 5 seconds:
var Gpio = require('onoff').Gpio, // Constructor function for Gpio objects.
  led = new Gpio(14, 'out'),      // Export GPIO #14 as an output.
  iv;

// Toggle the state of the LED on GPIO #14 every 200ms.
// Here synchronous methods are used. Asynchronous methods are also available.
iv = setInterval(function () {
  led.writeSync(led.readSync() ^ 1); // 1 = on, 0 = off :)
}, 200);

// Stop blinking the LED and turn it off after 5 seconds.
setTimeout(function () {
  clearInterval(iv); // Stop blinking
  led.writeSync(0);  // Turn LED off.
  led.unexport();    // Unexport GPIO and free resources
}, 5000);Blink the LED on GPIO #14 for 5 seconds:
var Gpio = require('onoff').Gpio, // Constructor function for Gpio objects.
  led = new Gpio(14, 'out');      // Export GPIO #14 as an output.

// Toggle the state of the LED on GPIO #14 every 200ms 'count' times.
// Here asynchronous methods are used. Synchronous methods are also available.
(function blink(count) {
  if (count <= 0) {
    return led.unexport();
  }

  led.read(function (err, value) { // Asynchronous read.
    if (err) {
      throw err;
    }

    led.write(value ^ 1, function (err) { // Asynchronous write.
      if (err) {
        throw err;
      }
    });
  });

  setTimeout(function () {
    blink(count - 1);
  }, 200);
}(25));On the Raspberry Pi, most GPIOs have either their pull-up or pull-down resistor activated by default. The defaults can be seen in Table 6-31 on pages 102 and 103 of the BCM2835 ARM Peripherals documentation.
Pullup and pulldown resistors for GPIOs can be configured with device tree overlays. The Wiki page Enabling Pullup and Pulldown Resistors on The Raspberry Pi describes how this can be acheived on the Raspberry Pi.
Three of the onoff tests are used to monitor performance:
- performance-async.js - determine max. no. of write ops per seconds
- performance-sync.js - determine max. no. of writeSync ops per second
- performance-interrupt.js - determine max. no. of interrupts per second
The average of ten runs of these tests using various versions of io.js, Node.js, and onoff are shown in the following tables.
Raspberry Pi 2, 900Mhz, Raspbian:
| node | onoff | kernel | write / sec | writeSync / sec | interrupts / sec |
|---|---|---|---|---|---|
| v4.0.0 | v1.0.2 | 4.1.6-v7+ | 12536 | 138193 | 8375 |
| v2.3.0 | v1.0.2 | 3.18.11-v7+ | 8896 | 111716 | 6067 |
| v2.0.2 | v1.0.2 | 3.18.11-v7+ | 8964 | 116785 | 5958 |
| v1.2.0 | v1.0.0 | 3.18.5-v7+ | 13863 | 171501 | 9268 |
| v0.10.36 | v1.0.0 | 3.18.5-v7+ | 12010 | 98493 | 9803 |
Raspberry Pi, 700Mhz, Raspbian:
| node | onoff | kernel | write / sec | writeSync / sec | interrupts / sec |
|---|---|---|---|---|---|
| v0.11.7 | v0.2.3 | 3.6.11+ | 3355 | 49651 | 2550 |
| v0.10.8 | v0.2.3 | 3.6.11+ | 2772 | 31825 | 2297 |
BeagleBone Black, 1GHz, Ångström v2012.12:
| node | onoff | kernel | write / sec | writeSync / sec | interrupts / sec |
|---|---|---|---|---|---|
| v0.11.9 | v0.3.0 | 3.8.13 | 8663 | 110219 | 7154 |
| v0.11.8 | v0.2.3 | 3.8.13 | 8446 | 100698 | 7323 |
BeagleBone, 720MHz, Ångström v2012.12:
| node | onoff | kernel | write / sec | writeSync / sec | interrupts / sec |
|---|---|---|---|---|---|
| v0.11.7 | v0.2.3 | 3.8.13 | 6399 | 84334 | 5519 |
| v0.10.20 | v0.2.3 | 3.8.13 | 4925 | 45713 | 4561 |
Tested on the following platforms:
- Raspberry Pi 1
- Raspbian
- Raspberry Pi 2
- Raspbian
- BeagleBone
- Ångström
- Debian
- BeagleBone Black
- Ångström
- Debian
- Ubuntu
The suitability of onoff for a particular Linux board is highly dependent on how GPIO interfaces are made available on that board. The GPIO interfaces documentation describes GPIO access conventions rather than standards that must be followed so GPIO can vary from platform to platform. For example, onoff relies on sysfs files located at /sys/classes/gpio being available. However, these sysfs files for userspace GPIO are optional and may not be available on a particular platform.