Simple "local" (cloud disabled) websocket server implementation for the sparkcoe (https://www.spark.io/) ported from https://github.com/brandenhall/Arduino-Websocket.git. The server, by default handles up-to 4 simultaneous clients.
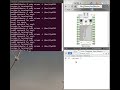
In the demo below, On the right, html5 +WebSocket that is connected to a sparkcore, on the left you see the serial output from the core. You can change the state of the digital pins by clicking on the pins, clicking on the analog pins will read the analog values.
NOTE, I have only tested this with local builds, so try it with sparkulator on your own risk :).
I did not have time to create new make files, so for now, you have to copy files (backup original the files first). Copy files from src|inc|build to core-firmware/src|inc|build. My plan is to learn how to create a proper sparkcore lib from this...
The applicaiton.cpp is a simplified version of the tinker firmware that I used for my testing and currently can handle: digitalread, digitalwrite, analogread and analogwrite. When I get a chance I will add something like Spark.publish... applicaiton.cpp requires Serial connection, the core will halt the execution in the setup (the RGB led will flash blue, green and pink) until the serial communication is established.
example syntax to how communicate withe tinker firmware
/digitalwrite?D3=HIGH /digitalread?D3
If you develop on Linux if you have nodejs installed read on. After flashing the core for the first time with the compiled files, you can use "doit" in the build folder, "doit" will put the core in the dfu mode, compile, and flash the core again.
tinker.js in the example folder can be used for demo and or testing, currently it has loop that will turn on/off the first four digital outputs on the core. Note you have to change the : in the tinker.js