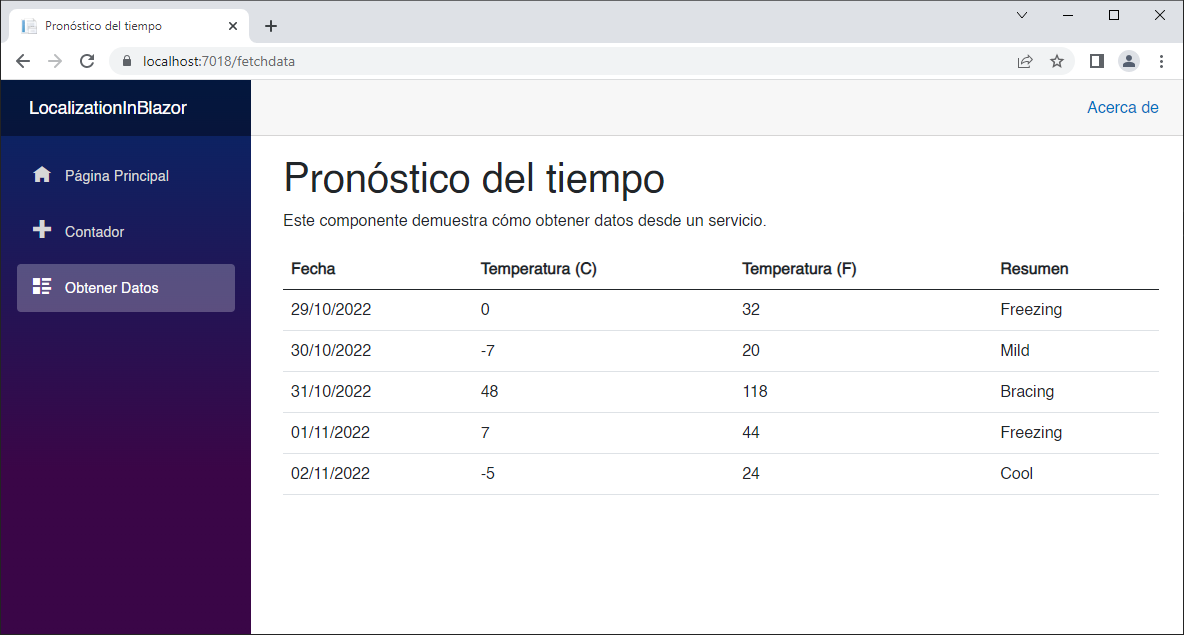
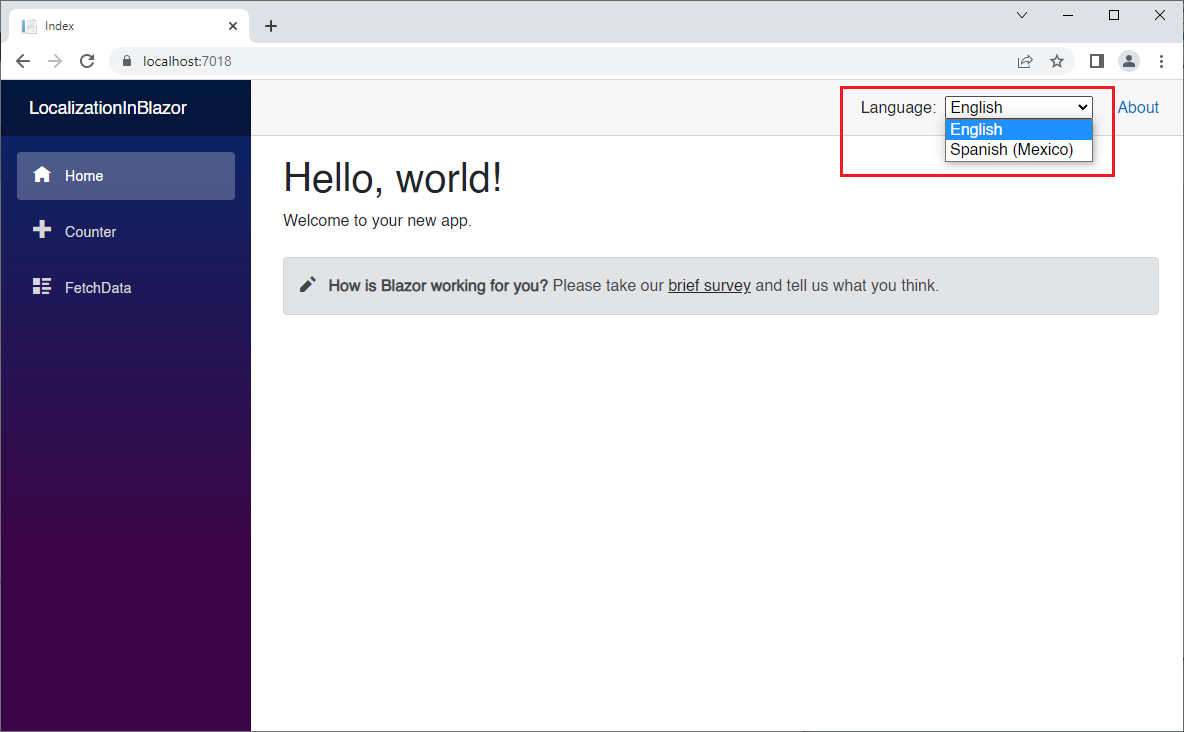
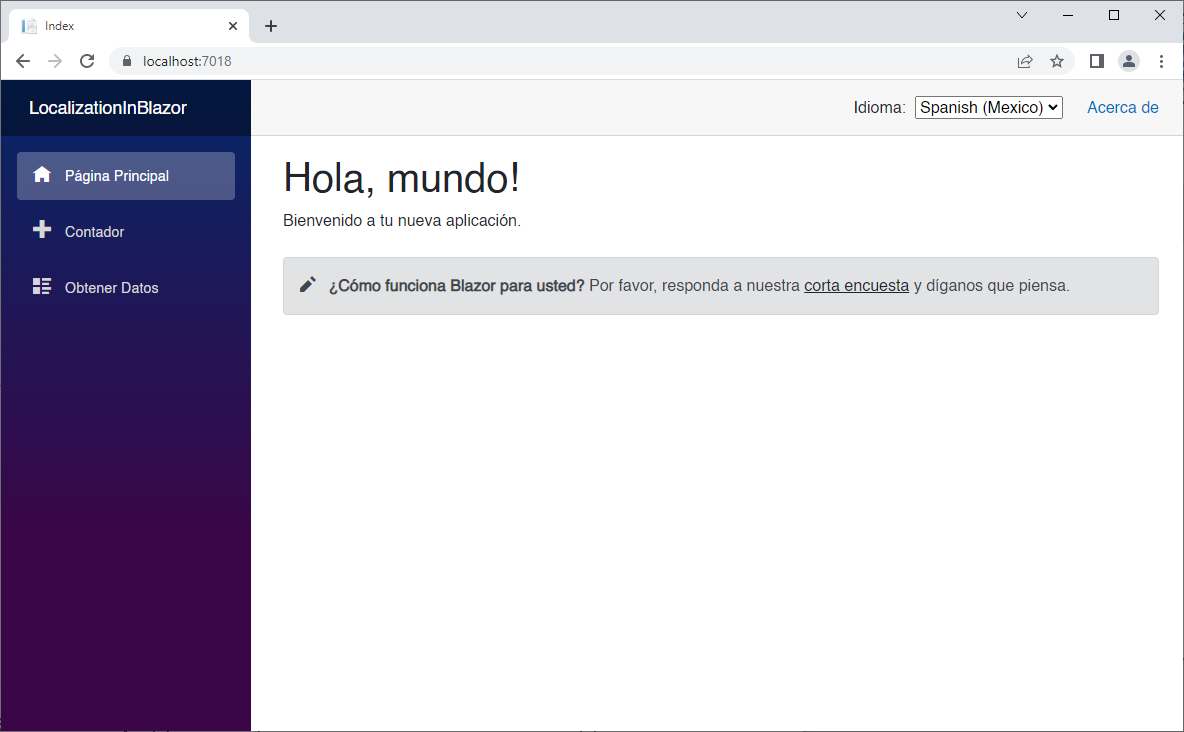
In this episode, we are going to build a Blazor WebAssembly application, and we are going to add localization support.
This demo uses .NET 6. For a .NET 8 version see https://github.com/carlfranklin/LocalizationInBlazor8
To learn how to add localization in a Blazor Server application, see my repo at https://github.com/carlfranklin/LocalizationInBlazorServer
We will make use of the Microsoft.Extensions.Localization NuGet package, to leverage localization services, such as the AddLocalization service, and the IStringLocalizer interface.
We will create an enumeration for all of our resource strings and use them in our app to avoid magic string typos.
At the end of the demo, we will have the default Blazor template application, with support for English and Spanish.
Let's get to it.
Create a new Hosted Blazor WebAssembly project called LocalizationDemo.
All of the changes we will make will be to the LocalizationDemo.Client app. No configuration changes are required on the server side.
We are going to set the application's culture, and in order to use that we need the Microsoft.Extensions.Localization NuGet package.
Add the Microsoft.Extensions.Localization by running the following command in the Package Manager Console against the LocalizationDemo.Client project.
Install-Package Microsoft.Extensions.LocalizationAlternatively, you can add this package reference in your LocalizationInBlazor.Client.csproj file:
<PackageReference Include="Microsoft.Extensions.Localization" Version="6.0.10" />We need a place to store our resource files in different languages. In our demo we will support two languages: English and Spanish.
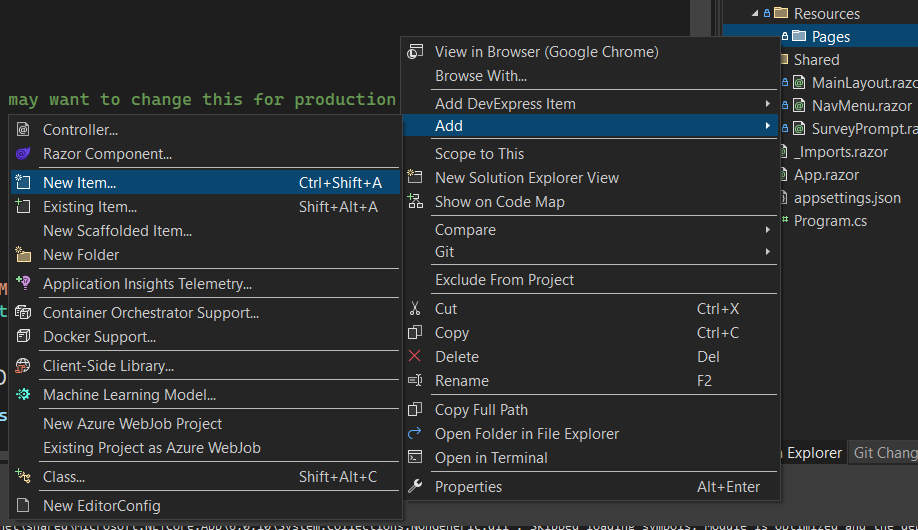
Create a Resources folder at the root level, and add a file called App.en-US.resx.
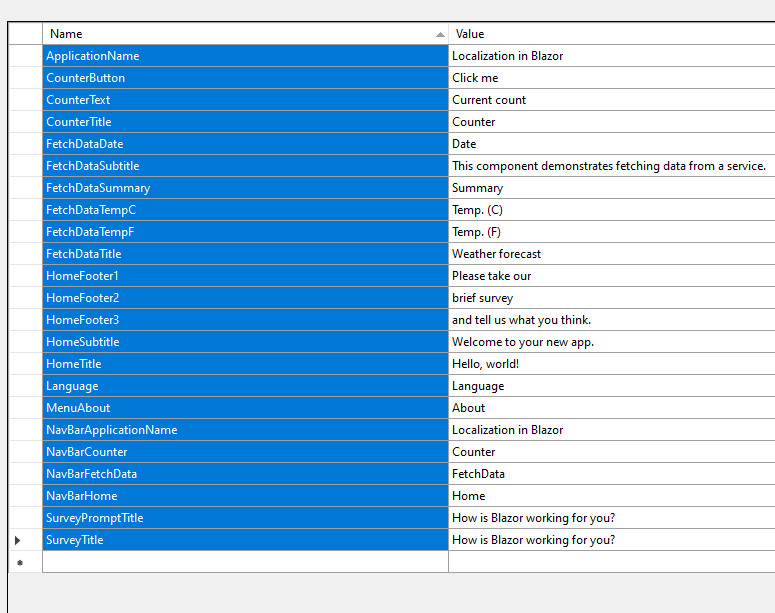
The file will be displayed in the Resource editor, with one String resource by default.
You can delete the default resource, or rename it. We are going to add all the English resource strings we need to display our application in English.
NOTE: You can add these values manually if you like, to get familiar with the UI, but I will also provide the actual XML of the resource files, so you can just copy and paste.
| Name | Value |
|---|---|
| ApplicationName | Localization in Blazor |
| CounterButton | Click me |
| CounterText | Current count |
| CounterTitle | Counter |
| FetchDataDate | Date |
| FetchDataSubtitle | This component demonstrates fetching data from a service. |
| FetchDataSummary | Summary |
| FetchDataTempC | Temp. (C) |
| FetchDataTempF | Temp. (F) |
| FetchDataTitle | Weather forecast |
| HomeFooter1 | Please take our |
| HomeFooter2 | brief survey |
| HomeFooter3 | and tell us what you think. |
| HomeSubtitle | Welcome to your new app. |
| HomeTitle | Hello, world! |
| Language | Language |
| MenuAbout | About |
| NavBarApplicationName | Localization in Blazor |
| NavBarCounter | Counter |
| NavBarFetchData | FetchData |
| NavBarHome | Home |
| SurveyPromptTitle | How is Blazor working for you? |
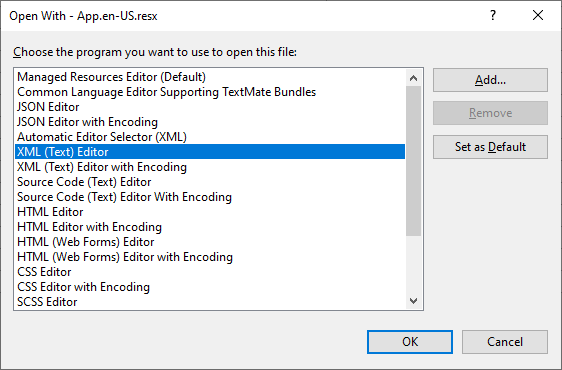
Resource files are nothing but XML files, in order to view the code, right-click on the resource file, and select Open With from the menu. Then select XML (Text) Editor, and then OK.
Replace the XML with the following:
<?xml version="1.0" encoding="utf-8"?>
<root>
  <!--
    Microsoft ResX Schema

    Version 2.0

    The primary goals of this format is to allow a simple XML format
    that is mostly human readable. The generation and parsing of the
    various data types are done through the TypeConverter classes
    associated with the data types.

    Example:

    ... ado.net/XML headers & schema ...
    <resheader name="resmimetype">text/microsoft-resx</resheader>
    <resheader name="version">2.0</resheader>
    <resheader name="reader">System.Resources.ResXResourceReader, System.Windows.Forms, ...</resheader>
    <resheader name="writer">System.Resources.ResXResourceWriter, System.Windows.Forms, ...</resheader>
    <data name="Name1"><value>this is my long string</value><comment>this is a comment</comment></data>
    <data name="Color1" type="System.Drawing.Color, System.Drawing">Blue</data>
    <data name="Bitmap1" mimetype="application/x-microsoft.net.object.binary.base64">
        <value>[base64 mime encoded serialized .NET Framework object]</value>
    </data>
    <data name="Icon1" type="System.Drawing.Icon, System.Drawing" mimetype="application/x-microsoft.net.object.bytearray.base64">
        <value>[base64 mime encoded string representing a byte array form of the .NET Framework object]</value>
        <comment>This is a comment</comment>
    </data>

    There are any number of "resheader" rows that contain simple
    name/value pairs.

    Each data row contains a name, and value. The row also contains a
    type or mimetype. Type corresponds to a .NET class that support
    text/value conversion through the TypeConverter architecture.
    Classes that don't support this are serialized and stored with the
    mimetype set.

    The mimetype is used for serialized objects, and tells the
    ResXResourceReader how to depersist the object. This is currently not
    extensible. For a given mimetype the value must be set accordingly:

    Note - application/x-microsoft.net.object.binary.base64 is the format
    that the ResXResourceWriter will generate, however the reader can
    read any of the formats listed below.

    mimetype: application/x-microsoft.net.object.binary.base64
    value   : The object must be serialized with
            : System.Runtime.Serialization.Formatters.Binary.BinaryFormatter
            : and then encoded with base64 encoding.

    mimetype: application/x-microsoft.net.object.soap.base64
    value   : The object must be serialized with
            : System.Runtime.Serialization.Formatters.Soap.SoapFormatter
            : and then encoded with base64 encoding.

    mimetype: application/x-microsoft.net.object.bytearray.base64
    value   : The object must be serialized into a byte array
            : using a System.ComponentModel.TypeConverter
            : and then encoded with base64 encoding.
    -->
  <xsd:schema id="root" xmlns="" xmlns:xsd="http://www.w3.org/2001/XMLSchema" xmlns:msdata="urn:schemas-microsoft-com:xml-msdata">
    <xsd:import namespace="http://www.w3.org/XML/1998/namespace" />
    <xsd:element name="root" msdata:IsDataSet="true">
      <xsd:complexType>
        <xsd:choice maxOccurs="unbounded">
          <xsd:element name="metadata">
            <xsd:complexType>
              <xsd:sequence>
                <xsd:element name="value" type="xsd:string" minOccurs="0" />
              </xsd:sequence>
              <xsd:attribute name="name" use="required" type="xsd:string" />
              <xsd:attribute name="type" type="xsd:string" />
              <xsd:attribute name="mimetype" type="xsd:string" />
              <xsd:attribute ref="xml:space" />
            </xsd:complexType>
          </xsd:element>
          <xsd:element name="assembly">
            <xsd:complexType>
              <xsd:attribute name="alias" type="xsd:string" />
              <xsd:attribute name="name" type="xsd:string" />
            </xsd:complexType>
          </xsd:element>
          <xsd:element name="data">
            <xsd:complexType>
              <xsd:sequence>
                <xsd:element name="value" type="xsd:string" minOccurs="0" msdata:Ordinal="1" />
                <xsd:element name="comment" type="xsd:string" minOccurs="0" msdata:Ordinal="2" />
              </xsd:sequence>
              <xsd:attribute name="name" type="xsd:string" use="required" msdata:Ordinal="1" />
              <xsd:attribute name="type" type="xsd:string" msdata:Ordinal="3" />
              <xsd:attribute name="mimetype" type="xsd:string" msdata:Ordinal="4" />
              <xsd:attribute ref="xml:space" />
            </xsd:complexType>
          </xsd:element>
          <xsd:element name="resheader">
            <xsd:complexType>
              <xsd:sequence>
                <xsd:element name="value" type="xsd:string" minOccurs="0" msdata:Ordinal="1" />
              </xsd:sequence>
              <xsd:attribute name="name" type="xsd:string" use="required" />
            </xsd:complexType>
          </xsd:element>
        </xsd:choice>
      </xsd:complexType>
    </xsd:element>
  </xsd:schema>
  <resheader name="resmimetype">
    <value>text/microsoft-resx</value>
  </resheader>
  <resheader name="version">
    <value>2.0</value>
  </resheader>
  <resheader name="reader">
    <value>System.Resources.ResXResourceReader, System.Windows.Forms, Version=4.0.0.0, Culture=neutral, PublicKeyToken=b77a5c561934e089</value>
  </resheader>
  <resheader name="writer">
    <value>System.Resources.ResXResourceWriter, System.Windows.Forms, Version=4.0.0.0, Culture=neutral, PublicKeyToken=b77a5c561934e089</value>
  </resheader>
  <data name="HomeSubtitle" xml:space="preserve">
    <value>Welcome to your new app.</value>
  </data>
  <data name="HomeTitle" xml:space="preserve">
    <value>Hello, world!</value>
  </data>
  <data name="SurveyPromptTitle" xml:space="preserve">
    <value>How is Blazor working for you?</value>
  </data>
  <data name="CounterButton" xml:space="preserve">
    <value>Click me</value>
  </data>
  <data name="CounterText" xml:space="preserve">
    <value>Current count</value>
  </data>
  <data name="CounterTitle" xml:space="preserve">
    <value>Counter</value>
  </data>
  <data name="FetchDataDate" xml:space="preserve">
    <value>Date</value>
  </data>
  <data name="FetchDataSubtitle" xml:space="preserve">
    <value>This component demonstrates fetching data from a service.</value>
  </data>
  <data name="FetchDataSummary" xml:space="preserve">
    <value>Summary</value>
  </data>
  <data name="FetchDataTempC" xml:space="preserve">
    <value>Temp. (C)</value>
  </data>
  <data name="FetchDataTempF" xml:space="preserve">
    <value>Temp. (F)</value>
  </data>
  <data name="FetchDataTitle" xml:space="preserve">
    <value>Weather forecast</value>
  </data>
  <data name="ApplicationName" xml:space="preserve">
    <value>Localization in Blazor</value>
  </data>
  <data name="Language" xml:space="preserve">
    <value>Language</value>
  </data>
  <data name="MenuAbout" xml:space="preserve">
    <value>About</value>
  </data>
  <data name="NavBarApplicationName" xml:space="preserve">
    <value>Localization in Blazor</value>
  </data>
  <data name="NavBarCounter" xml:space="preserve">
    <value>Counter</value>
  </data>
  <data name="NavBarFetchData" xml:space="preserve">
    <value>FetchData</value>
  </data>
  <data name="NavBarHome" xml:space="preserve">
    <value>Home</value>
  </data>
  <data name="HomeFooter1" xml:space="preserve">
    <value>Please take our</value>
  </data>
  <data name="HomeFooter2" xml:space="preserve">
    <value>brief survey</value>
  </data>
  <data name="HomeFooter3" xml:space="preserve">
    <value>and tell us what you think.</value>
  </data>
  <data name="SurveyTitle" xml:space="preserve">
    <value>How is Blazor working for you?</value>
  </data>
</root>
Now, let's add the resource strings we are going to need for Spanish.
Add a new resource file to the Resources folder called App.es-MX.resx:
Here are the values:
| Name | Value |
|---|---|
| ApplicationName | Localización en Blazor |
| CounterButton | Presióname |
| CounterText | Contador actual |
| CounterTitle | Contador |
| FetchDataDate | Fecha |
| FetchDataSubtitle | Este componente demuestra cómo obtener datos desde un servicio. |
| FetchDataSummary | Resumen |
| FetchDataTempC | Temperatura (C) |
| FetchDataTempF | Temperatura (F) |
| FetchDataTitle | Pronóstico del tiempo |
| HomeFooter1 | Por favor, responda a nuestra |
| HomeFooter2 | corta encuesta |
| HomeFooter3 | y díganos que piensa. |
| HomeSubtitle | Bienvenido a tu nueva aplicación. |
| HomeTitle | Hola, mundo! |
| Language | Idioma |
| MenuAbout | Acerca de |
| NavBarApplicationName | Localización en Blazor |
| NavBarCounter | Contador |
| NavBarFetchData | Obtener Datos |
| NavBarHome | Página Principal |
| SurveyPromptTitle | ¿Cómo funciona Blazor para usted? |
Here is the XML:
<?xml version="1.0" encoding="utf-8"?>
<root>
  <!--
    Microsoft ResX Schema

    Version 2.0

    The primary goals of this format is to allow a simple XML format
    that is mostly human readable. The generation and parsing of the
    various data types are done through the TypeConverter classes
    associated with the data types.

    Example:

    ... ado.net/XML headers & schema ...
    <resheader name="resmimetype">text/microsoft-resx</resheader>
    <resheader name="version">2.0</resheader>
    <resheader name="reader">System.Resources.ResXResourceReader, System.Windows.Forms, ...</resheader>
    <resheader name="writer">System.Resources.ResXResourceWriter, System.Windows.Forms, ...</resheader>
    <data name="Name1"><value>this is my long string</value><comment>this is a comment</comment></data>
    <data name="Color1" type="System.Drawing.Color, System.Drawing">Blue</data>
    <data name="Bitmap1" mimetype="application/x-microsoft.net.object.binary.base64">
        <value>[base64 mime encoded serialized .NET Framework object]</value>
    </data>
    <data name="Icon1" type="System.Drawing.Icon, System.Drawing" mimetype="application/x-microsoft.net.object.bytearray.base64">
        <value>[base64 mime encoded string representing a byte array form of the .NET Framework object]</value>
        <comment>This is a comment</comment>
    </data>

    There are any number of "resheader" rows that contain simple
    name/value pairs.

    Each data row contains a name, and value. The row also contains a
    type or mimetype. Type corresponds to a .NET class that support
    text/value conversion through the TypeConverter architecture.
    Classes that don't support this are serialized and stored with the
    mimetype set.

    The mimetype is used for serialized objects, and tells the
    ResXResourceReader how to depersist the object. This is currently not
    extensible. For a given mimetype the value must be set accordingly:

    Note - application/x-microsoft.net.object.binary.base64 is the format
    that the ResXResourceWriter will generate, however the reader can
    read any of the formats listed below.

    mimetype: application/x-microsoft.net.object.binary.base64
    value   : The object must be serialized with
            : System.Runtime.Serialization.Formatters.Binary.BinaryFormatter
            : and then encoded with base64 encoding.

    mimetype: application/x-microsoft.net.object.soap.base64
    value   : The object must be serialized with
            : System.Runtime.Serialization.Formatters.Soap.SoapFormatter
            : and then encoded with base64 encoding.

    mimetype: application/x-microsoft.net.object.bytearray.base64
    value   : The object must be serialized into a byte array
            : using a System.ComponentModel.TypeConverter
            : and then encoded with base64 encoding.
    -->
  <xsd:schema id="root" xmlns="" xmlns:xsd="http://www.w3.org/2001/XMLSchema" xmlns:msdata="urn:schemas-microsoft-com:xml-msdata">
    <xsd:import namespace="http://www.w3.org/XML/1998/namespace" />
    <xsd:element name="root" msdata:IsDataSet="true">
      <xsd:complexType>
        <xsd:choice maxOccurs="unbounded">
          <xsd:element name="metadata">
            <xsd:complexType>
              <xsd:sequence>
                <xsd:element name="value" type="xsd:string" minOccurs="0" />
              </xsd:sequence>
              <xsd:attribute name="name" use="required" type="xsd:string" />
              <xsd:attribute name="type" type="xsd:string" />
              <xsd:attribute name="mimetype" type="xsd:string" />
              <xsd:attribute ref="xml:space" />
            </xsd:complexType>
          </xsd:element>
          <xsd:element name="assembly">
            <xsd:complexType>
              <xsd:attribute name="alias" type="xsd:string" />
              <xsd:attribute name="name" type="xsd:string" />
            </xsd:complexType>
          </xsd:element>
          <xsd:element name="data">
            <xsd:complexType>
              <xsd:sequence>
                <xsd:element name="value" type="xsd:string" minOccurs="0" msdata:Ordinal="1" />
                <xsd:element name="comment" type="xsd:string" minOccurs="0" msdata:Ordinal="2" />
              </xsd:sequence>
              <xsd:attribute name="name" type="xsd:string" use="required" msdata:Ordinal="1" />
              <xsd:attribute name="type" type="xsd:string" msdata:Ordinal="3" />
              <xsd:attribute name="mimetype" type="xsd:string" msdata:Ordinal="4" />
              <xsd:attribute ref="xml:space" />
            </xsd:complexType>
          </xsd:element>
          <xsd:element name="resheader">
            <xsd:complexType>
              <xsd:sequence>
                <xsd:element name="value" type="xsd:string" minOccurs="0" msdata:Ordinal="1" />
              </xsd:sequence>
              <xsd:attribute name="name" type="xsd:string" use="required" />
            </xsd:complexType>
          </xsd:element>
        </xsd:choice>
      </xsd:complexType>
    </xsd:element>
  </xsd:schema>
  <resheader name="resmimetype">
    <value>text/microsoft-resx</value>
  </resheader>
  <resheader name="version">
    <value>2.0</value>
  </resheader>
  <resheader name="reader">
    <value>System.Resources.ResXResourceReader, System.Windows.Forms, Version=4.0.0.0, Culture=neutral, PublicKeyToken=b77a5c561934e089</value>
  </resheader>
  <resheader name="writer">
    <value>System.Resources.ResXResourceWriter, System.Windows.Forms, Version=4.0.0.0, Culture=neutral, PublicKeyToken=b77a5c561934e089</value>
  </resheader>
  <data name="HomeSubtitle" xml:space="preserve">
    <value>Bienvenido a tu nueva aplicación.</value>
  </data>
  <data name="HomeTitle" xml:space="preserve">
    <value>Hola, mundo!</value>
  </data>
  <data name="SurveyPromptTitle" xml:space="preserve">
    <value>¿Cómo funciona Blazor para usted?</value>
  </data>
  <data name="CounterButton" xml:space="preserve">
    <value>Presióname</value>
  </data>
  <data name="CounterText" xml:space="preserve">
    <value>Contador actual</value>
  </data>
  <data name="CounterTitle" xml:space="preserve">
    <value>Contador</value>
  </data>
  <data name="FetchDataDate" xml:space="preserve">
    <value>Fecha</value>
  </data>
  <data name="FetchDataSubtitle" xml:space="preserve">
    <value>Este componente demuestra cómo obtener datos desde un servicio.</value>
  </data>
  <data name="FetchDataSummary" xml:space="preserve">
    <value>Resumen</value>
  </data>
  <data name="FetchDataTempC" xml:space="preserve">
    <value>Temperatura (C)</value>
  </data>
  <data name="FetchDataTempF" xml:space="preserve">
    <value>Temperatura (F)</value>
  </data>
  <data name="FetchDataTitle" xml:space="preserve">
    <value>Pronóstico del tiempo</value>
  </data>
  <data name="ApplicationName" xml:space="preserve">
    <value>Localización en Blazor</value>
  </data>
  <data name="Language" xml:space="preserve">
    <value>Idioma</value>
  </data>
  <data name="MenuAbout" xml:space="preserve">
    <value>Acerca de</value>
  </data>
  <data name="NavBarApplicationName" xml:space="preserve">
    <value>Localización en Blazor</value>
  </data>
  <data name="NavBarCounter" xml:space="preserve">
    <value>Contador</value>
  </data>
  <data name="NavBarFetchData" xml:space="preserve">
    <value>Obtener Datos</value>
  </data>
  <data name="NavBarHome" xml:space="preserve">
    <value>Página Principal</value>
  </data>
  <data name="HomeFooter1" xml:space="preserve">
    <value>Por favor, responda a nuestra</value>
  </data>
  <data name="HomeFooter2" xml:space="preserve">
    <value>corta encuesta</value>
  </data>
  <data name="HomeFooter3" xml:space="preserve">
    <value>y díganos que piensa.</value>
  </data>
  <data name="SurveyTitle" xml:space="preserve">
    <value>¿Qué tal te está funcionando Blazor?</value>
  </data>
</root>
Open the Program.cs file, and add the following at line 6 after the line var builder = WebAssemblyHostBuilder.CreateDefault(args);
builder.Services.AddLocalization(options => {
    options.ResourcesPath = "Resources";
});
Open the LocalizationInBlazor.Client.csproj, and add the following section
<PropertyGroup>
	<BlazorWebAssemblyLoadAllGlobalizationData>true</BlazorWebAssemblyLoadAllGlobalizationData>
</PropertyGroup>
Then, open the _Imports.razor file, and add the following using statements.
@using LocalizationDemo.Shared
@using Microsoft.Extensions.Localization
To avoid typos, we're going to create an enumeration of our resource string names.
Add the following class:
ResourceStrings.cs:
namespace LocalizationDemo.Client;

public enum ResourceStrings
{
    ApplicationName,
    CounterButton,
    CounterText,
    CounterTitle,
    FetchDataDate,
    FetchDataSubtitle,
    FetchDataSummary,
    FetchDataTempC,
    FetchDataTempF,
    FetchDataTitle,
    HomeFooter1,
    HomeFooter2,
    HomeFooter3,
    HomeSubtitle,
    HomeTitle,
    Language,
    MenuAbout,
    NavBarApplicationName,
    NavBarCounter,
    NavBarFetchData,
    NavBarHome,
    SurveyPromptTitle,
    SurveyTitle
}
Here's a tip for creating your enum from the resource files.
Open App.en-US.resx
Select all the names in the Name column, and press Ctrl-C to copy them into the clipboard.
Add the following class file, change it to an enum and paste the names into it.
Then, add a comma to the end of each name (except the last one). Presto!
Now, let's modify the pages listed below, to be able to be displayed in English, or Spanish.
- Counter.razor
- FetchData.razor
- Index.razor
- MainLayout.razor
- NavMenu.razor
- SurveyPrompt.razor
In a nutshell, we are going to inject inject the IStringSerializer and replace all the strings in all components.
Replace the content of all pages, as follows:
Page Counter.razor
@inject IStringLocalizer<App> Loc
@page "/counter"

<PageTitle>@Loc[nameof(ResourceStrings.CounterTitle)]</PageTitle>

<h1>@Loc[nameof(ResourceStrings.CounterTitle)]</h1>

<p role="status">@Loc[nameof(ResourceStrings.CounterText)] @currentCount</p>

<button class="btn btn-primary" @onclick="IncrementCount">@Loc[nameof(ResourceStrings.CounterButton)]</button>

@code {
    private int currentCount = 0;

    private void IncrementCount()
    {
        currentCount++;
    }
}
Page FetchData.razor
@page "/fetchdata"
@inject HttpClient Http
@inject IStringLocalizer<App> Loc

<PageTitle>@Loc[nameof(ResourceStrings.FetchDataTitle)]</PageTitle>

<h1>@Loc[nameof(ResourceStrings.FetchDataTitle)]</h1>

<p>@Loc[nameof(ResourceStrings.FetchDataSubtitle)]</p>

@if (forecasts == null)
{
    <p><em>Loading...</em></p>
}
else
{
    <table class="table">
        <thead>
            <tr>
                <th>@Loc[nameof(ResourceStrings.FetchDataDate)]</th>
                <th>@Loc[nameof(ResourceStrings.FetchDataTempC)]</th>
                <th>@Loc[nameof(ResourceStrings.FetchDataTempF)]</th>
                <th>@Loc[nameof(ResourceStrings.FetchDataSummary)]</th>
            </tr>
        </thead>
        <tbody>
            @foreach (var forecast in forecasts)
            {
                <tr>
                    <td>@forecast.Date.ToShortDateString()</td>
                    <td>@forecast.TemperatureC</td>
                    <td>@forecast.TemperatureF</td>
                    <td>@forecast.Summary</td>
                </tr>
            }
        </tbody>
    </table>
}

@code {
    private WeatherForecast[]? forecasts;

    protected override async Task OnInitializedAsync()
    {
        forecasts = await Http.GetFromJsonAsync<WeatherForecast[]>("WeatherForecast");
    }
}
Page Index.razor
@inject IStringLocalizer<App> Loc
@inject IJSRuntime jsRuntime
@page "/"

<PageTitle>Index</PageTitle>

<h1>@Loc[nameof(ResourceStrings.HomeTitle)]</h1>

@Loc[nameof(ResourceStrings.HomeSubtitle)]

<SurveyPrompt Title="@Loc[nameof(ResourceStrings.SurveyPromptTitle)]" />
Shared/MainLayout.razor
@inject IStringLocalizer<App> Loc
@inherits LayoutComponentBase

<PageTitle>@Loc[nameof(ResourceStrings.ApplicationName)]</PageTitle>

<div class="page">
    <div class="sidebar">
        <NavMenu />
    </div>

    <main>
        <div class="top-row px-4">
            <a href="https://docs.microsoft.com/aspnet/" target="_blank">@Loc[nameof(ResourceStrings.MenuAbout)]</a>
        </div>

        <article class="content px-4">
            @Body
        </article>
    </main>
</div>
Shared/NavMenu.razor
@inject IStringLocalizer<App> Loc

<div class="top-row ps-3 navbar navbar-dark">
    <div class="container-fluid">
        <a class="navbar-brand" href="">@Loc[nameof(ResourceStrings.ApplicationName)]</a>
        <button title="Navigation menu" class="navbar-toggler" @onclick="ToggleNavMenu">
            <span class="navbar-toggler-icon"></span>
        </button>
    </div>
</div>

<div class="@NavMenuCssClass" @onclick="ToggleNavMenu">
    <nav class="flex-column">
        <div class="nav-item px-3">
            <NavLink class="nav-link" href="" Match="NavLinkMatch.All">
                <span class="oi oi-home" aria-hidden="true"></span> @Loc[nameof(ResourceStrings.NavBarHome)]
            </NavLink>
        </div>
        <div class="nav-item px-3">
            <NavLink class="nav-link" href="counter">
                <span class="oi oi-plus" aria-hidden="true"></span> @Loc[nameof(ResourceStrings.NavBarCounter)]
            </NavLink>
        </div>
        <div class="nav-item px-3">
            <NavLink class="nav-link" href="fetchdata">
                <span class="oi oi-list-rich" aria-hidden="true"></span> @Loc[nameof(ResourceStrings.NavBarFetchData)]
            </NavLink>
        </div>
    </nav>
</div>

@code {
    private bool collapseNavMenu = true;

    private string? NavMenuCssClass => collapseNavMenu ? "collapse" : null;

    private void ToggleNavMenu()
    {
        collapseNavMenu = !collapseNavMenu;
    }
}
Shared/SurveyPrompt.razor
@inject IStringLocalizer<App> Loc

<div class="alert alert-secondary mt-4">
    <span class="oi oi-pencil me-2" aria-hidden="true"></span>
    <strong>@Title</strong>

    <span class="text-nowrap">
        @Loc[nameof(ResourceStrings.HomeFooter1)]
        <a target="_blank" class="font-weight-bold link-dark" href="https://go.microsoft.com/fwlink/?linkid=2149017">@Loc[nameof(ResourceStrings.HomeFooter2)]</a>
    </span>
    @Loc[nameof(ResourceStrings.HomeFooter3)]
</div>

@code {
    // Demonstrates how a parent component can supply parameters
    [Parameter]
    public string? Title { get; set; }
}
Finally, build and run the app, you should see the application in English. 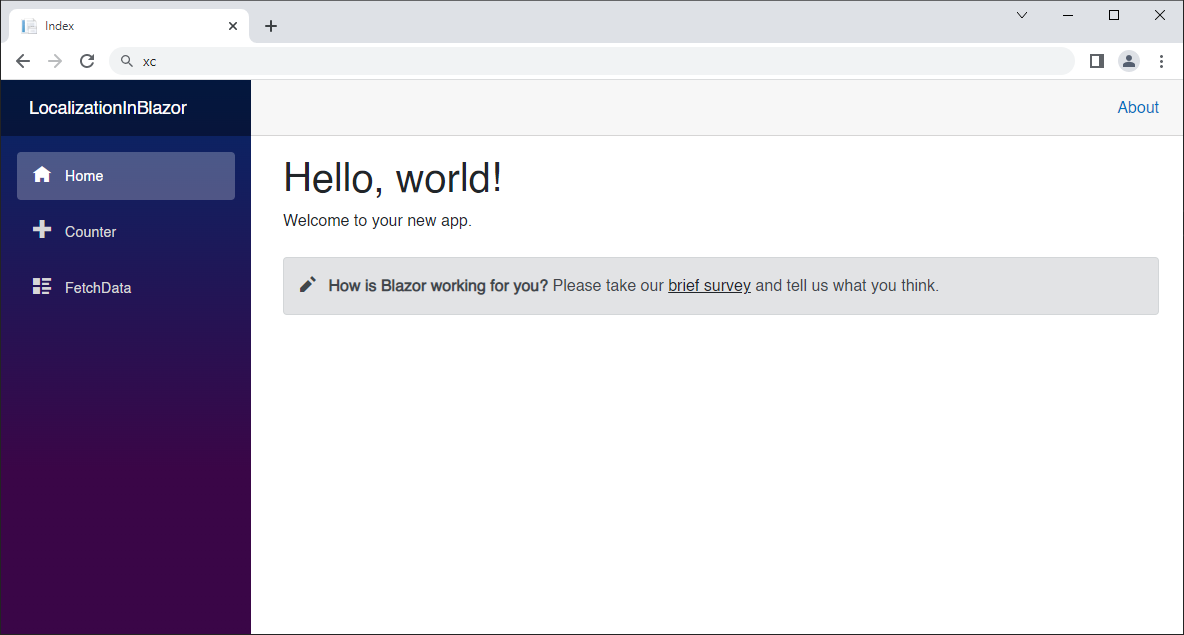
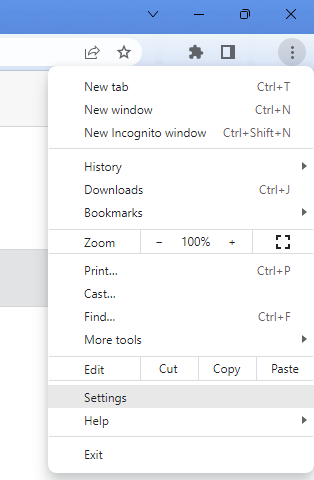
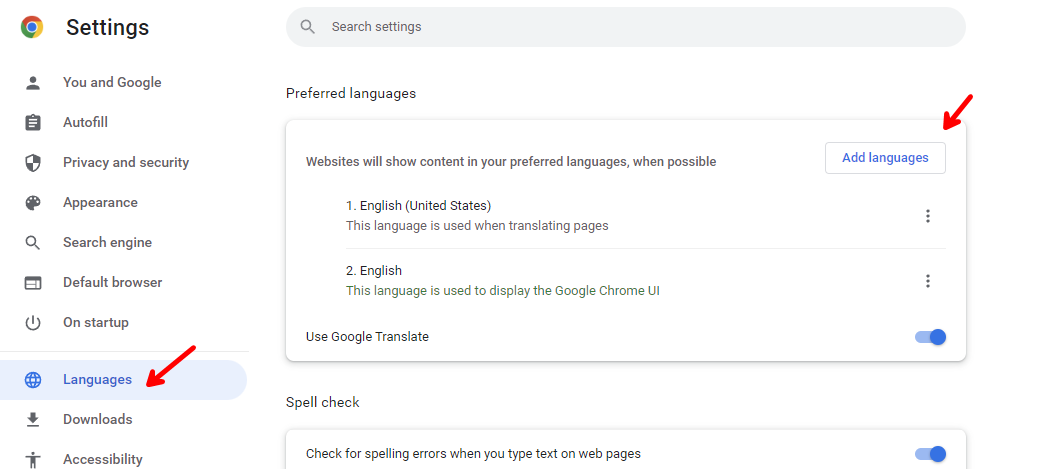
In order to test the application in Spanish, if you are using Chrome, go to Settings.
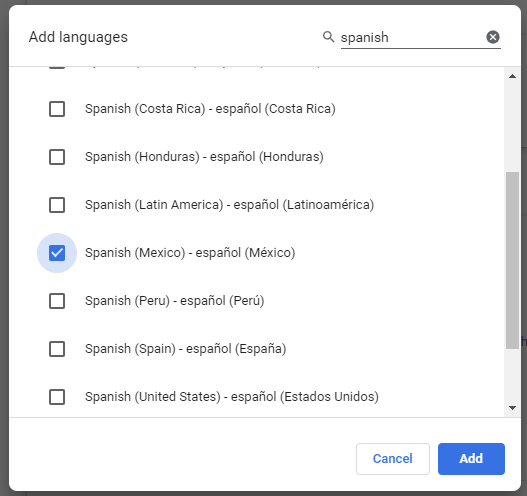
Click Languages on the left, and click the Add languages button.
Search for Spanish, and check Spanish (Mexico).
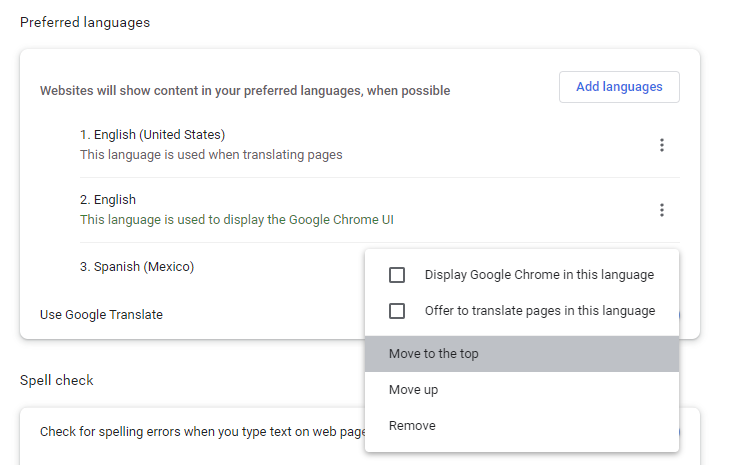
Then click on the three dots menu to the right of Spanish (Mexico), and click Move to the top.
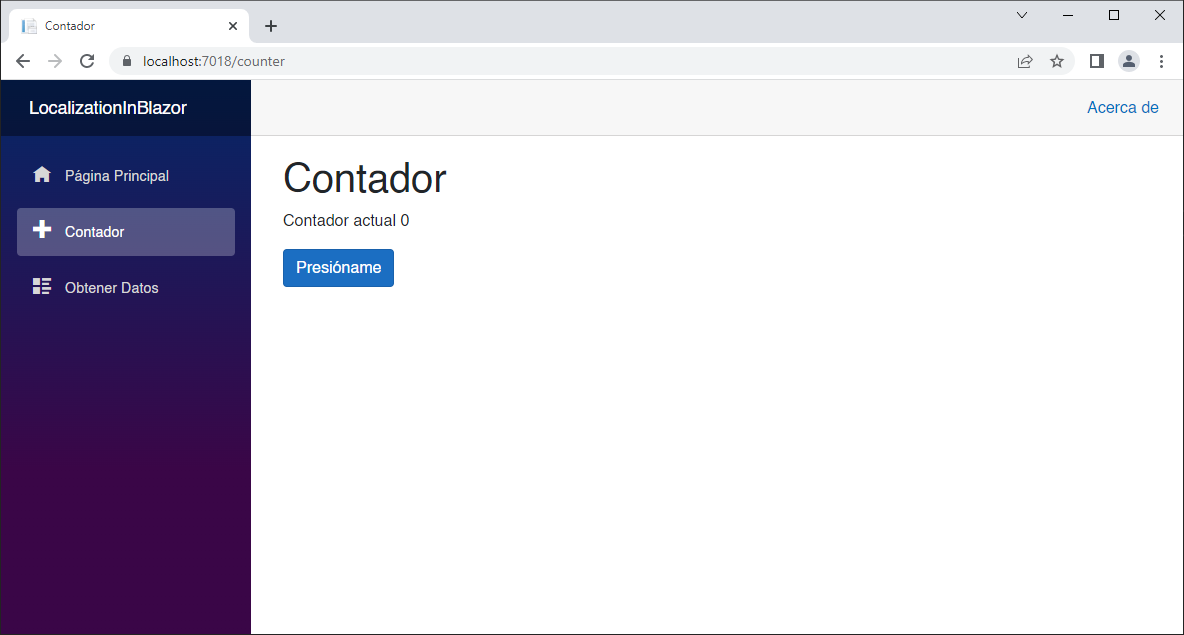
Go back to the application, and refresh the page. You should now see the complete application in Spanish. 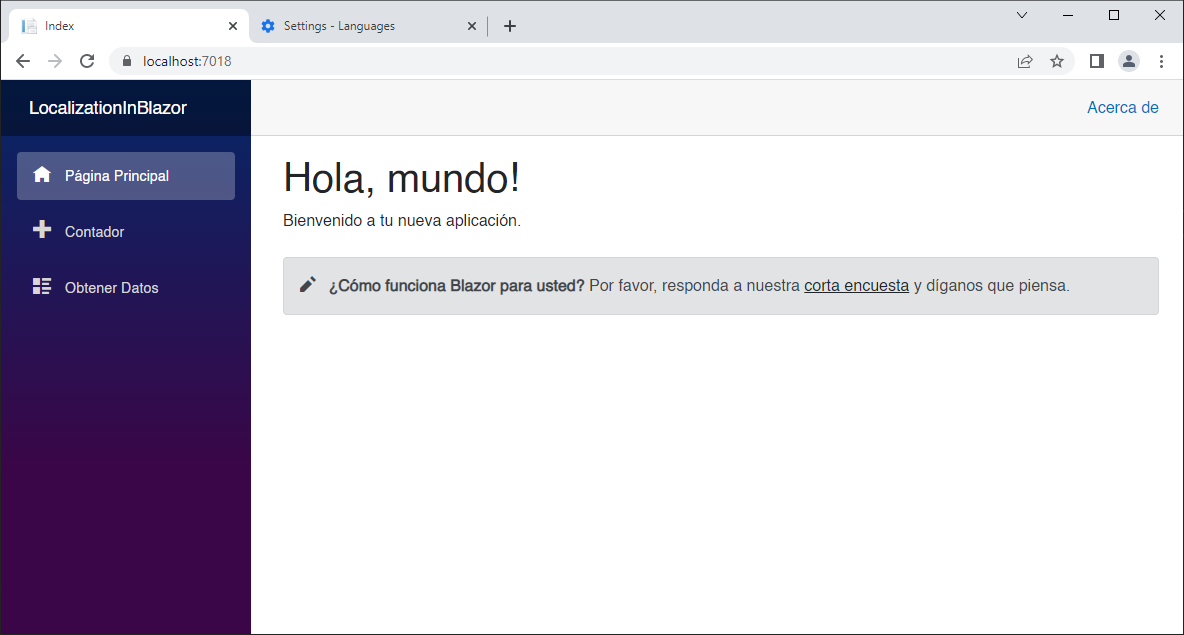
Gracias y hasta luego mundo!
Now, let's add a UI element to allow the user to change the language dynamically.
The workflow will be:
- The user changes the language.
- We change the culture using a component that calls an extension we provide
- We redirect the user back to the original page.
- The application shows on the correct language.
Again, we will be working solely in the Client project.
Add the following class files to the project:
CultureWithName.cs:
public record CultureWithName
{
    public string Name { get; init; } = default!;
    public string Culture { get; init; } = default!;

    public CultureWithName(string name, string culture)
    {
        Name = name;
        Culture = culture;
    }
}LocalizerSettings.cs:
public static class LocalizerSettings
{
    public static CultureWithName NeutralCulture =
    	new CultureWithName("English", "en-US");

    public static readonly List<CultureWithName> SupportedCulturesWithName =
        new List<CultureWithName>()
        {
            new CultureWithName("English", "en-US"),
            new CultureWithName("Spanish (Mexico)", "es-MX")
        };
}
LocalizerSettings is a static class that returns a list of available cultures with both a name and a culture string.
We will need a way to store and retrieve the selected culture, so let's use Blazored.LocalStorage.
Add the following PackageReference to LocalizationDemo.Client.csproj:
<PackageReference Include="Blazored.LocalStorage" Version="4.2.0" />Add to _Imports.razor:
@using Blazored.LocalStorage
Next, we need to add LocalStorage as a service in Program.cs:
builder.Services.AddBlazoredLocalStorage();You'll need this:
using Blazored.LocalStorage;Next, create the following razor component in the Shared folder:
CultureSelector.razor:
@inject NavigationManager Navigation
@inject ILocalStorageService LocalStorage
@inject IStringLocalizer<App> Loc
<span>
@Loc[nameof(ResourceStrings.Language)]:
<select @onchange="NewCultureSelectedAsync">
@foreach (var culture in LocalizerSettings.SupportedCulturesWithName)
{
@if (SelectedCulture != null && culture == SelectedCulture)
{
<option selected value="@culture.Culture">@culture.Name</option>
}
else
{
<option value="@culture.Culture">@culture.Name</option>
}
}
</select>
</span>
@code
{
CultureWithName SelectedCulture = null;
protected override async Task OnInitializedAsync()
{
var culture = await LocalStorage.GetItemAsync<string>("culture");
if (culture == "")
SelectedCulture = LocalizerSettings.NeutralCulture;
else
SelectedCulture = (from x in LocalizerSettings.SupportedCulturesWithName
where x.Culture == culture
select x).FirstOrDefault();
}
private async Task NewCultureSelectedAsync(ChangeEventArgs args)
{
string cultureString = args.Value.ToString();
await LocalStorage.SetItemAsync<string>("culture", cultureString);
Navigation.NavigateTo(Navigation.Uri, true);
}
}This component shows the available languages in a dropdown list.
When a new language is selected, we write the language culture to local storage and reload the app at the current page.
Replace Shared/MainLayout.razor with the following:
@inject IStringLocalizer<App> Loc
@inherits LayoutComponentBase

<PageTitle>@Loc[nameof(ResourceStrings.ApplicationName)]</PageTitle>

<div class="page">
    <div class="sidebar">
        <NavMenu />
    </div>

    <main>
        <div class="top-row px-4">
            <CultureSelector />
            <a href="https://docs.microsoft.com/aspnet/" target="_blank">@Loc[nameof(ResourceStrings.MenuAbout)]</a>
        </div>

        <article class="content px-4">
            @Body
        </article>
    </main>
</div>
All I did was add this guy in the top div, before the About link:
<CultureSelector />Finally, we need to be able to set the culture when we load the app.
To do this we'll add the following class file:
WebAssemblyHostExtensions.cs:
using Blazored.LocalStorage;
using Microsoft.AspNetCore.Components.WebAssembly.Hosting;
using System.Globalization;

public static class WebAssemblyHostExtensions
{
    public async static Task SetDefaultCulture(this WebAssemblyHost host)
    {
        var localStorage = host.Services.GetRequiredService<ILocalStorageService>();
        var cultureString = await localStorage.GetItemAsync<string>("culture");

        CultureInfo cultureInfo;

        if (!string.IsNullOrWhiteSpace(cultureString))
        {
            cultureInfo = new CultureInfo(cultureString);
        }
        else
        {
            cultureInfo = new CultureInfo(LocalizerSettings.NeutralCulture.Name);
        }

        CultureInfo.DefaultThreadCurrentCulture = cultureInfo;
        CultureInfo.DefaultThreadCurrentUICulture = cultureInfo;
    }
}
This will be called at startup.
We check local storage for the culture, and if it is set we change the default culture to it.
Now, this has to be called from Program.cs.
In Program.cs, replace line 17:
await builder.Build().RunAsync();... with this:
var host = builder.Build();
await host.SetDefaultCulture();
await host.RunAsync();
Since we added our WebAssemblyHostExtensions extension to WebAssemblyHost, we can call SetDefaultCulture() on it before running.
Run the app and switch cultures!
If you close the app and restart it again, you'll notice the language preference was saved.
In this episode, we built a Hosted Blazor WebAssembly application, and we added localization support.
We made use of the Microsoft.Extensions.Localization NuGet package, to leverage localization services, and used AddLocalization, and the IStringLocalizer interface, to accomplish that.
We created an enumeration of the resource strings to avoid typos.
This resulted in the default Blazor template application, but with support for English and Spanish.
We then added the ability for the user to select the language from a drop-down list.
The complete code for this demo can be found in the link below.
| Resource Title | Url |
|---|---|
| Blazor Train | https://blazortrain.com/ |
| The .NET Show with Carl Franklin | https://www.youtube.com/playlist?list=PL8h4jt35t1wgW_PqzZ9USrHvvnk8JMQy_ |
| Download .NET | https://dotnet.microsoft.com/en-us/download |
