School of Computing
College of Engineering
University of Nebraska-Lincoln
University of Nebraska-Omaha
An introduction to the Java programming language and tools including Eclipse, Eclipse Git client, etc.
A separate folder containing a Python version of this lab is included for the honors section.
In each lab there may be pre-lab activities that you are required to complete prior to attending lab. Failure to do so may mean that you will not be given full credit for the lab.
Following the lab, you should be able to:
- Clone projects from GitHub using Eclipse
- Open, compile, and execute a given Java program in Eclipse.
- Write a simple program in the Eclipse IDE, compile, and execute that program.
- Handin and grade your lab
To encourage collaboration and a team environment, labs will be structured in a pair programming setup. At the start of each lab, you may be randomly paired up with another student by a lab instructor. One of you will be designated the driver and the other the navigator.
The navigator will be responsible for reading the instructions
and telling the driver what is to be done. The driver will be
in charge of the keyboard and workstation. Both driver and
navigator are responsible for suggesting fixes and solutions
together. Neither the navigator nor the driver is "in charge."
Beyond your immediate pairing, you are encouraged to help and
interact and with other pairs in the lab.
Each week you should try to alternate: if you were a driver last week, be a navigator next, etc. Resolve any issues (you were both drivers last week) within your pair. Ask the lab instructor to resolve issues only when you cannot come to a consensus.
Because of the peer programming setup of labs, it is absolutely essential that you complete any pre-lab activities and familiarize yourself with the handouts prior to coming to lab. Failure to do so will negatively impact your ability to collaborate and work with others which may mean that you will not be able to complete the lab.
You may already have "Java" installed on your computer, but this is most likely the Java Virtual Machine (JVM) that allows you to run Java programs. To actually develop Java programs you need a Java Development Kit (JDK). There are several alternative JDKs and you are welcome to explore them, but for this course, we are recommending Oracle's JDK available for download at the following URL. Follow the instructions for downloading and installing.
https://www.oracle.com/java/technologies/javase-downloads.html
Eclipse is an Integrated Development Environment (IDE) for Java development. There are many other popular IDEs available and you are welcome (and encouraged) to try them out and use them if you wish. However, for this course, most instructions will assume the use of Eclipse and it is the IDE we will primarily use for this course. You can download and install Eclipse at the following URL.
IMPORTANT When you run the installer be sure to select and install the Eclipse IDE for Enterprise Java Developers and not the one just for Java Developers. We'll use some of the features of this version in future labs.
Each lab will have some starter code and other artifacts
(data files, scripts, etc.) that will be provided for to you.
The code is hosted on Github (https://github.com) and you must
clone your own copy to work with it. You will not need to
know the details of using git nor be a registered Github user
to get access to the code necessary for your labs. However,
you are highly encouraged to learn this essential tool.
You may find it very useful to keep track of your own code
and to share code if you work in pairs or groups.
To check out the code for this lab, do the following. You may want to reference this step-by-step process in subsequent labs.
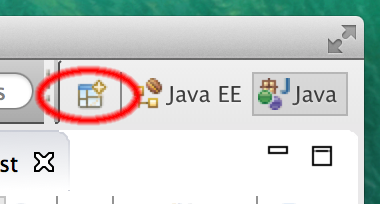
- First we need a Git perspective (a context in the Eclipse User Interface that will allow us to work with Git). To open the Git perspective, click on the "Open Perspective" tab in the upper right:
-
Select "Git" from the menu and click
OK -
Click the "Clone a Git repository" in the Git Repositories navigation menu:
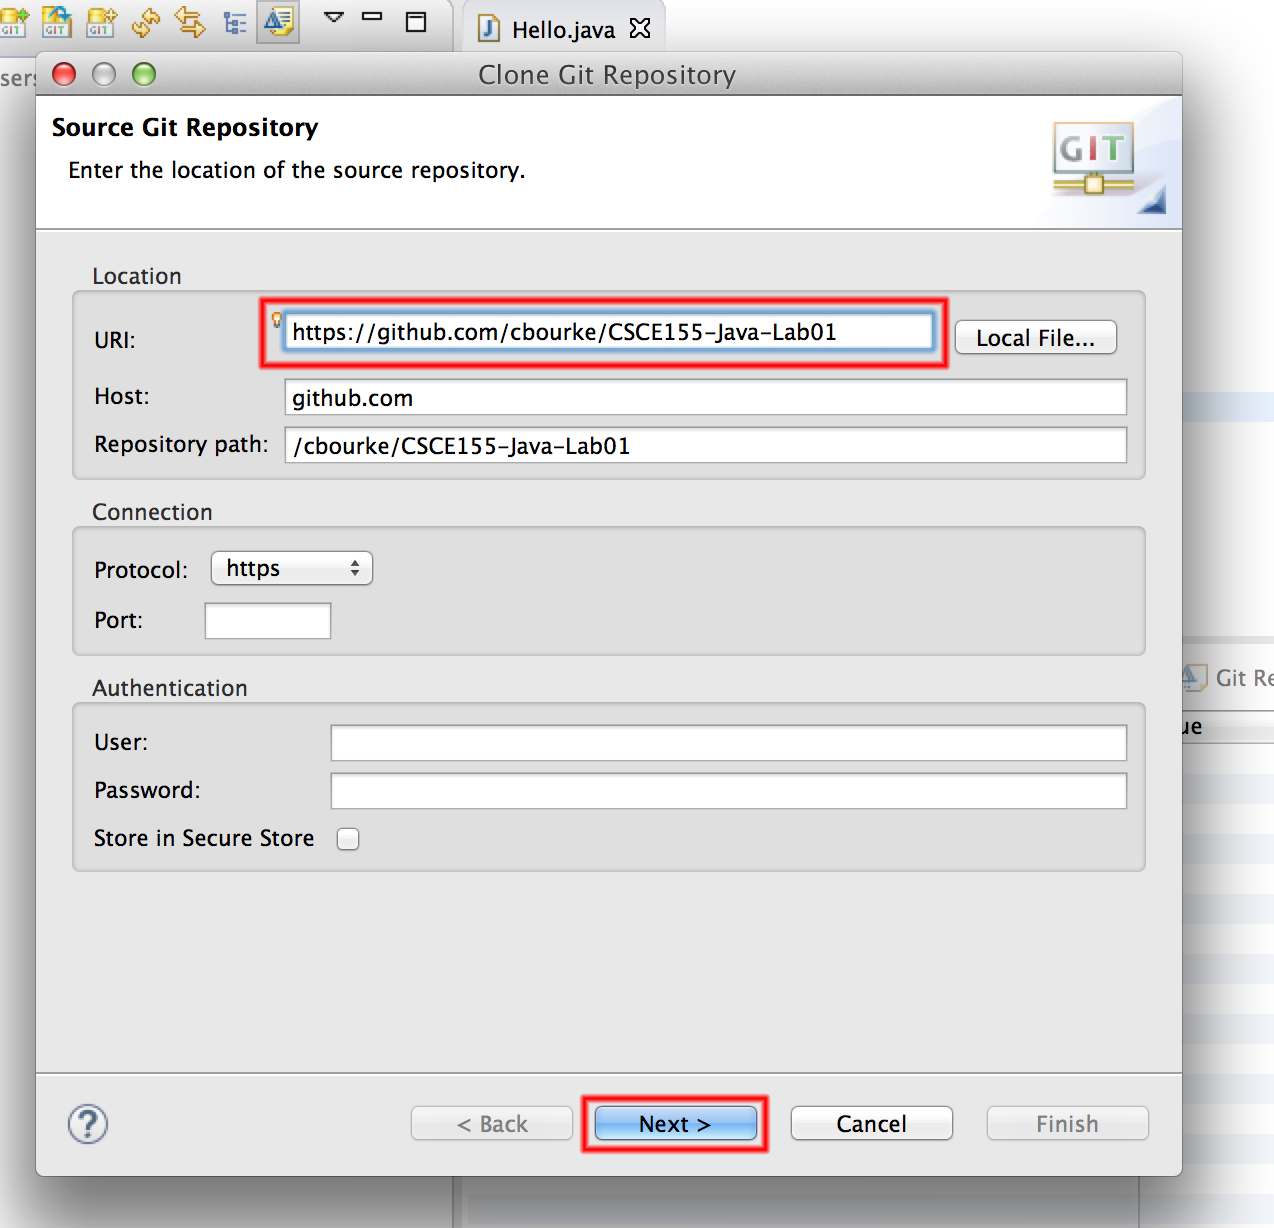
- Copy/paste or type into the URI field, the URL: https://github.com/cbourke/CSCE156-Lab01
- Click
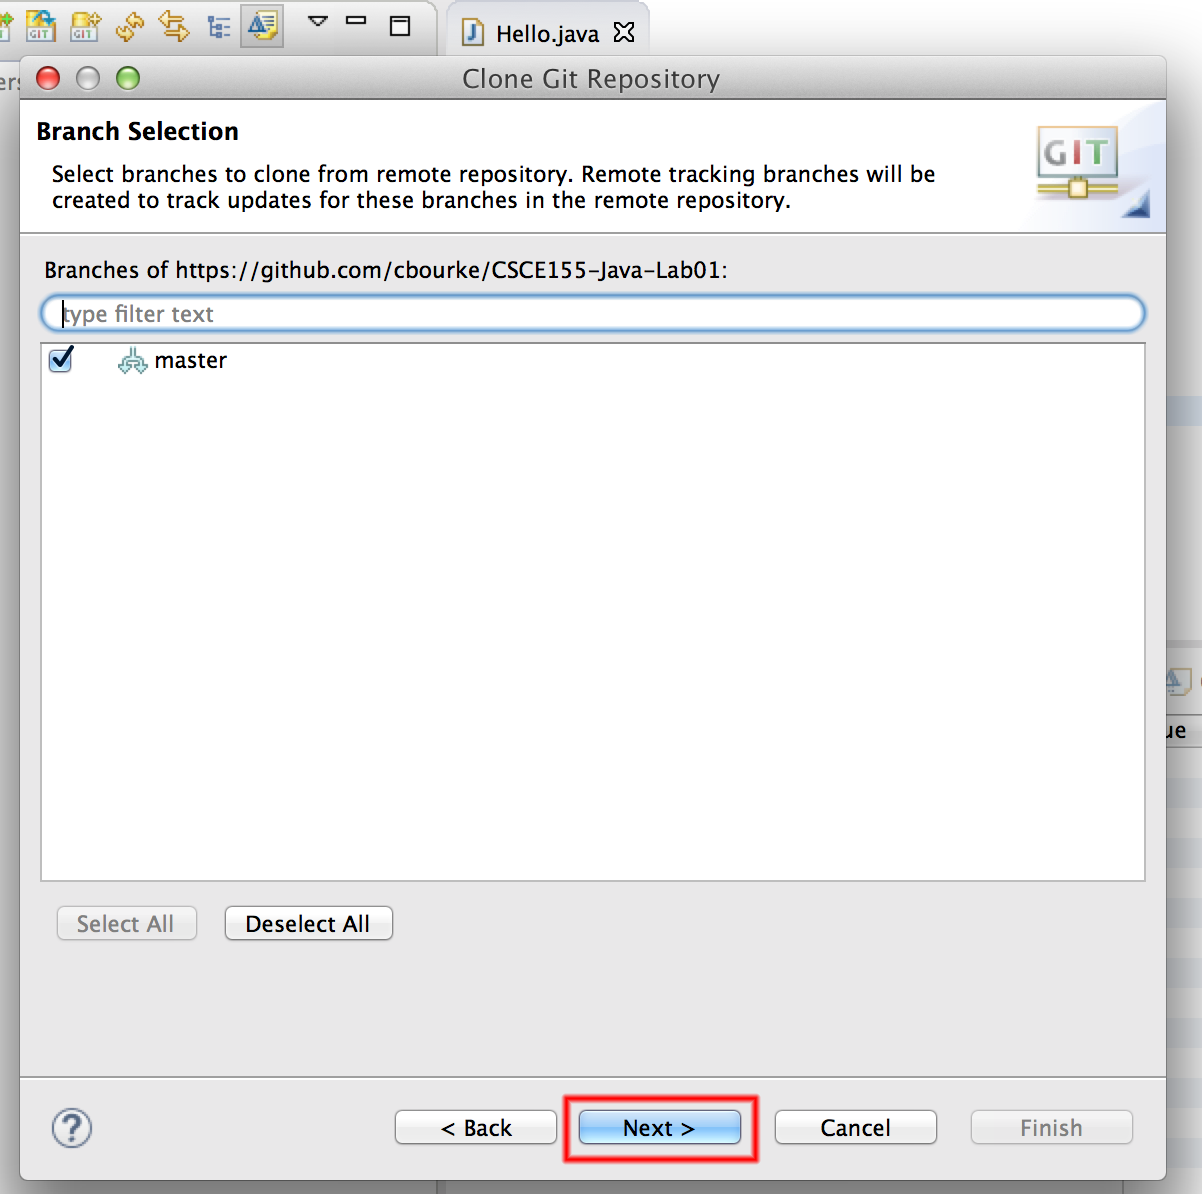
Next; once Eclipse has grabbed the project, the "master" branch should be selected (checkbox); clickNextagain.
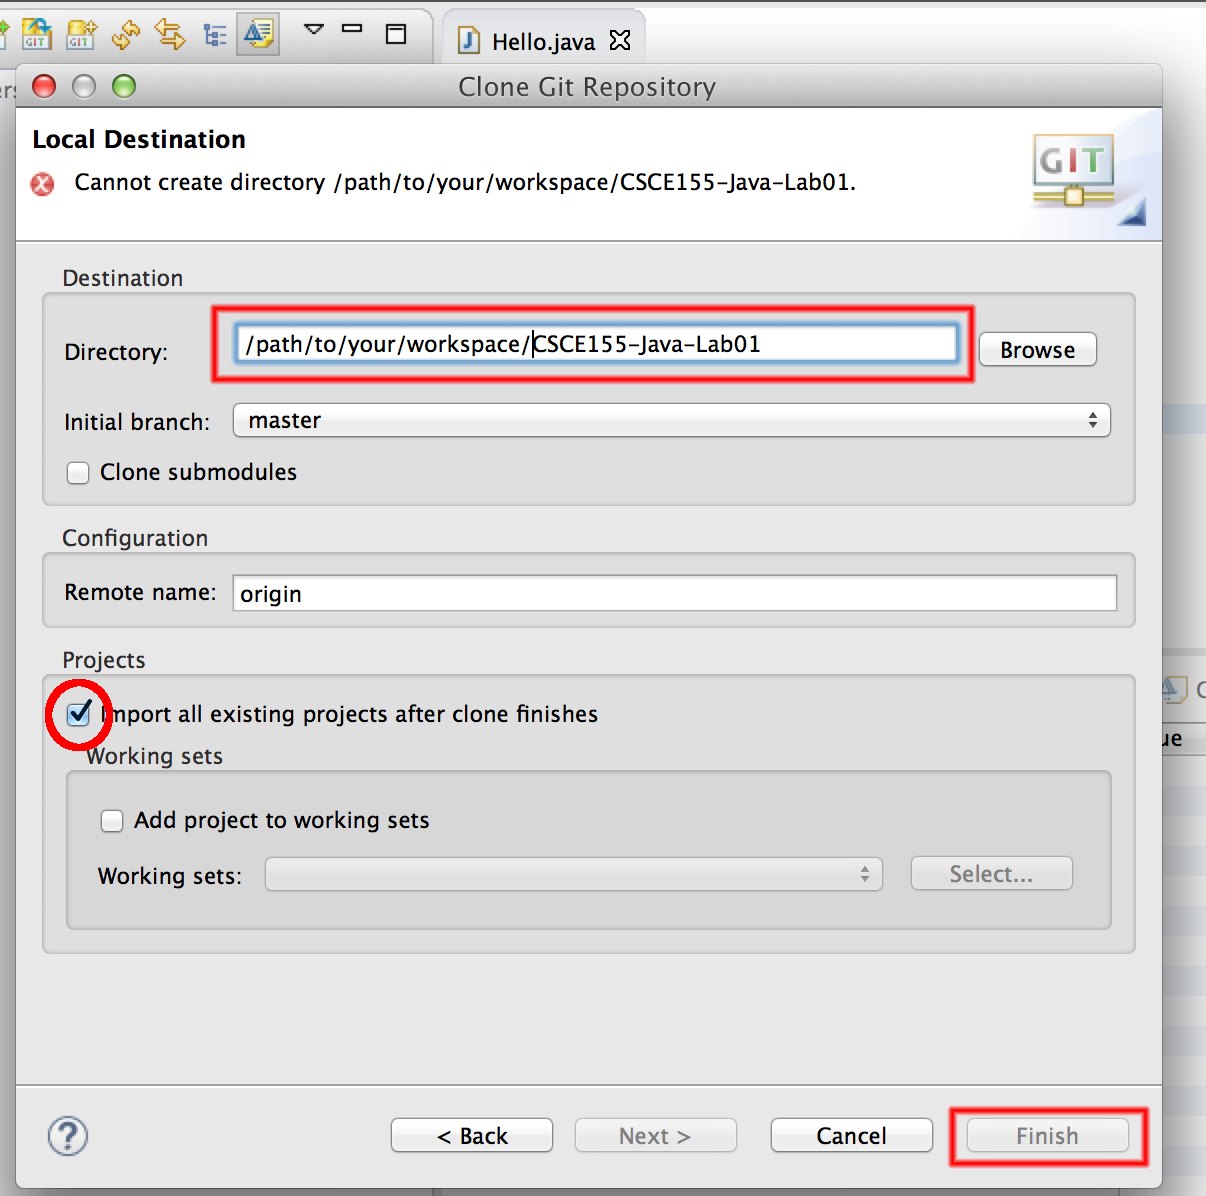
- Select the directory where you want your project to be saved.
Caution: the default option may not correspond to your default workspace. You will want to change it to your workspace. Mark the "Import all existing projects after clone finishes" checkbox option or you will need to manually import the cloned project into Eclipse.
- Switch back to your Java or JavaEE perspective and you can see your cloned project.
All students should complete this Java section, even if you are already familiar with Java, in order to familiarize yourself with how labs will work for the semester. Only those
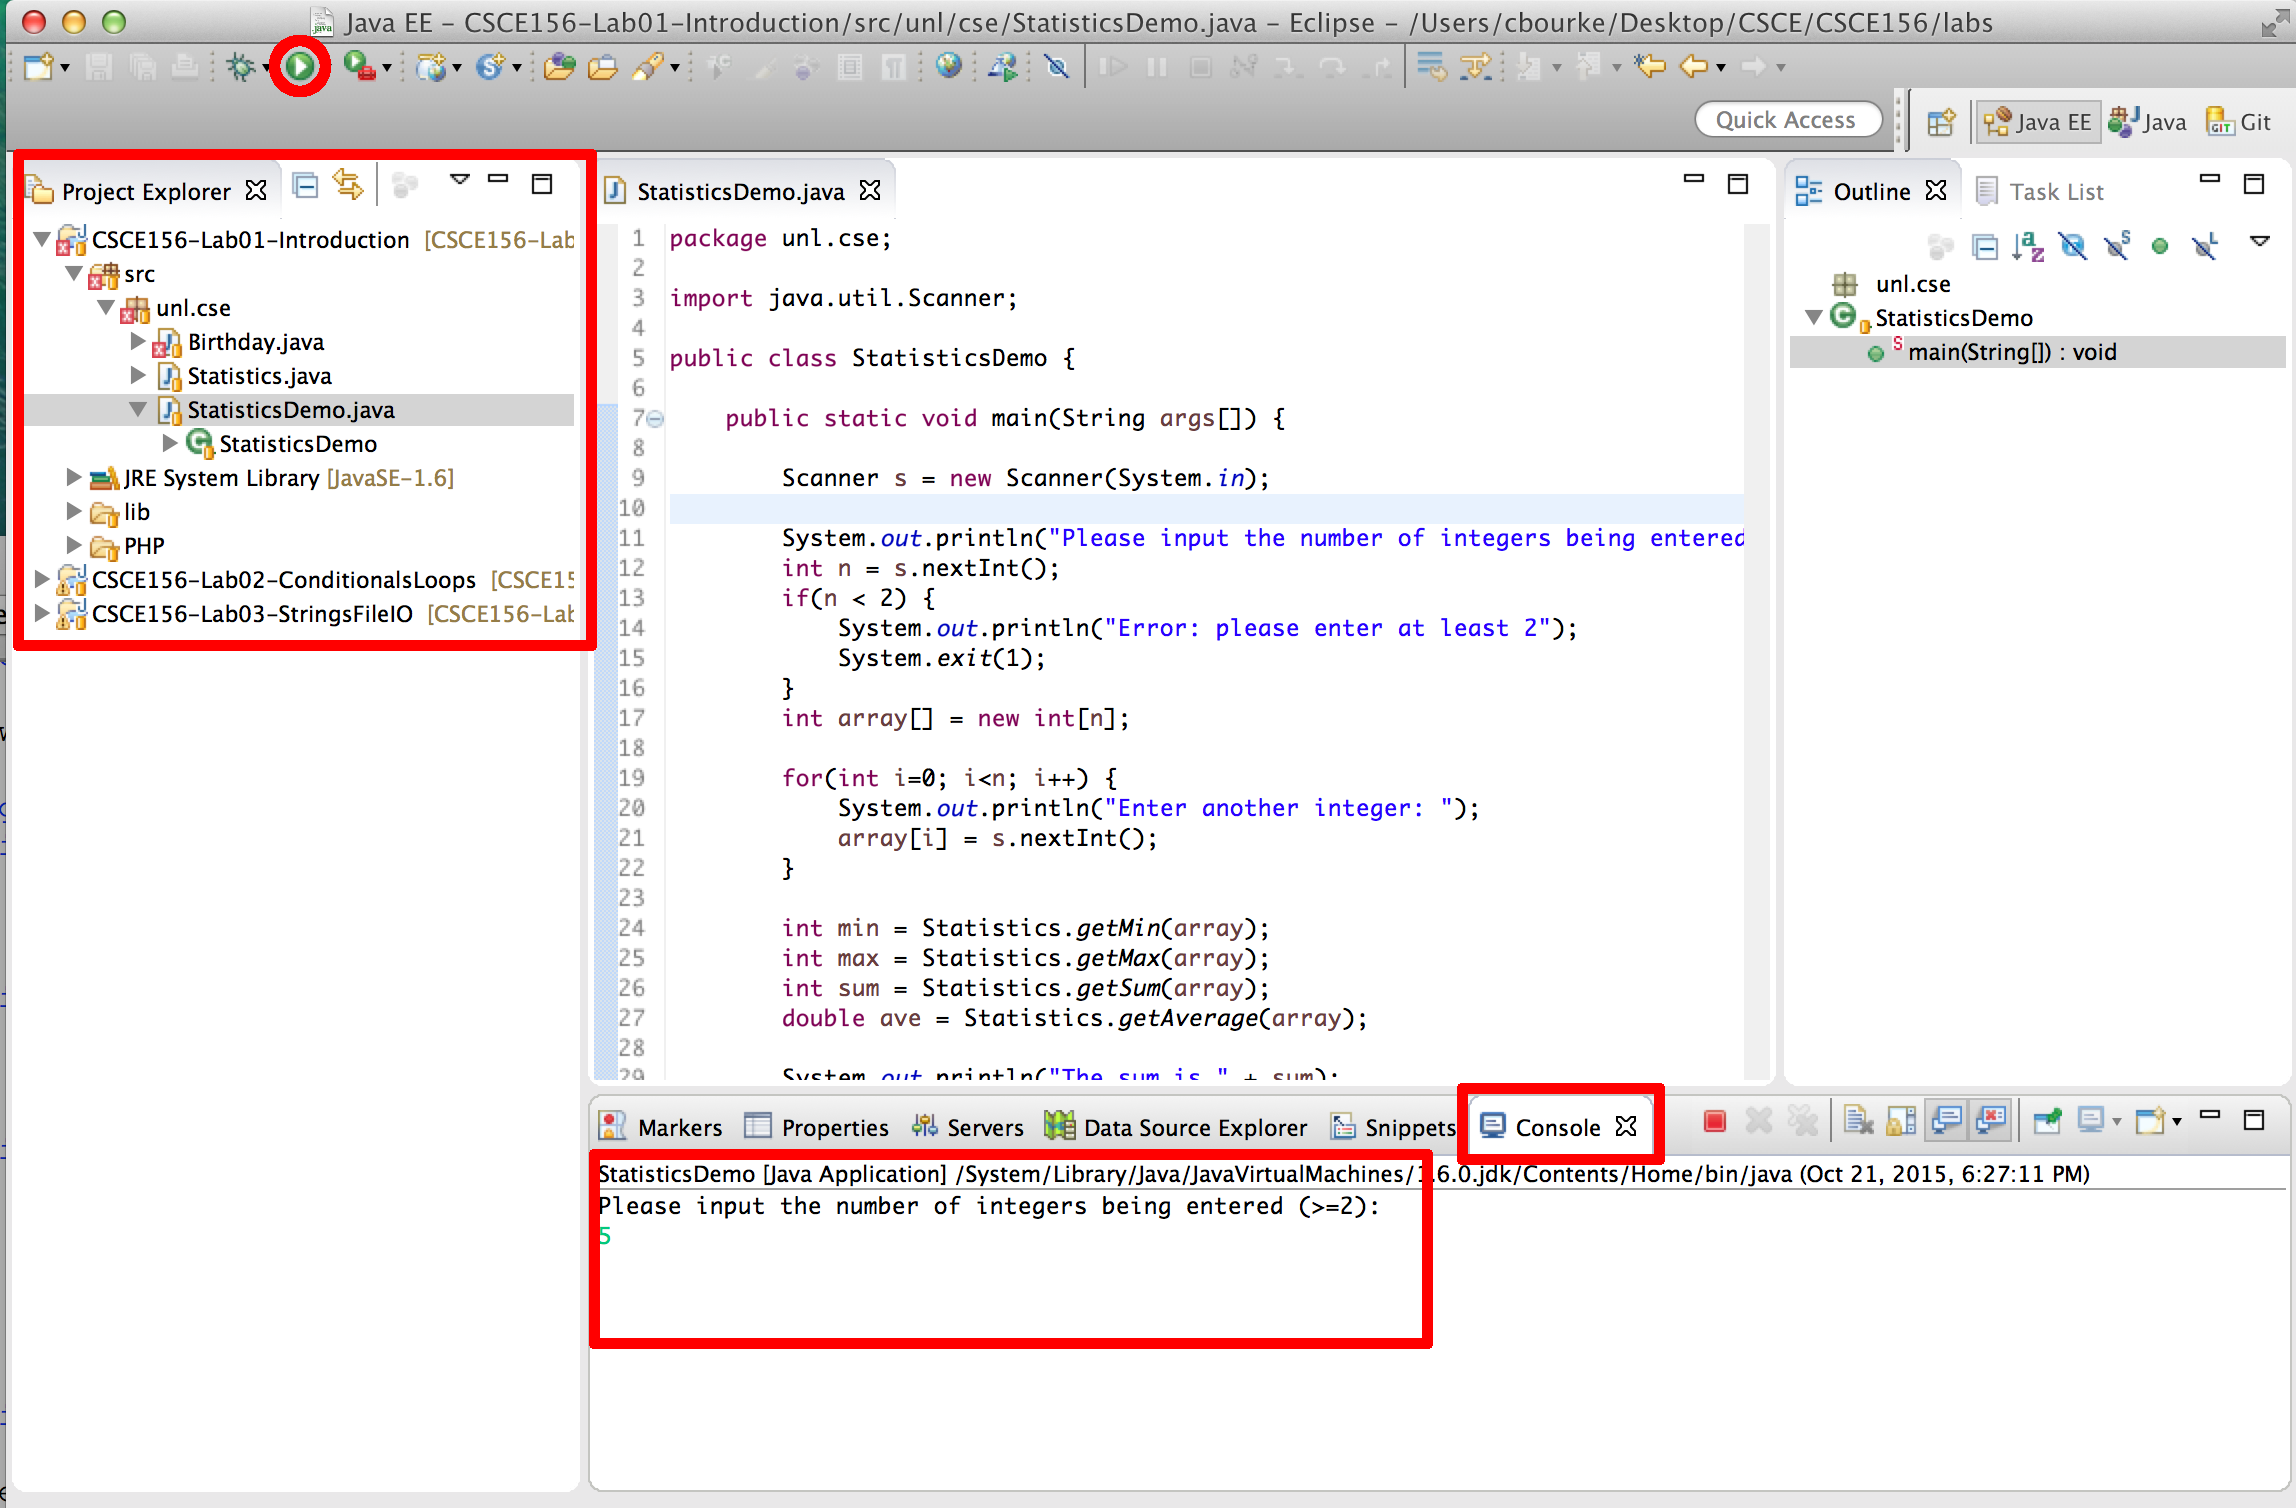
We will now familiarize you with Eclipse by editing an existing project's code.
-
Expand the main source directory:
src/main/java. Under this we have a package namedunl.soc. Java classes are organized in a hierarchy of packages. Packages correspond to actual directories in your file system. -
Expand the package and you'll find several classes. All Java code must be contained in a class. This is in contrast to other languages that may allow global variables or allow functions to exist without an object or a class.
-
Double click on the
StatisticsDemoclass to open it in the Eclipse editor. This class contains a main method,public static void main(String args[])In Java, classes are executable only if a main method is defined.
Classes without amainmethod can be used by other classes, but they cannot be run by themselves as an entry point for the Java Virtual Machine (JVM). -
Click on the "play" button as highlighted (click "Proceed" if prompted):
Though the program runs, it does not output correct answers. You will need to modify these classes to complete the program.
- Implement the
getMax()method in theStatisticsclass. Use thegetMin()method for directions on syntax. - Implement the
getSum()method in theStatisticsclass. Use the other methods for direction on syntax. - Rerun the program to verify that it now works.
The program you've completed is interactive in that it prompts the user for input. You will now change the program to instead use command line arguments to read in the list of numbers directly from the command line.
Command line arguments are available to your main method through
the args array of Strings. The size of this array
can be obtained by using args.length which is an
integer. Modify your code to iterate through this array and convert
the arguments to integers using the following snippet of code:
for(int i=0; i<args.length; i++) {
  array[i] = Integer.parseInt(args[i]);
}
The command line may not be apparent as you are using an IDE.
However, it is still available to you. Instead of clicking the "Play"
button to run your program, click the down arrow right next to it.
Then select "Run Configurations". This brings up a dialog box with
which you can run custom configurations. Click the Arguments tab and
enter a space-delimited list of numbers under "Program Arguments"
and click "Run".
In the next activities you'll get more familiar with using Eclipse and the convenient functionality IDEs provide.
No man is an island. Good code depends on selecting and (re)using standard libraries whenever possible so that you are not continually reinventing the wheel. This activity will familiarize you with how to import and use an external Java library. Java libraries are usually packaged into JAR Java ARchive files which contain a collection of compiled class files and other resources necessary to use the library.
- You'll notice that there are compilation errors in the
Birthday.javafile. This is because this class uses other classes that are not available in the standard Java Development Kit (JDK). It instead uses classes from the Joda-Time library; a library of useful classes and utilities for dealing with dates, times, intervals, durations, etc. - The JAR file,
joda-time-2.0.jarhas been included in the project in thelibfolder. External libraries are usually kept in a hierarchy of folders like this (you can create your own folders by right-clicking the project and selecting "New" then "Folder") - Right-click the JAR file and select "Build Path" then "Add to Build Path." The library is now included in your project and the compiler errors should go away.
Though the syntax errors should now be resolved, the code isn't pretty making it difficult to read and understand. Eclipse provides a built-in code formatter functionality. Typically if you write good code to begin with it will automatically provide consistent indentation and other stylistic features. It is best practice to get in the habit of writing good, clean code automatically. However, if you need to clean up a file in one shot you can do use the auto-formatter feature.
- On Windows: press
control-shift-fto reformat the code - On Mac: press
shift-command-fto reformat the code
Another issue with the code is that it is using lower_underscore_casing
for some of its variables. Change the variable names to the preferred
lowerCamelCasing convention in Java. You could do this manually but
a neat trick that most IDEs provide is as follows.
- Highlight the variable name (any instance will do)
- Right click and select
RefactorthenRename - Type the new variable name and hit enter and it will automatically be changed for all instances!
Finally, every non-trivial class and method should have documentation.
In Java, it is standard to use doc-style or "javadoc" comments. Look
at the Statistics.java file again to see the format for these style of comments.
Add documentation to this file to complete it.
Though the program should have no syntax errors, if you run it, no output will be displayed. You need to complete the program as follows.
- For the variables, name, month, date, and year, enter your own information (your name and your birthday)
- Add appropriate code (using
System.out.println()) which prints to the standard output a full line) a greeting similar to the following.Greetings, NAME. Today you are XX years, XX months, and XX days old.Of course, the placeholders should be replaced with variable values.
In Java, variable values can be concatenated with strings using the+(plus) operator. - Add a conditional statement that, if today is the user's birthday
will output
Happy Birthday. If it is not the user's birthday, outputYour friends have XX shopping days until your next birthdayagain with an appropriate variable value.
Every lab will come with a collection of test files that contain a suite of unit tests using the JUnit testing framework. Before you submit your lab, you should run these tests locally to verify that your code is correct.
- Open the
StatisiticsTests.javasource file in thesrc/test/javasource folder. This file contains several unit tests written using JUnit annotations. You are encouraged to explore how these tests are written and work and to even add your own tests but otherwise, the file is complete. - Run the test suite by clicking the usual "Play" button. A report will be presented in a JUnit tab detailing which test cases pass and which fail along with expected output and the actual output (for failed test cases).
- Address any issues or failing tests by debugging your code and rerun the test suite until all tests pass.
Your assignments will include a programming portion that will require you to hand in source files and other artifacts for graders to compile and evaluate. To do this, you will use a webhandin.
-
Open a browser to https://cse-apps.unl.edu/handin
-
Login with your Canvas credentials
-
Click on Lab 1.0 and hand in the
Statistics.javasource file.
You can either click the large "handin" area and select the file or you can drag-drop the files. You will be able to re-handin the same file as many times as you want up until the due date.
Now that the file has been handed in, you can "grade" yourself by using the webgrader
- Open a new tab/window and point your browser to one of the following URLs depending on the version of the course you are enrolled in:
- CSCE 156: https://cse-linux-01.unl.edu/~c-cbourke3/CSCE156/grade/
- CSCE 156H: https://cse-linux-01.unl.edu/~c-cbourke3/CSCE156H/grade/
- ECEN 156: https://cse-linux-01.unl.edu/~c-cbourke3/ECEN156/grade/
-
Login with your Canvas credentials if necessary and select the appropriate assignment and click "Grade"
-
Observe the expected output and compare it to your output to be sure that your program is correct.
For labs, the grader script simply runs the provided JUnit test suite, but it may run additional or modified tests. In any case, be sure your code compiles, runs and passes all tests in the webgrader. Address any issues and resubmit as many times as you like up to the due date. Only labs that pass all tests will be given credit.
Congratulations on your first lab!
