API LINK: https://mbonu-chinedum-lendsqr-be-test.herokuapp.com/
Mobile Application Link: link
At Lendsqr , many of our lenders use our mobile apps to reach over half a million customers.
At this scale, we use NodeJS with TypeScript as its backend software development stack which allows us to rapidly ideate and release features and functionality.
This application sole function is to allow users register, login, perform withdraws, transfer funds and check their respective account balance.
This application was hosted on the cloud platform heroku, for testing purposes go to the following link provided above.
The tech stack used to build this application compromises of the following:
- Nodejs
- sqlite3
- morgan
- Jsonweb token (JWT)
- expressjs
Also, this application programming interface also has an inbuilt logging function that logs all user activities and transactions. The main purpose of the logging function would be explained later in this section of the readme file.
In order to use or test this application you would require an application programming interface like postman or curl to perform request which could be POST or GET request to the server hosted on heroku.
The problem statement is as follows:
You are required to build an MPV wallet service where the following occurs: '
- A user can create an account
- A user can fund their account
- A user can transfer funds to another user's account
- A user can withdraw funds from their account
So as stated above, inorder to build such an application, you would need a database management system to store the values for each transaction, and log each respective transaction performed by each user using the application.
you would also need some kind of authentication/validaton system to validate users passwords before giving them access to their respective accounts.
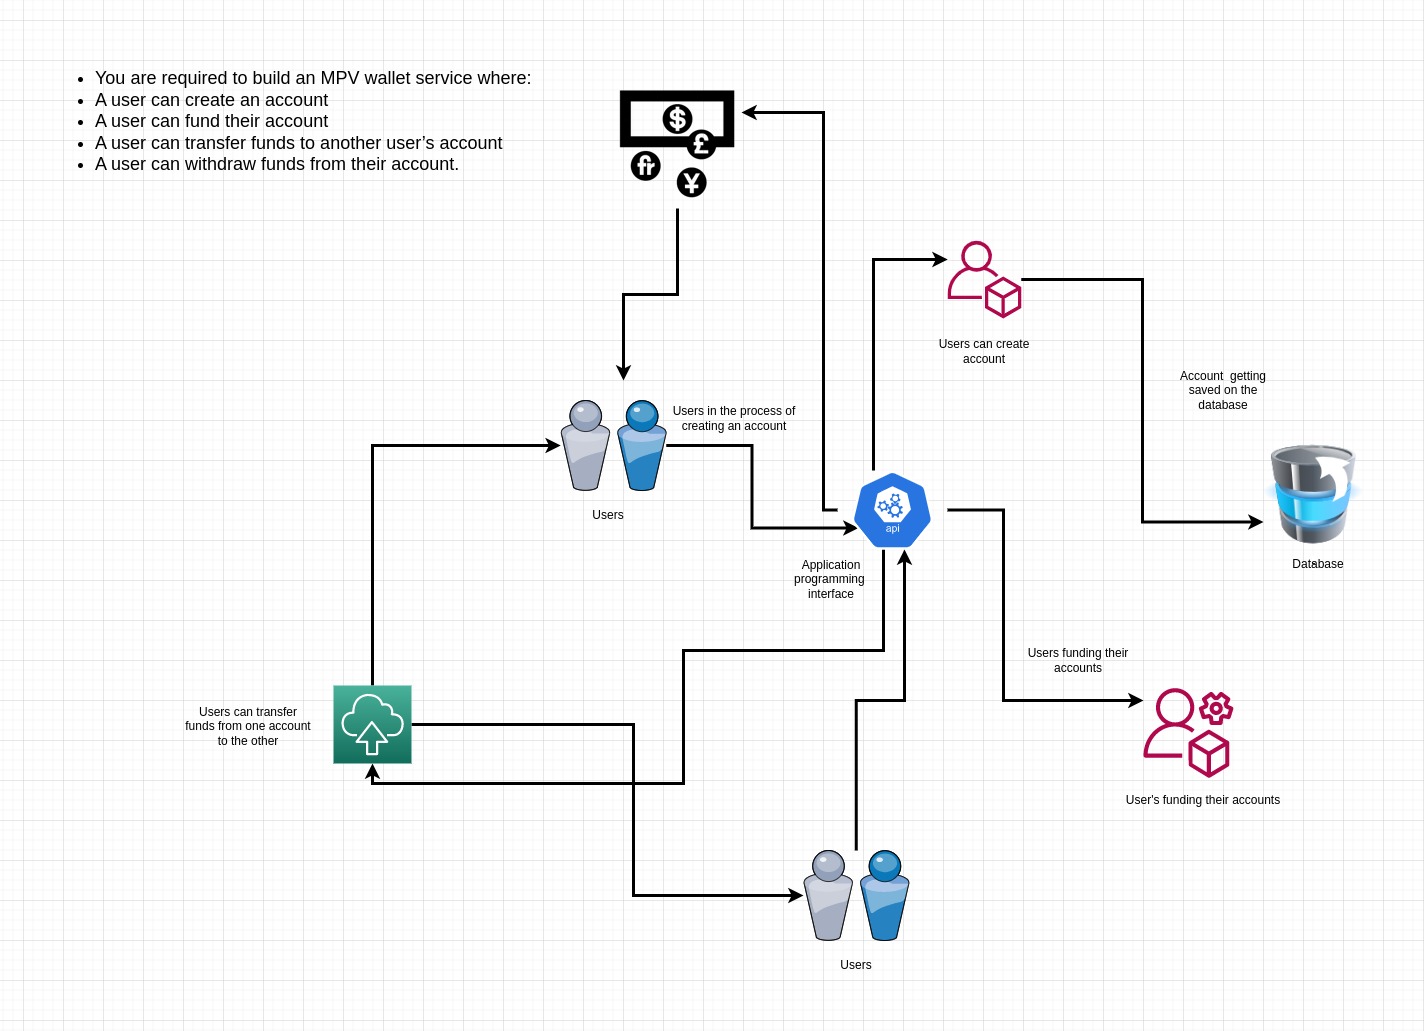
So to build this robust application programming interface, one need to draft out a block flow diagram explaining the working principle of how this application programming interface should function.
Below is the diagram explaining how this application works.
Inorder to understand how this application works, you need to download postman or curl on you desktop or laptop pc and follow the instructions below.
The first step is to register a user on the application programming interface, and to do that keep on reading this readme file.
POST REQUEST: url: https://mbonu-chinedum-lendsqr-be-test.herokuapp.com/register
To register a user access the following link using a POST HTTP request on your POSTMAN . And specify the following parameters in a json format which are:
{
    "firstname": "your-firstname",
    "lastname": "your-lastname",
    "age": "your-age",
    "email": "your-email",
    "password": "your-password",
    "account_balance": "the-starting-account-balance",
    "status": "create_account"
}
The following parameters could be explained in more details:
- The firstname: This is your firstname you want to use when registering the account.
- The lastname: This is your lastname you want to use for registration
- The age : This is the age of the user.
- The password : The password of the user | the password used for creating the account.
- The account_balance : The starting account balance value, this could be 0.00, or 2500.
N/B: When specifying the account value, specify the value as numbers, and commas should not be included as values e.g 2,500 is not allowed for the account balance. Use only number and floating point values, Commas are not allowed - The status : This is the instruction given to the logging module telling it that the transaction in progress is a "create_account" transaction. And as such, this section should be left as it is for easy logging and saving the respective transaction.
N/B: Leave the status field as "create_account" , when specifying other parameters
The image below explains how to perform a POST request to the register route
POST REQUEST url: https://mbonu-chinedum-lendsqr-be-test.herokuapp.com/api/signin
To be able signin into the application, access the following link above using a POST HTTP request on your POSTMAN . Then specify the following parameter in a json object format which includes:
{
    "email": "your-registered-email",
    "password": "your-password"
}
The following parameters could be explained in more details below:
- The email : This is the email address you used to register on the register route
- The password : This is the password of the user | the passwod you used during registration
N/B: Take note that the returned json object gives you a token value which could be used for further authentication purposes.
POST REQUEST url: https://mbonu-chinedum-lendsqr-be-test.herokuapp.com/api/get-funds
To view a registered user account details, access the following link using a POST HTTP request on your POSTMAN . Then specify the following parameters in a json object format which are:
{
    "email": "your-registered-email",
    "password": "your-password",
    "status": "view_funds"
}
The following parameters could be explained in more details below:
- The email : This is the email address you used to register on the register route
- The password : This is the password of the user | the password you used during registration
- The status : This is the instruction given to the logging module, telling it that the transaction which is in progress is a "view_funds" transaction. And as such, this field should not be changed, it should be left as it is for easy logging and saving of the respective transaction values.
N/B: When specifying the json object file above, leave the status field as "view_funds" . The reason for this is for the application to save the status when logging the transaction for every operation.
The image below explains how to perform a POST request to the register route
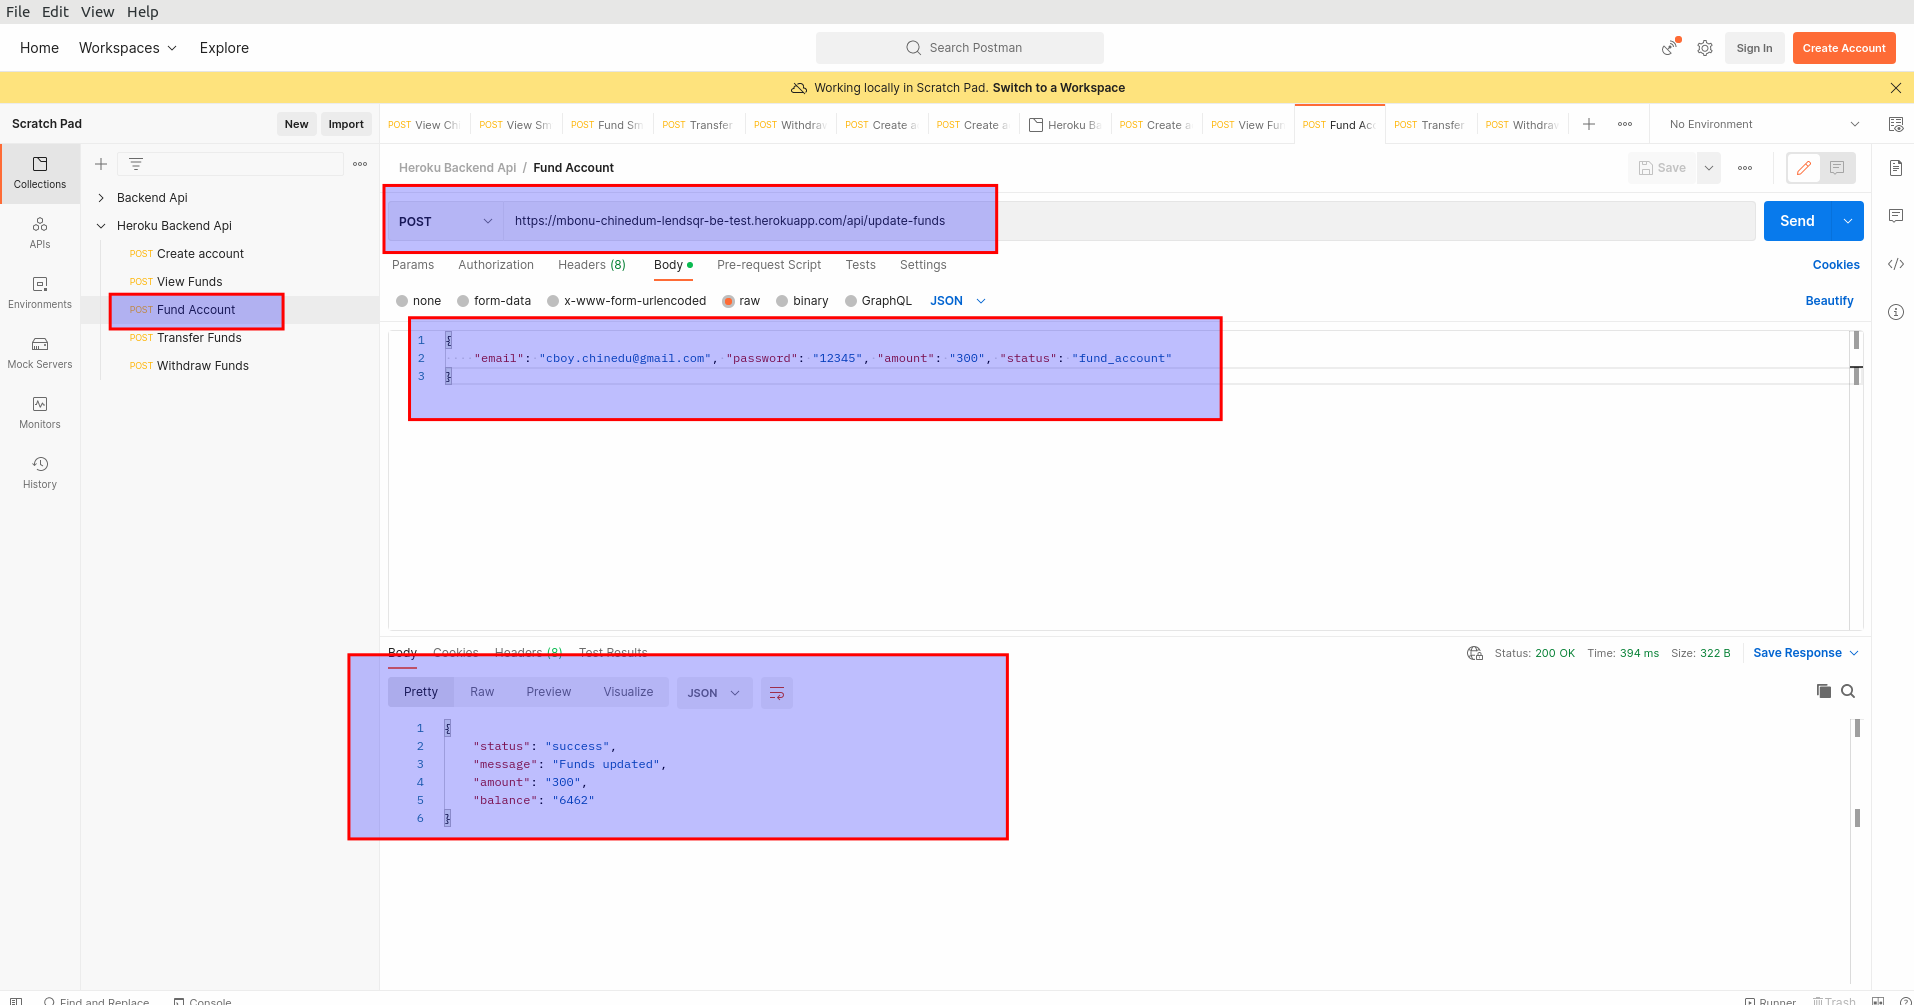
POST REQUEST url: https://mbonu-chinedum-lendsqr-be-test.herokuapp.com/api/update-funds
To fund a registered user account, access the following link using a POST HTTP request on your POSTMAN or CURL . Then specify the following paramters as a json object format, and they are:
{
    "email": "your-email-address",
    "password": "your-password",
    "amount": "the-fund-amount",
    "status": "fund_account"
}
The following parameters could be explained in more details:
- The email : This is the email address of the user that wants to fund his account
- The password : This is the password of the user that wants to fund his account
- The amount : This is the amount for which the user want to fund his account with, N/B: the values here must be integers or floating point numbers only, values with commas are not accepted by the program e.g 2,500 or N2,408 are not accepted
- The status : This is the instruction given to the logging module telling it that the transaction in progress is a "fund_account" transaction. And as such, this section should be left as it is for easy logging and saving the respective transaction values.
N/B: When specifying the json object file above, leave the status field as "fund_account" . The reason for this is for the logging function to log the transaction as a funding transaction.
The image below explains how to perform a POST request to fund a user's account with a specified amount value
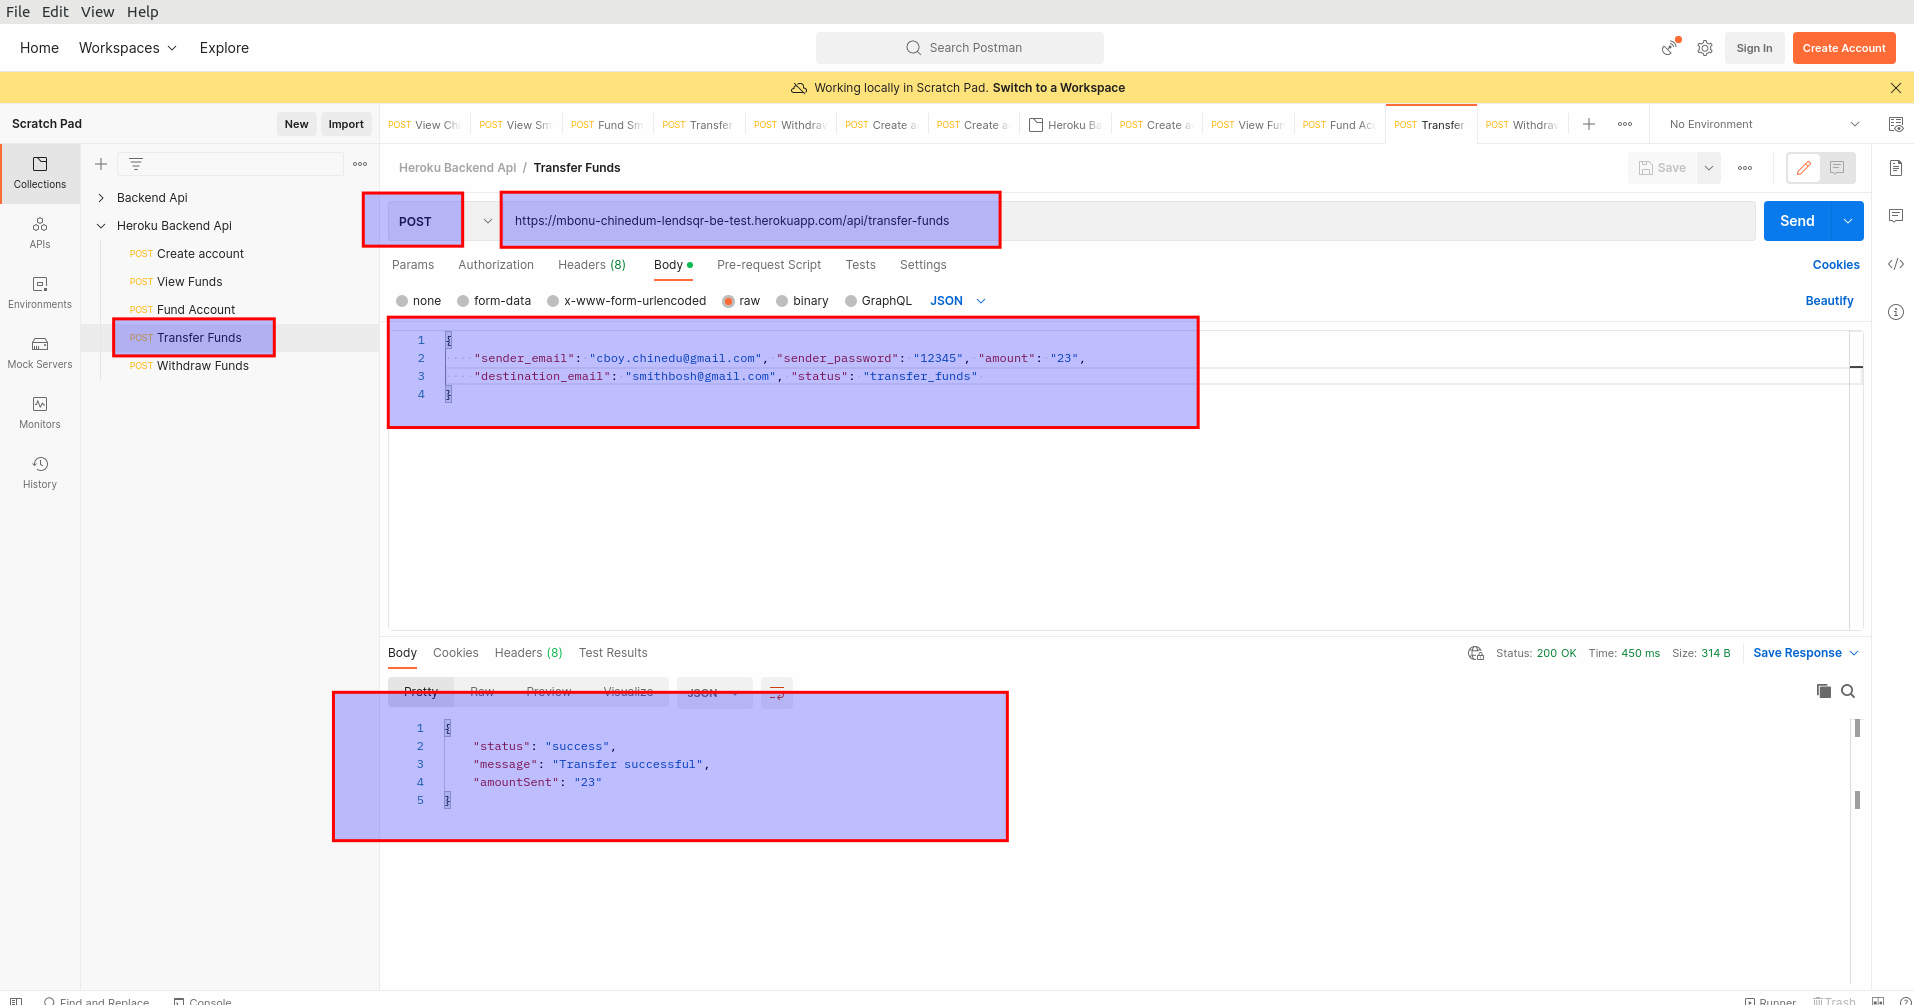
POST REQUEST url: https://mbonu-chinedum-lendsqr-be-test.herokuapp.com/api/transfer-funds
To transfer funds from one user account to another, you need to access the following link above on your POSTMAN or CURL using a POST request by specifying the following parameters in a json format.
Also note that you need to specify the correct values, e.g the password, the sender email, and the destination email address.
Failure to specify the correct values would result in an error for the transaction.
{
    "sender_email": "the-email-the-funds-are-leaving",
    "sender_password": "sender-password",
    "amount": "the-amount-you-are-sending",
    "destination_email": "the-receiver-email-address",
    "status": "transfer_funds"
}
The following parameters could be explained in more details;
- The sender_email : This is the email address you are sending the money from. N/B: Funds leaves this account.
- The sender_password : This is the password of the sender's account, and the values needs to be correct for a successful transaction.
- The amount : This is the amount the sender want to send from his account to the receiver/destination account. N/B: The values specified in this section should be integers or floating point numbers. Numbers like 2,500 or N2,345 or $300.00 are not allowed. You can only specify values like e.g 3445, 45500 and so on.
- The destination_email : This is the email address you are sending the money into. A point to take note is that the destination email address must be registered on the application/server or it would result into an error. So ensure the destination email value is correct.
- The status : This is the instruction given to the logging module telling it that the transaction in progress is a "transfer_funds" transaction. And as such, this section should be left as it si for easy logging and saving the respective transaction.
N/B: When specifying the json object file above, leave the status field as "transfer_funds" . The reason for this is for the loggin function to log the transaction as a transfer of funds transaction.
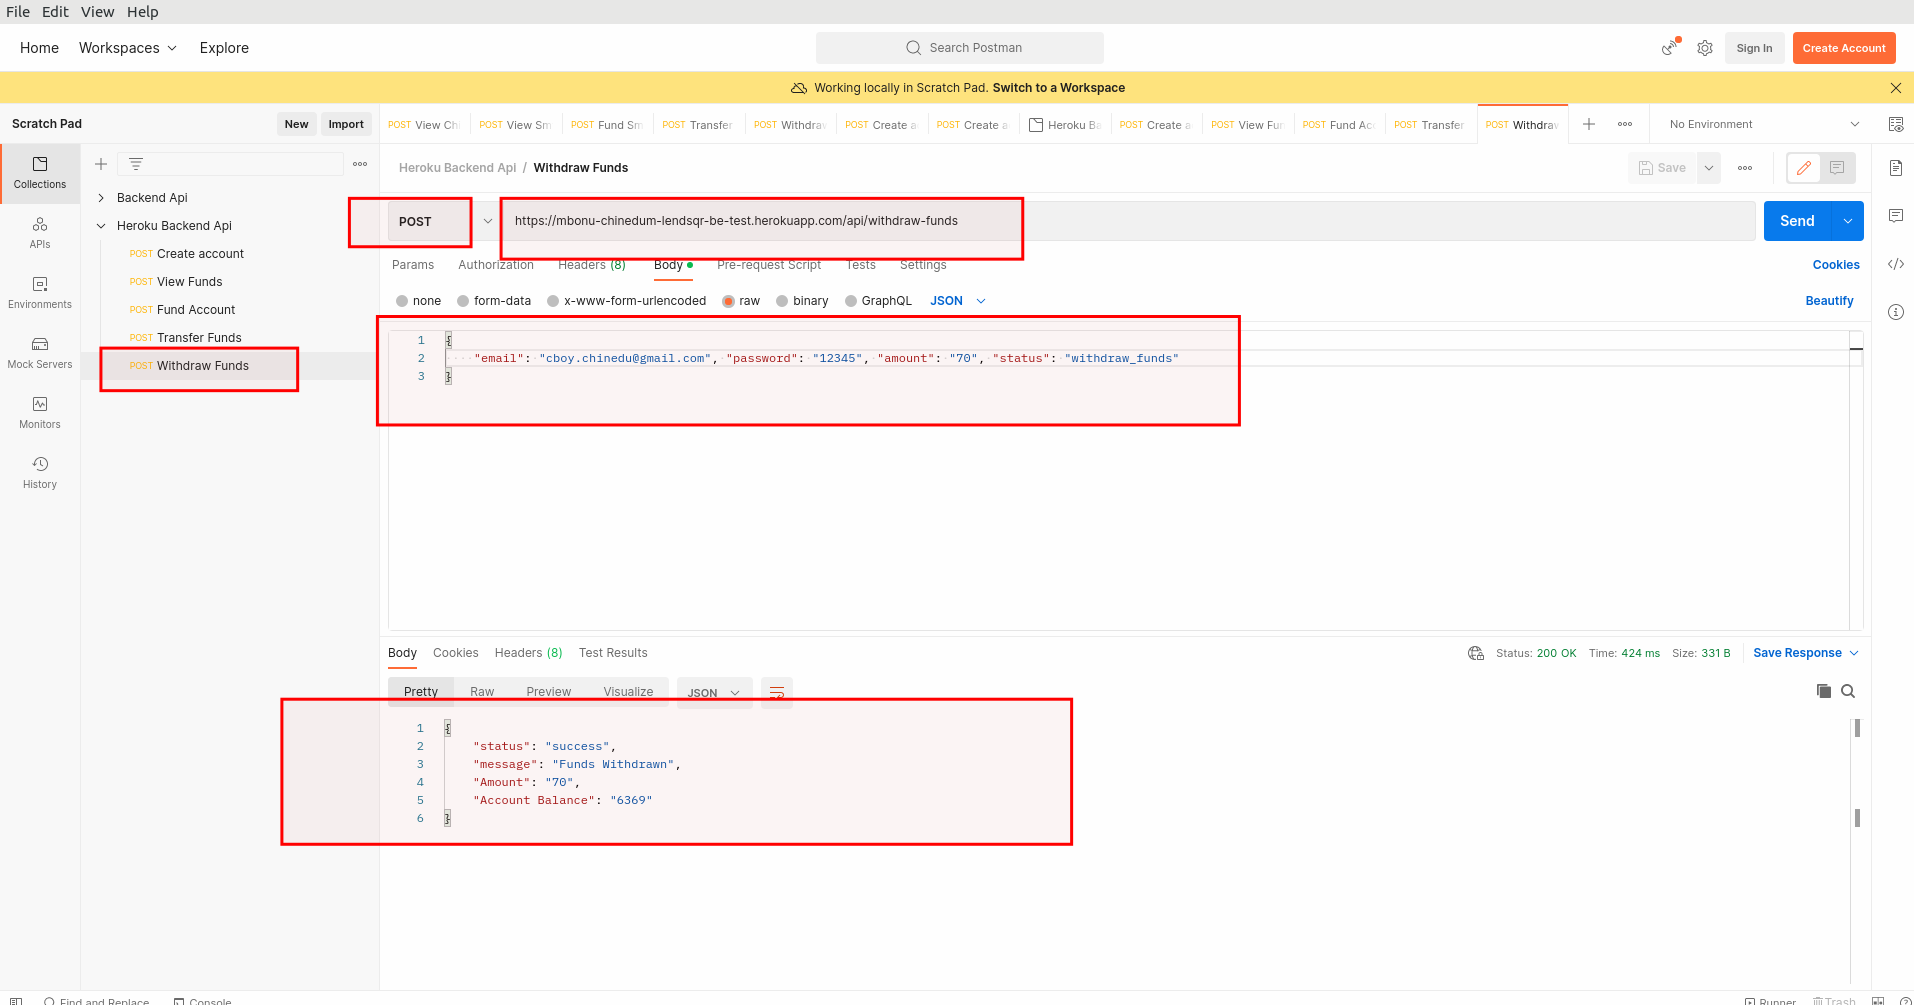
POST REQUEST url: https://mbonu-chinedum-lendsqr-be-test.herokuapp.com/api/withdraw-funds
To withdraw funds from a specified account, you need to access the following link above on your POSTMAN or CURL using a POST request by specifying the followiing parameters in a json format.
Also take note that you need to specify the correct values, e.g the password, and the correct email address for the account you want to withdraw funds from.
Failure to specify the correct values would result in an error for the transaction.
{
    "email": "your-email-address",
    "password": "your-password",
    "amount": "the-amount-you-want-to-withdraw",
    "status": "withdraw_funds"
}
The following parameters could be explained in more details;
- The email : This is the email address you want to withdraw the funds from. Remember, the email must be a registered account on the server, if not it could result into errors.
- The password : This is the password of the account
- The amount : This is the amount the registered user wants to withdraw from his/her own account. Also take note that the values accepted for the amount are integers, and floating point numbers. N/B: Numbers with commas, fullstop, and symbols are not accepted.
- The status : This is the instruction given to the logging module/function telling it that the transaction in progress is a "withdraw_funds" transaction. And as such, this section should be left as it is for easy logging and saving the respective transaction.
N/B: When specifying the json object file above, leave the status field as "withdraw_funds" . The reason for this is for the logging function to log the transaction as a withdraw of funds.
To download this application and use, open a command prompt or terminal and clone a copy of this repo.
$ git clone "https://github.com/cboychinedu/lendsqr-be-test-backend"
change directory or move into the folder and type the following commands on your command line.
$ npm install . This command would install all the required dependencies in your working directory. N/B: Edit the app.js file and change the PORT and HOST address to your own port and host address if need be, or run the application locally by using "localhost" as HOST, and port 3001 as port number.
    const PORT = process.env.PORT || 3001;
const HOST = "localhost"; To run the application, open a terminal in your working directory where the files are located, and in the root folder, type the commands below.
$ npm start OR
$ node app.js This would start the nodejs application running on "localhost", and port 3001.
SQLite is a C-language library that implements a small, fast, self-contained high reliability full-featured SQL database engine. SQLite is the most used database engine in the world. SQLite is build into all mobile phones and most computers and comes bundled inside countless other applications that people use every day.
The SQLite file format is stable , cross-platform, and backwards compatible and the developers pledge to keep it that way through the year 2050.
source : link
SQLite was designed to allow the program to be operated without installing a database management system or requiring a database administrator. Unlike client–server database management systems, the SQLite engine has no standalone processes with which the application program communicates. source: link
From your terminal type the following to host this application on heroku
$ heroku login
$ heroku create
$ heroku rename <"app-new-name">
$ git add .
$ git push heroku master
Logging is a process of recording information generated by application activities into log files. Messages saved in the log file are called logs. A log is a single instance recorded in the log file.
- Winston provides logging levels. They indicate the log priority, this gives you the ability to sort out critical logs from logs requiring less attention. For example:
 {
    "error": 0,
    "warn": 1,
    "info": 2,
    "verbose": 3,
    "debug": 4,
    "silly": 5
 }
- Error Log One : this displays the amount, the sender email, destination email, transfer funds status for a transaction that wasn't successful.
- Error Log Two : this displays the destination email address, the status of the transaction, and reason for failure.
- General Log 1: this displays the routes logged by the application, and the ip address that visited them.
- Log Folder : this displays the folder where the log files are saved on the server.
- Success Log: this displays the log for a successful transaction, with the amount, and the email address.
- Success Log: this displays the log for a successful transaction, with the amount, and the status of the transaction. N/B: The need for the status section.
- Success Log: this displays the log for a successful transaction, with the service and status for the funds, here the transaction was for funds being withdrawn.
- Time Log : this displays the log for the time the transaction took place, and was stored on the database.
Contact me for references and additional information.
- Email: cmbonu@protonmail.com
- Number: +234-7081-528827
- Number: +234-9030-045587
Mbonu Chinedum E
- Lendsqr
- MIT
- Apache
- Heroku
All thanks to God Almighty.


