This repository shows how Ceramic can be used together with Verax on-chain attestations as an efficient storage mechanism for off-chain metadata. This brief codebase is intended to be an extension to the Verax tutorial entitled From Schema to Attestation.
Ceramic is a decentralized data network that offers strong provenance and censorship-resistant qualities one would expect from a blockchain, with the cost efficiency, scalability, and querying capabilities one would compare to a traditional database. Users of applications built on Ceramic authenticate themselves using a familiar "Sign in With Ethereum" flow, and data those users create are forever solely controlled by the user accounts that created them. As a protocol, Ceramic can be characterized as a multi-directional replication layer that enables multi-master, eventually consistent databases to be built on top (such as ComposeDB).
In an on-chain attestation context, it may be the case that an individual or entity would want to attest to data that is inherently dynamic and subject to change. For example, within the realm of identity, an individual is likely to take on different roles, responsibilities, personas, and other self-defining characteristics over time. While that person could attest to each change in their identity individually in the form of separate on-chain attestations, this would not only incur cost inefficiencies from transaction fees over time, but would also make it incredibly difficult and inefficient for data consumers (applications, for example) to query and leverage in a meaningful way.
In Ceramic, data is organized into append-only event logs, with each new data event representing a change in that data stream's state. When building with ComposeDB on Ceramic, developers can define schemas (usable by any participant node in the network) that define the specific requirements of any stream's scalars that wish to implement that schema, including restrictions on how many schema model instances a given user can have, what subfields must be included, and so on. ComposeDB also uses GraphQL to offer developers a familiar, easy-to-use querying layer.
Finally, after the genesis commit (or initiating data event), a stream's ID will never change, no matter how many times it's updated by the controlling account. This provides a suitable identifier for developers who wish to point on-chain events to static off-chain identifiers.
For a more thorough dive on Ceramic's qualities, read Data Provenance in ComposeDB.
This tutorial uses a simple example of a Developer Profile. Therefore, we will swap out several sections of this Verax tutorial to meet our custom use case.
This tutorial will also utilize an example demo application meant to run locally. We recommend cloning the repository to your device and following along in your text editor of choice:
git clone https://github.com/ceramicstudio/verax-tutorial && cd verax-tutorialFollow the instructions in the Verax tutorial linked above (using Linea Testnet) until you reach the section labeled "3. Create a Schema" (you can do so in a separate repository, or by creating a dummy file in this repository to follow the steps).
The Verax schema we will be using for this tutorial will be intended to point to a Ceramic Stream ID. Therefore, to keep things simple, we will define our Verax schema as follows:
const SCHEMA = '(string ceramicProfileStream)';Let's customize the metadata associated with our Verax schema as well:
const txHash = await veraxSdk.schema.create(
    "Ceramic Tutorial Schema",
    "This Schema is used for the Ceramic tutorial and uses a ceramicProfileStream string to point to the Ceramic stream representing the users profile.",
    "Ceramic",
    SCHEMA,
);
You can continue following the instructions as the Verax tutorial entails until you reach "4. Create a Portal". We can go ahead and customize this portion as well:
const txHash = await veraxSdk.portal.deployDefaultPortal(
    [],
    "Ceramic Tutorial Portal",
    "This Portal is used for the Verax with Ceramic tutorial",
    true,
    "Verax with Ceramic Tutorial",
);
Navigate to line 156 of the profile component in your local repository and replace the string you see with the transaction hash you obtained from creating your portal. This will ensure that your portal ID is pulled each time you create an attestation.
You are finally ready to start creating attestations!
Install your dependencies in your local cloned repository:
npm installOnce your dependencies are installed we will need to create a Ceramic node configuration, which will also require a node admin DID. For this application, we're going to be running a local node configuration (for more on this, visit Running Locally in the Ceramic docs).
While we won't go into detail around all the options available to you in this tutorial, the main takeaway is that our server configuration dictates setting such as which SQL database our indexing protocol will use, whether we want our IPFS service to run separately or bundled, and other details like that.
To keep things simple, we've created a script for you to use in order to create your configuration and admin DID. Simply run the following in your terminal:
npm run generateYou should now see an admin seed and settings appear in both your admin_seed.txt and composedb.config.json files.
Finally, let's make sure we're running the correct version of node:
nvm use 20As mentioned above, we will be using the paradigm of a developer profile for this tutorial. As such, we've defined a very simple ComposeDB schema to meet this requirement:
enum Proficiency {
  Beginner
  Intermediate
  Advanced
  Expert
}

type Language {
  JavaScript: Proficiency
  Python: Proficiency
  Rust: Proficiency
  Java: Proficiency
  Swift: Proficiency
  Go: Proficiency
  Cpp: Proficiency
  Scala: Proficiency
  WebAssembly: Proficiency
  Solidity: Proficiency
  Other: Proficiency
}

type DeveloperProfile
  @createModel(accountRelation: SINGLE, description: "A developer profile") {
  developer: DID! @documentAccount
  name: String! @string(maxLength: 100)
  languages: Language!
  description: String! @string(maxLength: 100000)
  projects: [String] @string(maxLength: 100) @list(maxLength: 10000)
}
Important things to note here:
- The
accountRelation: SINGLEensures that any given authenticated user can only ever create 1 instance of this data type (whereasaccountRelation: LISTwould allow users to create as many as they wanted) - The
!next to the scalar definition defines those fields as required. Therefore, a user could create aDeveloperProfileinstance without any projects, if they wanted to
While this is not a particularly complex schema, we'll include several additional tutorials at the end of this document you can explore that introduce additional complexity and cool features.
Finally, we've create a script for you that deploys this definition onto your local node for you during the start-up sequence, and writes the composite runtimes to our generated folder that we'll use later to access our schema definitions. When running in production, your application would instead be using a live node endpoint that has already endured this model deployment sequence, and therefore, the only artifact needed by your production app would be the endpoint and the canonical .js composite runtime definition.
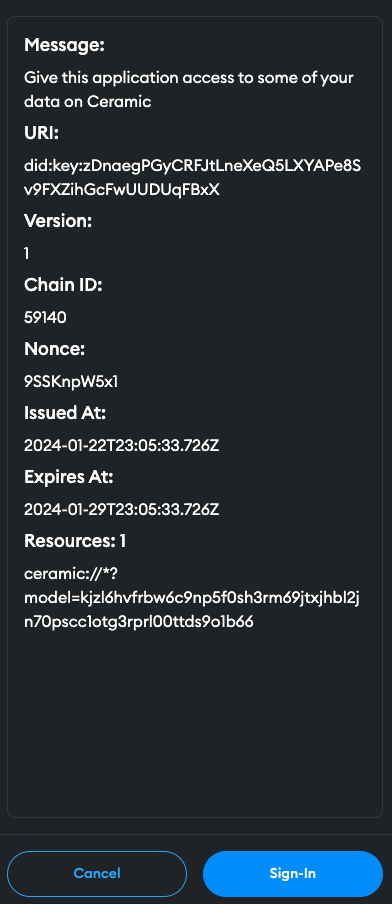
Users write data to Ceramic in the form of user sessions derived from a "Sign in With Ethereum" flow. This action allows applications temporary access (default is a 24-hour period) to edit Ceramic data on the authenticated user's behalf, and also defines limited scope solely for the models used for that application. Our application will authenticate the user on our local node, and grant us access to create and edit the DeveloperProfile data on the user's behalf.
If you look into the fragments index file, you can see this in action. More specifically, on line 47, you can see how we're creating a session with the limited scope over compose.resources (taken from our imported runtime definition).
We're finally ready to start up the application! In your terminal (running node v20), run the following:
npm run devDuring the authentication sequence, you will see a special message that looks similar to this:
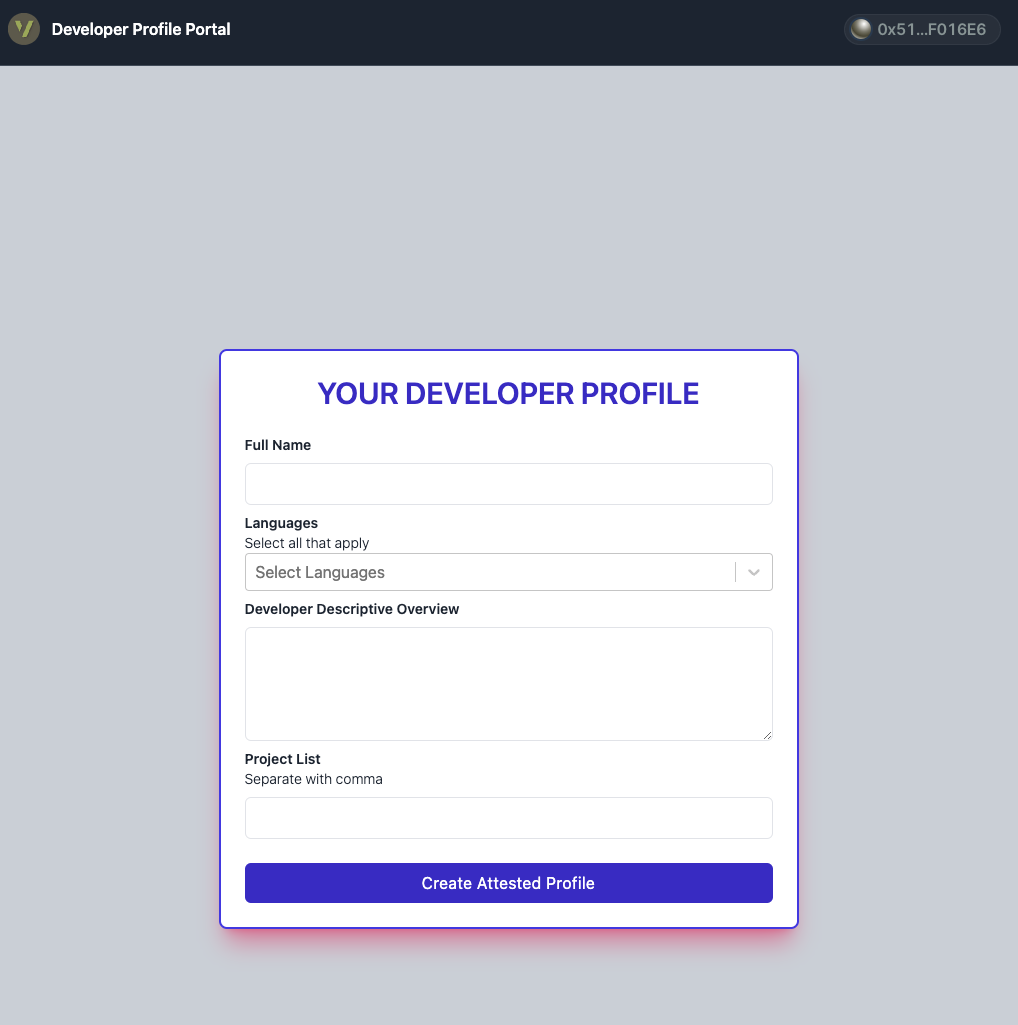
After authenticating yourself (you will be prompted to move to Linea Testnet, by the way), you should see the following in your browser:
Fill in some profile information including your name, programming languages + corresponding expertise, a description of yourself, and a list of projects you're associated with.
Once ready, you can go ahead and submit your profile. You can also follow along in the profile component, starting with the invocation of createCeramicDoc on line 64. You'll notice that were using our newly defined state variables in our ComposeDB mutation query. If our mutation is successful, we obtain the Ceramic Stream ID from the document we just created/mutated, and move on to createVeraxAttestation on line 141.
Since you've already edited line 156 to align with your portal's creation hash, your portalAddress on line 161 will be defined as your portal's unique contract address. More importantly, notice how we're using the id (Ceramic Stream ID) when defining our attestationData on line 171, thus creating a link between our immutable on-chain attestation and our static Ceramic stream identifier.
Back in your UI, you should now be able to access two new buttons - one will show you your stream's raw data read directly from your local node endpoint, and the other will take you to Linea Testnet Scan where you can observe the on-chain transaction result (this link may take a few moments to work).
Now that you've learned how to create an on-chain attestation to data on Ceramic that you can continue to mutate without needing to create a new attestation, try altering the code in the profile component to remove the call to create a new on-chain attestation (you can simply comment out lines 135-137). Now, when you make changes to your profile, your data lineage will be preserved and accessible by the static stream ID you recorded when creating your on-chain attestation.
To learn more about Ceramic please visit the following links
- Ceramic Documentation - Learn more about the Ceramic Ecosystem.
- ComposeDB - Details on how to use and develop with ComposeDB!
- Off-Chain EAS Attestations - Create off-chain attestations with EAS while using ComposeDB for storage and querying
- Data Control Patterns in Decentralized Storage - Learn how different teams are taking advantage of various data control patterns in the dStorage space
- AI Chatbot on ComposeDB - Build an AI-powered Chatbot and save message history to ComposeDB
- ComposeDB API Sandbox - Test GraphQL queries against a live dataset directly from your browser
- Ceramic Blog - Browse technical tutorials and more on our blog
- Ceramic Discord - Join the Ceramic Discord
- Follow Ceramic on Twitter - Follow us on Twitter for latest announcements!

