- bring your laptop
- if absent, install and set up git
- if absent, install VirtualBox
- if absent, install VirtualBox Extension Pack
- if absent, install Vagrant
- git clone https://github.com/cgundogan/RIOT-Tutorial.git
- git clone https://github.com/RIOT-OS/RIOT.git
- run the Vagrant RIOT Setup
- bring your laptop
- if absent, install and set up git
- install the build-essential packet (make, gcc etc.). This varies based on the operating system in use.
- Native dependencies
- openOCD
- GCC Arm Embedded Toolchain
- on OS X: Tuntap for OS X
- additional tweaks necessary to work with the targeted hardware (ATSAMR21)
- git clone https://github.com/cgundogan/RIOT-Tutorial.git
- git clone https://github.com/RIOT-OS/RIOT.git
For this tutorial we need to make a simple modification to the Vagrantfile located in the root
directory of RIOT. Please make sure that the RIOT-Tutorial directory is located at the same
level as the RIOT directory. Add the following to line 25 of the Vagrantfile:
config.vm.synced_folder "../RIOT-Tutorial", "/home/vagrant/RIOT-Tutorial"
If you have started the VM before, then you need to issue a vagrant reload in order for the change
to take effect.
-
Run
git checkout -f task_1 -
First, we need to setup the necessary virtual network interface
tap0:sudo ip tuntap add tap0 mode tap user ${USER} sudo ip link set tap0 up
-
Change into the application directory of this repository and run the following command:
make all term
-
Run
helpto see a list of all available commands.> help help Command Description --------------------------------------- reboot Reboot the node ps Prints information about running threads. ping6 Ping via ICMPv6 random_init initializes the PRNG random_get returns 32 bit of pseudo randomness ifconfig Configure network interfaces txtsnd send raw data ncache manage neighbor cache by hand routers IPv6 default router list -
Run
ifconfigto see the configured network interfaces and additional information.> ifconfig ifconfig Iface 4 HWaddr: 4a:ba:26:52:88:dd MTU:1500 HL:64 RTR RTR_ADV Source address length: 6 Link type: wired inet6 addr: ff02::1/128 scope: local [multicast] inet6 addr: fe80::48ba:26ff:fe52:88dd/64 scope: local inet6 addr: ff02::1:ff52:88dd/128 scope: local [multicast] inet6 addr: ff02::2/128 scope: local [multicast] -
Copy the link-local address of the RIOT node (prefixed with
fe80, without the/64) and try to ping it from your host machine.ping6 fe80::48ba:26ff:fe52:88dd%tap0If this notation does not work, then try the following command:
ping6 -I tap0 fe80::48ba:26ff:fe52:88ddIt is necessary for link-local addresses to specify the desired interface.
-
Lookup the link-local address of your
tap0interface on your host machine:> ip addr show dev tap0 14: tap0: <BROADCAST,MULTICAST,UP,LOWER_UP> mtu 1500 qdisc fq_codel state UP group default qlen 500 link/ether 4a:ba:26:52:88:dc brd ff:ff:ff:ff:ff:ff inet6 fe80::48ba:26ff:fe52:88dc/64 scope link valid_lft forever preferred_lft forever
Copy this link-local address (again, without
/64) and call the following command from within the RIOT shell:> ping6 fe80::48ba:26ff:fe52:88dc ping6 fe80::48ba:26ff:fe52:88dc 12 bytes from fe80::48ba:26ff:fe52:88dc: id=84 seq=1 hop limit=64 time = 0.218 ms 12 bytes from fe80::48ba:26ff:fe52:88dc: id=84 seq=2 hop limit=64 time = 0.234 ms 12 bytes from fe80::48ba:26ff:fe52:88dc: id=84 seq=3 hop limit=64 time = 0.218 ms --- fe80::48ba:26ff:fe52:88dc ping statistics --- 3 packets transmitted, 3 received, 0% packet loss, time 2.061141 s rtt min/avg/max = 0.218/0.223/0.234 ms -
(Optional) Create a second tap interface (
tap1) and start the second instance of RIOT with the environment variablePORT=tap1. Now you can try to ping between two RIOT instances.
-
Get to know your hardware
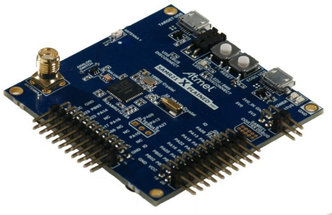
MCU ATSAMR21G18A Family ARM Cortex-M0+ Vendor Atmel RAM 32Kb Flash 256Kb Frequency up to 48MHz FPU no Timers 6 (1x 16-bit, 2x 24-bit, 3x 32-bit) ADCs 1x 12-bit (8 channels) UARTs / SPIs / I2Cs max 5 (shared) Vcc 1.8V - 3.6V -
Run
git checkout -f task_2 -
To compile an application for a specific board, we can make use of the
BOARDenvironment variable.BOARD=samr21-xpro make all flash term
This command will compile the application, burn the image onto the
samr21-xproand open a connection to the RIOT shell. -
Find out the link-local address that is configured on the radio interface with
ifconfig. -
Ask your neighbors for their link-local addresses and use the
ping6command to ping other nodes. You can specify the amount of ping requests, the delay for each ping request and the payload length.ping6 10 <IPv6-address> 0 0This will send 10 ping requests to the specified IPv6 address with 0 delay and no payload.

-
Run
git checkout -f task_3 -
Add a function with the following signature to
main.c:int cmd_func(int argc, char **argv);
As an example, you can implement this function to print out a certain string by using
printf();orputs();. You could also turn the onboard LED on withLED_ON;and turn it off withLED_OFF;. Any parameters following the shell command in the RIOT shell are accessible from theargvvariable.argccontains the number of parameters used to call this shell command plus one for the name of the command. If you are usingLED_ON;orLED_OFF;then you need to include the fileboard.h.Your function must return
0if it runs successfully and-1if an error occurs. -
Add your function to the
shell_commandsarray:static const shell_command_t shell_commands[] = { { "command", "command description", cmd_func }, { NULL, NULL, NULL } };
-
Flash the modified code to your board and test your new shell command.
BOARD=samr21-xpro make all flash term
You can verify with
helpif your command was picked up by the shell handler. Call your shell command and observe the output. -
Run
git checkout -f task_3_solutionto see one of many solutions. Keep in mind that all changes that you made to the working directory will be discarded when running this command. -
(Optional) Have a peek at RIOT's shell commands in
/sys/shell/commands.
-
Run
git checkout -f task_4 -
CoAP is a web transfer protocol with very similar features to HTTP. In fact, CoAP was designed to translate easyily to HTTP, but still meets necessary requirements to operate with constrained devices in constrained networks. In order to provide a new service that can be requested from a CoAP client, we need to take three steps:
- add a new callback function that is called whenever the service is requested. This callback function determines the content of the response.
- add an
end-point path. This basically resembles an URI that we need to link to the new callback function. - add a new
end-point. This is the structure that links the new callback function and the URI together.
-
In order to add a new CoAP end-point we first need to create a callback function in
main.c. Have a look at thehandle_get_riot_board()function. It is necessary that your function implements the same signature and returns the same values ashandle_get_riot_board(). In your new callback function, modifyresponseso that it includes the status of the LED. -
Add an
end-point paththat represents your new callback function. You can chain several strings together like it was done forpath_riot_board. These strings will resemble the url that is used to call your new callback. For example,path_riot_board:{ "riot", "board" }becomesriot/board. -
Add the new
end-point. UseCOAP_METHOD_GETas the request type and link to your custom callback function andend-point path. Use0for the content type (ct=0). -
Flash the binary of your solution to the hardware:
BOARD=samr21-xpro make all flash term
-
Approach the instructor and announce your global IPv6 address (not beginning with
fe80). The instructor will then do a CoAP request in order to verify your solution. -
Run
git checkout -f task_4_solutionto see one of many solutions. Keep in mind that all changes that you made to the working directory will be discarded when running this command.
-
Run
git checkout -f task_5 -
This task uses posix sockets in order to drive a simple UDP server and client application. The advantage of using posix sockets is their portability onto other systems that implement the posix API. Have a look at
udp.cand also at the new shell command declared inmain.cto send a UDP message directly from the shell. Give it a try: send a message to your neighbor's IPv6 address with the commandudp <IPv6-address> <msg>. -
The current implementation of the UDP server prints out the received message. Change this behavior in
udp.cto check the incoming message and react appropriately. Turn the LED on if you receiveonand turn the LED off if you receiveoff. Do not forget to mirror the changes to theled_statusvariable. -
Test your implementation with the global IPv6 address of your neighbor's node.
-
The instructor can then again verify with a CoAP request that your program successfully controlled your neighbor's node remotely.
-
Run
git checkout -f task_5_solutionto see one of many solutions. Keep in mind that all changes that you made to the working directory will be discarded when running this command.