This is the OCRus back-end part that preprocess the image and do OCR.
Download and install OpenCV.
- Currently we use OpenCV 2.4.10 because the greater version has some compile issues in Windows.
Download and install GSL
If they are not already installed, you need the following libraries (Ubuntu):
sudo apt-get install autoconf automake libtool
sudo apt-get install libpng12-dev
sudo apt-get install libjpeg62-dev
sudo apt-get install libtiff4-dev
sudo apt-get install zlib1g-dev
Download Leptonica 1.72.
Run following commands to install Leptonica:
tar -xzvf leptonica-1.72.tar.gz
cd leptonica-1.72
./configure --prefix=/path/to/install/leptonica
make
make install (use `sudo make install` if `/path/to/install/leptonica directory` has permission limits)
Download Tesseract 3.02.02 source code.
Run following commands to install Tesseract:
./autogen.sh
LIBLEPT_HEADERSDIR=/path/to/install/leptonica/include ./configure --prefix=/path/to/install/tesseract --with-extra-libraries=/path/to/install/leptonica/lib
make
make install (use `sudo make install` if /path/to/install/leptonica directory has permission limits)
Create a file /etc/ld.so.conf.d/tesseract.conf and add these two lines into the file:
/path/to/install/tesseract/lib
/path/to/install/leptonica/lib
Run following command to link shared libraries:
sudo ldconfig -v
Download English, Japanese, Chinese language trained data. Uncompress these 3 files.
Put the eng.traineddata, jpn.traineddata, chi_sim.traineddata to directory /path/to/install/tesseract/share/tessdata/.
Run following command to add TESSDATA_PREFIX variable to your environment variables.
export TESSDATA_PREFIX=/path/to/install/tesseract/share/
-
NOTE: Language data are in
/path/to/install/tesseract/share/tessdata/, butTESSDATA_PREFIXis/path/to/install/tesseract/share/, notessdata. -
If you want to use other language, please download the corresponding trained data and put the
*.traineddatato the above directory.
- Download Eclipse IDE for C/C++ Developers.
- Start Eclipse. Just run the executable that comes in the folder.
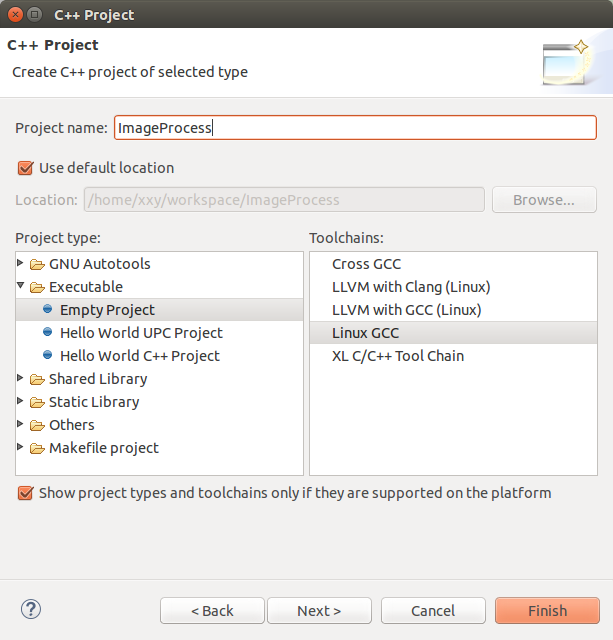
- Go to File -> New -> C/C++ Project
- Choose a name for your project (i.e.
ImageProcess). An Empty Project should be okay.
- Leave everything else by default. Press Finish.
- Git clone this project or download the zip file, extract all the file into this project root directory.
- Add OpenCV, Tesseract, GSL header files and libraries to the project. Do the following:
-
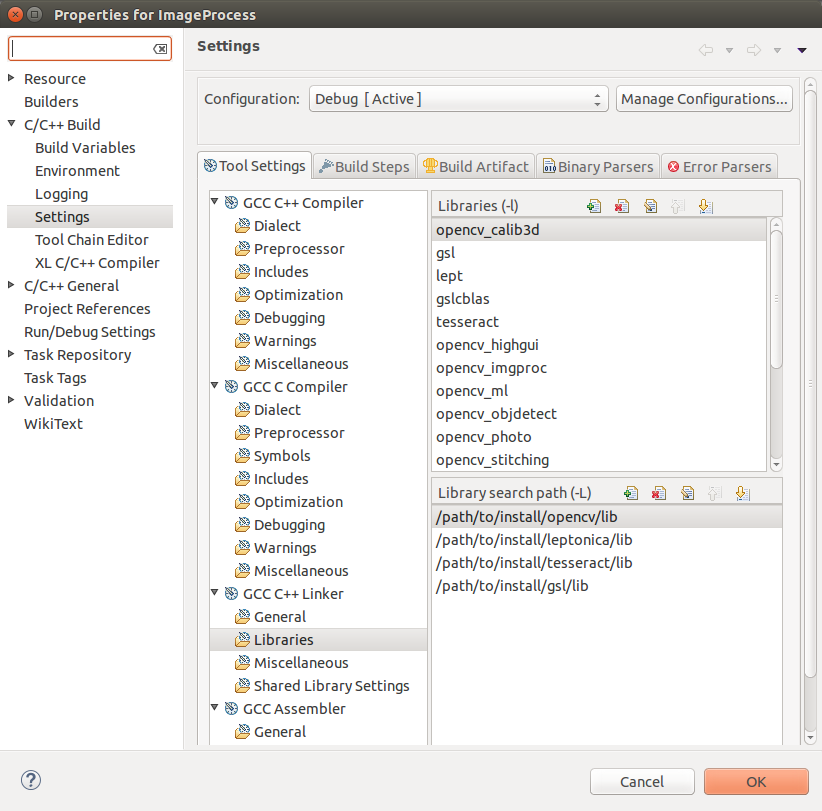
Go to Project–>Properties
-
In C/C++ Build, click on Settings.
-
In GCC C++ Compiler, go to Includes. In Include paths(-l) you should include the path of the folder where OpenCV, Leptonica, Tesseract, GSL were installed:
 -
In GCC C++ Linker, go to Libraries. In Library search path (-L) you should write the path to where the OpenCV, Leptonica, Tesseract, GSL libraries reside:
-
Then in Libraries(-l) add the OpenCV, Leptonica, Tesseract, GSL libraries that you may need. We use the following whole bunch:
opencv_core opencv_imgproc opencv_highgui opencv_ml opencv_video opencv_features2d opencv_calib3d opencv_objdetect opencv_flann opencv_photo opencv_stitching opencv_superres opencv_ts opencv_videostab lept tesseract gsl gslcblas Now you are done. Click OK.
- Your project should be ready to be built. For this, go to Project->Build all.
After build, the binary Debug/ImageProcess will be generated in project root directory.
Run the following command to do OCR by using command line:
Debug/ImageProcess -i input_path -o output_dir [OPTIONS]
OPTIONS explanation:
- -s Single image mode(Default)
- -d Directory mode
- -l OCR language(Default is English)
- -c Config file path.
- -i Input file or input directory (depends on mode). NECESSARY!
- -o OCR result output directory. NECESSARY!
Config File explanation:
- salient Salient object result directory.
- border Border dection result directory.
- turn Transform result directory.
- text Text detection object result directory.
- binarize Binarilization result directory.
- denoise Denoise result directory.
- deskew Deskew result directory.
Config File is used to control the workflow and store intermediate result. You can check config/sn.conf as an example.
- NOTE: Please make sure these directories in Config File exist.
For example, if you want to do OCR for an image img.jpg, the OCR output directory is ocr-output, the OCR language is jpn, the you can run the following command:
Debug/ImageProcess -s -c config/sn.conf -i img.jpg -o ocr-output -l jpn
Another example, if you want to do OCR for all images in directory imgs, the OCR output directory is ocr-output, the OCR language is eng, the you can run the following command:
Debug/ImageProcess -d -c config/sn.conf -i imgs -o ocr-output -l eng
After OCR, you can check directories in config/sn.conf to check the intermediate result and open ocr-output/*.txt to check the ocr result.
In the /src folder you can find different source code for different function
- /borderPostition: used to detect the border of the the object in image
- /preprocessing:
- /binarize: used for making colorful image into high quality white-and-black image
- /deskew: (find the skew of the texts, and turn it horizontally, not completed) an alternative is /textDetect/textorient.h
- /noiseLevel: detect the noise level of the image
- /GaussianSPDenoise: denoise
- /shadow: remove shadow in image
- /salientRecognition: find main object range in image
- /simpleNLP: this is actually post-processing after ocr, which will be running on phone
contact.h: recognize phone number and email namecardPost.h: a untrained model to analyze structure of namecard textClassifier.h: a classifier to judge whether a text is a namecard or not
Here is the server-side post-processing code.
You will find services for named-entity recognition, keywords extraction and event extraction in package jp.co.worksap.snapnote.nlp and jp.co.worksap.snapnote.services.
- Note: Java Restful Services, currently not linked to our release
You will find service for English spellcorrection in package jp.co.worksap.spellcorrection.service.