Openpilot is the currently leading1 Advanced Driver-Assitance System (ADAS), developed & open-sourced by Comma AI.
This repo attempts to re-create the data & training pipeline to allow training custom driving models for Openpilot.
The project is in early development. The ultimate goal is to create a community codebase for training end-to-end autonomous driving models.
Right now, the only implemented feature is distillation of path planning from the original Openpilot driving model. To train from scratch, we need to implement the creation of accurate ground truth paths by processing data from cars' GNSS, IMU, and visual odometry with laika and rednose (PRs welcome!).
Below we describe the implemented parts of the pipeline and current training results.
In the end, we list suggested improvements that could be easy PRs (be quick before they're out!).
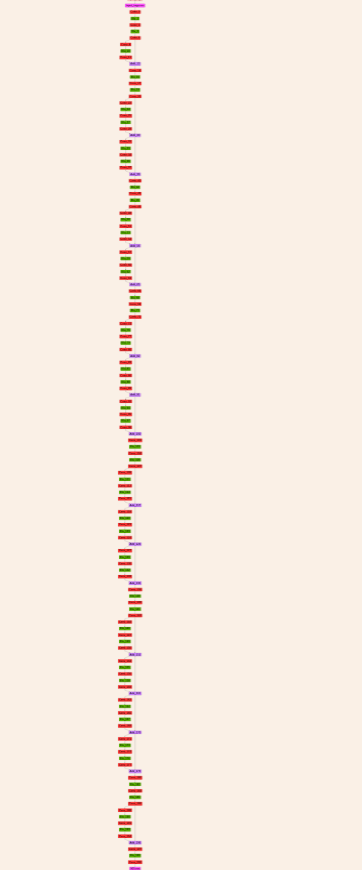
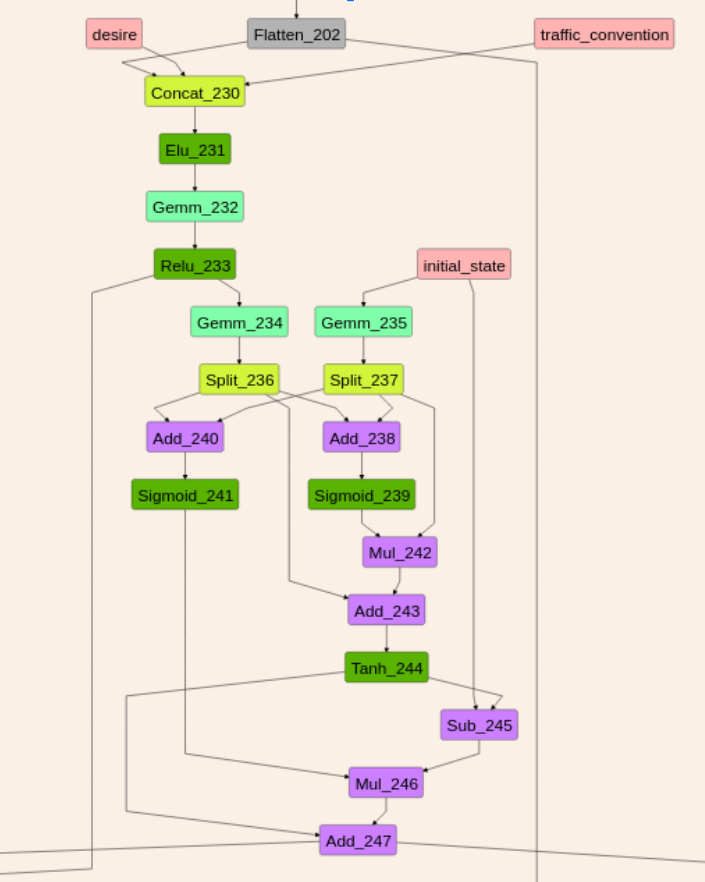
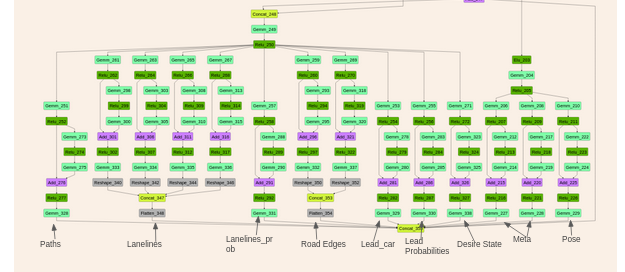
We currently fine-tune the original CommaAI's supercombo model from Openpilot 0.8.11 release. It consists of three parts:
- convolutional feature extractor (based on Resnet), followed by
- a GRU (used to capture the temporal context)
- several fully-connected branches for outputting paths, lane lines, road edges, etc. (explained in detail below)
| CNN Feature Extractor | GRU | Output Heads |
 |
 |
 |
Since Openpilot's repo Git LFS was broken at the time of our development, we kept a copy of the model in our repo for easy access.
Model inputs and outputs are described in detail in the official repo.
Note: ONNX models are only available in the non-release branches, so we had to look for the right ONNX model by comparing the hashes of the corresponding DLC models to the one in desired release.
The primary input to the model is two consecutive camera frames, converted into YUV420 format (good description here), reprojected and stacked into a tensor of shape (N,12,128,256).
Three other model inputs fed after the convolutional extractor into the GRU are:
- desire
(N,8) - traffic convention
(N,2) - recurrent state
(N,512)
The outputs from the task-specific branches are concatenated, resulting in the model output of shape (N,6472). We took the code for parsing the outputs from an older version of Openpilot.
Most outputs are predicted in the form of mean and standard deviation over time. Path plans, lane lines, road edges, etc are predicted for 33 timestamps quadratically spaced out for 10 seconds or 192 meters from the current position. These predictions are in the so-called calibrated frame of reference, explained in detail here.
Further details on model outputs is in the model readme.
To fine-tune an existing driving model, we convert it from the ONNX format to PyTorch using onnx2pytorch. Note: there is a bug in onnx2pytorch that impacts the outputs; until this PR is merged, we must manually set activation functions to be not in-place.
As mentioned above, we are currently doing only distillation of path prediction. We implement two loss functions:
The latter one works much better, and the code for it was shared with us by folks at CommaAI (thanks a lot!).
A script in gt_distill runs the official Openpilot model on the full dataset and saves the outputs.
True ground truth creation is currently not implemented.
For the dataset, we use comma2k19, a 33-hour (1980 min) driving dataset made by CommaAI:
The data was collected using comma EONs that has sensors similar to those of any modern smartphone including a road-facing camera, phone GPS, thermometers and 9-axis IMU. Additionally, the EON captures raw GNSS measurements and all CAN data sent by the car."
To use your data for training, you currently need to collect it with a Comma 2 device (no support for version 3 yet). In the future, when true ground truth creation is implemented, you might be able to use a different device. Still, you'll need to adjust some hardware-related code (camera intrinsics, GNSS configuration in laika post-processing, etc). If you need more data than you can store on the device or Comma cloud or want to do it at scale, you can use retropilot-server, a custom cloud server that re-implements Comma's API.
-
General:
- Recurrent state of the GRU and desire are intialized with zeros.
- Traffic convention is hard-coded for RHT (Right Hand Traffic, i.e. Left Hand Driving).
- A batch consists of
batch_sizesequences of lengthseq_leneach from a different one-minute driving segment to reduce data correlation.
-
GRU training Logic:
- The first batch of each segment is not used to update the weights (recurrent state warmup).
- The hidden state is preserved between batches of sequences within the same segment.
- The hidden state is reset to zero when the current
batch_sizesegments end.
-
Wandb
- All the hyperparameters, loss metrics, and time taken by different training components are logged and visualized in Wandb.
- For each validation loop, predictions vs ground truth are visualized on Wandb for the same one training and one validation segment.
Our preliminary experiments showed that having more driving segments per batch is crucial for convergence. Batch size 8 (each batch has sequences from 8 different segments) leads to overfitting, while batch size 28 (maximum we could fit on our machine) results in a good performance.
PyTorch multi-worker data loader does not support parallel sample loading, which is necessary for creating batches of sequences from different segments. We implemented a custom data loader where each worker loads a single segment at a time, and a separate background process combines the results into a single batch. We also implement pre-fetching and a (super hacky) synchronization mechanism to ensure the collation process doesn't block the shared memory until the main process has received the batch.
Altogether this results in relatively low latency: ~150ms waiting + ~175ms transfer to GPU on our machine. Instead of the hacky sync mechanism, inter-process messaging might bring the waiting down to <10ms. Speeding up transfer to GPU might be done through memory pinning, but it didn't work when we tried pinning tensors before pushing them to the shared memory queue. It probably has to be done on the consumer process side, but we are not sure how to keep it from slowing down the rest of the pipeline.
NOTE: The data loader requires two CPU cores (one train, one validation) per unit of batch size, plus additional two CPU cores for the main and background (collation) processes. The per-unit-of-batch-size cost could be brought down to 1 CPU-core if we implement stopping/restarting the train/validation workers as needed.
- Ubuntu 20.04 LTS with sudo for compiling openpilot & ground truth creation. You can probably run training on any Linux machine where PyTorch is supported.
- 50+ CPU cores, but more (~128-256) would mean better GPU utilization.
- GPU with at least 6 GB of memory.
- Install openpilot
- Clone the repo
git clone https://github.com/nikebless/openpilot-pipeline.git- Install conda if you don't have it yet
- Install the repo's conda environment:
cd openpilot-pipeline/
conda env create -f environment.yml- Ensure the conda environment is always activated:
conda activate optrain- Get the dataset in the comma2k19 format available in a local folder. You can use comma2k19 or your own collected data, as explained in the data pipeline.
- Run ground truth creation using gt_distill
- Set up wandb
- Run Training
-
via slurm script
sbatch train.sh --date_it <run_name> --recordings_basedir <dataset_dir>
-
directly
python train.py --date_it <run_name> --recordings_basedir <dataset_dir>
The only required parameters are --date_it and --recordings_basedir. Other parameters description of the parameters:
--batch_size- maximum batch size should be no more than half of the number of available CPU cores, minus two. Currently, we have tested the data loader until batch size28(maximum for 60 cores).--date_it- the name of the training run for Wandb.--epochs- number of epochs for training, default is15.--grad_clip- gradient clipping norm, default isinf(no clipping).--l2_lambda- weight decay value used in the adam optimizer, default is1e-4.--log_frequency- after every how many training batches you want to log the training loss to Wandb, default is100.--lr- learning rate, deafult is1e-3--lrs_factor- factor by which the scheduler reduces the learning rate, default is0.75--lrs_min- minimum learning rate, default is1e-6--lrs_patience- number of epochs with no improvement when the learning rate is reduced by the scheduler, default is3--lrs_thresh- sensitivity of the learning rate scheduler, default is1e-4--mhp_loss- use the multi hypothesis laplacian loss. By default,KL-divergence-based loss is used.--no_recurr_warmup- disable recurrent warmup. Enabled by default.--no_wandb- disable Wandb logging. Enabled by default.--recordings_basedir- path to the recordings root directory.--seed- for the model reproducibility. The default is42.--seq_len- length of sequences within each batch. Default is100.--split- training dataset proportion. The rest goes to validation; no test set is used. Default is0.94.--val_frequency- validation loop runs after this many batches. Default is400.
- Convert the model to ONNX format
cd train
python torch_to_onnx.py <model_path>- In a simulation (Carla)
Note: As Openpilot is always under development, the current version of the Carla bridge is sometimes broken. This is not helped by the fact that the bash script always pulls the latest Openpilot docker container. If you run into issues setting up the simulator, try using Openpilot v0.8.11 and this version of the docker container. To do the latter, you will need to update the
start_openpilot_docker.shscript with that version's SHA256 hash.
- Make sure that you have installed openpilot.
- Make sure that CUDA drivers are installed properly (e.g.
nvidia-smiis available) - Go to the sim folder in cloned openpilot repo.
cd openpilot/tools/sim - Add your model in
openpilot/modelsand rename it tosupercombo.onnx. - Mount the models directory into the container at the end of the
docker runcommand in the script start_openpilot_docker.sh by adding:
--mount type=bind,source=”$(HOME)/openpilot/models”,target=”/openpilot/models”
- Open two separate terminals and execute these bash scripts.
cd openpilot/tools/sim

./start_carla.sh

./start_openpilot_docker.sh
- In your car (via the Comma 2 device)
- Convert to DLC
- Replace the original model on the device via SSH
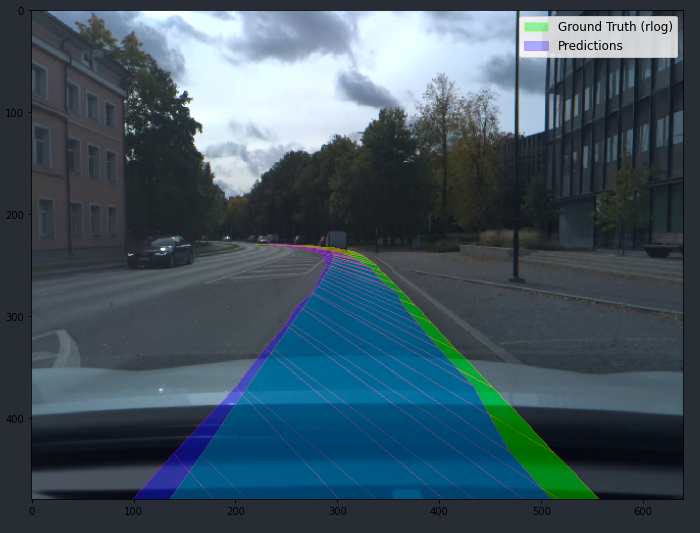
So far, the Likelihood loss worked much better, resulting in faster convergence than KL divergence (unintuitively):
| Likelihood model (~1h of training) | KL divergence model (~20h of training) |
 |
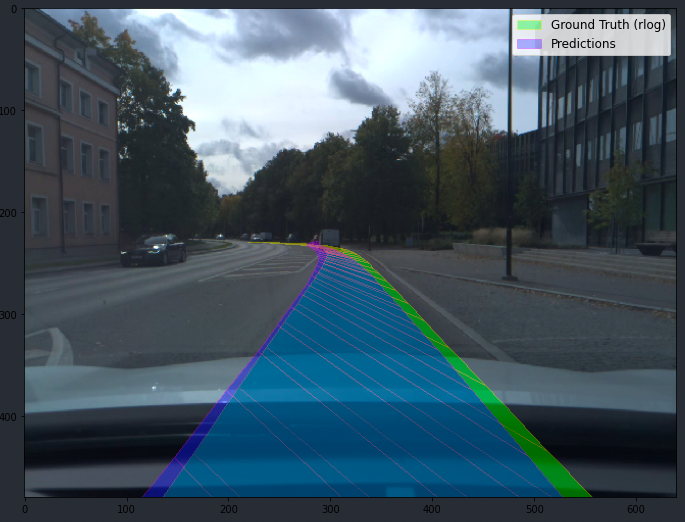 |
The short CARLA gif at the top of the README is the Likelihood model.
- Distillation of original model path planning
- True ground truth path creation
- Training on true ground truth paths
- Use drive calibration info from each segment for input transformation & predictions visualization
- Filter out segments where the car is not moving. A camera-based detection method is already implemented (untested)
- Fault-tolerant data loader (do not crash training when a single video failed to read)
- Speed up data loader via a better synchronization mechanism
- Kill & restart (remembering the state) train/validation data loaders to reduce CPU-per-unit-of-batch-size cost
- Move to PyTorch Lightning for better maintainability
Footnotes
-
Top 1 Overall Ratings, 2020 Consumer Reports ↩
