The content of this demo is the result of Terraforming several of the Boundary and HCP Learn Tutorials with a few additions along the way.
You need an AWS and HCP accounts.
The "Plataforma" directory contains the code to build a Vault and Boundary cluster in HCP together with a VPC in your AWS account. That VPC gets connected to HCP (where Vault is deployed) by means of a VPC peering with an HVN. After deploying the infrastructure we set a number of environmental variables that are required for the upcoming deployments. Finally, we authenticate with Boundary using the credentials we have defined within the terraform.tfvars file. Vault cluster is configured to send logs to Datadog.
cd 1_Plataforma/

<export AWS Creds>
terraform init
# Requires interactive login to HCP to approve cluster creation
terraform apply -auto-approve
export BOUNDARY_ADDR=$(terraform output -raw boundary_public_url)
export VAULT_ADDR=$( terraform output -raw vault_public_url)
export VAULT_NAMESPACE=admin
export VAULT_TOKEN=$(terraform output -raw vault_token)
# Log to boundary interactively using password Auth with admin user
boundary authenticate
export TF_VAR_authmethod=$(boundary auth-methods list -format json | jq -r '.items[0].id')
Note: This tutorial is supposed to be run in secuntial order making sure the enviromental variable installed above are used
The second steps consist on an EC2 instance deployed in a Public subnet (not quite the use case for Boundary). We are going to create a public key that will be associated to the instance and at the same time will be assigned to a Static Credential Store within Boundary. We are also going to build a route table that will connect the subnet where we are deploying the instance with HCP HVN.
cd ../2_First_target
terraform init
# We will be creating first the key
terraform apply -auto-approve -target=aws_key_pair.ec2_key -target=tls_private_key.rsa_4096_key
# Then the rest of the configuration
terraform apply -auto-approve
Once we have deployed the infrastructure, we check we can access the instance
eval "$(terraform output -json | jq -r .ssh_connect.value)"And then we proceed to access via Boundary. When we use the Static Credential Store we cannot do "Credential Injection", but "Credential Brokering", which is visible using the Desktop client. To log in with the Desktop client we need Boundary URL and the credentials we defined previously.

As you can see, when we use the Desktop client a tunnel session gets opened and credentials are presented. Credentials are of SSH Key type.

They key above is the same we used previosly to log in to the client, so there is no need to copy that content and build a new file, thus, we are going simply to re-use the cert created thru the boundary tunnel
ssh ubuntu@127.0.0.1 -p 49165 -i cert.pemThings get even simpler using the boundary client. In the first step we logged into Boundary using administrative credentials
# Retrieve list of targets for all scopes
boundary targets list -recursive
# Connect to the target in question once we have identified the target-id
boundary connect ssh -target-id=<id>
Here we are making use of a "Connection helper" which will take care of passing the private key and username to the local ssh client.
In this step we are going to:
- Create an Ubuntu instance where we are going to deployed a Postgres DB and an instance (named
northwind). This configuration is based on this tutorial: https://developer.hashicorp.com/boundary/tutorials/credential-management/hcp-vault-cred-brokering-quickstart. Vault is going to managed the creation of accounts by means of a "Database Secret Engine" connecting via the private endpoint. - We are going to install a Windows Server and use Boundary to open a tunnel to access via RDP. Credentials will be stored in Vault using a KV Engine.
Vault configuration will take place thanks to the environmental variables we defined in the first step (VAULT_ADDR, VAULT_NAMESPACE, VAULT_TOKEN)
To avoid building pre-conditions and adding some delay on the resource creation we are going to simply create the two instances and the the rest of the configuration.
cd ../3_Vault_Credential_Brokering
terraform init
# We build first the two EC2 instances
terraform apply -auto-approve -target=aws_instance.postgres_target -target=aws_instance.windows-server
# Then the Vault and Boundary configuration
sleep 60 && terraform apply -auto-approve
For the db access we have created two different roles in Vault with their correspondent path/endpoints. This translates into two targets for the same host, that are feed by two separate Credential Libraries

This is simpler to see based on the Terraform code
resource "boundary_credential_library_vault" "dba" {
  name                = "northwind dba"
  description         = "northwind dba"
  credential_store_id = boundary_credential_store_vault.vault.id
  path                = "database/creds/dba"# change to Vault backend path
  http_method         = "GET"
}
resource "boundary_credential_library_vault" "analyst" {
  name                = "northwind analyst"
  description         = "northwind analyst"
  credential_store_id = boundary_credential_store_vault.vault.id
  path                = "database/creds/analyst"# change to Vault backend path
  http_method         = "GET"
}
After the deployment we need to "Refresh" the Boundary Desktop Client to obtain the list of new scopes and targets. Next we can check access to the database using the different roles.

Here we are connecting using the "Northwind DBA Database" target

To leverage the tunnel we need to use a postgres client and set it up to use the localhost and local port, together with the username and password obtained via Vault.
psql -h 127.0.0.1 -p 54229 -U v-token-to-dba-caBAedEO2ShtIVxXd3NM-1689081824 -d northwindAgain, this is simpler if we use the Boundary CLI client, since the built-in postgres wrapper trigger the local postgres client with the (brokered credentials) retrieved from Vault
boundary connect postgres -target-id <id> -dbname northwindor using this commands
# DB Admin access
eval "$(terraform output -raw postgres_dbAdmin_connect)"
# DB Analyst access
eval "$(terraform output -raw postgres_dbAnalyst_connect)"
On the other hand, we have deployed a Windows Server that have been configured with IIS. On that basis, we can test a couple of access methods, not just RDP but also HTTP access. To that end, we have build to separate targets that points to two different ports.

To access the IIS server running on the Windows host, we simply click on the Connect Button and copy the address retrieved, that has to be pasted in a browser.

The session can be controlled via means of the Boundary client.

In the same fashion, we can open a tunnel session against the RDP target.


Using this info, we proceed with configuring our RDP client.


Then simply we initiate a connection towards that "PC"


Note: steps to integrate Vault with AD and access via RDP with short-lived accounts are available within the "Dynamic_Credentials_Windows" subdirectory
Boundary CLI client can also help in reducing the number of steps to get connected to a target. For MacOS devices you can use
# Directly using boundary connect
boundary connect rdp -target-id=<target-id> -exec bash -- -c "open rdp://full%20address=s={{boundary.addr}} && sleep 6000"
# Using terraform helper function
eval "$(terraform output -raw rdp_connect)"
This will launch your local RDP client (I'm using Microsoft Remote Desktop'). The
sleepcommand is required to keep the rdp client running.
In this instance we are going to create an SSH Secret Engine in Vault from which we are going to obtained a CA public key. This CA public key is going to be deployed within the EC2 instance as "Trusted CA". This way the certificates generated by Vault will be trusted by the EC2 host.
cd ../4_Vault_SSH_Injection/vault_config
terraform init
terraform apply -auto-approve
cd ..
terraform init
terraform apply -auto-approve
After deployment and once we have refresh our Boundary Desktop client we will see a new scope and target. Vault SSH credentials are injected in this case, and so, the user will not have to do anything in terms of public key management.

To connect with the local SSH client we have to simply connect to the localhost and local port.
ssh 127.0.0.1 -p 56533The approach using the Boundary CLI client, remains the same
boundary connect ssh -target-id=<id>
# Using eval to get that command from terraform output
eval "$(terraform output -raw ssh_connect)"
# Using eval with alias
eval $(terraform output -raw ssh_connect_alias)
With the the newer client and embeded Shell you can connect directly from the Desktop UI

In this step we are going to create a Self-Managed worker on an Ubuntu machine. This host will be deployed in a public subnet that will have connectivity with a private subnet where we are going to deployed another Ubuntu instance, that is configured to trust the Vault CA created in the previous step.
The connectivity between Boundary and Vault will be moved from the public to Vault private endpoint using the Worker as proxy (worker_filter).
resource "boundary_credential_store_vault" "vault" {
    name        = "certificates-store"
    description = "My second Vault credential store!"
    address     = data.terraform_remote_state.local_backend.outputs.vault_public_url
    address     = data.terraform_remote_state.local_backend.outputs.vault_private_url
    token       = vault_token.boundary_token.client_token
    scope_id    = boundary_scope.project.id
    namespace   = "admin"
    # Adding worker filter to send request to Vault via Worker, worker that has access to Vault via HVN peering
    worker_filter =" \"worker1\" in \"/tags/type\" "
    # Introducing some delay to let the worker start up
    depends_on =[ null_resource.delay ]
}
To deploy the infrastructure and configuration
cd ../5_Self_Managed_Worker/
terraform init
cp ../4_Vault_SSH_Injection/vault_ca.pub vault_ca.pub
terraform apply -auto-approve
The result of this configuration will be a new scope (ssh-private-org) and target (ssh-target-private)

eval "$(terraform output -raw connect_ssh)"In this case we are going to deploy a new VPC where we are going to deploy a self-managed worker in a Public Subnet and a couple of EC2 instances in a private subnet:
- A Windows server, whose credentials will be stored within Boundary.
- An Ubuntu server that is configured to trust Vault CA.
This self-managed worker will connect to HCP Boundary controllers via the Self-managed worker created in step 5.

Likewise, targets are configured with ingress and egress workers

To install the code
cd ../6_Multi_hop/
terraform init
cp ../4_Vault_SSH_Injection/vault_ca.pub vault_ca.pub
terraform apply -auto-approve
The result of this would be two scopes in Boundary:
-
win-private-multi-org: it will host two targets for the same host, one pointing to port 80 and the other on the RDP port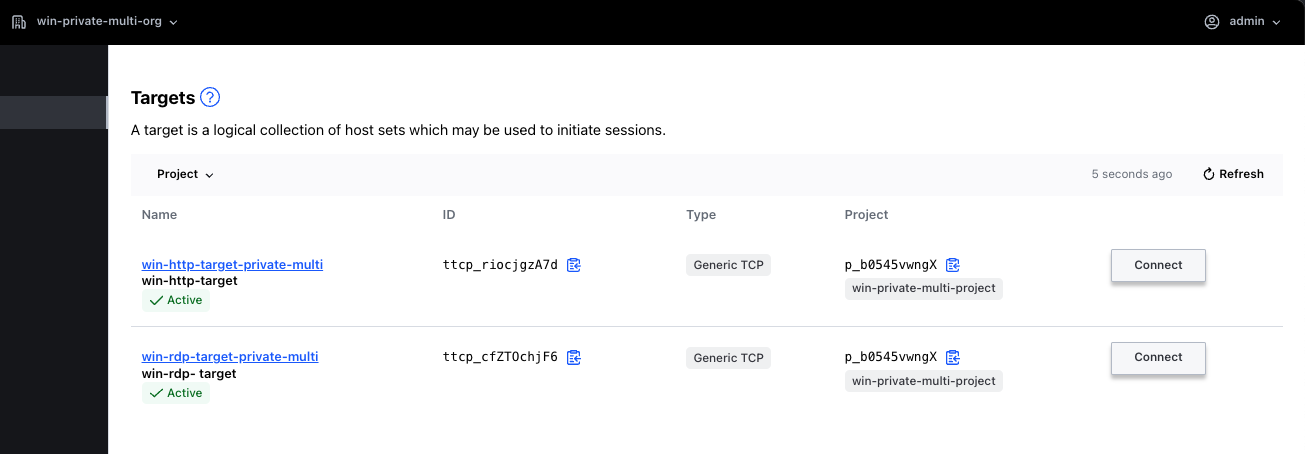
-
ssh-private-multi-org: it will host a single target that will make use of SSH Credential Injection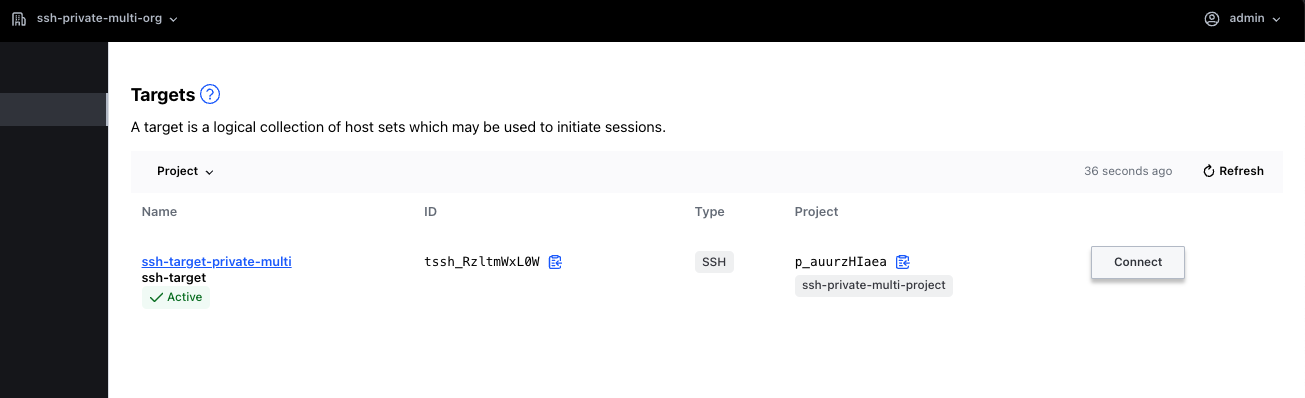


In this case we are going to re-use the infrastructure created previously to connect Boundary and Vault, but before that, we are going to create an EKS cluster.
cd ../7_K8S_Vault_Credential_Brokering/eks-cluster
terraform init
terraform apply -auto-approve
export TF_VAR_kubernetes_host=$(terraform output -raw cluster_endpoint)
# Set kubeconfig to use the cluster just generated
aws eks --region $(terraform output -raw region) update-kubeconfig  --name $(terraform output -raw cluster_name)
Then we are going to create a service account for Vault. The service account will be associated to a clusterRole via a clusterRoleBinding. Then we are going to create a service account with a Role that has permissions to list, create and remove pods in the test namespace. Finally we are going to export the token and associated Kubernetes CA from the vault service account into two files that are going to be used as part of Vault configuration.
cd ../vault-boundary-config
kubectl create ns vault
kubectl create sa vault -n vault
kubectl apply -f - <<EOF
apiVersion: v1
kind: Secret
metadata:
  name: vault
  namespace: vault
  annotations:
    kubernetes.io/service-account.name: vault
type: kubernetes.io/service-account-token
EOF
kubectl create ns test
kubectl apply -f .
kubectl get secret -n vault vault -o jsonpath='{.data.token}' | base64 --decode > token.txt
kubectl get secret -n vault vault -o jsonpath='{.data.ca\.crt}' | base64 --decode > ca.crt
terraform init
terraform apply -auto-approve
After this we are going to have a new org withing Boundary that contains our EKS cluster host

After clicking in connect, we get a tunnel open towards the EKS target with the corresponding secrets.

In a separate terminal we have to run the following
export PORT=<port> # port above
export REMOTE_USER_TOKEN=<service_account_token> #service_account_token
After this we can get access to the EKS cluster
kubectl run my-pod --image=nginx --namespace=test --tls-server-name kubernetes --server=https://127.0.0.1:$PORT --token=$REMOTE_USER_TOKEN
kubectl delete pod my-pod  --tls-server-name kubernetes --server=https://127.0.0.1:$PORT --token=$REMOTE_USER_TOKEN -n test
kubectl get pod --tls-server-name kubernetes --server=https://127.0.0.1:$PORT --token=$REMOTE_USER_TOKEN -n test 

if we try to run this commands in a namespace different than test it will file or if we try to operate with a resoure other than pods
kubectl get deploy --tls-server-name kubernetes --server=https://127.0.0.1:PORT −−token=REMOTE_USER_TOKEN -n test
Error from server (Forbidden): deployments.apps is forbidden: User "system:serviceaccount:test:test-service-account-with-generated-token" cannot list resource "deployments" in API group "apps" in the namespace "test"

kubectl get pod --tls-server-name kubernetes --server=https://127.0.0.1:PORT −−token=REMOTE_USER_TOKEN -n default
Error from server (Forbidden): pods is forbidden: User "system:serviceaccount:test:test-service-account-with-generated-token" cannot list resource "pods" in API group "" in the namespace "default"
This is expected given the Role associated to the service-account
apiVersion: rbac.authorization.k8s.io/v1
kind: Role
metadata:
  name: test-role-list-create-delete-pods
  namespace: test
rules:
- apiGroups: [""]
  resources: ["pods"]
  verbs: ["list","create", "update", "delete"]
Now, you may be wondering: it have to be an easier way. The answer is yes. This blog offers an alternative to set the Kubernetes context. Boundary CLI can also be used, for which we first need to get the authentication token. To that end we use the boundary targets authorize-session command
eval "$(boundary targets authorize-session -id ttcp_fGlZJbn7n9 -format json | jq -r '.item | "export BOUNDARY_SESSION_TOKEN=\(.authorization_token) BOUNDARY_K8S_TOKEN=\(.credentials[0].secret.decoded.service_account_token)"')"With the token and K8S API CA, let's create a Pod
> boundary connect kube -target-id ttcp_fGlZJbn7n9 -- run my-pod3 --image=nginx -n test --token=$BOUNDARY_K8S_TOKEN --certificate-authority=ca.crt
Credentials:
  Credential Source Description: Account for test namespace
  Credential Source ID:          clvlt_iLCMBSGjG1
  Credential Source Name:        Test Namespace
  Credential Store ID:           csvlt_b1b29pWfLz
  Credential Store Type:         vault-generic
  Secret:
      {
          "service_account_name": "test-service-account-with-generated-token",
          "service_account_namespace": "test",
          "service_account_token":
          "eyJhbGciOiJSUzI1NiIsImtpZCI6ImZjNzEwZjNmZDRkMTM2MWI4MTA0OTI5NzkyYTBiNTRhMGY3ZDZlNzIifQ.eyJhdWQiOlsiaHR0cHM6Ly9rdWJlcm5ldGVzLmRlZmF1bHQuc3ZjIl0sImV4cCI6MTcxMDM1NjA4MiwiaWF0IjoxNzEwMzUyNDgyLCJpc3MiOiJodHRwczovL29pZGMuZWtzLmV1LXdlc3QtMi5hbWF6b25hd3MuY29tL2lkLzgxMjQxOUEyRDY2NzZENjNGMTg3MDBFQjJDQTBEQTdEIiwia3ViZXJuZXRlcy5pbyI6eyJuYW1lc3BhY2UiOiJ0ZXN0Iiwic2VydmljZWFjY291bnQiOnsibmFtZSI6InRlc3Qtc2VydmljZS1hY2NvdW50LXdpdGgtZ2VuZXJhdGVkLXRva2VuIiwidWlkIjoiNmI0OTk5ZGYtNzllOS00NjdkLTk2Y2ItMmNkNTczYTU1YjZkIn19LCJuYmYiOjE3MTAzNTI0ODIsInN1YiI6InN5c3RlbTpzZXJ2aWNlYWNjb3VudDp0ZXN0OnRlc3Qtc2VydmljZS1hY2NvdW50LXdpdGgtZ2VuZXJhdGVkLXRva2VuIn0.egZtvsdbd5UOQ_A6KR_cx-yJGB821Y4-q_pG0YmS96ADnEz5qZK6weCUsgclQCcxwMU3p8uYL4KoSJ_5WZteLDLRdcwQIiBdub1W6E0AZFYIco5JLkwgV-AXyXQY_i8iXz21vplr9kv9cGP66xCjF1iGVQ4nFZrp4R0Xwg9eRGN1mDJVjgJoktTtUUhhyy3QRQmqifPXh2RveiJ8Fv9R77w3rdcSdcfwBGUkTEa7mGsdbhS0n2k5W0apfsQCU6tzr2L9psLX8Rjzp6aMxk5QH5xupq6wQr0tCAyCb-kQ-nwXXFQ7OF2DplT7U-iuQos5ABOr6eNgQrBT_YivvG2Vog"
      }

pod/my-pod3 created
Let's verify running pods in test namespace
> boundary connect kube -target-id ttcp_fGlZJbn7n9 -- get pods -n test --token=$BOUNDARY_K8S_TOKEN --certificate-authority=ca.crt
Credentials:
  Credential Source Description: Account for test namespace
  Credential Source ID:          clvlt_iLCMBSGjG1
  Credential Source Name:        Test Namespace
  Credential Store ID:           csvlt_b1b29pWfLz
  Credential Store Type:         vault-generic
  Secret:
      {
          "service_account_name": "test-service-account-with-generated-token",
          "service_account_namespace": "test",
          "service_account_token":
          "eyJhbGciOiJSUzI1NiIsImtpZCI6ImZjNzEwZjNmZDRkMTM2MWI4MTA0OTI5NzkyYTBiNTRhMGY3ZDZlNzIifQ.eyJhdWQiOlsiaHR0cHM6Ly9rdWJlcm5ldGVzLmRlZmF1bHQuc3ZjIl0sImV4cCI6MTcxMDM1NjEzMSwiaWF0IjoxNzEwMzUyNTMxLCJpc3MiOiJodHRwczovL29pZGMuZWtzLmV1LXdlc3QtMi5hbWF6b25hd3MuY29tL2lkLzgxMjQxOUEyRDY2NzZENjNGMTg3MDBFQjJDQTBEQTdEIiwia3ViZXJuZXRlcy5pbyI6eyJuYW1lc3BhY2UiOiJ0ZXN0Iiwic2VydmljZWFjY291bnQiOnsibmFtZSI6InRlc3Qtc2VydmljZS1hY2NvdW50LXdpdGgtZ2VuZXJhdGVkLXRva2VuIiwidWlkIjoiNmI0OTk5ZGYtNzllOS00NjdkLTk2Y2ItMmNkNTczYTU1YjZkIn19LCJuYmYiOjE3MTAzNTI1MzEsInN1YiI6InN5c3RlbTpzZXJ2aWNlYWNjb3VudDp0ZXN0OnRlc3Qtc2VydmljZS1hY2NvdW50LXdpdGgtZ2VuZXJhdGVkLXRva2VuIn0.LnCJKPY5ayeVOE4lHakCvaUL4-Y6V7gBZT2HgnL7YMkWbKNz8VTJwMMd_UuWtrfgjGpOdq7-flQ9itnvHH0NaLsDHsxZ3-Pvnd-rYXOAwczPv8OzNG1LVRM2ghkKaeUrWmXGXVrg2jSvY1F60OY0r7ICp4tpljFfq98mqscxBqh4OgC_IjDOeIJ7zmAkGy-guKw3d_b9XtMHqzvqaAj2dP6gYkN5RdPrTiEGvifG3PA8w-cERl5aP45STsjezyT1Uaeps2wuDh9SVC3ZZHUjMIyK3-JrkVL2Izrl0T-cC8S91EJ4PtuiYj4JVzvn2x2LvI-oE4ULbis0Dg0r2CHt7Q"
      }

NAME      READY   STATUS    RESTARTS   AGE
my-pod    1/1     Running   0          25h
my-pod2   1/1     Running   0          11m
my-pod3   1/1     Running   0          49s
Finally, lets removed the running pod
> boundary connect kube -target-id ttcp_fGlZJbn7n9 -- delete pods my-pod my-pod2 my-pod3 -n test --token=$BOUNDARY_K8S_TOKEN --certificate-authority=ca.crt
Credentials:
  Credential Source Description: Account for test namespace
  Credential Source ID:          clvlt_iLCMBSGjG1
  Credential Source Name:        Test Namespace
  Credential Store ID:           csvlt_b1b29pWfLz
  Credential Store Type:         vault-generic
  Secret:
      {
          "service_account_name": "test-service-account-with-generated-token",
          "service_account_namespace": "test",
          "service_account_token":
          "eyJhbGciOiJSUzI1NiIsImtpZCI6ImZjNzEwZjNmZDRkMTM2MWI4MTA0OTI5NzkyYTBiNTRhMGY3ZDZlNzIifQ.eyJhdWQiOlsiaHR0cHM6Ly9rdWJlcm5ldGVzLmRlZmF1bHQuc3ZjIl0sImV4cCI6MTcxMDM1NjI1NSwiaWF0IjoxNzEwMzUyNjU1LCJpc3MiOiJodHRwczovL29pZGMuZWtzLmV1LXdlc3QtMi5hbWF6b25hd3MuY29tL2lkLzgxMjQxOUEyRDY2NzZENjNGMTg3MDBFQjJDQTBEQTdEIiwia3ViZXJuZXRlcy5pbyI6eyJuYW1lc3BhY2UiOiJ0ZXN0Iiwic2VydmljZWFjY291bnQiOnsibmFtZSI6InRlc3Qtc2VydmljZS1hY2NvdW50LXdpdGgtZ2VuZXJhdGVkLXRva2VuIiwidWlkIjoiNmI0OTk5ZGYtNzllOS00NjdkLTk2Y2ItMmNkNTczYTU1YjZkIn19LCJuYmYiOjE3MTAzNTI2NTUsInN1YiI6InN5c3RlbTpzZXJ2aWNlYWNjb3VudDp0ZXN0OnRlc3Qtc2VydmljZS1hY2NvdW50LXdpdGgtZ2VuZXJhdGVkLXRva2VuIn0.IgFgZmyuLy5iaUwZHfzbL2vh35RQensxNTeYOOqLQlg2ttES_UZNUe7oNlhJX2KLUGFmjSJ2lk-KS_m07TaOodPR1Oo4xN48D7FQSS_tv2pCtLN4iPKELhLvSLtfMTYcHOHwKyDwnxFC5pNUraBKWUMJSUhBx_9Cajm00O6yf-YHNWpl5wAfx5vXTmYV1PnTXl5oR-06NYcUCpHHeIDWzlBDnoBDk7MsJ0r3R5SkDYnc6nMJfubKFO8OM-QqAMvwVsnVfLHBoElFjJ3RehKJ9IujQraZplXPLfsKViaRpVtcryYI6sF_ryE8kG4FdcNtMxFzxoWF49UmTRkJLNmf_g"
      }

pod "my-pod" deleted
pod "my-pod2" deleted
pod "my-pod3" deletedIn the BONUS/ directory you can find a few more examples around:
- Dynamic Host Catalog
- SSH Session Recording (Internal)
- RBAC
- Integration with Postgres RDS
<export AWS Creds>
# Step 1
cd 1_Plataforma/
terraform init
# Requires interactive login to HCP to approve cluster creation
terraform apply -auto-approve
export BOUNDARY_ADDR=$(terraform output -raw boundary_public_url)
export VAULT_ADDR=$( terraform output -raw vault_public_url)
export VAULT_NAMESPACE=admin
export VAULT_TOKEN=$(terraform output -raw vault_token)
# Log to boundary interactively using password Auth with admin user
# boundary authenticate
export TF_VAR_authmethod=$(boundary auth-methods list -format json | jq -r '.items[0].id')

# Step 2
cd ../2_First_target
terraform init
# We will be creating first the key
terraform apply -auto-approve -target=aws_key_pair.ec2_key -target=tls_private_key.rsa_4096_key
# Then the rest of the configuration
terraform apply -auto-approve

# Step 3
cd ../3_Vault_Credential_Brokering
terraform init
# We build first the two EC2 instances
terraform apply -auto-approve -target=aws_instance.postgres_target -target=aws_instance.windows-server
# Then the Vault and Boundary configuration
terraform apply -auto-approve

# Step 4
cd ../4_Vault_SSH_Injection/vault_config
terraform init
terraform apply -auto-approve
cd ..
terraform init
terraform apply -auto-approve

# Step 5
cd ../5_Self_Managed_Worker/
terraform init
cp ../4_Vault_SSH_Injection/vault_ca.pub vault_ca.pub
terraform apply -auto-approve

# Step 6
cd ../6_Multi_hop/
terraform init
cp ../4_Vault_SSH_Injection/vault_ca.pub vault_ca.pub
terraform apply -auto-approve

# Step 7
cd ../7_K8S_Vault_Credential_Brokering/eks-cluster
terraform init
terraform apply -auto-approve
export TF_VAR_kubernetes_host=$(terraform output -raw cluster_endpoint)
# Set kubeconfig to use the cluster just generated
aws eks --region $(terraform output -raw region) update-kubeconfig  --name $(terraform output -raw cluster_name)
cd ../vault-boundary-config
kubectl create ns vault
kubectl create sa vault -n vault
kubectl apply -f - <<EOF
apiVersion: v1
kind: Secret
metadata:
  name: vault
  namespace: vault
  annotations:
    kubernetes.io/service-account.name: vault
type: kubernetes.io/service-account-token
EOF
kubectl create ns test
kubectl apply -f .
kubectl get secret -n vault vault -o jsonpath='{.data.token}' | base64 --decode > token.txt
kubectl get secret -n vault vault -o jsonpath='{.data.ca\.crt}' | base64 --decode > ca.crt
terraform init
terraform apply -auto-approveTo clean up, we go to the main directory and from there
If you get a 403 error relative to the Vault token run (
apply) step 1 to update Vault token.
cd 7_K8S_Vault_Credential_Brokering/vault-boundary-config
terraform destroy -auto-approve
cd ../eks-cluster
terraform destroy -auto-approve

cd ../../6_Multi_hop
terraform destroy -auto-approve
rm -rf vault_ca.pub

cd ../5_Self_Managed_Worker/
terraform destroy -auto-approve
rm -rf vault_ca.pub

cd ../4_Vault_SSH_Injection
terraform destroy -auto-approve
rm -rf vault_ca.pub
cd vault_config
terraform destroy -auto-approve

cd ../../3_Vault_Credential_Brokering
# See this https://github.com/hashicorp/vault/issues/9420 in case of issues removing the db engine
vault lease revoke -force -prefix database && terraform destroy -auto-approve

cd ../2_First_target
terraform destroy -auto-approve
rm -rf cert.pem

cd ../1_Plataforma
rm -rf data.json
terraform destroy -auto-approve