参考链接 🔗: https://unocss.dev/integrations/vite
pnpm add -D unocss
# 添加预设
pnpm add -D @unocss/transformer-attributify-jsx @unocss/transformer-directives @unocss/transformer-variant-group
添加 unocss.config.ts 文件
import { defineConfig, presetAttributify, presetIcons, presetUno } from 'unocss'

import transformerAttributifyJsx from '@unocss/transformer-attributify-jsx'
import transformerDirectives from '@unocss/transformer-directives'
import transformerVariantGroup from '@unocss/transformer-variant-group'

export default defineConfig({
  presets: [
    presetUno({ dark: 'media' }),
    presetAttributify({ strict: true }),
    presetIcons({
      autoInstall: true,
      extraProperties: { display: 'inline-block', 'vertical-align': 'middle' }
    })
  ],
  transformers: [transformerDirectives(), transformerVariantGroup(), transformerAttributifyJsx()],
})
在 src 目录下新建 shims.d.ts文件, 这个文件的作用是对 TS 未识别的 unocss 属性进行声明
// This File is only needed if you use Attributify
// Learn more: https://unocss.dev/presets/attributify
import type { AttributifyAttributes } from '@unocss/preset-attributify'

declare module 'react' {
  // eslint-disable-next-line @typescript-eslint/no-unused-vars
  interface HTMLAttributes<T> extends AttributifyAttributes { }
}- 使用 hook 的等方式创建和使用状态管理。
- 可以直接使用 async 异步函数,而不需要像 Redux 一样,额外安装第三方插件才能实现。
npm install zustand # or yarn add zustand or pnpm add zustandimport { create } from 'zustand'
export const useBearStore = create((set) => ({
bears: 0,
user: {
name: 'yi',
age: 18
},
increasePopulation: () => set((state) => ({
// ...state,
bears: state.bears + 1
})),
removeAllBears: () => set({ bears: 0 }),
setName: (name: string) => set((state) => ({
...state,
user: {
...state.user,
name
}
}))
}))- zustand 会自动合并第一层的
state,所以第一层可以不使用...state,但如果是更深层的状态,比如第二层或第三层,就还是需要...state修改 state。
给 srore 定义类型
import { create } from 'zustand'

type TBearStore = {
  bears: number
  user: {
    name: string
    age: number
  }
  increasePopulation: () => void
  removeAllBears: () => void
  setName: (name: string) => void
}

export const useBearStore = create<TBearStore>()((set) => ({
  bears: 0,
  user: {
    name: 'yi',
    age: 18
  },
  increasePopulation: () => set((state) => ({
    ...state,
    bears: state.bears + 1
  })),
  removeAllBears: () => set({ bears: 0 }),
  setName: (name: string) => set((state) => ({
    ...state,
    user: {
      ...state.user,
      name
    }
  })),
}))
注意📢:给 store 添加 TS 类型时时,我们要在传入泛型的后面加一个()。具体原因感兴趣可以查看下面的连接 🔗 https://github.com/pmndrs/zustand/blob/main/docs/guides/typescript.md。
Zustand 创建的 Store比较特别, 本质上就是一个hook,所以它能够很方便的被调用,你不需要像 Redux 或者 useContext 一样,外面还要包一层传送门。
import { useBearStore } from "@/stores/bearStore";

export const BearBox = () => {
  const bears = useBearStore((state) => state.bears);
  const increasePopulation = useBearStore((state) => state.increasePopulation);
  const removeAllBears = useBearStore((state) => state.removeAllBears);

  return (
    <div className="box">
      <h1>Bear Box</h1>
      <p>bears: {bears}</p>
      <div>
        <button onClick={increasePopulation}>add bear</button>
        <button onClick={removeAllBears}>remove all bears</button>
      </div>
    </div>
  );
};
上面的 useBearStore,返回一个 clalback (回调函数),在这个回调函数里,可以获取到 state,这个state 就是 store 里所有的状态,然后你可以用它返回任何你在 useBearStore 中定义的 state 和 Action。
在上面使用 store 的示例中,我们可以看到,我们每次取出 store 中的数据都需要使用 const xx = useBearStore((state) => state.xx) 方式,如果你需要使用很多状态,每一个都这么写会很累,你可能会想,有没有什么方式更简便一点呢?
如果是需要返回 store中所有的状态,我们可以这么写:
import { useBearStore } from "@/stores/bearStore";

export const BearBox = () => {
  const { bears, increasePopulation, removeAllBears } = useBearStore();

  return (
    <div className="box">
      <h1>Bear Box</h1>
      <p>bears: {bears}</p>
      <div>
        <button onClick={increasePopulation}>add bear</button>
        <button onClick={removeAllBears}>remove all bears</button>
      </div>
    </div>
  );
};
注意📢:如果你不需要全部状态,而是为了偷懒而这样写的话,可能会引起页面不必要的重复渲染,在小的 app 里无关紧要,但在大而复杂的项目里就会影响速度。
import { create } from 'zustand'

type TBearStore = {
  user: {
    name: string
    phone: string
  }
  getUserInfo: () => Promise<any>
}

export const useBearStore = create<TBearStore>()((set) => ({
  user: {
    name: 'yi',
    phone: '13246566447'
  },
  getUserInfo: async () => {
    const res = await fetch('https://jsonplaceholder.typicode.com/users/1')
    const user = await res.json()
    set((state) => ({
      user: {
        ...state.user,
        name: user.name
      }
    }))
    return user.name
  }
}))import { create } from "zustand";
type TCatStoreState = {
cats: {
bigCats: number;
smallCats: number;
};
increaseBigCats: () => void;
increaseSmallCats: () => void;
};
export const useCatStore = create<TCatStoreState>()(
(set, get) => ({
cats: {
bigCats: 0,
smallCats: 0,
},
increaseBigCats: () => {
set((state) => ({
cats: {
//zustand 只会自动合并第一层的 state, 所以这里要手动合并
...state.cats,
bigCats: state.cats.bigCats + 1,
},
}))
},
increaseSmallCats: () => {
set((state) => ({
cats: {
...state.cats,
smallCats: state.cats.smallCats + 1,
},
}))
}
})
)在页面中使用
import { useCatStore } from "@/stores/catStore";

export const CatBox = () => {
  const bigCats = useCatStore((state) => state.cats.bigCats);
  const smallCats = useCatStore((state) => state.cats.smallCats);
  const increaseBigCats = useCatStore((state) => state.increaseBigCats);
  const increaseSmallCats = useCatStore((state) => state.increaseSmallCats);

  return (
    <div className="box">
      <h1>Cat Box</h1>
      <p>big cats: {bigCats}</p>
      <p>small cats: {smallCats}</p>
      <div>
        <button onClick={increaseBigCats}>add big cats</button>
        <button onClick={increaseSmallCats}>add small cats</button>
      </div>
    </div>
  )
}
在上面定义的 store 中,我们频繁的使用了
...state的方式来把state先复制一下,再定义新的值从而覆盖旧的state来更新 store 的状态。
我们可以使用 Immer Middleware 来解决这个问题:
- 首先安装 immer
pnpm i -D immer- 使用方法也很简单,导入 immer ,然后在
create方法中在在包裹一个immer()
import { create } from "zustand";
import { immer } from "zustand/middleware/immer";

export const useCatStore = create(
  immer(
    (set) => ({
      //...
    })
  )
)- 示例:优化上面在 catStore.ts
import { create } from "zustand";
import { immer } from "zustand/middleware/immer";

type TCatStoreState = {
  cats: {
    bigCats: number;
    smallCats: number;
  };
  increaseBigCats: () => void;
  increaseSmallCats: () => void;
};

export const useCatStore = create<TCatStoreState>()(
  immer(
    (set) => ({
      cats: {
        bigCats: 0,
        smallCats: 0,
      },
      increaseBigCats: () =>
        set((state) => {
          state.cats.bigCats++;
      }),
      increaseSmallCats: () =>
        set((state) => {
          state.cats.smallCats++;
      }),
    })
  )
)
使用 immer 后我们直接通过函数的形式,使用 set 方法设置 state 中的值,在这个函数里不需要 return (不再需要返回一个对象)。
在使用 zustand 时,是无法直接访问 state 中数据的,只能通过 zustand 给我们提供的 set 、 get 方法来访问 state状态。所以,如果需要再 set 方法外访问 state,那我们需要使用 get 方法。
import { create } from "zustand";
import { immer } from "zustand/middleware/immer";

type TCatStoreState = {
  cats: {
    bigCats: number;
    smallCats: number;
  };
  increaseBigCats: () => void;
  increaseSmallCats: () => void;
  summary: () => void;
};

export const useCatStore = create<TCatStoreState>()(
  immer(
    (set, get) => ({
      cats: {
        bigCats: 0,
        smallCats: 0,
      },
      increaseBigCats: () => set((state) => { state.cats.bigCats++ }),
      increaseSmallCats: () => set((state) => { state.cats.smallCats++ }),
      summary: () => {
        const total = get().cats.bigCats + get().cats.smallCats;
        return `There are ${total} cats in total. `;
      }
    })
  )
)使用的时候注意,summary 是一个函数,所以在使用的时候需要调用一下:
import { useCatStore } from "@/stores/catStore";

export const CatBox = () => {
  const summary = useCatStore((state) => state.summary);
	console.log(summary())

  return (
    <div className="box">
      <h1>Cat Box</h1>
      <p>small summary: {summary()}</p>
    </div>
  )
}const bigCats = useCatStore((state) => state.cats.bigCats) 我们把 useCatStore 括号里的
(state) => state.cats.bigCats称为 selector,且这个 selector (选择器) 是一个回调函数。
在上面的实例中,我们在页面中消费 store 的时候,是非常繁琐的:
const bigCats = useCatStore((state) => state.cats.bigCats);
const smallCats = useCatStore((state) => state.cats.smallCats);
const increaseBigCats = useCatStore((state) => state.increaseBigCats);
const increaseSmallCats = useCatStore((state) => state.increaseSmallCats);
const summary = useCatStore((state) => state.summary);
如果我们要使用所有的状态,我们就可以直接从 useCatStore 解构出所有 state ,从而简化代码:
 const {
    cats: { bigCats, smallCats },
    increaseBigCats,
    increaseSmallCats,
    summary,
  } = useCatStore();
我们之前也提到过,这种方式 只适用与你需要使用全部状态,如果只是使用部分状态,那情况就不妙了,因为这会导致不必要的重渲染,接下来我们来看一个了 🌰:
假设我们右如下 CatBox、CatBox2 组件, 为了验证页面是否发生重渲染,我们给组件添加一个 Math.random()方法:
import { useCatStore } from "@/stores/catStore";

export const CatBox = () => {
  const {
    cats: { bigCats, smallCats },
    increaseBigCats,
    increaseSmallCats,
    summary,
  } = useCatStore();

  console.log(summary());

  return (
    <div className="box">
      <h1>Cat Box</h1>
      <p>big cats: {bigCats}</p>
      <p>small cats: {smallCats}</p>
      <p>{Math.random()}</p>
      <div>
        <button onClick={increaseBigCats}>add big cats</button>
        <button onClick={increaseSmallCats}>add small cats</button>
      </div>
    </div>
  );
};
import { useCatStore } from "../stores/catStore";
export const CatBox2 = () => {
const { cats: { bigCats } } = useCatStore();
return (
<div className="box">
<h1>Partial States from catStore</h1>
<p>big cats: {bigCats}</p>
<p>{Math.random()}</p>
</div>
);
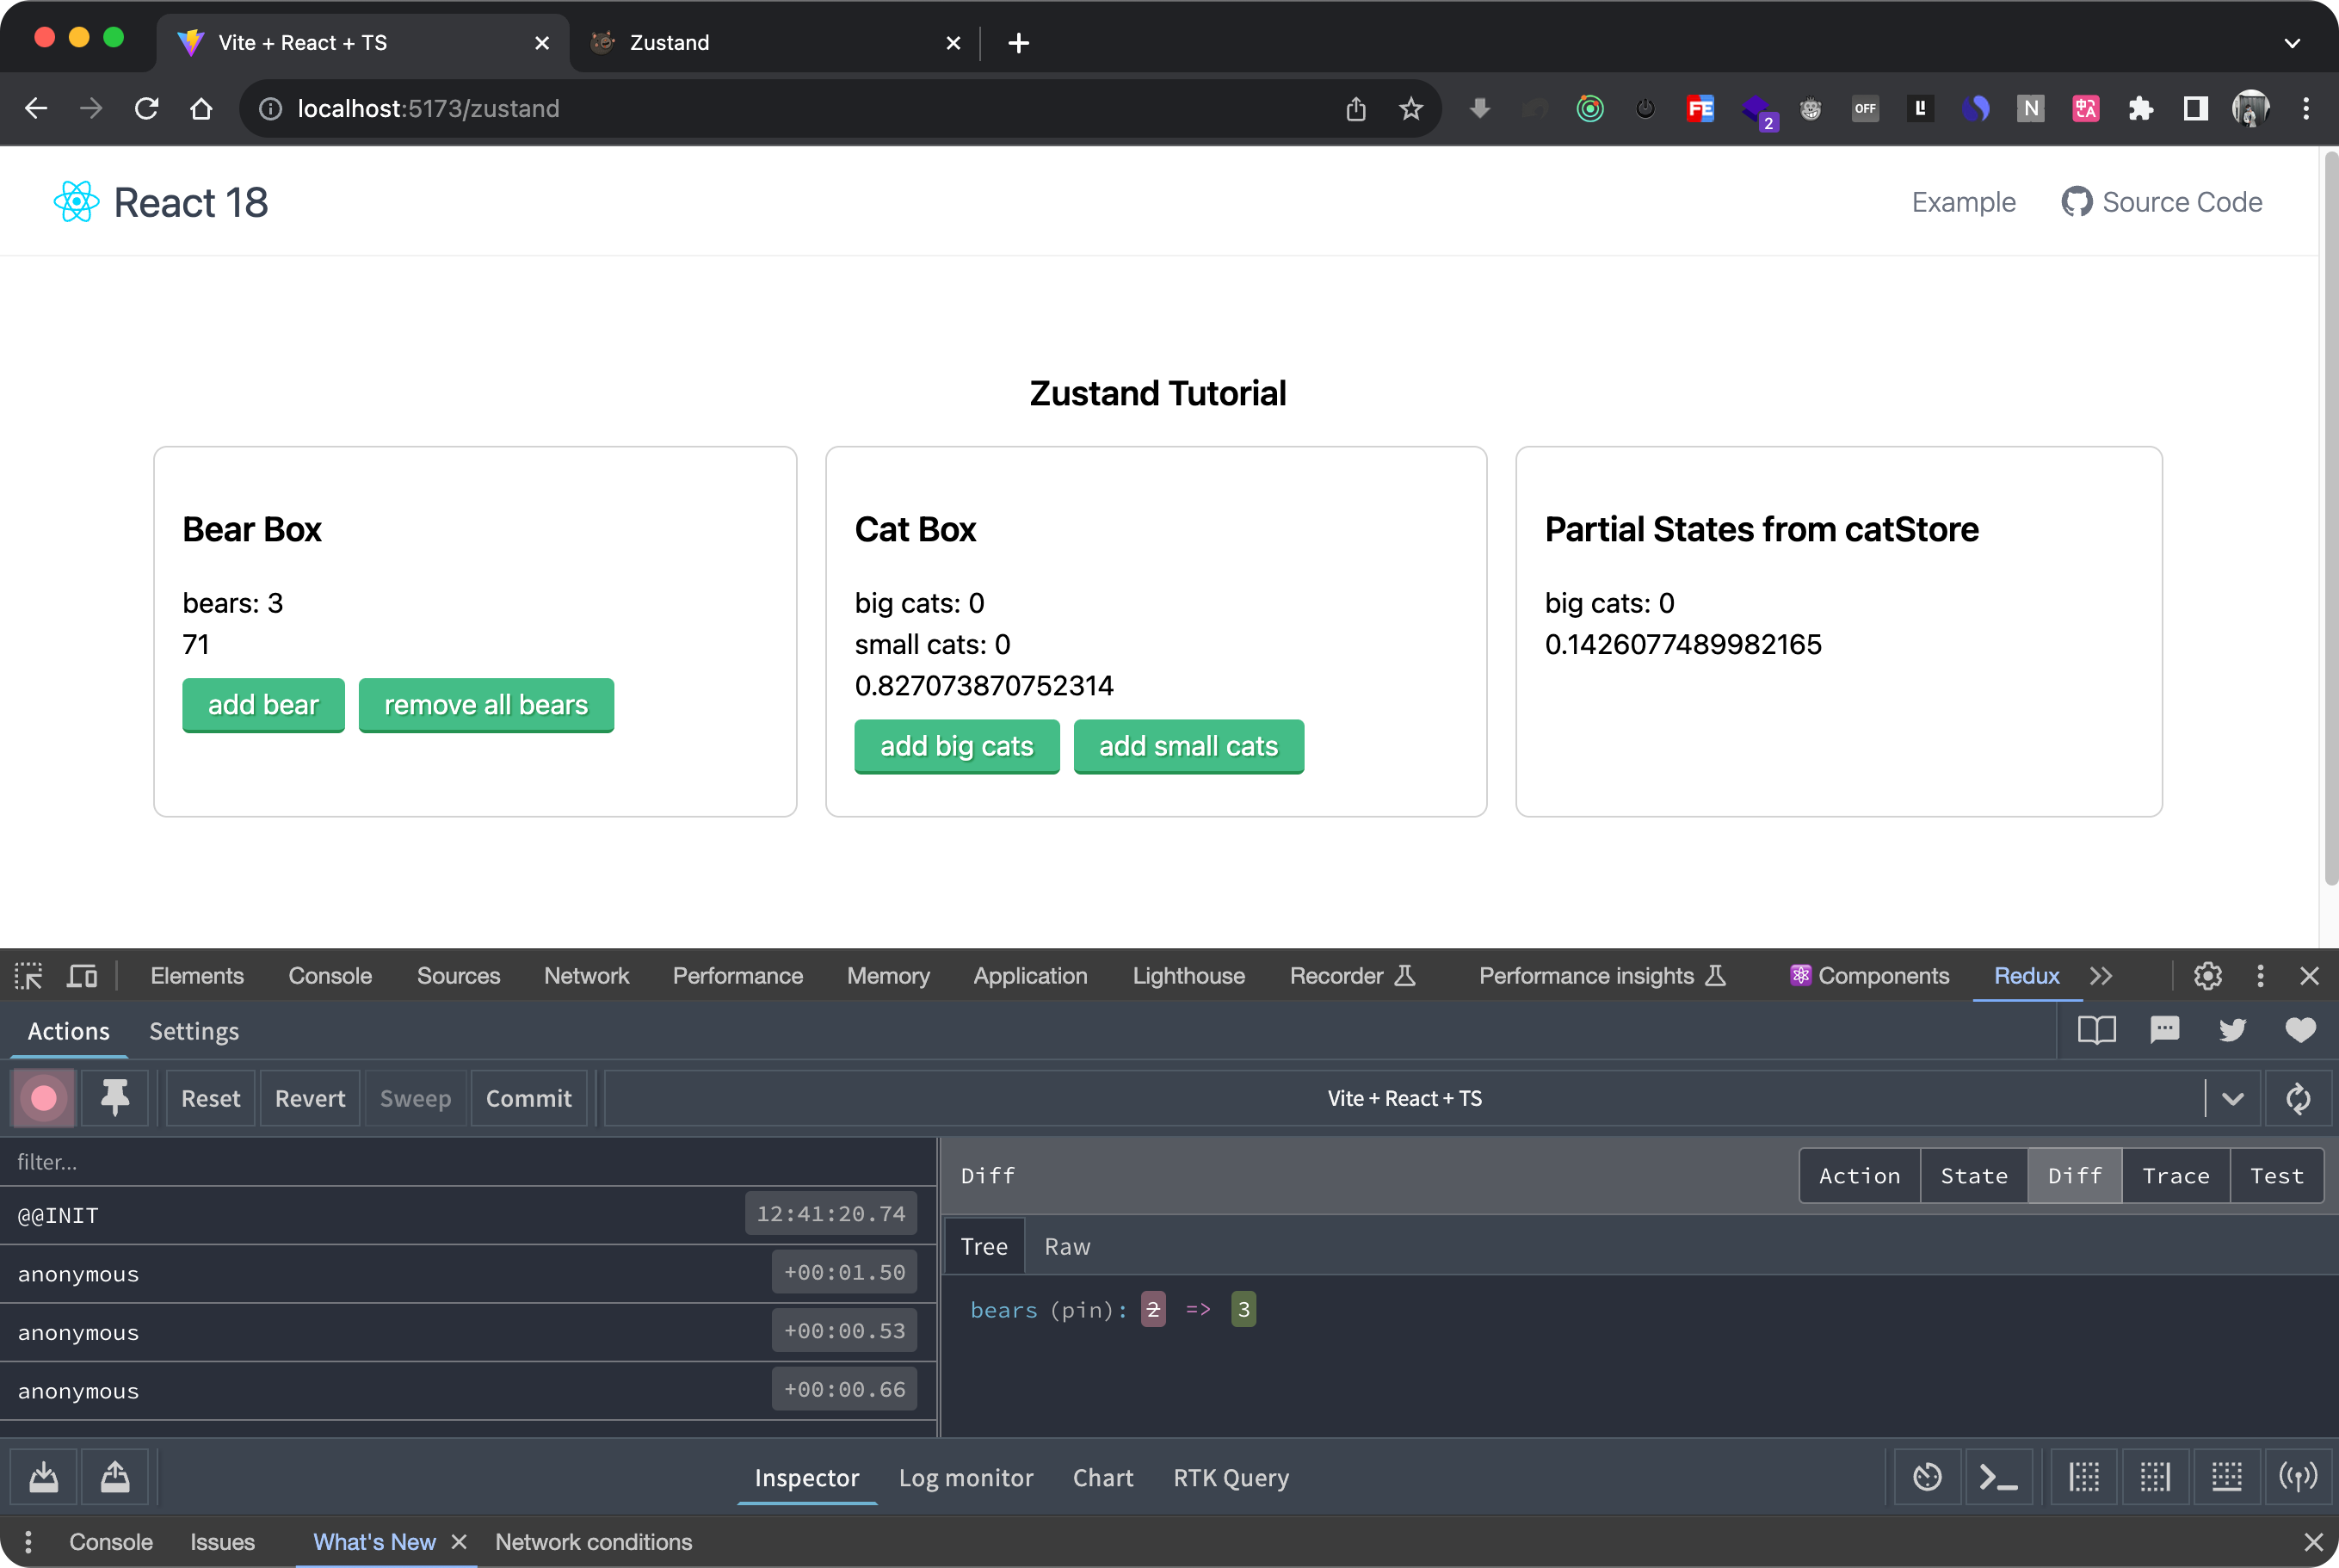
};- 点击左侧 CatBox 组件 add big cats 按钮时,两侧随机数发生变化了,这是正常的,因为在两个组件中我们都使用了 store 中的 bigCats;
- 但是点击 add small cats 按钮时,两边又重新产生了随机数,说明组件重渲染了。
这就是问什么我们要使用 selector 来调用状态的原因,因为他可以避免页面不必要的重复渲染,我们更改一下 CatBox 组件中的代码:
import { useCatStore } from "@/stores/catStore";

export const CatBox2 = () => {
  const bigCats = useCatStore((state) => state.cats.bigCats);

  return (
    <div className="box">
      <h1>Partial States from catStore</h1>
      <p>big cats: {bigCats}</p>
      <p>{Math.random()}</p>
    </div>
  );
};
上面的代码中,
useCatStore()括号里放的就是我们上面说的 selector,它就是一个回调函数,这个回调函数会自动拿到一个 state,也就是useCatStore中的全部 state 状态,然后我们按需返回所需要的状态,比如我们这里是 bigCats ,更改代码后,我们回到从新打开页面再次点击 add small cats 按钮时,右侧CatBox2 组件的随机数不再发生变化,说明使用 selector 方式可以避免页面重渲染。
但是,如果页面中需要使用 n 个状态,我们这么写,还是很拉胯的,先别急,其实作者在官方文档里,给我们提供了一个秘方,就是在第一层状态里,能大大提高你选择第一层状态时的效率。
在项目新建 src/utils/createSelectors.ts 文件:
import { StoreApi, UseBoundStore } from 'zustand'

type WithSelectors<S> = S extends { getState: () => infer T }
  ? S & { use: { [K in keyof T]: () => T[K] } }
  : never

const createSelectors = <S extends UseBoundStore<StoreApi<object>>>(
  _store: S,
) => {
  const store = _store as WithSelectors<typeof _store>
  store.use = {}
  for (const k of Object.keys(store.getState())) {
    ;(store.use as any)[k] = () => store((s) => s[k as keyof typeof s])
  }

  return store
}
上面这段代码比较简单,其实就是把你的 store 作为输入值,然后把store 拓展成一个 use 的属性,这个 use 属性是一个对象,里面包含所有的 state 的 key,和它对应的 selector function,最后返回 store。
使用 createSelectors 方式也简单:
import { create } from "zustand";
import { immer } from "zustand/middleware/immer";
import { createSelectors } from "@/utils/createSelectors";

type TCatStoreState = {
  cats: {
    bigCats: number;
    smallCats: number;
  };
  increaseBigCats: () => void;
  increaseSmallCats: () => void;
  summary: () => void;
};

export const useCatStore = createSelectors(create<TCatStoreState>()(
  immer(
    (set, get) => ({
      cats: {
        bigCats: 0,
        smallCats: 0,
      },
      increaseBigCats: () => set((state) => state.cats.bigCats++),
      increaseSmallCats: () => set((state) => state.cats.smallCats++)
    })
  )
))import { shallow } from "zustand/shallow";
import { useCatStore } from "@/stores/useCatStore";
export const CatController = () => {
const increaseBigCats = useCatStore.use.increaseBigCats()
const increaseSmallCats = useCatStore.use.increaseSmallCats()
return (
<div className="box">
<h1>Cat Controller</h1>
<p>{Math.random()}</p>
<div>
<button onClick={increaseBigCats}>add big cats</button>
<button onClick={increaseSmallCats}>add small cats</button>
</div>
</div>
);
}如果我们想避免组件重渲染的同时,还可以在 store 选择多个状态,那就要使用
shallow(平安符)。
  //   const { increaseBigCats, increaseSmallCats } = useCatStore();
  //   const increaseBigCats = useCatStore.use.increaseBigCats();
  //   const increaseSmallCats = useCatStore.use.increaseSmallCats();

	import { shallow } from "zustand/shallow";

  const { increaseBigCats, increaseSmallCats } = useCatStore(
    (state) => ({
      increaseBigCats: state.increaseBigCats,
      increaseSmallCats: state.increaseSmallCats,
    }),
    shallow
);- 这个 shallow 是一个判断函数,它判断第一层状态是否相等,需要从
zustand/shallow中导入。 - 为什么加入 shallow 函数后就可以避免重渲染问题呢,因为我们的上面的代码中我们使用 useCatStore 时返回的是一个 object ,它每一次都是重新产生的,而这个 shallow 函数的作用,就是用于比较两个 object 的第一层值是不是一样,如果一样,就认为相等,反之则不相等。如果你的情况更复杂,你还可以自己写这个 shallow 比较函数。
我们不仅仅可以返回一个对象,还可以返回一个数组:
import { shallow } from "zustand/shallow";

const [increaseBigCats, increaseSmallCats] = useCatStore(
    (state) => [state.increaseBigCats, state.increaseSmallCats],
    shallow
);因为 zustand 和 Redux 是同门,所以可以直接借用 Redux 的调试工具来调试状态。
import { create } from 'zustand'
import { devtools } from 'zustand/middleware'

type TBearStore = {
  bears: number
  increasePopulation: () => void
  removeAllBears: () => void
}

export const useBearStore = create<TBearStore>()(devtools(
  (set) => ({
    bears: 0,
    increasePopulation: () => set((state) => ({
      ...state,
      bears: state.bears + 1
    })),
    removeAllBears: () => set({ bears: 0 }),
  })
))
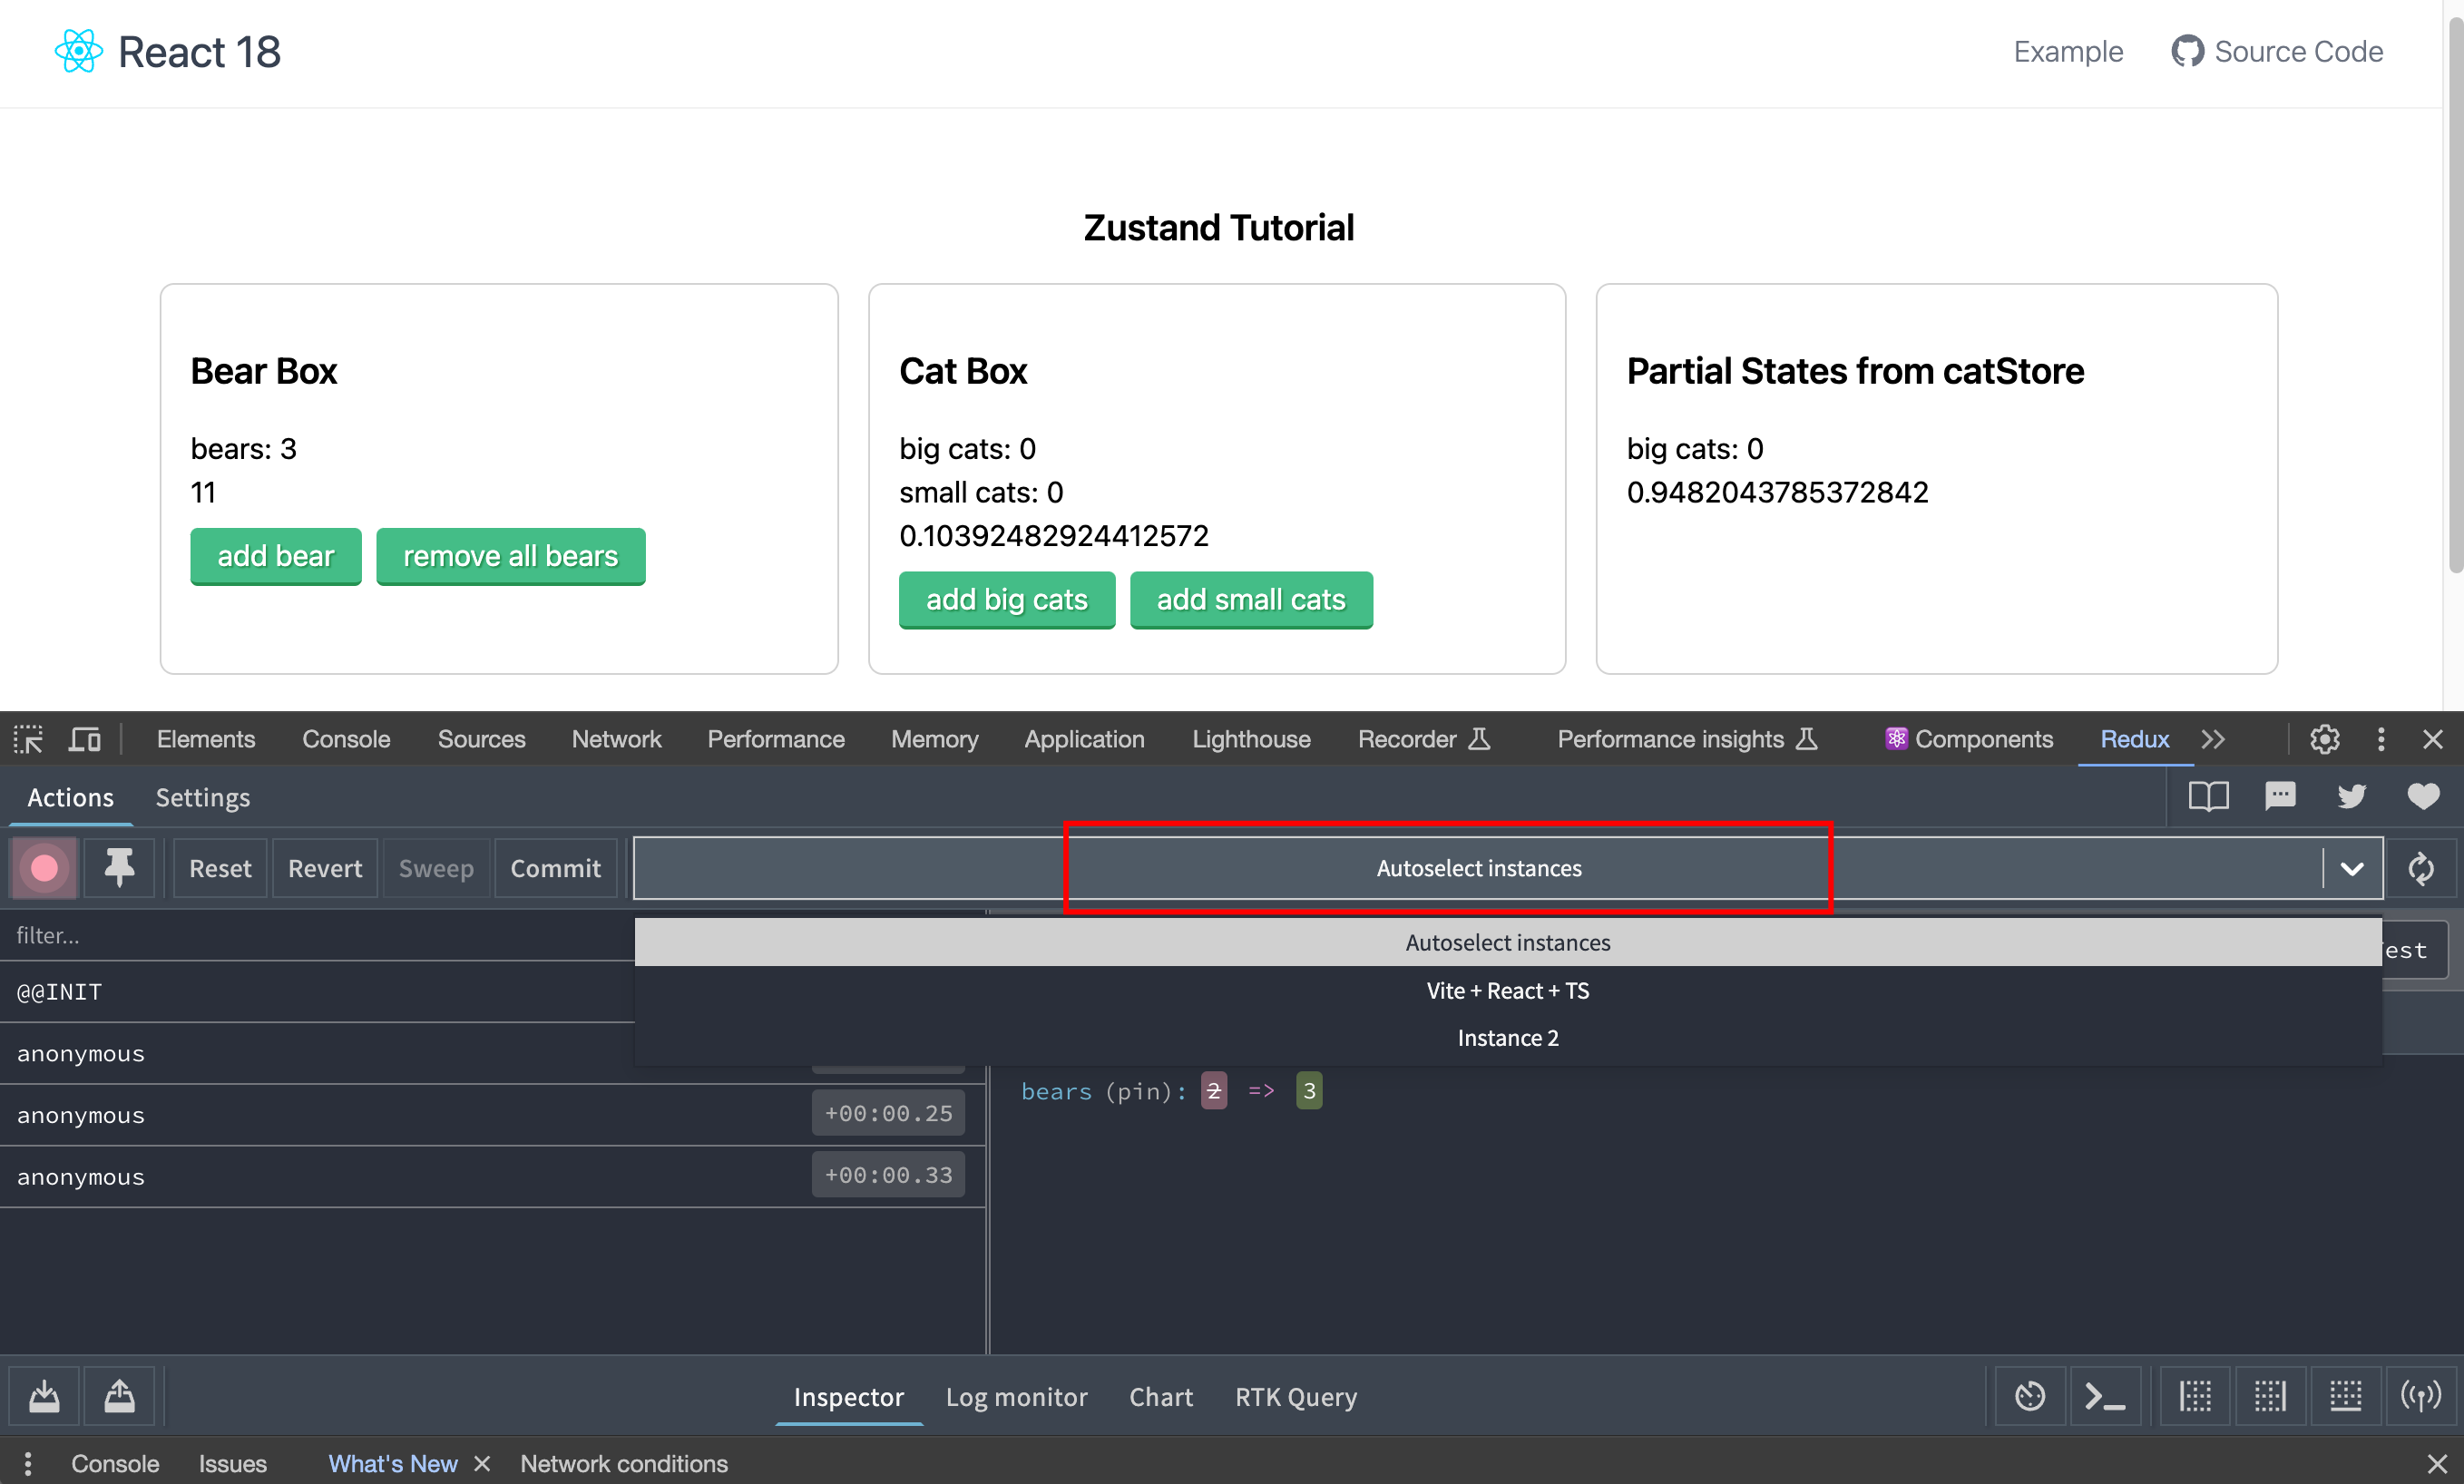
如果触发没效果,需要配置一下 Redux tools ,将 instance 设置为 Autoselect instances:
如果你想设置在生产环境下关闭浏览器状态调试,可以使用 devtools 的第二个参数,这个参数是一个对象,我们在对象里加设置 enlabed 属性,值为布尔值,为 true 时会开启浏览器调试,反之则关闭。
import { create } from 'zustand'
import { devtools } from 'zustand/middleware'

type TBearStore = {
  bears: number
  increasePopulation: () => void
  removeAllBears: () => void
}

export const useBearStore = create<TBearStore>()(devtools(
  (set) => ({
    bears: 0,
    increasePopulation: () => set((state) => ({
      ...state,
      bears: state.bears + 1
    })),
    removeAllBears: () => set({ bears: 0 }),
  }),
  {
    enabled: true,
  }
))
如果使用了immer, 必须把 devtools 放在 immer 后面,因为 immer 可能会改变 state 状态:
import { create } from "zustand";
import { immer } from "zustand/middleware/immer";
import { devtools } from "zustand/middleware";

export const useCatStore = create(
  immer(
    devtools(
      (set, get) => ({
       // ...
      }))
  )
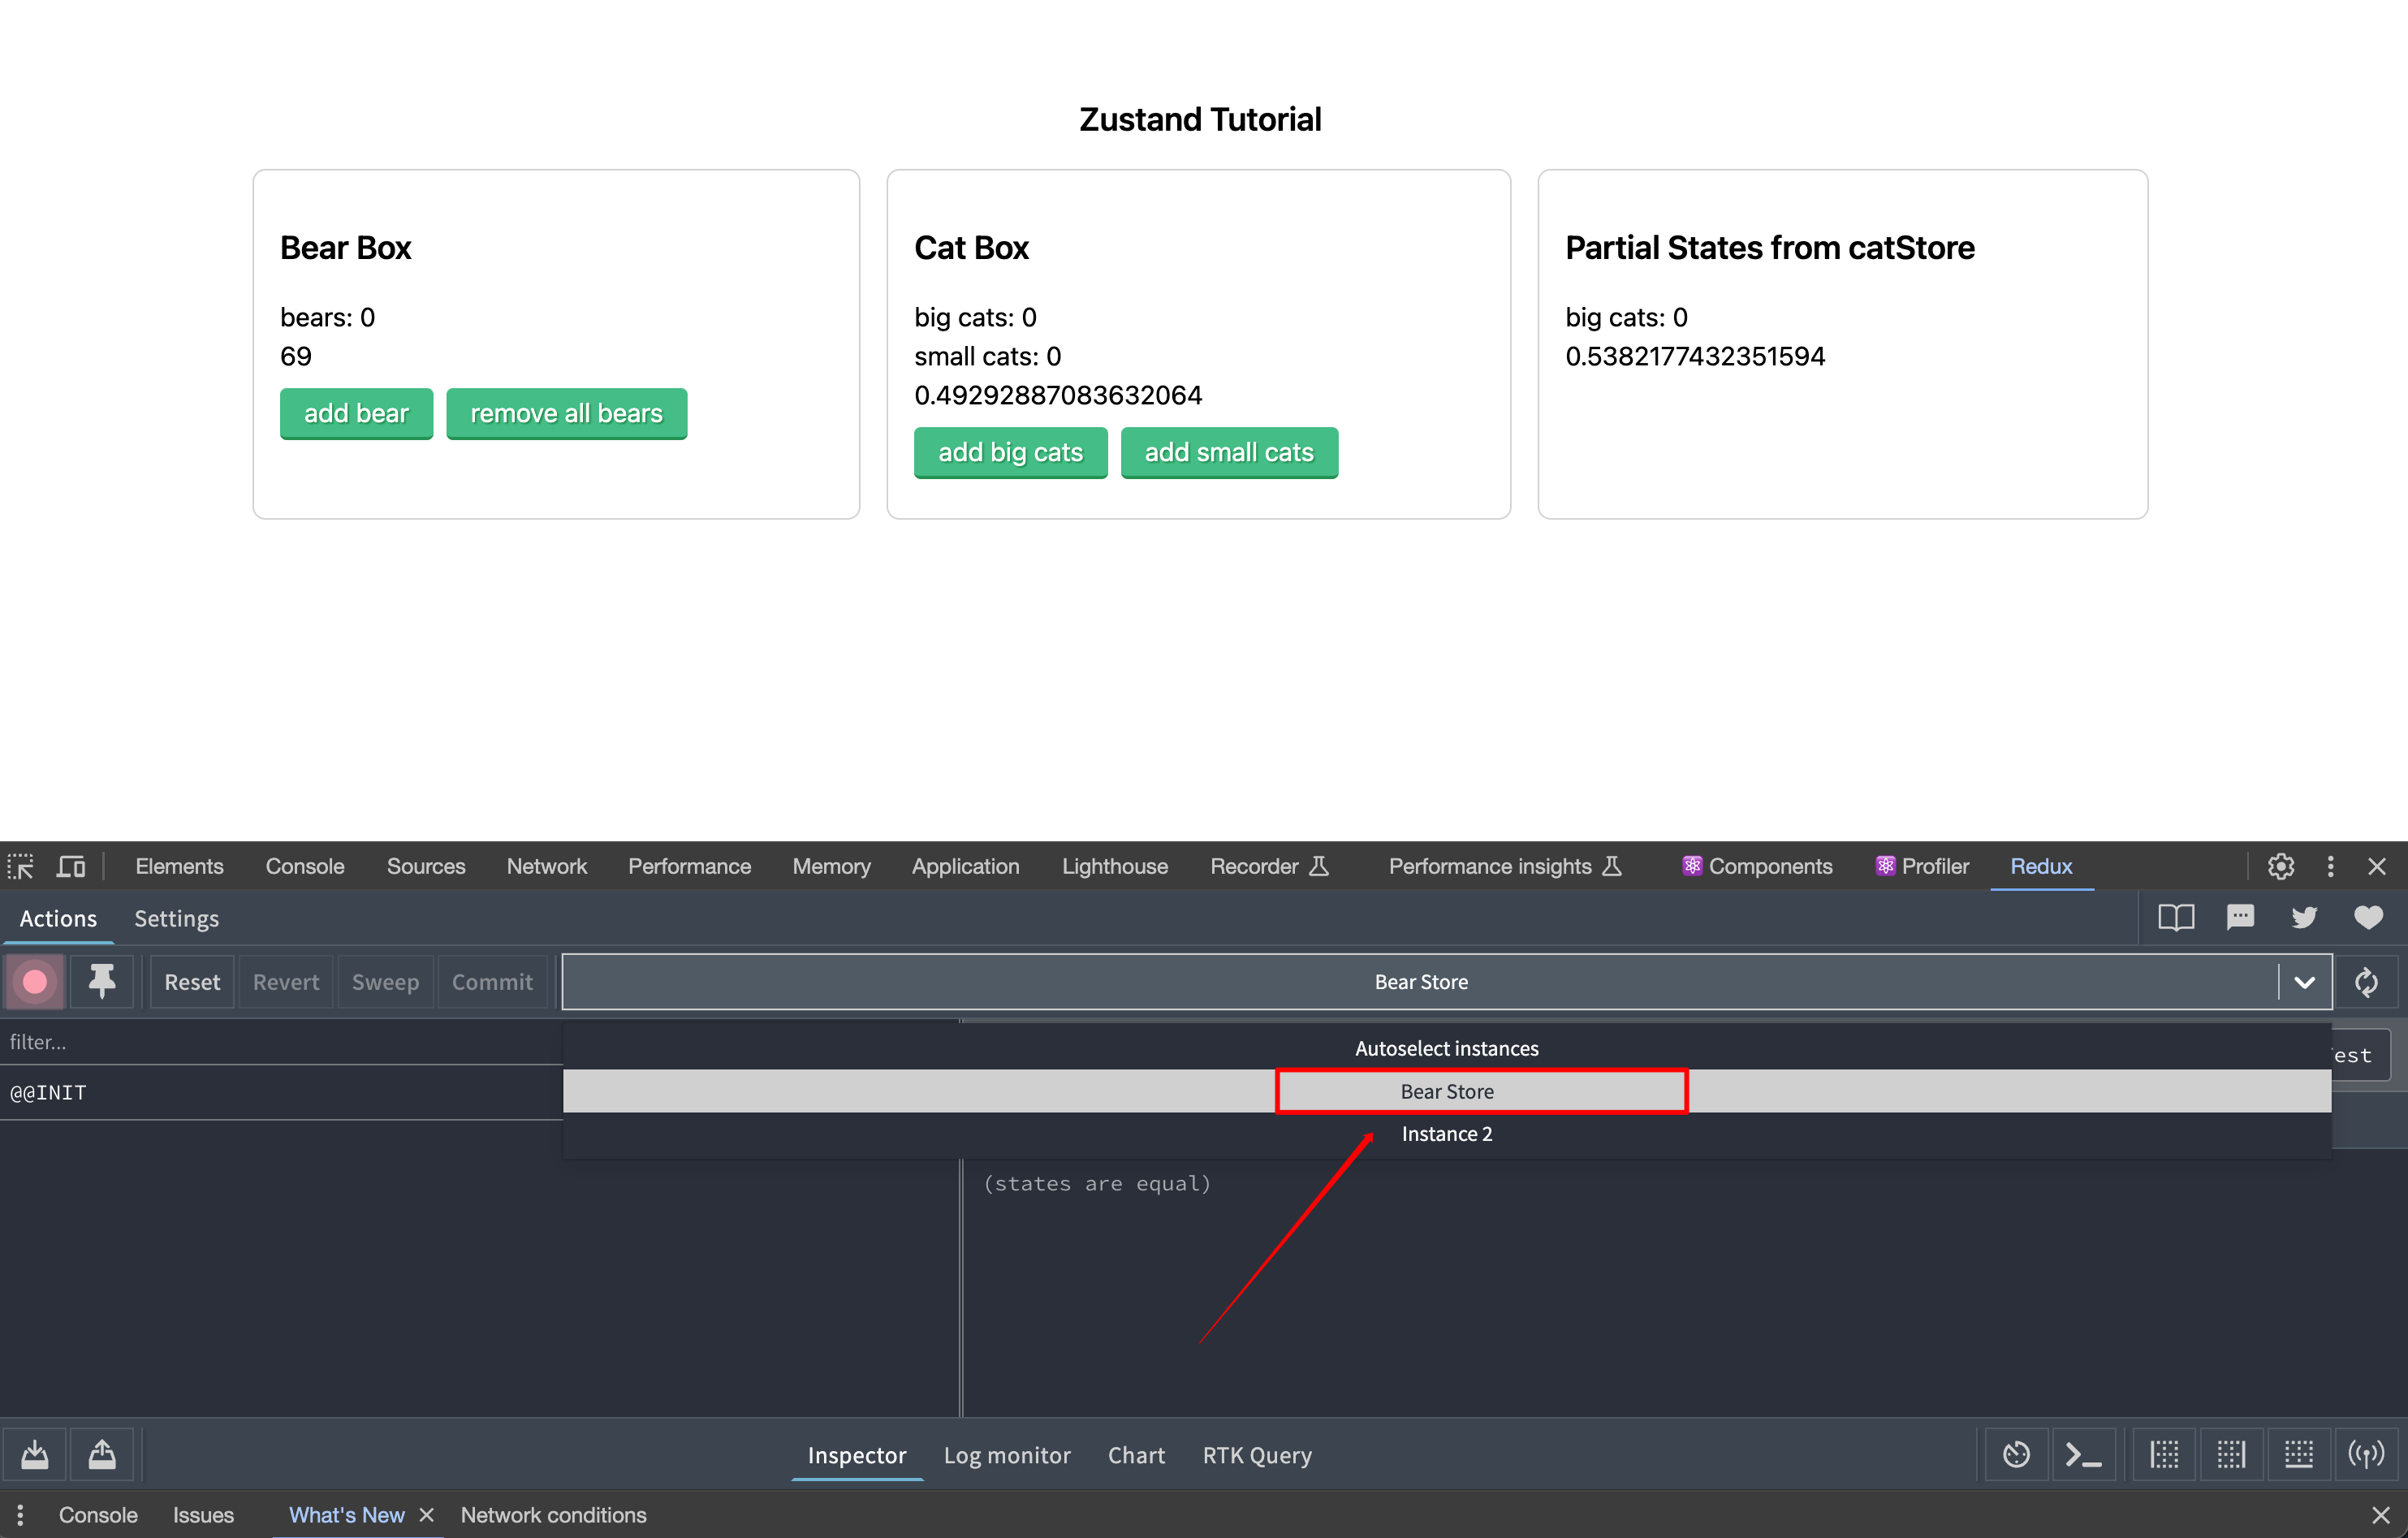
)上面有提到我们因为不确定创建的 store 对应的 instance,导致调试时看不到状态变化, 所以将 instance 设置为 Autoselect instances,为了解决这个问题,我们在开启devtool时给store设置别名:
import { create } from 'zustand'
import { devtools } from 'zustand/middleware'

type TBearStore = {
  bears: number
  increasePopulation: () => void
  removeAllBears: () => void
}

export const useBearStore = create<TBearStore>()(devtools(
  (set) => ({
    bears: 0,
    increasePopulation: () => set((state) => ({
      ...state,
      bears: state.bears + 1
    })),
    removeAllBears: () => set({ bears: 0 }),
  }),
  {
    enabled: true,
    name: 'Bear Store',
  }
))
如下图,设置别名后,我们可以通过别名很方便的选择正确的 instance
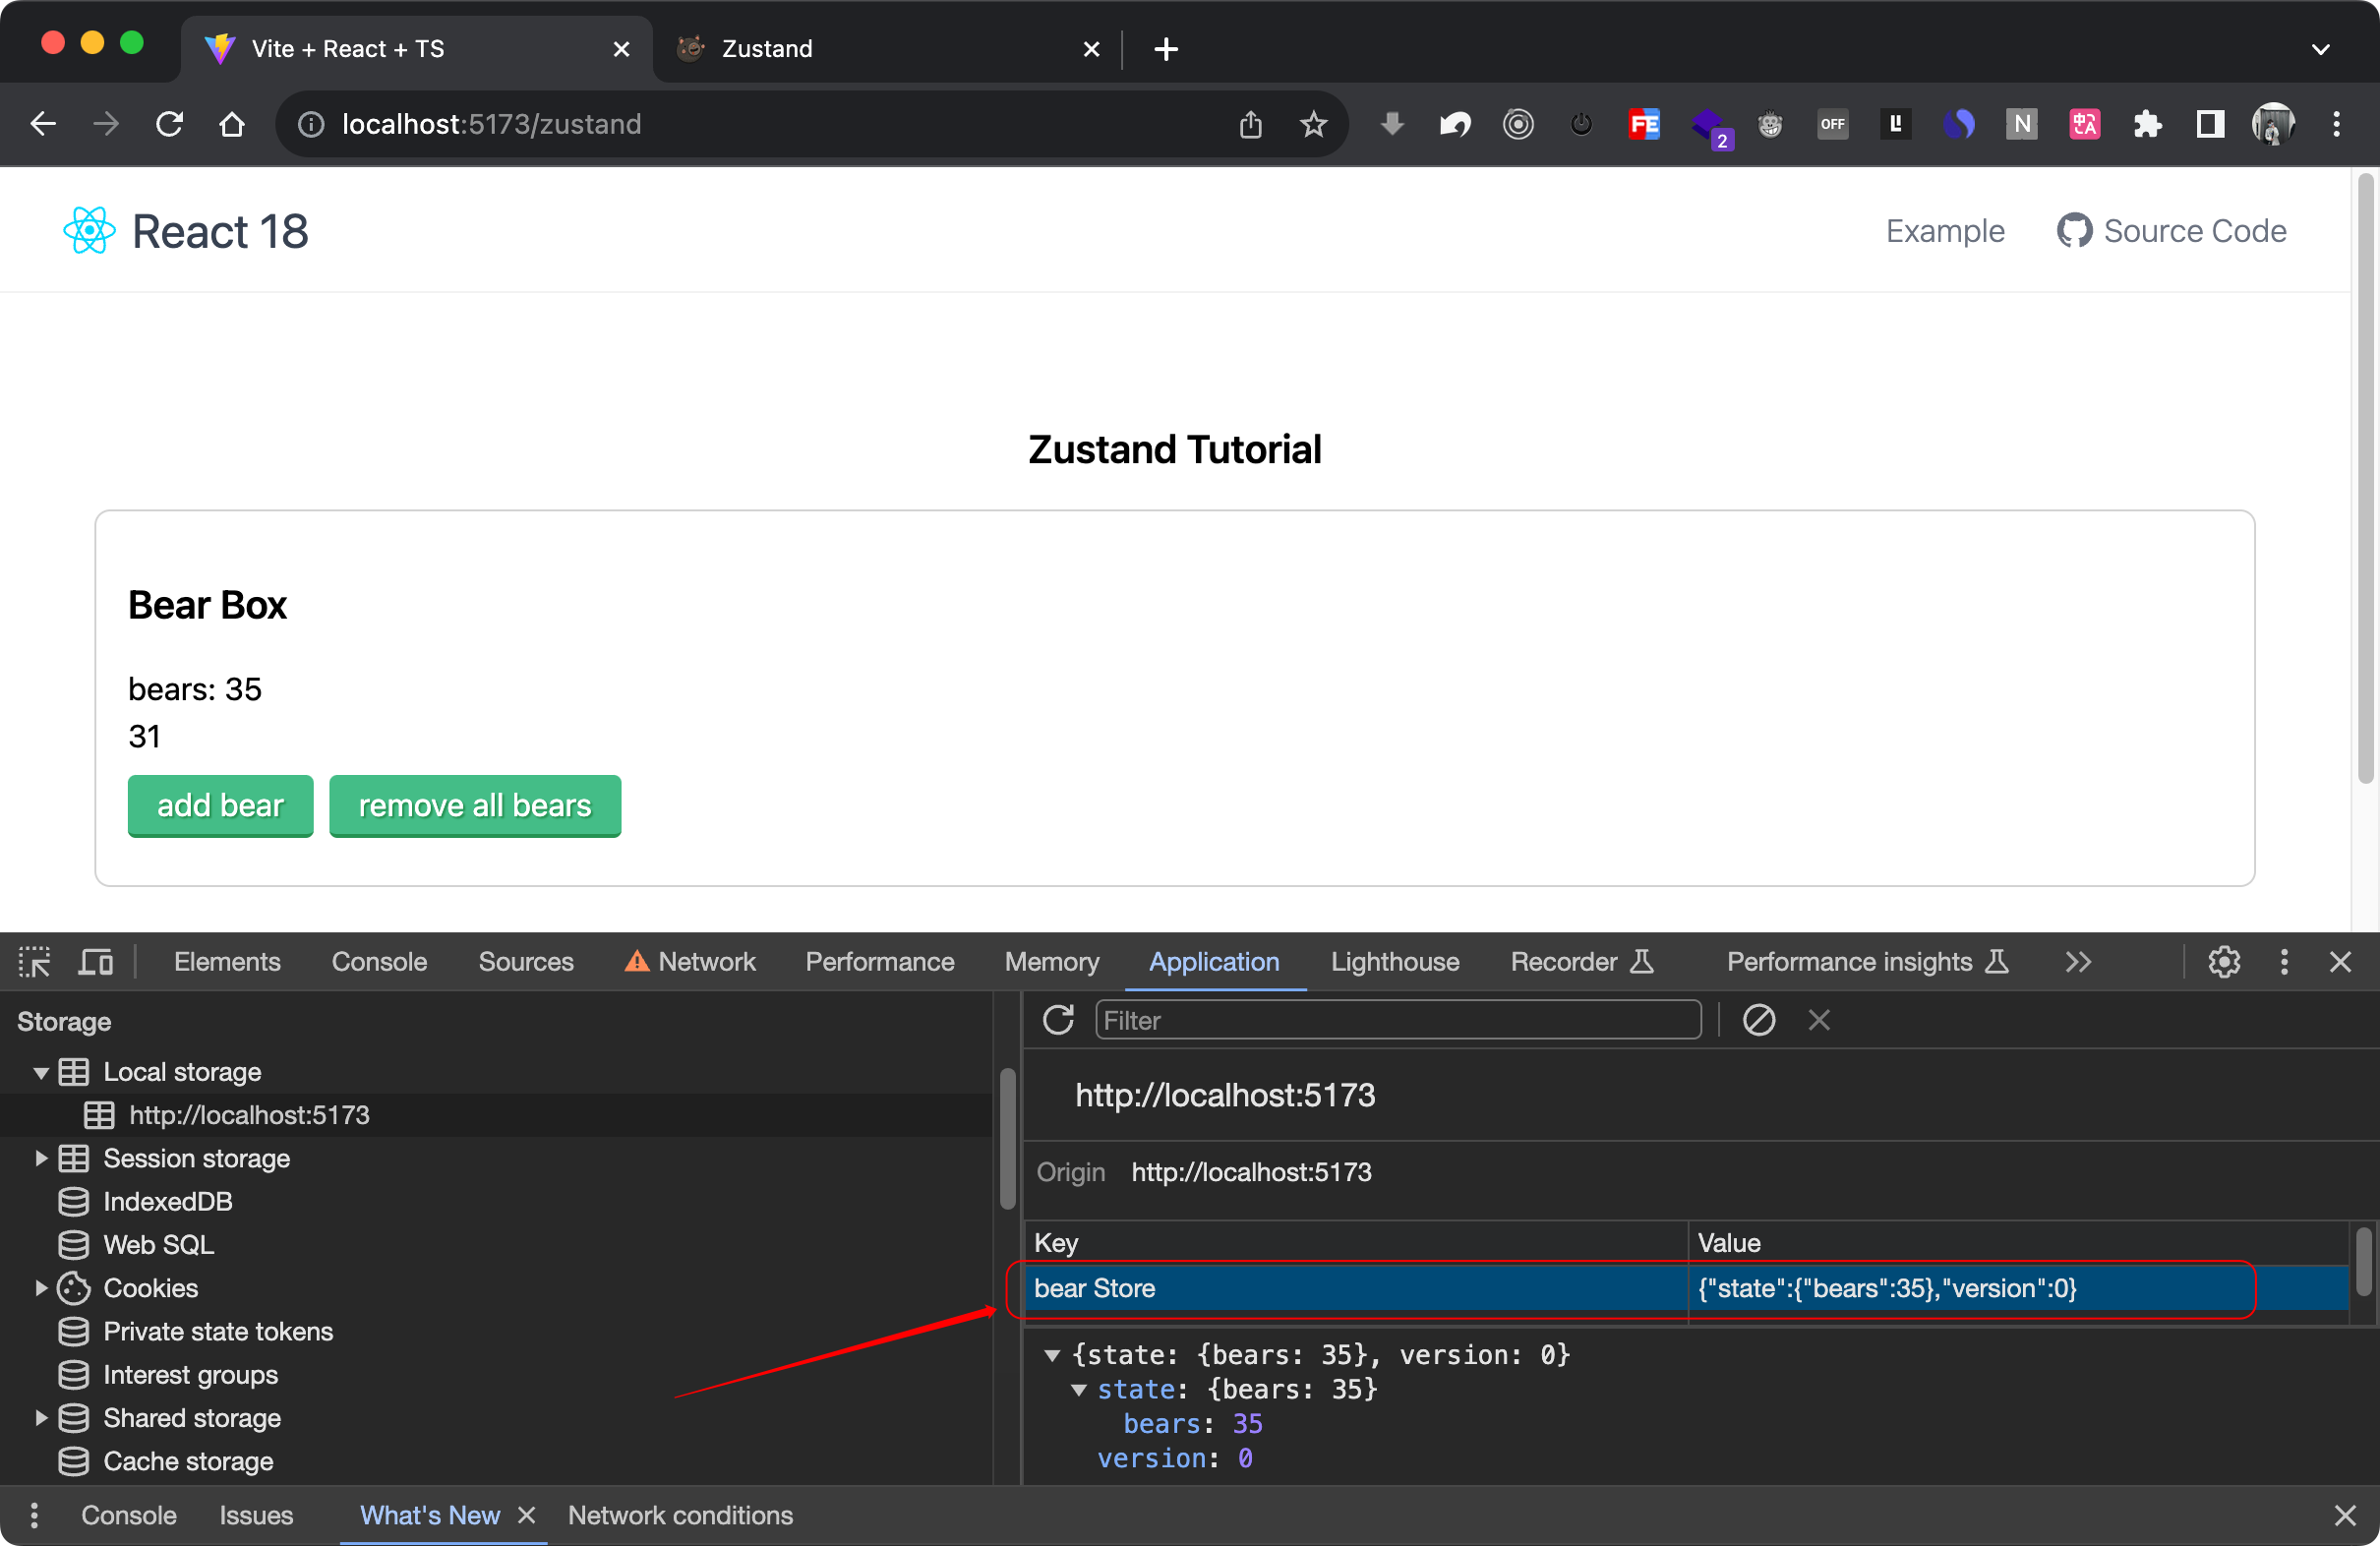
在很多时候,我们是需要将状态保存到本地的,常规的思路是使用手动将一些数据保存在浏览器的 localStorage 本地缓存中,但在 zustand 中提供了更简单的本地存储方法。
使用 persist 本地储存状态:
import { create } from 'zustand'
import { persist } from 'zustand/middleware'

type TBearStore = {
  bears: number
  increasePopulation: () => void
  removeAllBears: () => void
}

export const useBearStore = create<TBearStore>()(persist(
  (set) => ({
    bears: 0,
    increasePopulation: () => set((state) => ({
      ...state,
      bears: state.bears + 1
    })),
    removeAllBears: () => set({ bears: 0 }),
  }),
  {
    // 设置存储的key名称, 且必须是唯一的
    name: 'bear Store',
  }
))zustand 默认将开启 persist 的 store 全部保存到浏览器的 localStorage 中。
如果想存储到 sessionStorage:
import { create } from 'zustand'
import { persist, createJSONStorage } from 'zustand/middleware'

export const useBearStore = create(
  persist(
    (set, get) => ({
      bears: 0,
      addABear: () => set({ bears: get().bears + 1 }),
    }),
    {
      name: 'bear Store', // name of the item in the storage (must be unique)
      storage: createJSONStorage(() => sessionStorage), // (optional) by default, 'localStorage' is used
    },
  ),
)🌰 比如有如下 store 代码:
export const useBoundStore = create(
  persist(
    (set, get) => ({
      foo: 0,
      bar: 1,
      size: 24,
      userInfo: {
        name: 'yi',
        age: 25
      }
    }),
  ),
)
我们只想将 userInfo 保存到本地存储
export const useBoundStore = create(
  persist(
    (set, get) => ({
      foo: 0,
      bar: 1,
      size: 24,
      userInfo: {
        name: 'yi',
        age: 25
      }
    }),
    {
      name: 'bound Store'
      partialize: (state) => ({ userInfo: state.userInfo })
    },
  ),
)- partialize 是一个回调函数,可以拿到所有 state,在这个函数内部需要返回一个对象,在这个对象里我们可以仅返回需要本地存储的字段。
比如我们想排除 foo、size 状态的本地缓存,可以这么写:
export const useBoundStore = create(
  persist(
    (set, get) => ({
      foo: 0,
      bar: 1,
      size: 24,
      userInfo: {
        name: 'yi',
        age: 25
      }
    }),
    {
      name: 'bound Store'
       partialize: (state) =>
        Object.fromEntries(
          // 根据 key,过滤掉相应的 states
          Object.entries(state).filter(([key]) => !['foo','size'].includes(key)),
        ),
    },
  ),
)import { create } from 'zustand'
import { persist } from 'zustand/middleware'
type TBearStore = {
bears: number
increasePopulation: () => void
removeAllBears: () => void
}
export const useBearStore = create<TBearStore>()(persist(
(set) => ({
bears: 0,
increasePopulation: () => set((state) => ({
bears: state.bears + 1
})),
removeAllBears: () => set({ bears: 0 }),
}),
{
name: 'bear Store',
}
))import { useBearStore } from "@/stores/bearStore";
export const BearBox = () => {
const { bears, increasePopulation, removeAllBears } = useBearStore();
return (
<div className="box">
<h1>Bear Box</h1>
<p>bears: {bears}</p>
<button onClick={increasePopulation}>add bear</button>
<div>
<button onClick={useBearStore.persist.clearStorage}>
clear storage
</button>
</div>
</div>
);
}注意 📢:
ClearStorage方法并不是RestStorage,上面这种方式可以正确清除浏览器中的 Storage,但是并没有清除 memory,所以,当你再次点击add bear按钮时,bears的值不会从 0 开始自增,而是基于上次的 memory 值来改变的。
如果你要实现 rest states(重置状态),可以自己在 store 中定义一个重置逻辑
import { create } from 'zustand'
import { persist } from 'zustand/middleware'

type TBearStore = {
  bears: number
  color: string
  size: string
  increasePopulation: () => void
  removeAllBears: () => void
}

export const useBearStore = create<TBearStore>()(persist(
  (set) => ({
    bears: 0,
    color: 'pink',
    size: 'big',
    increasePopulation: () => set((state) => ({
      ...state,
      bears: state.bears + 1
    })),
    removeAllBears: () => set({ bears: 0 }),
    reset: () => set({
      bears: 0,
      color: 'pink',
      size: 'big',
    })
  }),
  {
    name: 'bear Store',
  }
))当同时使用 immer、devtools、persist 时,需要把 persist 放在 devtools 中间件里面, 注意 persist 中的第二个参数为必填项,必须设置 name 也就是本地存储时的 key 名称。
import { create } from "zustand";
import { immer } from "zustand/middleware/immer";
import { devtools,persist } from "zustand/middleware";

export const useCatStore = create(
  immer(
    devtools(
      persist(
        (set, get) => ({
       		// ...
     		}),
        {
          name: 'user Store'
        }
      )
    )
  )
)- 关于 persist 更多的用法,点击参考链接 🔗
我们前面在组件中消费 store 中的数据时,都是这么写的:
const { increaseBigCats, increaseSmallCats } = useCatStore();
const increaseBigCats = useCatStore.use.increaseBigCats();
const increaseSmallCats = useCatStore.use.increaseSmallCats();

// 或者
const [increaseBigCats, increaseSmallCats] = useCatStore(
    (state) => [state.increaseBigCats, state.increaseSmallCats],
    shallow
)
上面的写法中, selector 返回的状态是 reactive 的,与 subscribe 不同的是, reactive 的状态会在每次状态变化后都重渲染。
举个生活中的例子,解释 reactive 和 subscribe 的区别
比如你是一个 reactive 的小孩,那不管你是看到**妈在做饭还是做家务或者洗碗,你都会放下手上的游戏,跑过去看一下妈妈在做什么,有什么事是需要帮忙的。 而 subscribe 的小孩,不管妈妈在做洗碗、洗衣服、做饭,都不会有反应;但一旦看到妈妈两眼冒着火花盯着他的时候,他就会立刻放下手中的游戏,去帮妈妈晾衣服。 总结: subscribe 的小孩只会对某些特定情况做出反应,而 reactive 的小孩则会对所有情况做出反应。
比如熊需要食物,主食是鱼,所以我们可以创建一个 FoodStore ,里面包含一个 fish 状态,如果鱼的状态下降到 5 一些,我们就将页面背景变为红色,大于5的时候变为绿色。这里我们只需要关注 鱼的数量是否大于5 ,其它的状态我们并不想关注。 🌰 按照上面的思路,我们会这么定义 Store:
import { create } from 'zustand'

type TBearStore = {
  bears: number
  color: string
  size: string
  increasePopulation: () => void
  removeAllBears: () => void
}

export const useBearStore = create<TBearStore>()(
  (set) => ({
    bears: 0,
    color: 'pink',
    size: 'big',
    increasePopulation: () => set((state) => ({
      ...state,
      bears: state.bears + 1
    })),
    removeAllBears: () => set({ bears: 0 })
  })
)


type TFishStoreState = {
  fish: number;
  addOneFish: () => void;
  removeOneFish: () => void;
  removeAllFish: () => void;
}

export const useFoodStore = create<TFishStoreState>((set) => ({
  fish: 0,
  addOneFish: () => set((state) => ({ fish: state.fish + 1 })),
  removeOneFish: () => set((state) => ({ fish: state.fish - 1 })),
  removeAllFish: () => set({ fish: 0 }),
}));
🌰 在页面中使用:
import { useBearStore, useFoodStore } from "@/stores/reactiveStore";

export const BearBox = () => {
  const { bears, increasePopulation, removeAllBears } = useBearStore();
  const fish = useFoodStore((state) => state.fish);

  return (
    <div className="box" style={{ backgroundColor: fish > 5 ? 'lightgreen' : 'lightpink' }}>
      <h1>Bear Box</h1>
      <p>bears: {bears}</p>
      <p>{Math.random()}</p>
      <div>
        <button onClick={increasePopulation}>add bear</button>
        <button onClick={removeAllBears}>remove all bears</button>
      </div>
    </div>
  );
};

export const FoodBox = () => {
  const { fish, addOneFish, removeOneFish, removeAllFish } = useFoodStore();

  return (
    <div className="box">
      <h1>Food Box</h1>
      <p>fish: {fish}</p>
      <div>
        <button onClick={addOneFish}>🐟 + 1</button>
        <button onClick={removeOneFish}>🐟 — 1</button>
        <button onClick={removeAllFish}>Remove all fish 🗑️ </button>
      </div>
    </div>
  );
};
运行上面的代码,可以看到当我们点击右侧 Food Box 组件的按钮时,无论是添加鱼的数量还是减少鱼的数量,左侧 Bear Box组件都会重渲染,虽然这是正常的(因为两个组件我们都用到了
fish状态),但是如果是更复杂的程序,页面频繁的点击操作,每次都要重新渲染页面,就会影响性能。
使用 subscribe 可以订阅全局状态并监听状态变化, 而不需要重渲染。
🌰 我们修改一下 BearBox 组件代码:
export const BearBox = () => {
  const { bears, increasePopulation, removeAllBears } = useBearStore();

  // const fish = useFoodStore((state) => state.fish);
  const [bgColor, setBgColor] = useState('lightpink');

  useEffect(() => {
    // subscribe 返回一个 unsubscribe 函数,我们可以通过变量接收
    const unsub = useFoodStore.subscribe((state, prevState) => {
      if (prevState.fish <= 5 && state.fish > 5) {
        setBgColor("lightgreen");
      } else if (prevState.fish > 5 && state.fish <= 5) {
        setBgColor("lightpink");
      }
    })
    // 返回 unsub,即可实现页面销毁的同时也销毁 subscribe 订阅
    return unsub;
  }, []);

  return (
    <div className="box" style={{ backgroundColor: bgColor }}>
      <h1>Bear Box</h1>
      <p>bears: {bears}</p>
      <p>{Math.random()}</p>
      <div>
        <button onClick={increasePopulation}>add bear</button>
        <button onClick={removeAllBears}>remove all bears</button>
        <button onClick={useBearStore.persist.clearStorage}>
          clear storage
        </button>
      </div>
    </div>
  );
};subscribe方法返回一个 listener (监听器) 回调函数,可以拿到 state,和 prevState (上一次的状态)参数。- 在这个回调函数里写的代码逻辑,在 每次state发生变化时,都会重新执行,但不会引起页面重渲染。
- subscribe 可以放在组件内,也可以放在组件外面。注意:如果要放在组件里面时,我们要尽量把它放在 useEffect 🪝中,subscribe 会返回一个 unSubscribe 的方法,我们可以通过一个变量接收,然后在 useEffect 中 return,即可实现在组件销毁(页面隐藏)时卸载订阅。
假如你有很多状态,但只关心其中的一部分,那我们还可以使用 subscribeWithSelector 中间件来 subscribe 一部分状态。
type TFishStoreState = {
  fish: number;
  addOneFish: () => void;
  removeOneFish: () => void;
  removeAllFish: () => void;
}

export const useFoodStore = create<TFishStoreState>()(
  subscribeWithSelector(
    (set) => ({
      fish: 0,
      addOneFish: () => set((state) => ({ fish: state.fish + 1 })),
      removeOneFish: () => set((state) => ({ fish: state.fish - 1 })),
      removeAllFish: () => set({ fish: 0 }),
    })
  )
)
🌰 在组件中使用:
import { useBearStore, useFoodStore } from "@/stores/subscribeStore";
import { useEffect, useState } from "react";
import { shallow } from "zustand/shallow";

export const BearBox = () => {
  const { bears, increasePopulation, removeAllBears } = useBearStore();
  const [bgColor, setBgColor] = useState('lightpink');

  useEffect(() => {
    const unsub = useFoodStore.subscribe(
      (state) => state.fish,
      (fish, prevFish) => {
        if (prevFish <= 5 && fish > 5) {
          setBgColor("lightgreen");
        } else if (prevFish > 5 && fish <= 5) {
          setBgColor("lightpink");
        }
      },
      {
        equalityFn: shallow, // 判断两个对象是否相等
        fireImmediately: true, // 是否在第一次调用(初始化时)立刻执行
      }
    );
    return unsub;
  }, []);

  return (
    <div className="box" style={{ backgroundColor: bgColor }}>
      <h1>Bear Box</h1>
      <p>bears: {bears}</p>
      <p>{Math.random()}</p>
      <div>
        <button onClick={increasePopulation}>add bear</button>
        <button onClick={removeAllBears}>remove all bears</button>
      </div>
    </div>
  );
};
subscribeWithSelector 中间件后,store 中的 subscribe 方法和之前就不同的,这个 subscribe 会返回三个参数,selector、listener、还有一个 options 配置对象。注意 listener 回调函数可以获取的参数也不同,拿到的是你选择的 selectedState -> selector (state.fish) ,还有 previousState (上一次的 state.fish)。
subscribeWithSelector 要放在 devtools 和 persist 中间件的中间:
import { create } from "zustand";
import { immer } from "zustand/middleware/immer";
import { devtools,persist, subscribeWithSelector } from "zustand/middleware";

export const useCatStore = create(
  immer(
    devtools(
      subscribeWithSelector(
        persist(
          (set, get) => ({
         		// ...
       		}),
          {
            name: 'user Store'
          }
      	)
      )
    )
  )
)使用 getState、setState 方法可以在组件或独立的 JS文件中操作 store 中的状态。
🌰 有下面 store 代码:
type TFishStoreState = {
  fish: number;
  addOneFish: () => void;
  removeOneFish: () => void;
  removeAllFish: () => void;
}

export const useFoodStore = create<TFishStoreState>((set) => ({
  fish: 0,
  addOneFish: () => set((state) => ({ fish: state.fish + 1 })),
  removeOneFish: () => set((state) => ({ fish: state.fish - 1 })),
  removeAllFish: () => set({ fish: 0 }),
}));
我们的组件代码如下,导出并使用了所有状态,但是我还想在不修改 useFoodStore.ts 文件的情况下,再添加一个方法,比如在页面中增加一个按钮,每次点击时,让 fish 状态的值 +5:
import { useFoodStore } from "@/stores/foodStore";

export const FoodBox = () => {
  const { fish, addOneFish, removeOneFish, removeAllFish } = useFoodStore();
  return (
    <div className="box">
      <h1>Food Box</h1>
      <p>fish: {fish}</p>
      <div>
        <button onClick={addOneFish}>add one fish</button>
        <button onClick={removeOneFish}>remove one fish</button>
        <button onClick={removeAllFish}>remove all fish</button>
      </div>
    </div>
  );
};
我们可以使用 setState 方法,手动添加一个 Action
import { useFoodStore } from "@/stores/foodStore";

export const FoodBox = () => {
  const { fish, addOneFish, removeOneFish, removeAllFish } = useFoodStore();

  const add5Fish = () => {
    useFoodStore.setState((state) => ({
      fish: state.fish + 5,
    }));
  };

  return (
    <div className="box">
      <h1>Food Box</h1>
      <p>fish: {fish}</p>
      <div>
        <button onClick={addOneFish}>add one fish</button>
        <button onClick={removeOneFish}>remove one fish</button>
        <button onClick={removeAllFish}>remove all fish</button>
        <button onClick={add5Fish}>add 5 fish</button>
      </div>
    </div>
  );
};getState用于在 store 外面获取状态,但它是 non-reactive 的,什么意思呢 ?
const { fish, addOneFish, removeOneFish, removeAllFish } = useFoodStore();

const fish = useFoodStore((state) => state.fish);
上面两种消费 store 的方式,那就是 reactive 的。( reactive 的状态会在每次状态变化后都重渲染,而 subscribe 只会在开启订阅的状态发生变化时重渲染 )。
const fish = useFoodStore.getState().fish; // non-reactive上面代码我们使用 getState 获取 fish 状态,即使当 store 中的 fish 在其它地方发生了改变,组件也不会重渲染,所以上面的 fish 也不知道,store 中的状态发生变化了。
既然页面不更新的话,那 getState 能用来干嘛呢 ?
在之前的讲到使用 subscribeWithSelector 🌰 中,我们手动给 bgColor 设置了初始值,我们还可以使用 getState 从状态里获取初始值:
type TBGColor = "lightgreen" | "lightpink" | undefined

export const BearBox = () => {
  const { bears, increasePopulation, removeAllBears } = useBearStore();

  const [bgColor, setBgColor] = useState<TBGColor>(() => {
    return useFoodStore.getState().fish > 5 ? "lightgreen" : "lightpink"
  });

  useEffect(() => {
    const unsub = useFoodStore.subscribe(
      (state) => state.fish,
      (fish, prevFish) => {
        if (prevFish <= 5 && fish > 5) {
          setBgColor("lightgreen");
        } else if (prevFish > 5 && fish <= 5) {
          setBgColor("lightpink");
        }
      },
      {
        equalityFn: shallow,
        fireImmediately: true,
      }
    );
    return unsub;
  }, []);

  return (
    <div className="box" style={{ backgroundColor: bgColor }}>
      <h1>Bear Box</h1>
      <p>bears: {bears}</p>
      <p>{Math.random()}</p>
      <div>
        <button onClick={increasePopulation}>add bear</button>
        <button onClick={removeAllBears}>remove all bears</button>
      </div>
    </div>
  );
};再来回顾一下我们之前定义store 时的写法:
import { create } from "zustand";
import { immer } from "zustand/middleware/immer";
import { devtools, subscribeWithSelector, persist } from "zustand/middleware";

type TFishStoreState = {
  fish: number;
  addOneFish: () => void;
  removeOneFish: () => void;
  removeAllFish: () => void;
}

export const useFoodStore = create<TFishStoreState>()(
  immer(
    devtools(
      subscribeWithSelector(
        persist(
          (set) => ({
            fish: 0,
            addOneFish: () => {
              set((state) => ({ fish: state.fish + 1 }))
            },
            removeOneFish: () => {
              set((state) => ({ fish: state.fish - 1 }))
            },
            removeAllFish: () => {
              set({ fish: 0 });
            },
          }),
          {
            name: "food store",
          }
        )
      ),
      {
        name: "food store"
      }
    ))
);
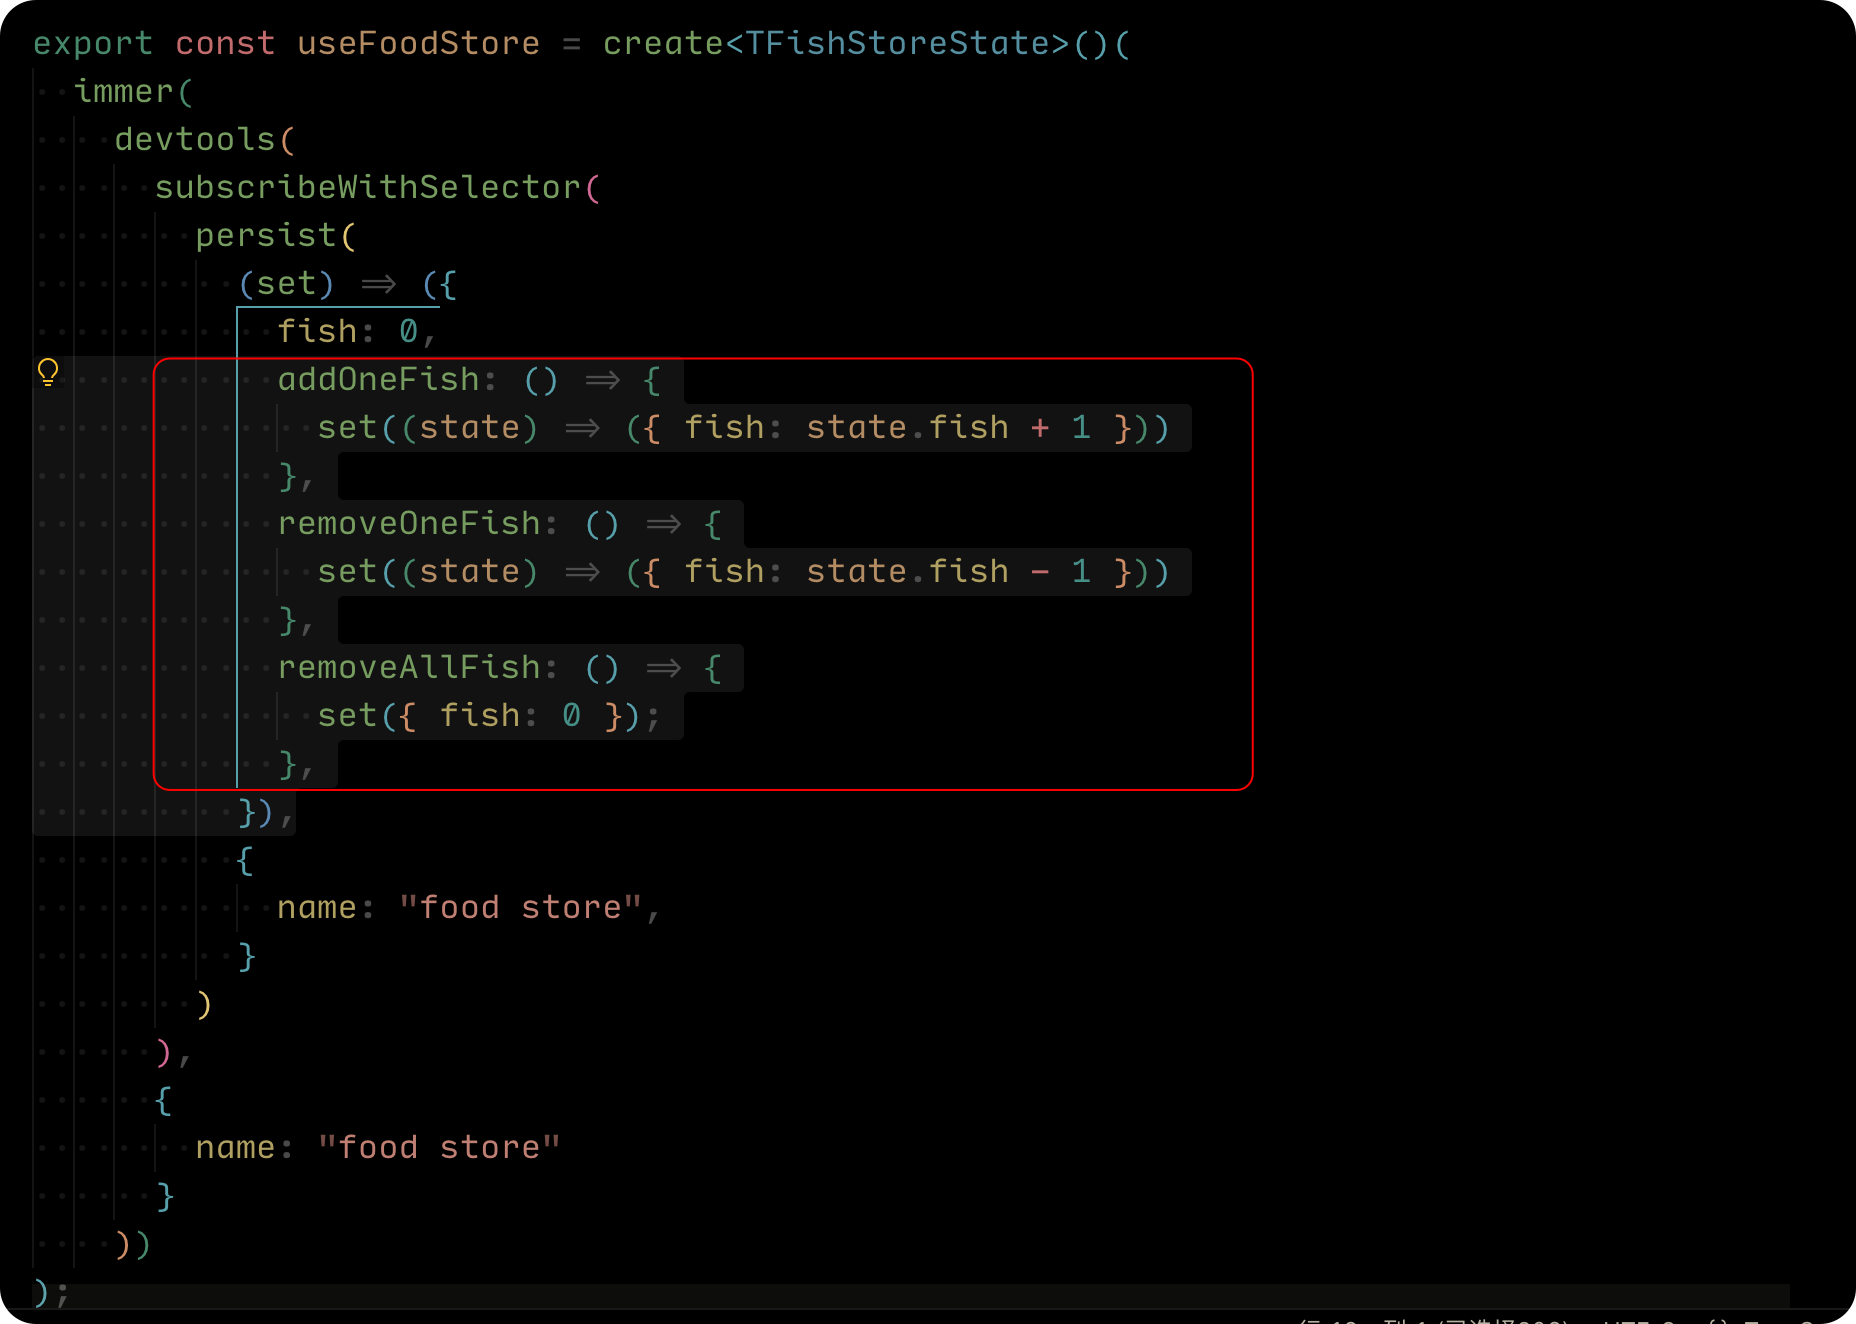
是不是有点回调地狱的感觉了,一层又包含一层, state 和 Action 都在一起,而且在页面使用的时候,我们还得写各种 const xx = useFoodStore(selector) 如果开发中都这么写,我想你和我一样肯定会骂人,甚至不会考虑这个状态管理库。先别急,我们试着把代码重写一下:
- 先剪切所有 Action 方法的代码
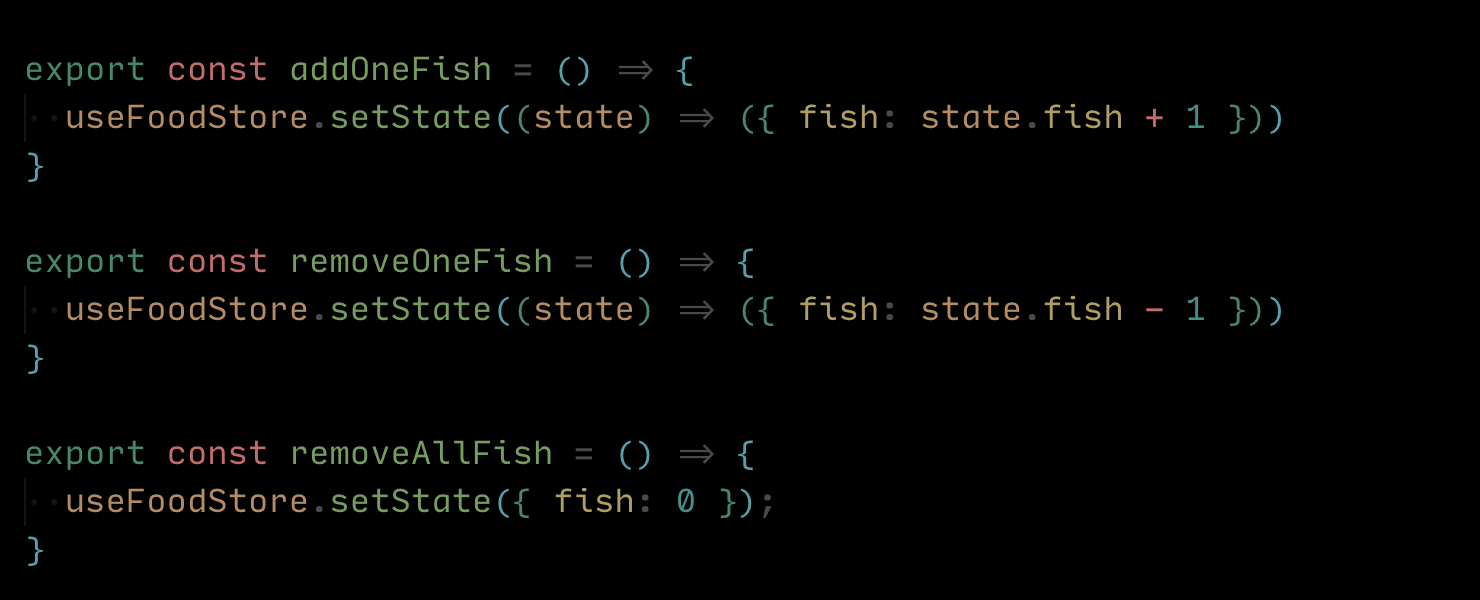
- 修改一下 Action 导出成方法:
- 将报错的 set 替换成
useFoodStore.setState
- 我们还可以将 state 提取出来,最后完成代码如下
import { create } from "zustand";
import { immer } from "zustand/middleware/immer";
import { devtools, subscribeWithSelector, persist } from "zustand/middleware";

const initialState = {
  fish: 0
}

export const useFoodStore = create<typeof initialState>()(
  immer(
    devtools(
      subscribeWithSelector(
        persist(() => initialState, { name: "food store" })
      ),
      { name: "food store" }
    ))
);

export const addOneFish = () => {
  useFoodStore.setState((state) => ({ fish: state.fish + 1 }))
}

export const removeOneFish = () => {
  useFoodStore.setState((state) => ({ fish: state.fish - 1 }))
}

export const removeAllFish = () => {
  useFoodStore.setState({ fish: 0 });
}
在页面中使用的时候,导入对应的 Action 就可以了。
import {
  useFoodStore,
  addOneFish,
  removeOneFish,
  removeAllFish,
} from "@/stores/foodStore";

export const FoodBox = () => {
  const fish = useFoodStore((state) => state.fish)
  return (
    <div className="box">
      <h1>Food Box</h1>
      <p>fish: {fish}</p>
      <div>
        <button onClick={ addOneFish }>add one fish</button>
        <button onClick={ removeOneFish }>remove one fish</button>
        <button onClick={ removeAllFish }>remove all fish</button>
      </div>
    </div>
  )
}- 不再需要使用 hook 来调用 store 中的 Action。
- 可以更灵活的分离、组织代码。
- 并且不会存在任何负面效果 (指之前提到一系列的重渲染问题 🙋)
来看看下面的代码,我们的 store 有很多的状态和 Action,我们把所有中间件还有状态都写在了一起,非常拥挤:
import { create } from "zustand";
import { immer } from "zustand/middleware/immer";
import { createSelectors } from "../utils/createSelectors";
import { devtools, persist, subscribeWithSelector } from "zustand/middleware";

type TCatStoreState = {
  cats: {
    bigCats: number;
    smallCats: number;
  };
  increaseBigCats: () => void;
  increaseSmallCats: () => void;
  summary: () => void;
};

export const useCatStore = createSelectors(create<TCatStoreState>()(
  immer(
    devtools(
      subscribeWithSelector(
        persist(
          (set, get) => ({
            cats: {
              bigCats: 0,
              smallCats: 0,
            },
            increaseBigCats: () =>
              set((state) => {
                state.cats.bigCats++;
              }),
            increaseSmallCats: () =>
              set((state) => {
                state.cats.smallCats++;
              }),
            summary: () => {
              const total = get().cats.bigCats + get().cats.smallCats;
              return `There are ${total} cats in total. `;
            },
          }),
          { name: "cat store" }
        ),
      ),
      { name: "cat store" }
    )
  ))
)
我们可以把 StateCreator 从 store 中提取出来
import { type StateCreator, create } from "zustand";
import { immer } from "zustand/middleware/immer";
import { createSelectors } from "@/utils/createSelectors";
import { devtools, persist, subscribeWithSelector } from "zustand/middleware";

type TCatStoreState = {
  cats: {
    bigCats: number;
    smallCats: number;
  };
  increaseBigCats: () => void;
  increaseSmallCats: () => void;
  summary: () => void;
};

type TMiddlewares = [
  ["zustand/immer", never],
  ["zustand/devtools", unknown],
  ["zustand/subscribeWithSelector", never],
  ["zustand/persist", unknown]
]


const createCatSlice: StateCreator<TCatStoreState, TMiddlewares> =
 (set, get) => ({
    cats: {
      bigCats: 0,
      smallCats: 0,
    },
    increaseBigCats: () => set((state) => {
      state.cats.bigCats++;
    }),
    increaseSmallCats: () => set((state) => {
      state.cats.smallCats++;
    }),
    summary: () => {
      const total = get().cats.bigCats + get().cats.smallCats;
      return `There are ${total} cats in total. `;
    },
});


export const useCatStore = createSelectors(
  create<TCatStoreState>()(
    immer(
      devtools(
        subscribeWithSelector(
          persist(createCatSlice, { name: "cat store" })
        ),
        {
          enabled: true,
          name: "cat store",
        }
      )
    )
  )
)
分享一个快速优化的技巧:
- 使用
Ctrl + Shift + -> + -> + ->选中括号内所有StateCreator数据 - 然后右键菜单选择
Refactor(重构) - 在弹出的菜单选择
extract to constant in enclosing scope(提取到封闭范围中的 constant) - 然后给提取出的 StateCreator 取一个变量名为
createCatSlice - 给 createCatSlice 定义类型,从 zustand 中导入 StateCreator 类型,StateCreator 需要传入两个范型,第一个是我们定义 Store 的TS类型,第二个是中间件的TS类型。
参考链接 🔗:


