In this hands-on project I created a simple serverless web application where users can signup and request rides indicating pickup location.

- An AWS account
- Prior AWS knowledge
- an account with ArcGIS for adding mapping to the app
- a text editor and a browser
- The following AWS services will be used
- AWS Amplify Console
- Amazon Cognito
- Amazon API Gateway
- AWS Lambda
- Amazon DynamoDB
- Amplify Console provides continuous deployment and hosting of the client interface (HTML, CSS, JavaScript and image files loaded in the browser)
- The client sends request to a public backend API built using Lambda and API Gateway.
- Authentication and user management is provided by Amazon Cognito to secure the backend APIs.
- Data storage is provided by Amazon DynamoDB. Lambda execusion role granted Lambda function for read/write permission to our database.
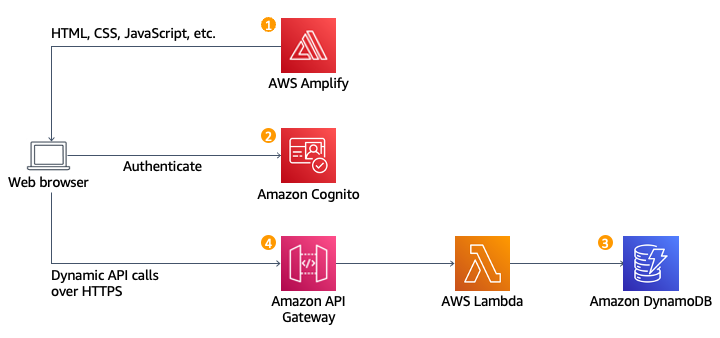
AWS Amplify provides sets of tools and products for easy front-end web development, secure and scalable deployment. It provides a git-based workflow for hosting and continuous deployment of full-stack apps. Provides a public website URL for site accessibility.
-
Region selection
- Navigate to AWS Amplify console and
- select a region of your choice that supports the services. I used the N.Virginia region
-
Create a Repository
- You can decide to use AWS CodeCommit or GitHub
- Here I used AWS CodeCommit
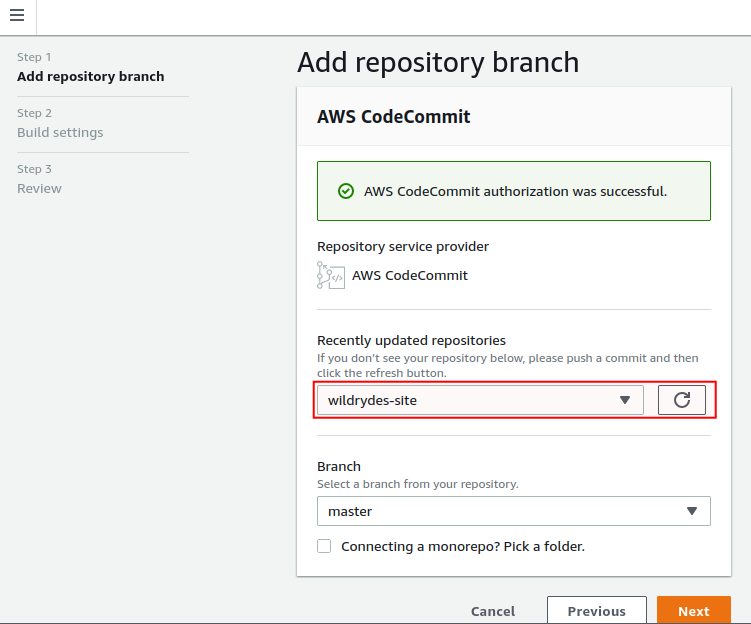
- Head over to AWS CodeCommit console and create a repository named
wildrydes-site - follow the instructions to set up Git credentials for an IAM user in the IAM console
- Back in the CodeCommit console, From the Clone URL drop down, select Clone HTTPS
- from your machine terminal run the command,
git clone <https url copied>. for some reason VS-Code terminal doesn't authenticate with it so use your machine command line tool. - provide the git credential username and password downloaded
-
Copy source codes to the repository
- run
cd wildrydes-site - to copy the source code from an associated s3 run
aws s3 cp s3://wildrydes-us-east-1/WebApplication/1_StaticWebHosting/website ./ --recursive - you can run the
lscommand to view copied files - run the commands to commit to remote repository
git add . git commit -m "source code first commit" git push - run
-
Enable Web Hosting with the AWS Amplify
- On the AMW Amplify console, click on Get Started - Get started under Amplify Hosting
- select AWS CodeCommit and click continue
- select the
wildrydes-siterepository and branch - aknowledge under Build and testing settings
- leave the rest of the settings at defaul and click Next
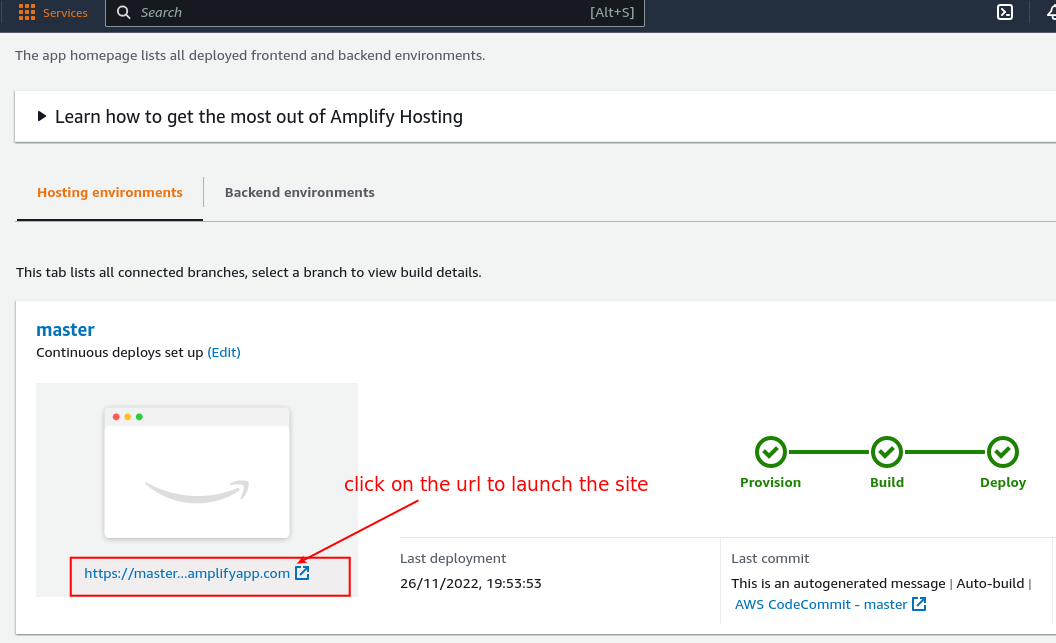
- click
Save and deploy - click on the url to launch the static wepsite
-
Test continuous deployment


- The AWS Amplify Console will rebuild and redeploy the app when it detects changes to the connected repository. To test this
- open the
index.htmlfile in your text editor and make a minor change, save and recommit to your repository.
- open the

Create an Amazon Cognito user pool to manage users accounts. Deploy new user registration page. Authenticate users for sign in.
-
Create an Amazon Cognito User Pool
- Navigate to the Cognito console
- click on Manage User Pools - Create a User Pool
- provide
WildRydesas pool name and click on Review Default - click Create pool
- take note of the
Pool id
-
Add an App to Your User Pool
- select App clients on the left menu of your user pool detail page
- click on Add an app client
- use
WildRydesWebAppas the App client name uncheckGenerate client secret- leave the rest at defaul and click
Create app client - note down the
App client id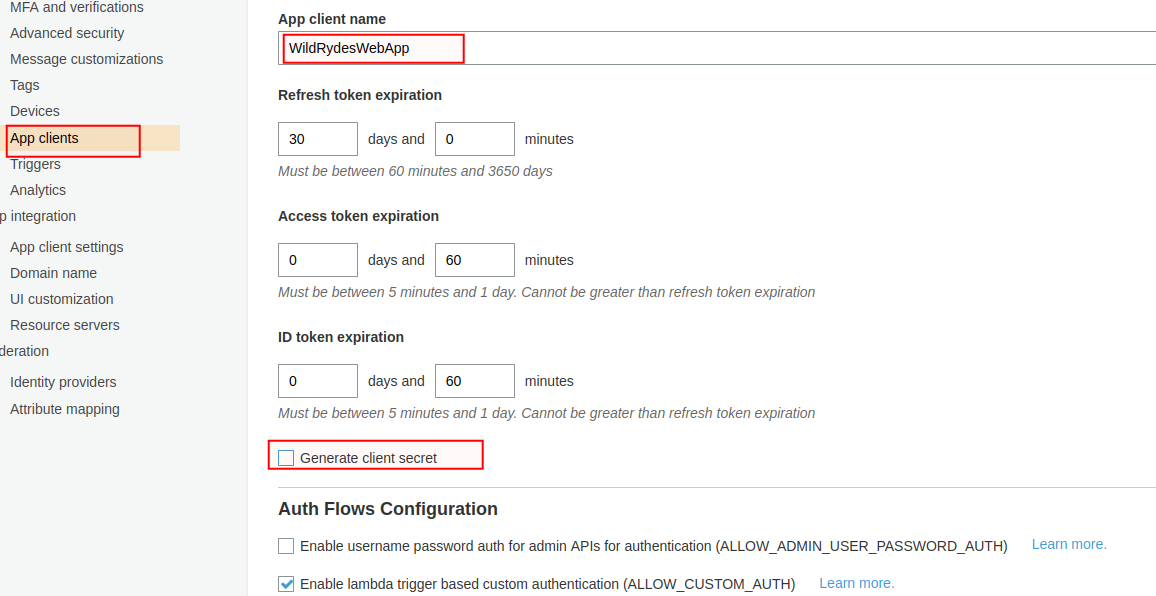
-
Update the Website Config
- Update the js/config.js file with the credentials of the user pool, app client id, and the region you launched your resources
- navigate to js/config.js
- provide the necessary details, that is userPoolId, userPoolClientId, and region. the region is the aws region code where you provisioned your resources e.g us-east-1
- save the changes and push to your git repository
-
Validate the Implementation
- on the webpage, click
Giddy Upto visit the user registration page. - complete the registration form and click on Let's Ryde
- enter a valid email and password. the password should contain a capital letter, number, and a special character.
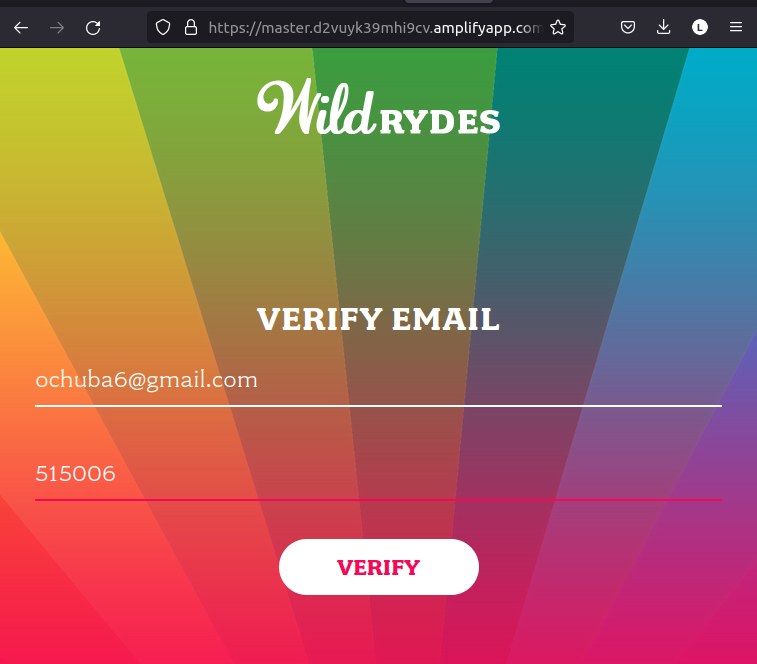
- visit <amplify_endpoint>/verify.html to enter the verification code sent to the email you provided
- note that the email may be in the spam folder. for production deployment, configure your user pool to use Amazon Simple Email Service to send emails from a domain you own.
- after confirming your registration, visit <amplify_endpoint>/signin.html and login with your credential.
You will be redirected to /ride.html with a notification that the API is not configured.
- on the webpage, click


Here, we will implement a Lambday function that will be invoked from the browser using Amazon API Gateway each time a user requests a unicorn. The function will select a unicorn from the fleet, record the request in a DynamoDB table, and then respond to the frontend application with details about the unicorn being dispatched.
-
Create an Amazon DynamoDB Table
- run the command on your terminal,
aws dynamodb create-table --table-name Rides --attribute-definitions AttributeName=RideId,AttributeType=S --key-schema AttributeName=RideId,KeyType=HASH --provisioned-throughput ReadCapacityUnits=5,WriteCapacityUnits=5 --table-class STANDARD - OR create using the console
- navigate to the DynamoDB console
- click on Create table
- enter Rides as Table name
- enter
RideIdfor the partition key and select **String for the key type. - check the Use default settings box and choose Create.
- scroll to the buttom and note down the ARN
- run the command on your terminal,
-
Create IAM Role for Your Lambda Function Here we will create IAM role that will grant our lambda function permission to write logs to Amazon CloudWatch Logs and access to write items to your DynamoDB table.
- Navigiate to IAM console, select Roles and click Create Role
- choose AWS service - as Trusted entity type
- select Lambda under Use case and click Next
- type
AWSLambdaBasicExecutionRolein the searchbox and select the result. - enter
WildRydesLambdaas role name, scroll down and clickCreate role - enter
WildRydesLambdain the searchbox to select the role you just created by clicking on the name - on the permission tab, select
Create inline policyfrom theAdd permissionsdropdown - on the
Visual editortab, clickChoose a service - type
dynamodbin the searchbox and select it - type
PutItemin the searchbox and select it - click on
Resources-Specific-Add ARN - copy and paste the ARN of the DynamoDB Table created in step 1 above, then click Add
- click on Review policy and enter
DynamoDBWriteAccessas name - click
create policy
- Create a Lambda Function for Handling Requests Here we will build the core function to process the API client requests for a unicorn
- navigate to Lambda console and click on
Create function - select
Autho from scratchif not already selected - enter
RequestUnicornin the name field - select
Node.js 16.xas Runtime NOTNode.js 18.xas node18.x image includes the AWS SDK not v2 but v3 according to this comment - click to expand Change default execution role
- select Use an existing role and select
WildRydesLambdafrom the drop down and click onCreate function - scroll down to *Code source, go to your editor, copy and paste the content of requestUnicorn.js
- click on Deploy
- Validate Implementation Test the function you just created using the AWS Lambda console
- click on the Test tabe and select Create new event
- enter
TestRequestEventas Event name - copy and past the content of test-lambda.json into the Event JSON editor
- click save then click Test
- the response should look like
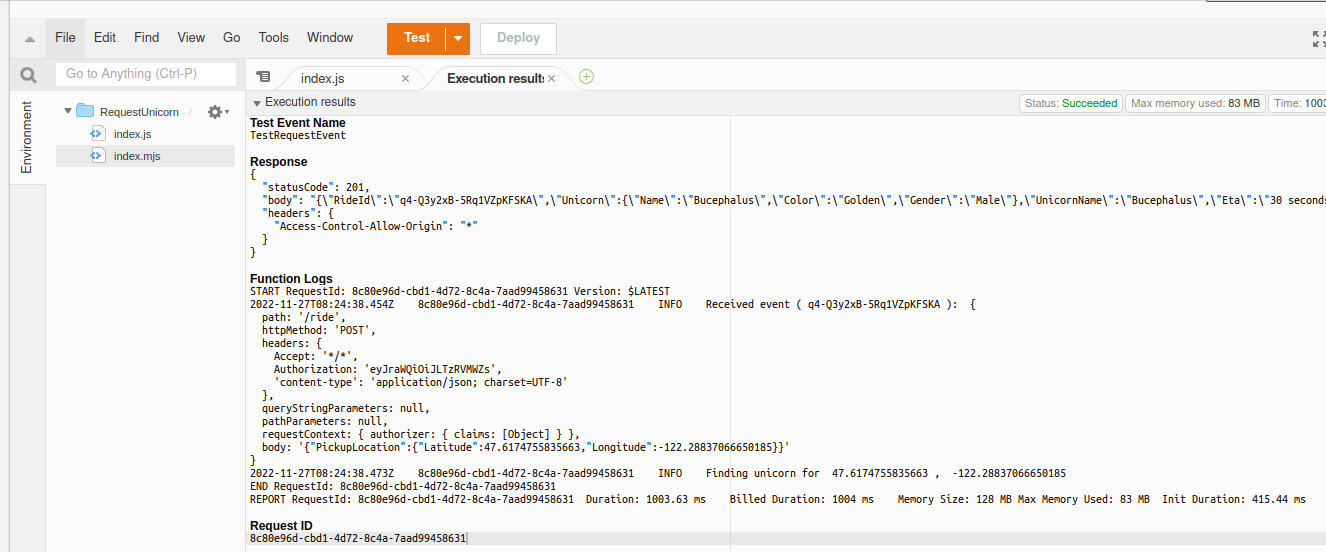 , if successful.


Here we will build a RESTful API using Amazon Gateway to expose the Lambda function built in stage 3.3 above. The API will be accessible on the public internet and protected by the user pool created in stage 2.
-
Create a New REST API
- Search and navigate to the API Gateway console and click on
Buildunder REST API - ensur
RESTis checked, then selectNew API - enter
WildRydesas API name - select
Edge optimizedfrom the Endpoint Type dropdown - click
Create API
- Search and navigate to the API Gateway console and click on
-
Create a Cognito User Pools Authorizer
- Here we will create an authorizer for the user pool created earlier such that Amazon API Gateway will use the JWT tokens returned by the Cognito User Pools to authenticate API calls.
- on the left menu of the newly created API, select *Authorizers
- click
Create New Authorizer - enter
WildRydesas Name - select
Cognitounder Type and choose the user pool you created in the input under Cognito User Pool - enter
Authorizationas Token Source - click
Create - Verify your Authorizer Configuration
- open the amplify endpoint and visit
/fide.html - signin if required
- copy the auth token from the notification on the
/ride.html - go back to the API Authorizer console browser tab
- paste the authorization token and click Test
- it will return a response code of 200 if successful else 401 error code
- open the amplify endpoint and visit
-
Create a new API endpoint Resource and request method
- select
Resourceson the left menu bar - click on the
Actionsdropdown and selectCreate Resources - enter
rideas Resource Name and ensure Resource Path is alsoride - check the
Enable API Gateway CORSand clickCreate Resource - while the newly created
/rideis selected, selecteCreate Methodfrom theActionsdropdown - select
POSTunder OPTIONS and click the checkmark - ensure Lambda Function is selected a
integration type - Check the box for Use Lambda Proxy integration.
- select the region you created your lambda function
- enter
RequestUnicornto select it under Lambda Function - click
Save - click
OKon the prompt to Add permission to Lambda function - click on the name
Method Requestand click on the pencil icon next to Authorization - select
WildRydesunder Cognito user pool authorizer and click the checkmark icon.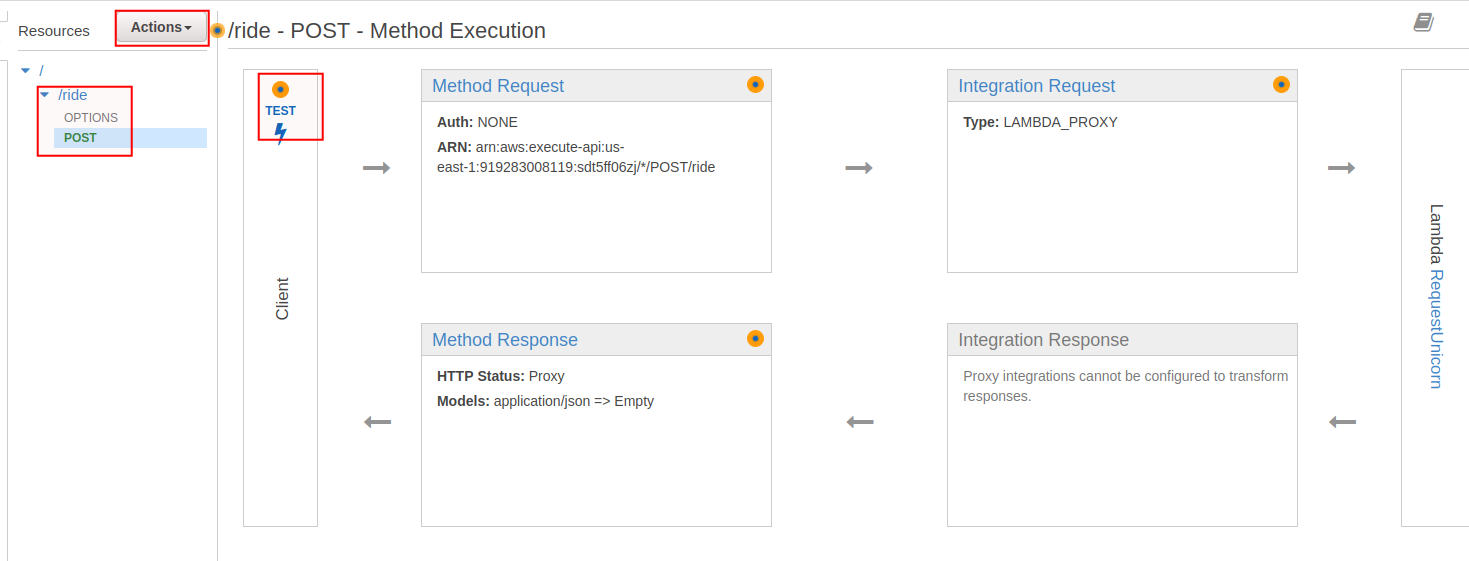
- select
-
Deploy Your API
- click on the Actions dropdown and select
Deploy API - select
New Stagein the *Deployment stage drop-down list - enter
prodas Stage Name - click Deploy
- note the
Invoke URLas you will need it later. this should end witn /prod
- click on the Actions dropdown and select
-
Update the Website Config
- open the /js/config.js file
- copy the
Invoke URLfrom the deployed API console and update theinvokeUrlin the /js/config.js file - save the file and push to your git repository

-
Validate your Implementation
- Visit the
amplify_url_endpoint/ride.html - login to your ArcGIS account
- After the map has loaded, click anywhere on the map to set a pickup location.
- Choose Request Unicorn. You should see a notification in the right sidebar that a unicorn is on its way and then see a unicorn icon fly to your pickup location.

- Visit the

Terminate all AWS resources you created throughout this tutorial.
- Delete the Amplify app
- navigate to AWS Amplify console
- select the app
wildrydes-site - click on
Actionsdrop-down and selectDelete App - type delete to confirm delete.
- Delete Amazon Cognito User Pool
- navigate to Cognito console
- click on Manage User Pools and select the WildRydes created
- click on Delete pool, type delete to confirm action
- click to delete.
- Delete the Serverless Backend
- Delete the Lambda Function
- navigate to the Lambda console
- select the
RequestUnicornfunction we created - click on Actions drop-down and select Delete
- type delete to confirm and then click Delete
- Delete the IAM Role
- navigate to the IAM console and select Roles
- type *wildRydesLambda into the filter box to select the role
- click on Delete - confirm the role name and click Delete role
- Delete DynamoDB Table
- select Tables on the left menu on the DynamoDB console
- select the
Ridestable created and click Delete at the top right - Leave the checkbox to Delete all CloudWatch alarms for this table selected and choose Delete.
- Delete the Lambda Function
- Delete the REST API
- navigate to API Gateway console and click on APIs on the left navigation menu
- select the
WildRydeswe created - click on
Actionsdrop-down then Delete - click Delete again to confirm
- Delete CloudWatch Log
- navigate to CloudWatch console and click on Logs - Log groups
- select
/aws/lambda/RequestUnicornlog group - click Delete log group(s) from the Actions drop-down
- click Delete to confirm