Single window system to configure and deploy data flow processors, execution stacks such as Function as Service(FaaS) at Fog and Cloud environment. The main objective of the project is to develop a toolset that can configure the fog environment with cloud connection along with necessary softwares required for data driven execution using various commands.
The system has the following components:
Add- diagram Write all the main components
##Command line tool should be main focus here- ##Than try to add step by step configuration steps
Create a directory in the virtual machine in the path:
sudo mkdir /etc/docker
Create a file in the docker directory:
sudo nano /etc/docker/daemon.json
Copy the following script:
{
"default-address-pools": [{"base":"172.80.0.0/16","size":24}]
}
Update the apt repo:
sudo apt-get update
Install packages to allow apt to use a repository over HTTPS:
sudo apt-get install apt-transport-https
sudo apt-get install ca-certificates
sudo apt-get install curl
sudo apt-get install gnupg-agent
sudo apt-get install software-properties-common
Add Docker’s official GPG key
curl -fsSL https://download.docker.com/linux/ubuntu/gpg | sudo apt-key add -
Use the following command to set up the stable repository:
sudo add-apt-repository "deb [arch=amd64] https://download.docker.com/linux/ubuntu $(lsb_release -cs) stable"
Update the apt package index:
sudo apt-get update
Install the docker:
sudo apt-get install docker-ce docker-ce-cli containerd.io
Create a docker container with apache nifi image from docker hub using the following command line command:
sudo docker run --name nifi \
-p 8080:8080 \
-p 8081:8081 \
-d \
-e NIFI_WEB_HTTP_PORT='8080' \
apache/nifi:latest
sudo docker run --name nifi -p 8080:8080 -p 8081:8081 -d -e NIFI_WEB_HTTP_PORT='8080' apache/nifi:latest
The NiFi will run inside the docker container and the NiFi 8080 web interface port will be made available through the instance. To access NiFi web interface, you can direct your browser to the following address :8080/nifi, afetr replacing the IP with the OpenStack instance IP.
sudo apt-get update
sudo apt-get install python3.6
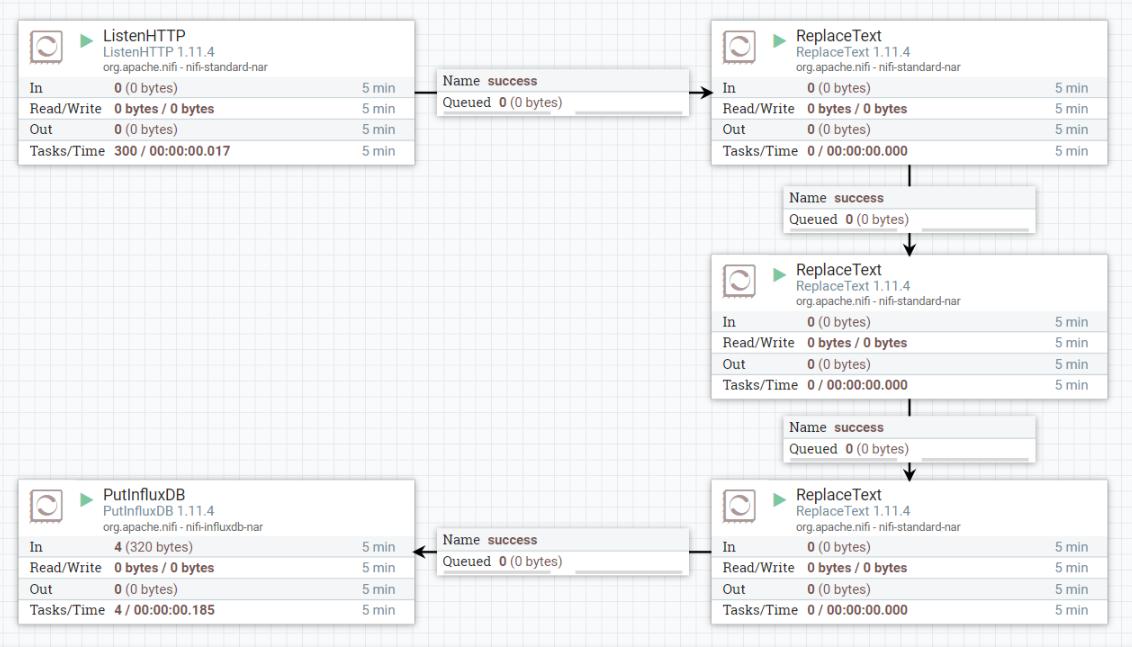
Five NiFi processors are used in cloud. ListenHTTP, three ReplaceText, and PutInfluxDB processors. Configuration of the processors are as follow.
Listening port: 8081
Search Value: [{"} ]
Replacement Value: Empty string set
Replacement Strategy: Regex Replace
Search Value: :
Replacement Value: =
Replacement Strategy: Regex Replace
Search Value: (?s)(^.*$)
Replacement Value: sensordata,location=room   (put a free space at the end)
Replacement Strategy: Prepend
Database Name: iot
InfluxDB connection URL: http://<DataBase IP Address>:8086
Install Java
sudo apt-get update
sudo apt install openjdk-8-jdk
Install unzip
sudo apt install unzip
Install MiNiFi service:
wget https://downloads.apache.org/nifi/minifi/0.5.0/minifi-0.5.0-bin.zip
unzip minifi-0.5.0-bin.zip
cd minifi-0.5.0/
sudo bin/minifi.sh install
Install MiNiFi toolbox:
cd ~
wget https://downloads.apache.org/nifi/minifi/0.5.0/minifi-toolkit-0.5.0-bin.zip
unzip minifi-toolkit-0.5.0-bin.zip
Run/stop minifi:
/bin/minifi.sh run	: to run on foreground
/bin/minifi.sh {start|stop|run|restart|status|flowStatus|dump|install} : to run on background
Add a work flow: Add config.yml to minifi/conf and restart the minifi
Create a directory in the virtual machine in the path:
sudo mkdir /etc/docker
Create a file in the docker directory:
sudo nano /etc/docker/daemon.json
Copy the following script:
{
"default-address-pools": [{"base":"172.80.0.0/16","size":24}]
}
Update the apt repo
sudo apt-get update
Install docker:
curl -fsSL https://get.docker.com -o get-docker.sh
sudo sh get-docker.sh
Update the apt repo
sudo apt-get update
Install swarm:
sudo docker swarm init
If there are multiple raspberry pies to run swarm, install docker and swarm as mentioned above. At worker machine type below command to join swarm cluster:
docker swarm join --token <TOKEN> <IP ADDRESS>:2377
Install the faas-cli:
curl -sL https://cli.openfaas.com | sudo sh
Install the OpenFaas:
cd ~
mkdir openfaas
cd openfaas
git clone https://github.com/openfaas/faas
cd faas
sudo ./deploy_stack.sh
Then save the username and password
Access the UI at:
http://<ip_address>:8080
Create a directory to place the functions:
mkdir serverless && cd serverless
Pull the templates of serverless functions consisting of different language interpreters:
sudo faas-cli template pull
Check the downloaded templates:
ls template
Create a new openfaas function:
faas-cli new datavalidation --lang python3
Copy the serverless funtion code from repository to datavalidation/handler.py file.
Write the dependency packages to datavalidation/requirements.txt file:
nano datavalidation/requirements.txt
Add: requests
Build the function:
sudo faas-cli build -f datavalidation.yml
It builds the docker image and you see the image in docker images local repo.
sudo docker images | grep datavalidation
Login openfaas:
faas-cli login --username <username> --password <password>
Deploy the function:
faas-cli deploy -f datavalidation.yml
The function is deployed and check-in running containers list:
sudo docker ps
In order to add processors to MiNiFi, processors should be designed in NiFi and then NiFi template should be converted to MiNiFi template. Then MiNiFi template can be added to config directory of MiNiFi.
Listening Port: 8081
URL: http://localhost:8080/function/datavalidation
Use Chunked Encoding: false
NB! "Multipart Request Max Size" and "Multipart Read Buffer Size" properties do not exist in MiNiFi. So in order to run this template in MiNiFi, these two properties mus be deleted from the NiFi template manually before converting it to MiNiFi template.
cd ~
mkdir one_shot_ifc
mkdir one_shot_ifc/data_out
cd one_shot_ifc
Copy "get_sensor_data.py" file from repository to this directory.
Install Java
sudo apt-get update
sudo apt install openjdk-8-jdk
Install unzip
sudo apt install unzip
Install MiNiFi service:
wget https://downloads.apache.org/nifi/minifi/0.5.0/minifi-0.5.0-bin.zip
unzip minifi-0.5.0-bin.zip
cd minifi-0.5.0/
sudo bin/minifi.sh install
Install MiNiFi toolbox:
cd ~
wget https://downloads.apache.org/nifi/minifi/0.5.0/minifi-toolkit-0.5.0-bin.zip
unzip minifi-toolkit-0.5.0-bin.zip
Run/stop minifi:
/bin/minifi.sh run	: to run on foreground
/bin/minifi.sh {start|stop|run|restart|status|flowStatus|dump|install} : to run on background
Add a work flow:
Add config.yml to minifi/conf and restart the minifi
In order to add processors to MiNiFi, processors should be designed in NiFi and then NiFi template should be converted to MiNiFi template. Then MiNiFi template can be added to config directory of MiNiFi.
Input Directory: /home/pi/one_shot_ifc/data-out
URL: http://<Fog Node IP Address>:8081/contentListener
Use Chunked Encoding: false


