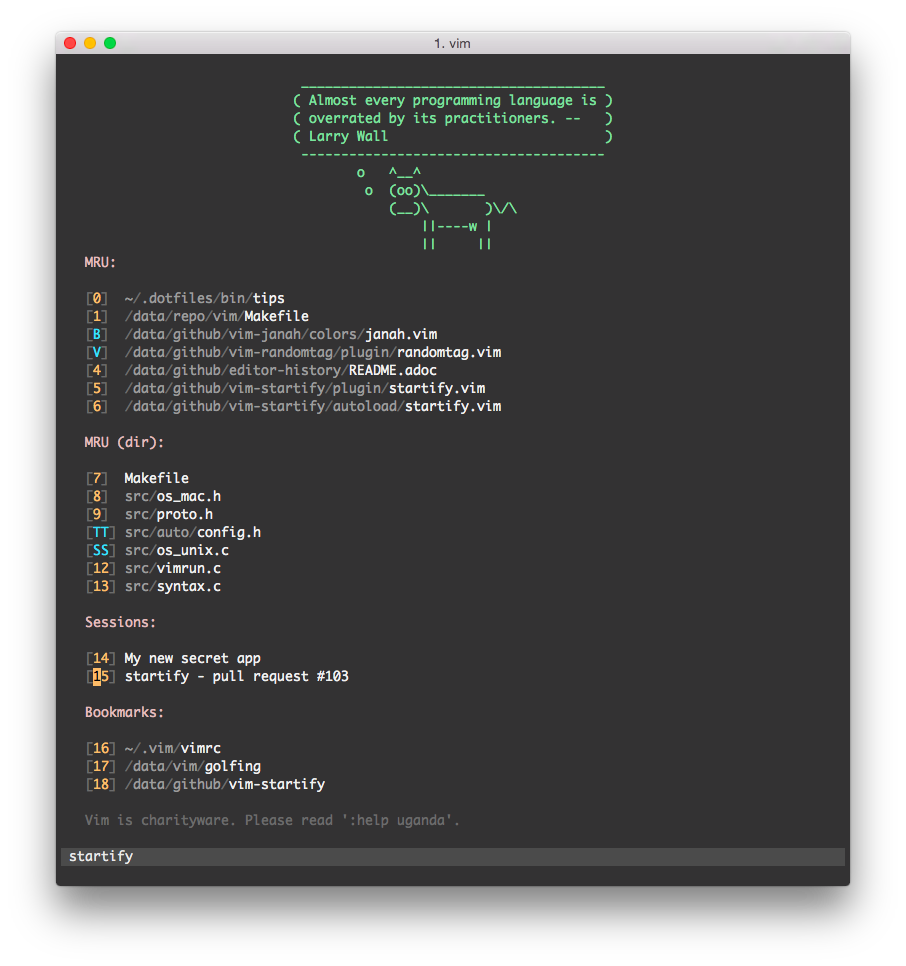
That’s it. A fancy start screen for Vim. (almost all visible features enabled - freely customizable)
It does 3 things that will be explained in detail further below:
If you start Vim without giving any filenames or piping text to it, Startify will show a pretty start screen that shows a configurable list of files or directories:
-
Custom header: How about some ASCII art action? Perhaps even dynamically generated?
-
Default:
<empty>
-
-
Recently used files from directory: List recently modified files from the current directory recursively. The list can also be filtered.
-
Default:
<enabled>
-
-
Recently used files: List recently used files. The list can also be filtered.
-
Default:
<enabled>
-
-
Sessions: List all your sessions from a certain directory.
-
Default:
~/.vim/session
-
-
Bookmarks: Define bookmarks, thus entries for files that will always be listed.
-
Default:
<empty>
-
-
Custom footer: Same as the custom header.. but at the bottom.
-
Default:
<empty>
-
|
Tip
|
See :h startify-options for more information.
|
You can either navigate the menu by using the usual suspects (j, G, }
etc.) and hit <cr> or just key in whatever is written between the square
brackets on that line. You can even double-click anywhere on the line.
Moreover, you can open several files at one go! Navigate to an entry and hit
either b (open in same window), s (open in split), v (open in vertical
split) or t (open in tab) for marking it. You can mark several entries and
also mix different markers. Afterwards execute all the markers in the order
they were given via <cr>.
In case you don’t want to open a file, there is also e for creating an empty
buffer, i for creating an empty buffer and jumping into insert mode and q
for quitting.
When one or more files were opened by Startify, it will close automatically.
You can always reopen the screen via :Startify.
|
Tip
|
Please read and understand :help 'sessionoptions' if you work with
sessions.
|
Essentially there are two supported workflows for handling sessions that will be shown here:
The Startify way:
The handling of loading, saving and deleting sessions is eased by always working with one and the same directory. These commands are used for convenience:
:SLoad    load a session
:SSave    save a session
:SDelete  delete a session
|
Tip
|
See :h startify-commands for more information.
|
The advantage of always using the same directory is that Startify can conveniently show you a list of all your sessions.
The old way:
The old way means using :mksession to save a Session.vim file to the
current directory. Imagine a project folder with a Session.vim at its root
directory. This way makes it very portable.
When Vim gets started and the file Session.vim is found in the current
directory, it will be shown at the top of all lists as entry [0] as a
shortcut.
If you bookmark a directory (project folder, anyone?) that contains a Session.vim, and you access that directory via Startify, that session will be loaded automatically.
Optionally:
There is even support for persistent sessions. Thus you load a session via Startify, add some buffers, remove some buffers, change the window layout, .. and when you finish and exit Vim, the session will be saved automatically. This works for both ways of handling sessions.
|
Tip
|
Read :help startify-options to learn more about how to configure session
handling to your liking.
|
If you have no preferred installation method, I suggest using tpope’s vim-pathogen. Afterwards installing vim-startify is as easy as pie:
$ git clone https://github.com/mhinz/vim-startify ~/.vim/bundle/vim-startify
$ vim
It works without any configuration, but you might want to look into the documentation for further customization:
:Helptags  " rebuilding tags files
:h startify
:h startify-faq
If you like my plugins, please star them on Github. It’s a great way of getting feedback. Same goes for issues reports or feature requests.
Names: Marco Hinz, mhinz, mhi^, mhi
Mail: <mh.codebro@gmail.com>
Twitter: @_mhinz_
Stackoverflow: mhinz
Thank you for flying mhi airlines. Get your Vim on!
