NOTE: THIS IS PART 3/4 FOR MY TUTORIAL THAT CAN BE FOUND ON DEV.TO LINK TO DEV.TO ( UNPUBLISHED ) - https://dev.to/mstokluska/technologies-that-changed-my-perception-of-software-development-514o-temp-slug-9091855?preview=b2b0b8ac7f06850f80c48acef4b4ecabbcc4bc9e17ac24aaee54a92d445a726b93f98d34d347f67c5d3790bb21672185625b38f389f912606739cfdf
GraphQL is a query language invented by Facebook and it's used to query data within from a schema. Schema is at the center of any GraphQL server and describes functionality available to clients. Schema has types which define:
- Relationships between entities - in our case it would be a relationship between users and tasks
- Data manipulation and operation that can be executed by the client, in our project those will be for example queries to fetch all users or all tasks, and mutations to delete a user or a task.
There is a couple of approaches to create a graphQL server, however, for me, the most appealing is the "Schema First" approach, as it allows me to visualize data flow between my entities and queries/mutations that I might require!
So imagine our project, with tasks and users, our GraphQL schema will look something like this:
type User {
    id: ID!
    firstName: String!
    lastName: String!
    title: String!
    email: String
    task: [Task!]!
}

type Task {
    id: ID!
    title: String!
    description: String!
    status: String!
    assignedTo: [User!]!
}
Just to clarify the idea of task in User and assignedTo in Task, each User can have one or more Task assigned to him, also, each Task can have more than one user assigned to it. Imagine now that you want to access a task of id:1, some title, description, and status. However, as a client, you are not interested in the task itself, your more interested in user who is about to complete that task. Our schema allows for two approaches:
- We can filter through all the users and find a user with "task" of id:1
- Or we can filter through tasks, select the one with "id" of 1 and pull user details through that task thanks to "assignedTo" field! I know it might not make too much sense right now, so let's just do it!
Essentially GraphQL is connected into an HTTP endpoint, usually under POST /graphql, so we need to connect to an endpoint handler. There's a lot of work involved in it but luckily for us, a team called Apollo did it already and we can use their implementation! Apollo basically allows for the creation of graphQL server.
- In your existing server project use yarn to add the following dependencies:
$ npm install apollo-server-express graphql
- After installation of required dependencies, we can edit our
index.tsfile.
const express = require('express');
const cors = require('cors');
const { ApolloServer } = require('apollo-server-express');
const schema = require('./schema');

const app = express();

app.use(cors());
app.use(express.json());

const server = new ApolloServer({ schema });

server.applyMiddleware({
  app,
  path: '/graphql',
});

const port = 4000;

app.listen(port, () => {
  console.log(`🚀 Server is running at: http://localhost:${port}/graphql`);
});
We no longer need all of the REST methods and we have changed the way our server is build. Firstly, we are adding Apollo Server to our project which is used to be our chosen option to work with our GraphQL. Next, we are applying a schema ( that is yet to be implemented ) to our Apollo Server, and then we are applying middleware to it, which is express and path - or endpoint.
- Create a new folder within our
serverfolder, calledschema - Next in
schemafolder create a file calledtypeDefs.graphqland paste the following code:
type User {
    id: ID!
    firstName: String!
    lastName: String!
    title: String!
    email: String
    task: [Task!]!
}

type Task {
    id: ID!
    title: String!
    description: String!
    status: String!
    assignedTo: [User!]!
}
By doing so we have specified our first two GraphQL types!
- We also need to ask a query type as we would like our data to be returned to the client. To enable support for queries, we need to add another type:
type Query {
    tasks: [Task!]!
    users: [User!]!
}
We have just constructed our first two queries - tasks query and users query. Task query returns an array of tasks and users query returns an array of users! The exclamation mark means it is a must, while a question mark means it's optional. So for example, we could have changed tasks query to look like this:
tasks: Task!
or even like this:
tasks: ?Task
Which means that we are going to return one task only in the first scenario, or one or none tasks in the second. However, for now, let's stick to our plan and leave type Query as it is.
- Next, add another file called
resolvers.jsintoschemafolder and paste the following code:
const { tasks, users } = require('../db');

const resolvers = {
  Query: {
    tasks() {
      return tasks;
    },

    users() {
      return users;
    },
  },
};

module.exports = resolvers;
I like to think of resolvers as workhorses of GraphQL types - types are defining what accessible and resolvers do all the magic with types! Our first Query resolver contains two types of queries - tasks and users - as in our typeDefs we have only specified two queries.
- Lastly, create
index.jsinschemafolder and paste following code:
const { importSchema } = require('graphql-import');
const { makeExecutableSchema } = require('graphql-tools');
const resolvers = require('./resolvers');
const typeDefs = importSchema('schema/typeDefs.graphql');

module.exports = makeExecutableSchema({ resolvers, typeDefs });
In this step we have simply made an executable schema that contains both, our resolvers and typeDefs created in previous steps! Can you remember where is it used next? Our main index.js!
const express = require('express');
const cors = require('cors');
const { ApolloServer } = require('apollo-server-express');
const schema = require('./schema'); <-----------------------------

const app = express();

app.use(cors());
app.use(express.json());

const server = new ApolloServer({ schema });<---------------------

server.applyMiddleware({
  app,
  path: '/graphql',
});

const port = 4000;

app.listen(port, () => {
  console.log(`🚀 Server is running at: http://localhost:${port}/graphql`);
});
Pretty cool right?!
- You can now save all your changes, run npm start and navigate to
http://localhost:4000/graphql. You should see the following:

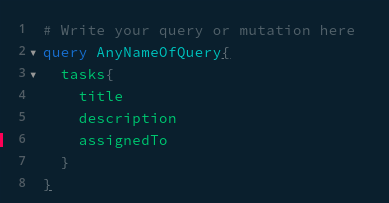
- You have just launched GraphQL playground! In the left window, you can write your queries and mutations and responses will be displayed on the right-hand side! Let's give it a go and write our very first query:

- Hit the play button in the middle of the playground and you should get the following response:

There's a couple of things you must know about queries or mutations typed in the playground.
- Line#2
query AnyNameOfQuery- in here you simply specify whether you are about to use query or mutation and the second thing you do is you are naming your query/mutation. - Line#3
tasks{this is the name of our query specified in typeDefs file:
tasks: [Task!]!
- Line#4 & 5 specified what are we interested in. We have specified in our typeDefs that query task is going to return an array of task objects.
What it means is that when we execute query task we have access to the full object, but we might only want a certain part of it! So in our example above, we have requested only title and description from an array of tasks and it is what we get! Now, you might think, why can we set a name of our query if we are using the pre-named query from our typeDefs. Like in our example, we are using tasks query so why do we need to call it AnyNameOfQuery? We don't have to! But imagine you are working on a client and you want to access tasks twice, once where you are only interested in titles, and other time when you are interested in descriptions only! Naming queries can be very helpful!
- Now, let's add
assignedToto our existing query.
Straight away GraphQL playground shows us an error on the side. Looking back at our typeDefs we can see that assignedTo returns an array of users.
assignedTo: [User!]!
Change assignedTo to assignedTo{ and hit ctrl + space. You should see all the available data that GraphQL can fetch for you, it's all the users data we have specified in our typeDefs!
- Let's select
firstNameandlastNamefor ourassignedTofield.

Hit play and...an error! Think of our resolvers and typeDefs now:
const { tasks, users } = require('../db');

const resolvers = {
  Query: {
    tasks() {
      return tasks;
    },

    users() {
      return users;
    },
  },
};

module.exports = resolvers;
In our typeDefs we have specified that accessing assignedTo will return an array of users, however, in our resolvers, we have only specified how the server should behave when asked for tasks or users on line 6 & 10 above. Because a query task needs to access an array of users we need to instruct GraphQL how to do this in our resolvers!
- Let's specify what our assignedTo should do by adding the following code to the resolvers:
const resolvers = {
    Task: {
        assignedTo(task) {
            return users.filter(u => u.taskId.includes(task.id));
        },
    },

    Query: {
        tasks() {
            return tasks;
        },

        users() {
            return users;
        },
    },
};
We are basically instructing GraphQL that whenever assignedTo is accessed from Task object, use that Task object and filter through an array of users to find a user whos task id matches current task id. Because remember, our User object has also task field which contains the id of the task that links to Task object! And because of this, we need to instruct GraphQL what to do when someone is going to try access task from users query!
const resolvers = {
    Task: {
        assignedTo(task) {
            return users.filter(u => u.taskId.includes(task.id));
        },
    },
    User: {
        task(user) {
          return tasks.filter(t => t.assignedTo.includes(user.id));
        },
      },

    Query: {
        tasks() {
            return tasks;
        },

        users() {
            return users;
        },
    },
};
Now your query should work just fine. Try also accessing tasks from users query:

Will give you the following response:
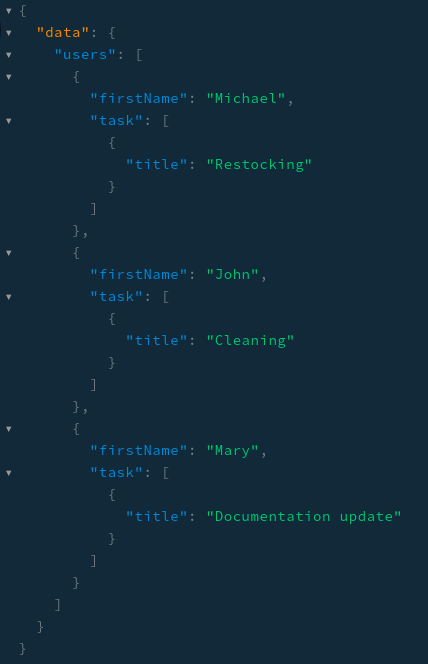
I recommend you to play a little bit with queries in the playground to get a better understanding of GraphQL.
- Next, let's add one more query to our server - let's say we would like our server to accept a user name and reply with that user object. First, we need to edit our
typeDefs.graphql:
type Query {
    tasks: [Task!]!
    users: [User!]!
    userByName(firstName: String!): User!
}
So our new userByName query is going to take in a string and is going to return a User object to us.
- Now into resolvers:
Query: {
        tasks() {
            return tasks;
        },

        users() {
            return users;
        },

        userByName(parent, args, context,){
            const findIndex = users.findIndex(u => u.firstName === args.firstName)
            return users[findIndex]
        }
    },
I know it might look confusing but all you need to know for now is that args is an object that contains the arguments passed to the field. It's equivalent to REST params if that makes it simpler! We can access what has been specified in typeDefs!
- Now restart the server and test our new query in a playground:

Although it's not great as we are looking for a user based on their first name - which in a real-world scenario makes no sense - I think it should give you a clear sense how to create working resolvers! Practice it yourself, maybe add a proper resolver to find a user by his ID?
- Let's add our first mutation type next! It would be great if we could add tasks to our database, to start it we need to edit our typeDefs first:
type Mutation {
    addTask(id: ID!, title: String!, description: String!, status: String!, assignedTo: String!): Task!
}
Our addTask mutation takes in an id, title, description, status and assignedTo, all fields are required and we want to return the task created just to make sure that it has been added.
- You probably now what is the next step - resolvers! Let's add our brand new resolver:
const { tasks, users } = require('../db');

const resolvers = {
    Task: {
        assignedTo(task) {
            return users.filter(u => u.taskId.includes(task.id));
        },
    },
    User: {
        task(user) {
          return tasks.filter(t => t.assignedTo.includes(user.id));
        },
      },

    Query: {
        tasks() {
            return tasks;
        },

        users() {
            return users;
        },

        userByName(parent, args, context,){
            const findIndex = users.findIndex(u => u.firstName === args.firstName)
            return users[findIndex]
        }
    },
    Mutation: {
        addTask(parent, args, context) {
          const newTask = {
            id: args.id,
            title: args.title,
            description: args.description,
            status: args.status,
            assignedTo: args.assignedTo,
          };

            let taskAssignedUser = users.find(u => u.id === args.assignedTo);
            taskAssignedUser.taskId = taskAssignedUser.taskId + args.id;

            tasks.push(newTask);

            return newTask;
        },
    }
};

module.exports = resolvers;
What we are doing in about addTask mutation is:
- Creating a new task based on passed parameters
- As our task contains assignedTo we need also need to push new task id to an existing user.
- Push new task to the task array
You can view our newly created mutation in action by visiting the playground:

- Our second mutation is going to be deleteTask mutation, again we start with
typeDefs.graphqlfile:
removeTask(id: ID!): [Task!]!
- Next our resolvers:
const resolvers = {
    Task: {
        assignedTo(task) {
            return users.filter(u => u.taskId.includes(task.id));
        },
    },
    User: {
        task(user) {
          return tasks.filter(t => t.assignedTo.includes(user.id));
        },
      },

    Query: {
        tasks() {
            return tasks;
        },

        users() {
            return users;
        },

        userByName(parent, args, context,){
            const findIndex = users.findIndex(u => u.firstName === args.firstName)
            return users[findIndex]
        }
    },
    Mutation: {
        addTask(parent, args, context) {
          const newTask = {
            id: args.id,
            title: args.title,
            description: args.description,
            status: args.status,
            assignedTo: args.assignedTo,
          };

            let taskAssignedUser = users.find(u => u.id === args.assignedTo);
            taskAssignedUser.taskId = taskAssignedUser.taskId + args.id;

            tasks.push(newTask);

            return newTask;
        },

        removeTask(parent, args, context) {
            const taskIndex = tasks.findIndex(t => t.id === args.id);

            tasks.splice(taskIndex, 1);

            return tasks;
          },
    }
};
I think by now you should have a good idea what can you do with GraphQL and what is the difference between GraphQL and REST - all those queries and mutations we went through used one endpoint! It is the client that can specify what data he wants from available data. The client dictates what he wants from the server which can hugely improve the speed of our requests and responses! Another huge success of GraphQL is that it allows receiving many resources in a single request! Imagine that on one of your pages you need access to both tasks and user - you can do it by sending one query! Isn't it amazing ?! To me, understanding GraphQL was a life-changing experience - simply because I'm finding it so amazing and easy to work with that I regret I only got to know it now! I really do hope you will enjoy it as well!
Now, let's head straight for our last part - absolutely mind-blowing Graphback!