tribeca
tribeca is a very low latency cryptocurrency market making trading bot with a full featured web client, backtester, and supports direct connectivity to several cryptocoin exchanges. On modern hardware, it can react to market data by placing and canceling orders in under a millisecond.
Runs on the latest node.js (v5 or greater). Persistence is acheived using mongodb. Installation is recommended via Docker, but manual installation is also supported.
Docker Installation
-
Please install docker for your system before preceeding. Requires at least Docker 1.7.1. Mac/Windows only: Ensure boot2docker or docker-machine is set up, depending on Docker version. See the docs for more help.
-
Set up mongodb. If you do not have a mongodb instance already running:
docker run -p 27017:27017 --name tribeca-mongo -d mongo. -
Copy the repository Dockerfile into a text editor. Change the environment variables to match your desired configuration. Input your exchange connectivity information, account information, and mongoDB credentials.
-
Save the Dockerfile, preferably in a secure location and in an empty directory. Build the image from the Dockerfile
docker build -t tribeca . -
Run the container
docker run -p 3000:3000 --link tribeca-mongo:mongo --name tribeca -d tribeca. If you rundocker ps, you should see tribeca and mongo containers running.
Manual Installation
-
Ensure your target machine has node v5 (or greater) and mongoDB v3 or greater. Also, ensure Typescript 1.7.5, grunt, typings, and, optionally, forever are installed (
npm install -g grunt-cli typescript typings@0.8.1 forever). -
Clone the repository.
-
In the cloned repository directory,
npm installand thentypings installto pull in all dependencies. -
Compile typescript to javascript via
grunt compile. -
cd to the outputted JS files, in
tribeca/service. -
Create a
tribeca.jsonfile based off the providedsample-dev-tribeca.jsonorsample-prod-tribeca.jsonfiles and save it in the current directory. Modify the config keys (see configuration section) and point the instance towards the running mongoDB instance. -
Set environmental variable TRIBECA_CONFIG_FILE to full path of tribeca.json
-
Run
forever start main.jsto start the app.
Configuration
-
EXCHANGE
-
coinbase- uses the WebSocket API. Ensure the Coinbase-specific properties have been set with your correct account information if you are using the sandbox or live-trading environment. -
hitbtc- WebSocket + socket.io API. Ensure the HitBtc-specific properties have been set with your correct account information if you are using the dev or prod environment. -
okcoin- Websocket.Ensure the OKCoin-specific properties have been set with your correct account information. Production environment only. -
bitfinexREST API only. Ensure the Bitfinex-specific properties have been filled out. REST API is not suitable to millisecond latency trading. Production environment only. -
null- Test in-memory exchange. No exchange-specific config needed.
-
-
TRIBECA_MODE
-
prod -
dev
-
-
MongoDbUrl - If you are on OS X, change "tribeca-mongo" in the URL to the output of
boot2docker ipon your host machine. If you are running an existing mongoDB instance, replace the URL with the existing instance's URL. If you are running from a Linux machine and set up mongo in step 1, you should not have to modify anything. -
TradedPair - The following currency pairs are supported on these exchanges:
-
BTC/USD- Coinbase, HitBtc, OkCoin, Null -
BTC/EUR- Coinbase, HitBtc, Null -
BTC/GBP- Coinbase, Null
-
-
WebClientUsername and WebClientPassword - Username and password for web UI access. If kept as
NULL, no the web client will not require authentication (Not recommended at all!!)
Input your exchange connectivity information, account information, and API keys in the config properties for the exchange you intend on trading on.
Application Usage
-
Open your web browser to connect to port 3000 of the machine running tribeca. If you're running tribeca locally on Mac/Windows on Docker, replace "localhost" with the address returned by
boot2docker ip. -
Read up on how to use tribeca and market making in the wiki.
-
Set up trading parameters to your liking in the web UI. Click the "BTC/USD" button so it is green to start making markets.
Web UI
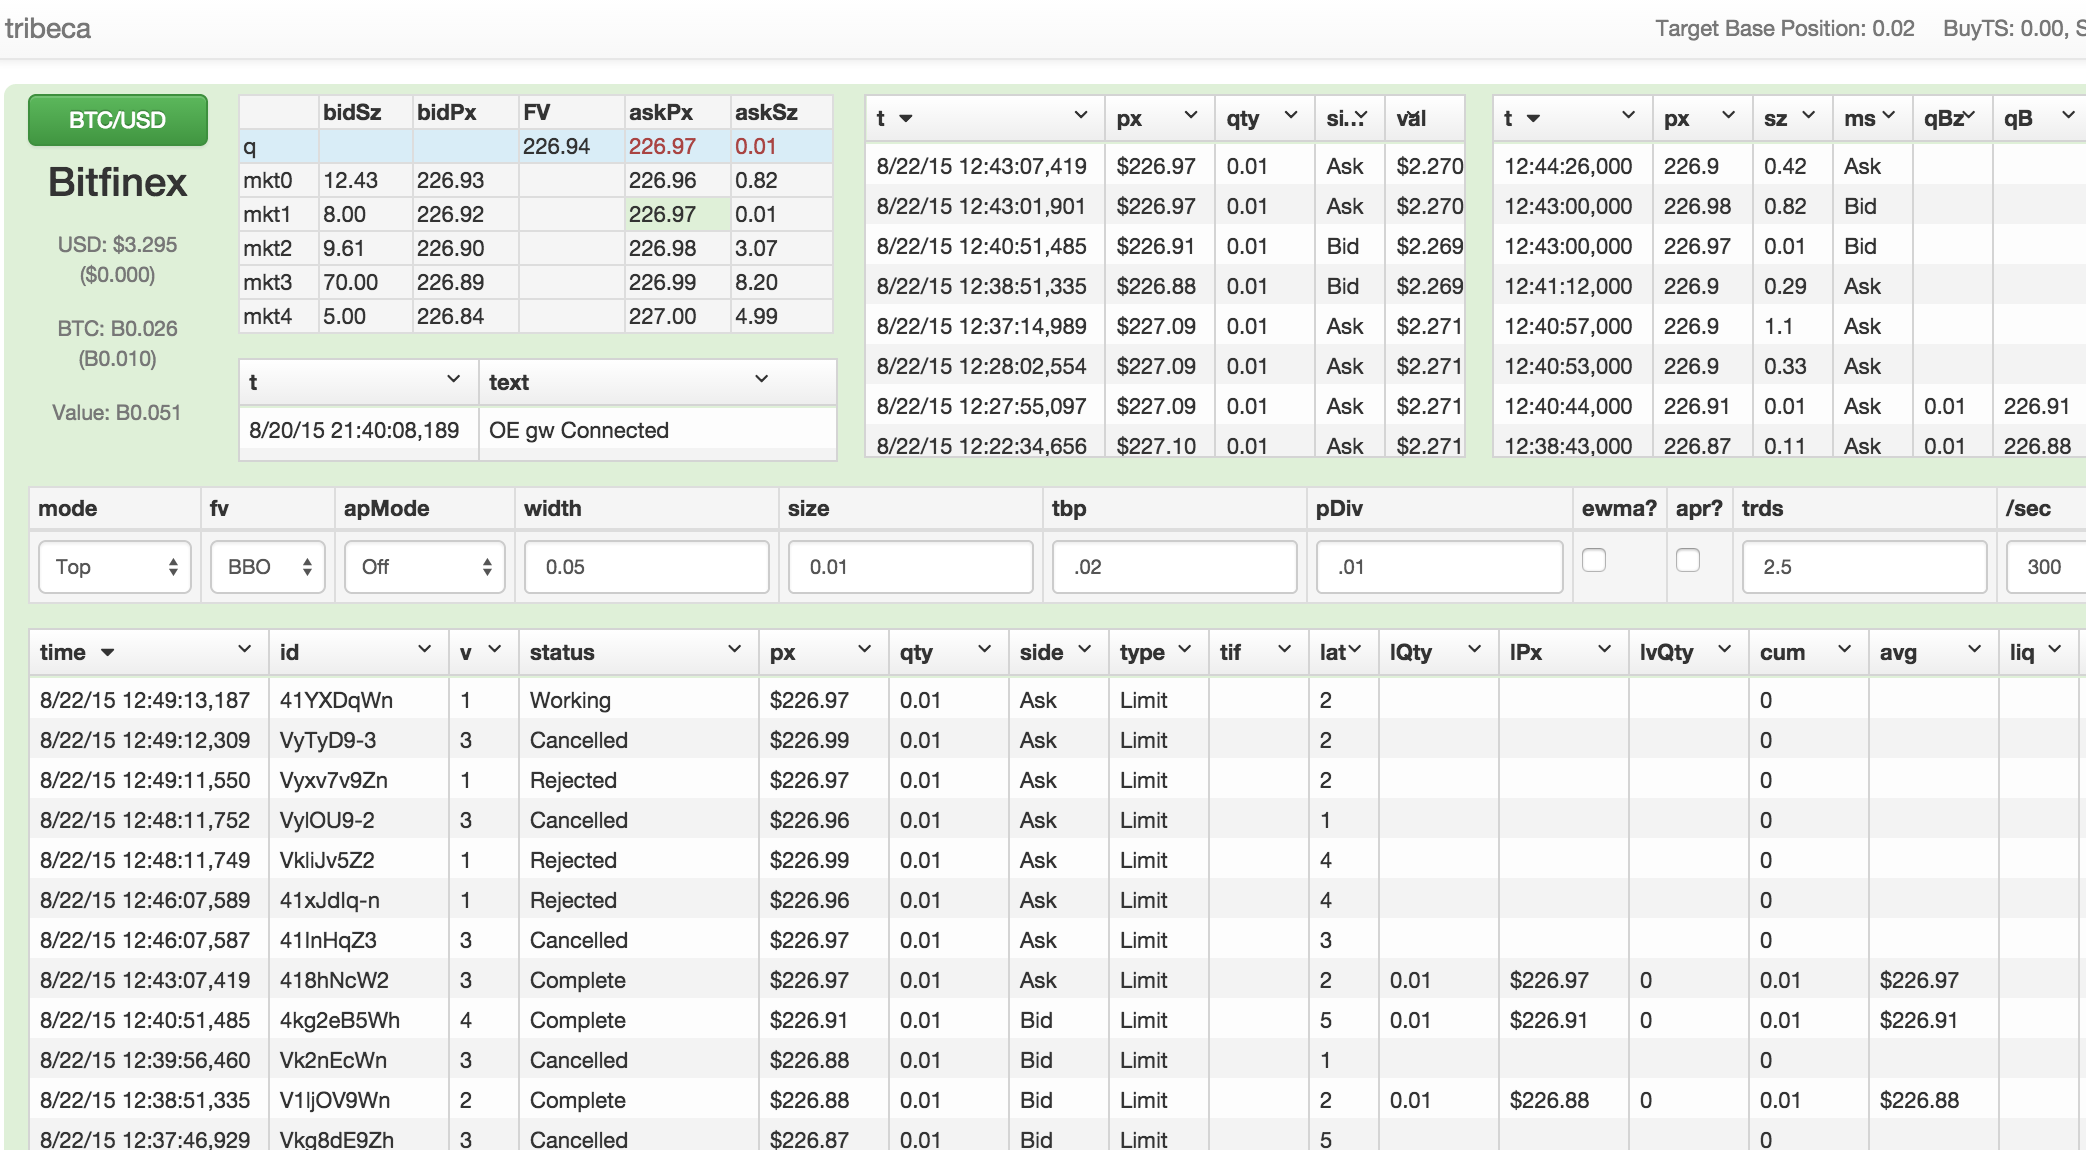
Once tribeca is up and running, visit port 3000 of the machine on which it is running to view the admin view. There are inputs for quoting parameters, grids to display market orders, market trades, your trades, your order history, your positions, and a big button with the currency pair you are trading. When you're ready, click that button green to begin sending out quotes. The UI uses a healthy mixture of socket.io and angularjs.
REST API
Tribeca also exposes a REST API of all it's data. It's all the same data you would get via the Web UI, just a bit easier to connect up to via other applications. Visit http://localhost:3000/data/md for the current market data, for instance.
TODO
TODO:
-
Add new exchanges
-
Add new, smarter trading strategies (as always!)
-
Support for currency pairs which do not trade in $0.01 increments (LTC, DOGE)
-
More documentation
-
More performant UI
Donations
If you would like to support this project, please consider donating to 1BDpAKp8qqTA1ASXxK2ekk8b8metHcdTxj
