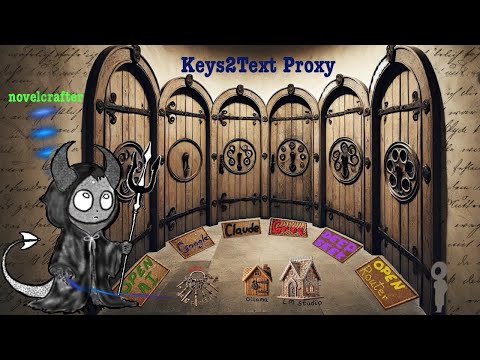
Keys2Text Proxy is a Python-based application that acts as an API proxy server, offering OpenAI API compatibility while seamlessly routing requests to multiple AI providers using your own API keys. You can use the familiar OpenAI endpoints in your existing code and effortlessly switch between providers—Anthropic, Google AI Studio, Groq, OpenRouter, DeepSeek, LM Studio, Ollama, or OpenAI itself—simply by configuring your API keys.
Keys2Text Chat is a similar app but independent of novelcrafter.
It's a standalone app also intended to capture chat conversations as plain text (no Markdown, no HTML, no XML).
-
Free and Open-source forever
Keys2Text Proxy is a Python FastAPI based app that is free and open-sourced.
This technology relies on two key foundations: the essential infrastructure provided by AI companies and their APIs, along with innovative writing tools like novelcrafter that help bring these capabilities to life. -
OpenAI API Compatibility
Mimics OpenAI's endpoints and request/response formats, but only the text-based chat completion endpoints.
And now that each AI provider returns a list of available models by usingclient.models.list()the app can stay up-to-date with model releases. -
Multi-Provider Support
Supply your own API keys to these services, and the proxy will handle the request translation behind the scenes.
The API keys are found if/when you've exported them into the environment.With Keys2Text Proxy, you can easily connect to:
- OpenAI
- Anthropic (Claude)
- Google AI Studio (Gemini) free as of Jan 2025
- Groq free as of Jan 2025
- OpenRouter a few free models as of Jan 2025
- DeepSeek
- LM Studio
- Ollama
-
Timestamped Chat History as plain text file
- The app keeps a plain text log of all requests and responses for reference and as an aid in writing.
- Conversations are saved with timestamps and paired using
Me:andAI:labels. - A new text file is created whenever the app is started up, which allows for organizing
your AI chats simply by starting, stopping, and restarting this app.
- The app keeps a plain text log of all requests and responses for reference and as an aid in writing.
This was the result of a personal itch; I find repeatedly doing copy/paste's tedious, as it's
much easier to just have everything then do editing.
-
Local HTTP Server
Keys2Text Proxy starts an HTTP server (default:http://localhost:8000) with
routes matching the OpenAI API —-for example,/v1/chat/completions. -
Request Translation
When a request arrives (in OpenAI-compatible format), the proxy translates it to
the corresponding provider’s format using the model named in the request. -
Response Translation
The provider’s response is then converted back into the OpenAI-like responses. -
Provider-Specific API Keys
Users configure environment variables, API keys, for their preferred AI services.
Pick your ☠️ poison based on your setup:
- Option 1: Install via pip (if you already have Python)
- Option 2: Install via Miniconda (for a fresh start)
- Open a terminal (mac) or Command Prompt (Windows).
- Run:
python --version
pip --version
pip install keys2text_proxy
- Start the proxy:
Note: this will fail if you do not already have API keys defined in your environment.
keys2text_proxy
- Open Command Prompt.
- Run:
curl https://repo.anaconda.com/miniconda/Miniconda3-latest-Windows-x86_64.exe -o miniconda.exe
start /wait "" .\miniconda.exe /S
del miniconda.exe
- Make a new folder, create a conda environment, and install Keys2Text Proxy:
mkdir someFolder
cd someFolder
conda create -n keysapp python=3.11
conda activate keysapp
pip install keys2text_proxy
keys2text_proxy
- Open Terminal.
- Run:
mkdir -p ~/miniconda3
curl https://repo.anaconda.com/miniconda/Miniconda3-latest-MacOSX-arm64.sh -o ~/miniconda3/miniconda.sh
bash ~/miniconda3/miniconda.sh -b -u -p ~/miniconda3
rm ~/miniconda3/miniconda.sh
- Initialize your shell:
source ~/miniconda3/bin/activate
conda init --all
- Close and reopen Terminal, then:
mkdir someFolder
cd someFolder
conda create -n keysapp python=3.11
conda activate keysapp
pip install keys2text_proxy
keys2text_proxy
- Windows: If you get permission errors, try running Command Prompt as administrator.
- macOS: If conda isn’t recognized, make sure you ran
conda init --alland then reopened your terminal. - Conda environment: Double-check you’ve activated it (
conda activate keysapp) before starting the proxy.
After configuring your API keys, Keys2Text Proxy will start on your machine, ready for novelcrafter or any other app that needs it.
You can set up your API keys in two ways:
- Locate the
.example.envfile in the project root directory - Make a copy of this file and/or rename it to
.env - Open the
.envfile and replace the placeholder values with your actual API keys:
OPENAI_API_KEY=api-key-here
ANTHROPIC_API_KEY=api-key-here
GOOGLE_AI_STUDIO_API_KEY=api-key-here
GROQ_API_KEY=api-key-here
OPENROUTER_API_KEY=api-key-here
DEEPSEEK_API_KEY=api-key-here
# Note: these are not used and not required:
LM_STUDIO_API_KEY=lmstudio
OLLAMA_API_KEY=ollamaIf you prefer setting environment variables directly:
export OPENAI_API_KEY=api-key-here
export ANTHROPIC_API_KEY=api-key-here
export GOOGLE_AI_STUDIO_API_KEY=api-key-here
export GROQ_API_KEY=api-key-here
export OPENROUTER_API_KEY=api-key-here
export DEEPSEEK_API_KEY=api-key-here
# note: these are not used and not required:
export LM_STUDIO_API_KEY=lmstudio
export OLLAMA_API_KEY=ollamaset OPENAI_API_KEY=api-key-here
set ANTHROPIC_API_KEY=api-key-here
set GOOGLE_AI_STUDIO_API_KEY=api-key-here
set GROQ_API_KEY=api-key-here
set OPENROUTER_API_KEY=api-key-here
set DEEPSEEK_API_KEY=api-key-here
REM note: these are not used and not required:
set LM_STUDIO_API_KEY=lmstudio
set OLLAMA_API_KEY=ollama- Each key is only used if/when you send requests to a model from that provider.
Run Ollama, if installed
for Mac do:
OLLAMA_ORIGINS=https://app.novelcrafter.com ollama serveRun the local proxy server
keys2text_proxyBy default, the server runs on http://localhost:8000.
You can now direct any OpenAI-compatible client to this URL, well maybe,
as I have only used this app withnovelcrafter(read more under Usage).
-
This app is a personal proxy server
Keys2Text Proxy is intended to be run locally, i.e. on your computer, and not in the
cloud/internet which may violate the AI providers APITerms of Service/Use(maybe).
While there are advantages to running it locally; this app will probably only
run on desktops and laptops. -
novelcrafter
- Keys2Text was written for and tested using novelcrafter
- Keys2Text handles CORS so your web browser can perform behind the scenes
localfetch-es to your Keys2Text Proxy server
- Keys2Text was written for and tested using novelcrafter
Personally, for
novelcraftersettings I useLM StudioinAI Connectionsand change the port.
When using API keys for all of the AI providers, the list of models is over 300, which is wow and unweildy.
So far it all works great together:
🏴☠️ and I'm my own middle-man
🐢 the proxy is not any slower or quirkier in responding than the usual chatters
👽 any issues are between me and the AI provider (429's and such) and handled via their support (if ever)
🔐 my API keys are directly used with AI providers (more secure), and no extra usage fees
💰 yes, you still pay for API usage (when not free) via your API keys directly to the AI provider
😱 No offense to the ever growing number of cloud providers offering a similar service.
-
Chat Logging
Every conversation is automatically logged in a timestamped text file, e.g.,
chat_YYYY-MM-DD_HH-MM-SS.txt.
This log is just a plain text file tracking your prompts as pairs ofMe:prompt andAI:response,
which may be helpful for writers and editing.
-
Additional Providers
While we (who is we? 🤔) already support several popular AI services,
the proxy is designed to be extended easily (well, if you can code python/fastapi/generator-yielding/streaming-nonstreaming-apis/wrangle-json-and-text, then sure).
We plan to continually add new integrations.
Do we, maybe, perhaps a new AI provider will emerge someday or overnight.🥸 -
Advanced Features
Next in the hopper 🎡:
🤖 NER (name entity recognition) for existing writing
⏪🤖 reverse-NER for story outlining
📜 ✍🏽 both are kind ofcodexrelated (like innovelcrafter)
We welcome contributions (we do?), bug 🐞 reports, and feature 🍿 requests.
Please open an issue or submit a pull request on GitHub.
This project is licensed under the MIT License.
With Keys2Text Proxy, you can unify your AI workflows under a single,
OpenAI-compatible interface—while retaining the freedom to choose any provider that best fits your needs.
If any of the above reads like AI writing, for example, all of that "we" speak, well, there is only "I" as in "me" ... 🙋🏽♂️ guilty.
Enjoy! ☮️