ContosoAMPBasic sample for Azure Marketplace SaaS integration
This sample demonstrates the basic interaction of a SaaS solution with Azure Marketplace. It does not have any SaaS functionality, however it is a bare bones approach focusing on the marketplace integration.
Please see the related section on my marketplace REST API client implementation for an overview of the integration concepts.
This sample can be a good starting point if the solution does not have requirements for providing native experience for cancelling and updating a subscription.
It exposes a landing page that can be customized for branding. It provides a webhook endpoint for processing the incoming notifications from the Azure Marketplace. The rest of the integration is done via emails.
The landing page can also used for adding new fields for getting more information from the subscriber, for example what is the favored region.When a subscriber provides the details on the landing page, the solution generates an email to the configured operations contact. The operations team then provisions the required resources and onbards the customer using their internal processes then comes back to the generated email and clicks on the link in the email to activate the subscription.
The solution does not implement native "cancel" or "update" subscription options. The subscriber uses the Azure Marketplace to cancel or update the subscription. In the case of a change on the subscription (cancel, update, suspend), the marketplace posts a notification to the webhook, and the operations contact receives an email. Just like the onboarding operation, the operations contact performs the required operation manually, and then returns to the email, and click on the included link to indicate completion of the operation.
I give an overview of integrating a SaaS application with Azure Marketplace in my sample client library sample. I point out three areas for integration.

Notes
Secrets
Secrets such as API keys are managed through "dotnet user-secrets" command. For example, to set the value for "FulfillmentClient:AzureActiveDirectory:AppKey" use the following command:
dotnet user-secrets set "FulfillmentClient:AzureActiveDirectory:AppKey" "secret here"Please see the user secrets documentation for more details.
How do I run the sample?
The top level actions are:
- Create and configure Azure Active Directory applications.
- Create and configure a SendGrid account.
- Update user secrets.
Registering Azure Active Directory applications
I usually maintain a separate Azure Active Directory tenant (directory) for my application registrations. To create one,
-
Login to Azure portal
-
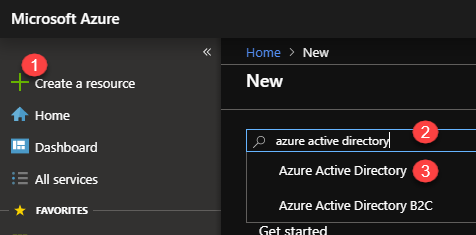
Click "Create a resource", and type in "azure active directory" in the search box, and select
Then fill in the details as you see fit after clicking the "create" button
-
Switch to the new directory.
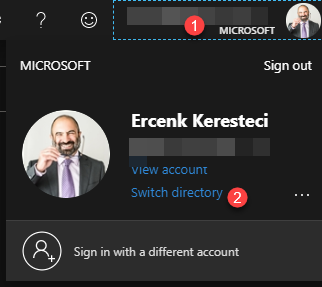
-
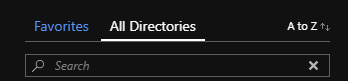
Select the new directory, if it does not show under "Favorites" check "All directories"


Once you switch to the new directory (or if you have not created a new one, and decided to use the existing one instead), select the Active Directory service (1 on the image below). If you do not see it, find it using "All services" (2 on the image below).

Click on "App registrations", and select "New registration". You will need to create two apps.

Register two apps
I recommend you register two apps:
- For the landing page, the Azure Marketplace SaaS offers require to have a landing page, authenticating through Azure Active Directory. Register it as described in the documentation. Make sure you register a multi-tenant application, you can find the differences in the documentation. Set the value of the ClientId setting in the appsettings.json file in the "AzureAd" section to the AppId (clientId) for the app.
- To authenticate Azure Marketplace Fulfillment APIs, you can register a single tenant application. You will need to provide the application ID (also referred to as the "client ID") and the tenant ID on the "Technical Configuration page" on the Partner portal while registering your offer. Set the ClientId value of the "FulfillmentClient:AzureActiveDirectory" section to this value. You will need to create a client key, and either put it in the appsettings.json file or add it as a user secret using
dotnet user-secretscommand. You will also need to set the TenantId as described in the appsettings.json file. Remember, this is a single tenant app.
Creating and configuring a SendGrid account
Follow the steps in the tutorial, and grab an API Key. Set the value of the ApiKey in the configuration section, "Dashboard:Mail", either using the user-secrets method or in the appconfig.json file.
Running the sample
You can run the sample either in Docker by building an image using the Dockerfile on the src/Dashboard folder, or running with dotnet run in the "ContosoAMPBasic\src\Dashboard" folder. Once you run the application, you need to grab the URL and update the "redirect URLs" section of the multi-tenant AD application's "Authentican" settings. E.g. if you run using dotnet run, make sure to add https://localhost:5001/ and https://localhost:5001/signin-oidc to the URL list.
The default page uses the "Dashboard:DashboardAdmin" value to authorize the logged on user. Make sure to set it to your email in the configuration. The default page queries the marketplace API to list the subscriptions to the offers.

The sample uses the mock API with its default "FulfillmentClient:FulfillmentService" settings.
Now you want to navigate to the landing page to simulate a redirect. Append "/landingpage?token=wwww" to the URL. It should look something like this, "https://localhost:5001/landingpage?token=wwww".
Since we are using the mock API, the value of the token does not really matter.
If everything is configured correctly, you should see the landing page, be able to initiate your subscription, and receive an email momentarily after clicking the "all is good..." button.

The email should look like the following.

At this point we can assume the operations team will go off and provision the customer using the received details. The example captures the "MaximumNumberofThingsToHandle" and "Region". After the operations team complete their tasks and ready to activate the subscription, they need to come back to this email and click on the "Click here to activate subscription" link in the email.
Simulating the cancelled subscription
I included a Postman collection containing one request to the webhook endpoint. Send the request using Postman, and go through the same steps as described above, this time for decommisioning the customer.