This tutorial will walkthrough the process of creating a web interface to display text on an Arduino connected LCD. The web interface will include a text box to type a message in.
Create an HTML file called index.html. Add the following code:
type html>
<html>
    <head>

        <title>Communicating from Node.js to an Arduino</title>

        <script src='https://cdnjs.cloudflare.com/ajax/libs/socket.io/2.0.4/socket.io.js'></script>

    </head>
    <body>

        <h1>Communicating from Node.js to an Arduino</h1>

        <input type="text" name="message" id="message">

        <script>

        var typingTimer;

        document.getElementById('message').onkeyup = function() {

            clearTimeout(typingTimer);
            typingTimer = setTimeout(doneTyping, 1000);

        };

        var socket = io();

        function doneTyping () {

            socket.emit('newMessage', { "message":document.getElementById('message').value });
            console.log(document.getElementById('message').value);

        }

        </script>

    </body>
</html>
The above code creates a webpage with a textbox. When text is entered the text is sent to the Node.js app using JavaScript and Socket.io.
Create a file called app.js and add the following code:
var http = require("http");
var fs = require("fs");
var index = fs.readFileSync("index.html");

var SerialPort = require("serialport");
const parsers = SerialPort.parsers;

const parser = new parsers.Readline({
  delimiter: "\r\n",
});

var port = new SerialPort("/dev/tty.wchusbserialfa1410", {
  baudRate: 9600,
  dataBits: 8,
  parity: "none",
  stopBits: 1,
  flowControl: false,
});

port.pipe(parser);

var app = http.createServer(function (req, res) {
  res.writeHead(200, {"Content-Type": "text/html"});
  res.end(index);
});

var io = require("socket.io").listen(app);

io.on("connection", function (socket) {
  socket.on("newMessage", function (data) {
    console.log(data);

    port.write(data.message);
  });
});

parser.on("data", function (data) {
  console.log("Received data from port: " + data);
});

app.listen(3000);
The above code uses Socket.io to listen for a message from the HTML/JavaScript webpage and then simply passes on the message to the connected Arduino.
Note
Make sure to change the name of the serial port.
Using Arduino Create create the following sketch and upload it to your Arduino.
#include <LiquidCrystal.h>

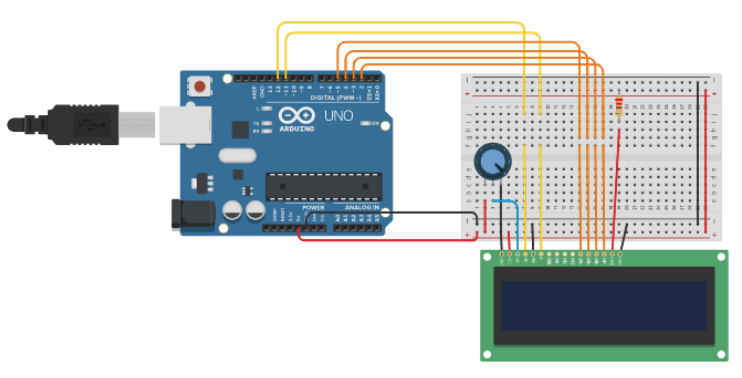
LiquidCrystal lcd(12, 11, 5, 4, 3, 2);

void setup() {

  lcd.begin(16, 2);
  lcd.print("hello, world!");

  Serial.begin(9600);

}

void loop() {

  if (Serial.available() > 0) {

    String receivedString = "";

    while (Serial.available() > 0) {
      receivedString += char(Serial.read ());
      delay(20);
    }

    Serial.println(receivedString);

    lcd.clear();
    lcd.setCursor(0, 0);
    lcd.print(receivedString);

  }

  lcd.setCursor(0, 1);
  lcd.print(millis() / 1000);

}
The previous code will listen to the serialport for an incoming message. Once a message is received it will display the message using the connected LCD.
You will need to setup the following circuit using your Arduino:
- Using Arduino Create upload the sketch to your Arduino.
- Using the Terminal start your Node.js app using
node app.js. - Open up a browser and enter the URL
http://localhost:3000/. - Using your browser type in a message to display on your LCD screen.
Full tutorial URL:
https://codeadam.ca/learning/arduino-from-nodejs.html
- Visual Studio Code or Brackets (or any code editor)
- Arduino Create
- SerialPort NPM
- Socket.io

