This is a demo GitHub repository for introducing students to Git and GitHub. You will need a GitHub account to proceed. Make sure you login or register.
Please take a moment to notice that the registration page acts like a command line! That's kind of awesome!

There are two possible scenarios when setting up a project and a Git repository:
If you are starting a brand new project that does not have a GitHub repository you will need to follow these steps:
-
Register or login to your GitHub account.
-
Create a new GitHub repository. Give it a title using lowercase letters and dashes. Make it
Publicand ClickAdd a README file.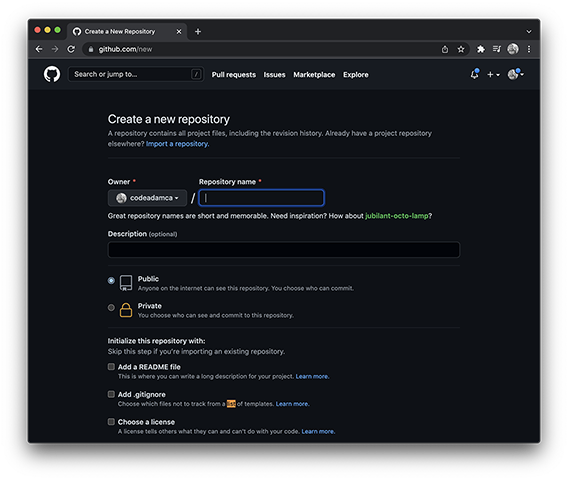
-
On the new repository page click the green
Codebutton and copy the repository URL.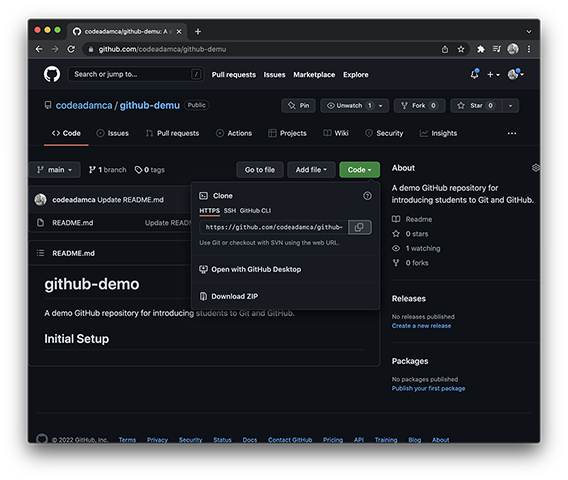
-
Open up the Terminal or Command Prompt. If you do not have Git installed, download and install GIT.
-
Navigate to the folder you want to place your project in. To navigate folders use the following commands:
# Change directoy $ cd repository-name # Go back a folder $ cd .. # Go to the root drive $ cd / -
In your working folder clone your new repository:
$ git clone https://github.com/<GUTHUB_USERNAME>/<REPO_NAME> -
This will create a new folder using the repository name. Change the direftory to that new folder:
$ cd <REPO_NAME>


You are now setup and ready to follow the development cylcle instructions below.
If the sitry already exists and you want to contribute to the project follow these steps:
-
Provide your uasername to the programmer who owns the project. The owner will need to login to their GitHub account and follow these steps:
- Navigate to the repository
- Click
Settings - Click
Collaborators - Click the
Add Peoplebutton - Enter the username
- Click
Add <GITHUB_USERNAME> to this repository

-
You will receive an email with the invitation details. Click
View Invitationin the email and thenAccept Invitationin the browser. You are not a contributor! -
Navigat to the repository. Click the
Codebutton and copy the repositry URL. -
Open up the Terminal or Command Prompt. If you do not have Git installed, download and install GIT.
-
Navigate to the folder you want to place your project in. To navigate folders use the following commands:
# Change directoy $ cd repository-name # Go back a folder $ cd .. # Go to the root drive $ cd / -
In your working folder clone your new repository:
$ git clone https://github.com/<GITHUB_USER>/<REPO_NAME> -
This will create a new folder using the repository name. Change the direftory to that new folder:
$ cd <REPO_NAME> -
Your
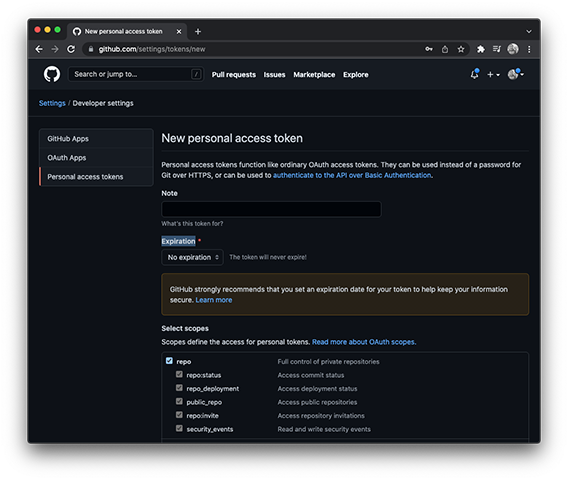
github-demofolder contains a lot of Git settings. You can view these settings using the following commands:$ git config user.name $ git config user.email $ git config remote.origin.urlWe need to add a Personal Access Token to the origin URL to make sure you are authorized. In your browser, go to GitHub, and follow these steps:
- Click on your profile avatar (top right)
- Click on
Settings - Click on
Developer Settings(last option) - Click
Personal Access Token - Click
Generate New Token - Give the token a name, set the expiration to
No Expiration, and check off justrepo - Copy your new token and save it somewhere, GitHub will not redisplay this token
In the terminal, run the following command to apply your Personal Access Token:
$ git remote set-url https://<PERSONAL_ACCESS_TOKEN>@github.com/codeadamca/github-demo

You are now setup and ready to follow the development cycle instructions below!!
Now that you have access to the repository and a local copy, it's time to make some changes!
Open up the IDE of your choice. I will be using Visual Studio Code. Using your IDE, open the folder that contains your repository. Also open up a terminal or command prompt and change the folder to the same repository.
There are two primary methods of commiting a change to a repository:
If you are working in a small group and everyone has access to the main branch, then group members can all make change and commit them directly to the main branch:
-
In the terminal check on the status of your local repository:
$ git statusYou will be given a summary of which branch you are working on and a list of files that have been changed. At this point you should be on a branch called
mainand there should not be any changes that need to be commited. If there were changes, the files would be listed in red text.On branch main Your branch is up to date with 'origin/main'. nothing to commit, working tree clean -
Open up the files named
main-content.md. This is a MarkDown file! Using the table example, add a row with your name and a portfolio URL (if you have one). -
In your terminal, commit the changes to the
mainbranch:$ git status $ git add . $ git commit -am "Add <GITHUB_USERNAME> to content" $ git push origin mainIf someone has made changes since you last downloaded the content of the repository you will need to first update your local copy:
$ git pull origin main
Congratulations! You have officially contributed to the github-demo repository. Checn out your GitHub home page and view your contributions calendar. You have a green square!
If one group member is responsible for merging all code, the other group members can make their code contributions and then submit pull requests.
-
In the terminal, create a new branch:
$ git branch <BRANCH_NAME> -
Checkout the new branch:
$ git checkout <BRANCH_NAME> -
Open up the files named
branch-content.md. Using the table example, add a row with your name and a portfolio URL (if you have one). -
Commit your changes:
$ git add . $ git commit -am "Add <GITHUB_USERNAME> to content" $ git push origin <BRANCH_NAME> -
Your changes have been pushed to the <BRANCH_NAME> branch in GitHub. You now need to create a
Pull Requestto request that your code be merged with themainbranch.After pushing to <BRANCH_NAME> you will receive a message like this:
Enumerating objects: 9, done.
Counting objects: 100% (9/9), done.
Delta compression using up to 8 threads
Compressing objects: 100% (6/6), done.
Writing objects: 100% (6/6), 608 bytes | 608.00 KiB/s, done.
Total 6 (delta 4), reused 0 (delta 0)
remote: Resolving deltas: 100% (4/4), completed with 3 local objects.
remote:
remote: Create a pull request for 'reorder' on GitHub by visiting:
remote:      https://github.com/codeadamca/github-demo/pull/new/reorder
remote:
To https://github.com/codeadamca/github-demo.git
* [new branch]      reorder -> reorder
Go to the recommended URL in a browser and click
Create Pull Request. -
Now you can clean up your local repository:
$ git checkout main
$ git merge <BRANCH_NAME>
$ git branch <BRANCH_NAME> -d
Congratulations! You are ready to work in a team environment!
- Visual Studio Code or Brackets (or any code editor)
- GitHub
- Git
- MarkDown