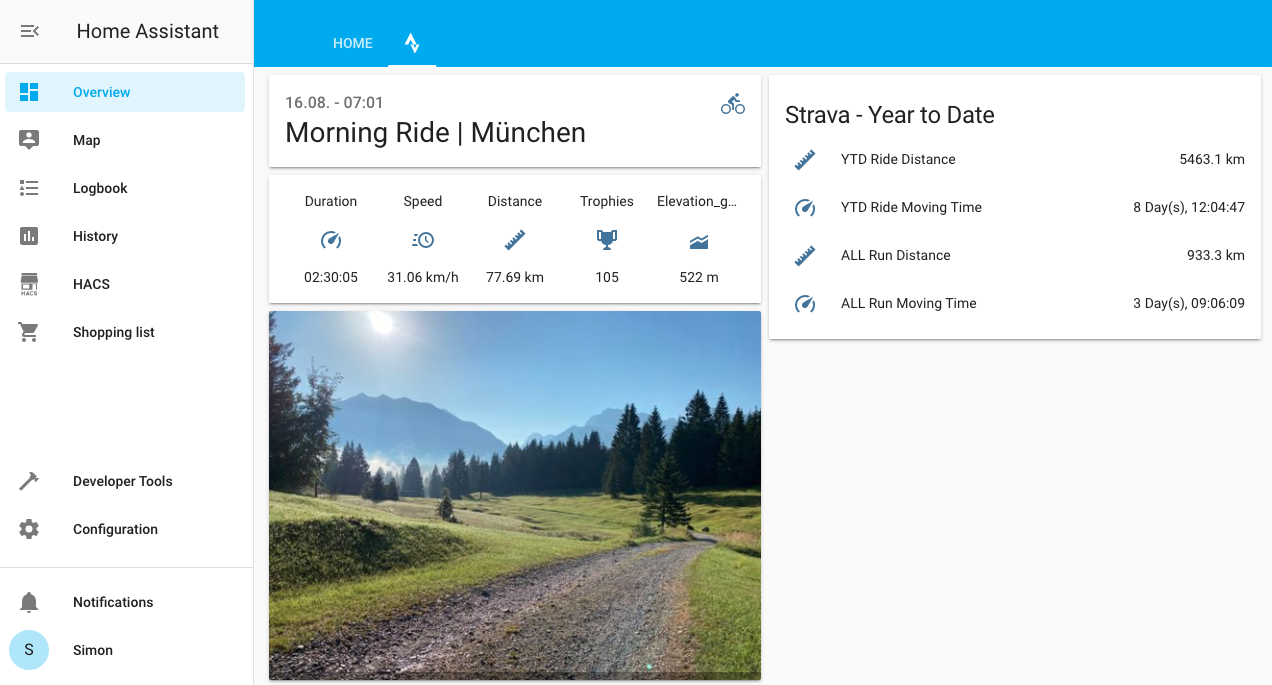
Custom Component to integrate Activity Data from Strava into Home Assistant.
- Gives you access to up to 10 of your most recent activities in Strava.
- Supports both the metric and the imperial unit system
- Activity data in Home Assistant auto-updates whenever you add, modify, or delete activities on Strava
- Exposes 5 customizeable sensor entities for each Strava activity
- Easy set-up: only enter your Strava Client-ID and -secret and you're ready to go
For every Strava activity, the Strava Home Assistant Integration creates a device entity in Home Assistant (max 10 activities). Each of these virtual device entities exposes five sensor entities which you can customize to display one of the following activity KPIs:
- Duration (Minutes),
- Pace (Minutes/Mile ; Minutes/Km)
- Speed (Miles/Hour; Km/Hour)
- Distance (Miles; Km)
- # Kudos
- Kalories (cKal),
- Elevation Gain (Feet, Meter)
- Power (Watts)
- # Trophies
One additional sensor entity will be available for every Strava activity to display Date & Title of the underlying activity. To map a name to an activities's GPS start location, Strava Home Assistant relies on the free API at geocode.xyz. In the event that Strava Home Assistant cannot fetch a location name from geocode.xyz, it'll put "Paradise City" as the default location.
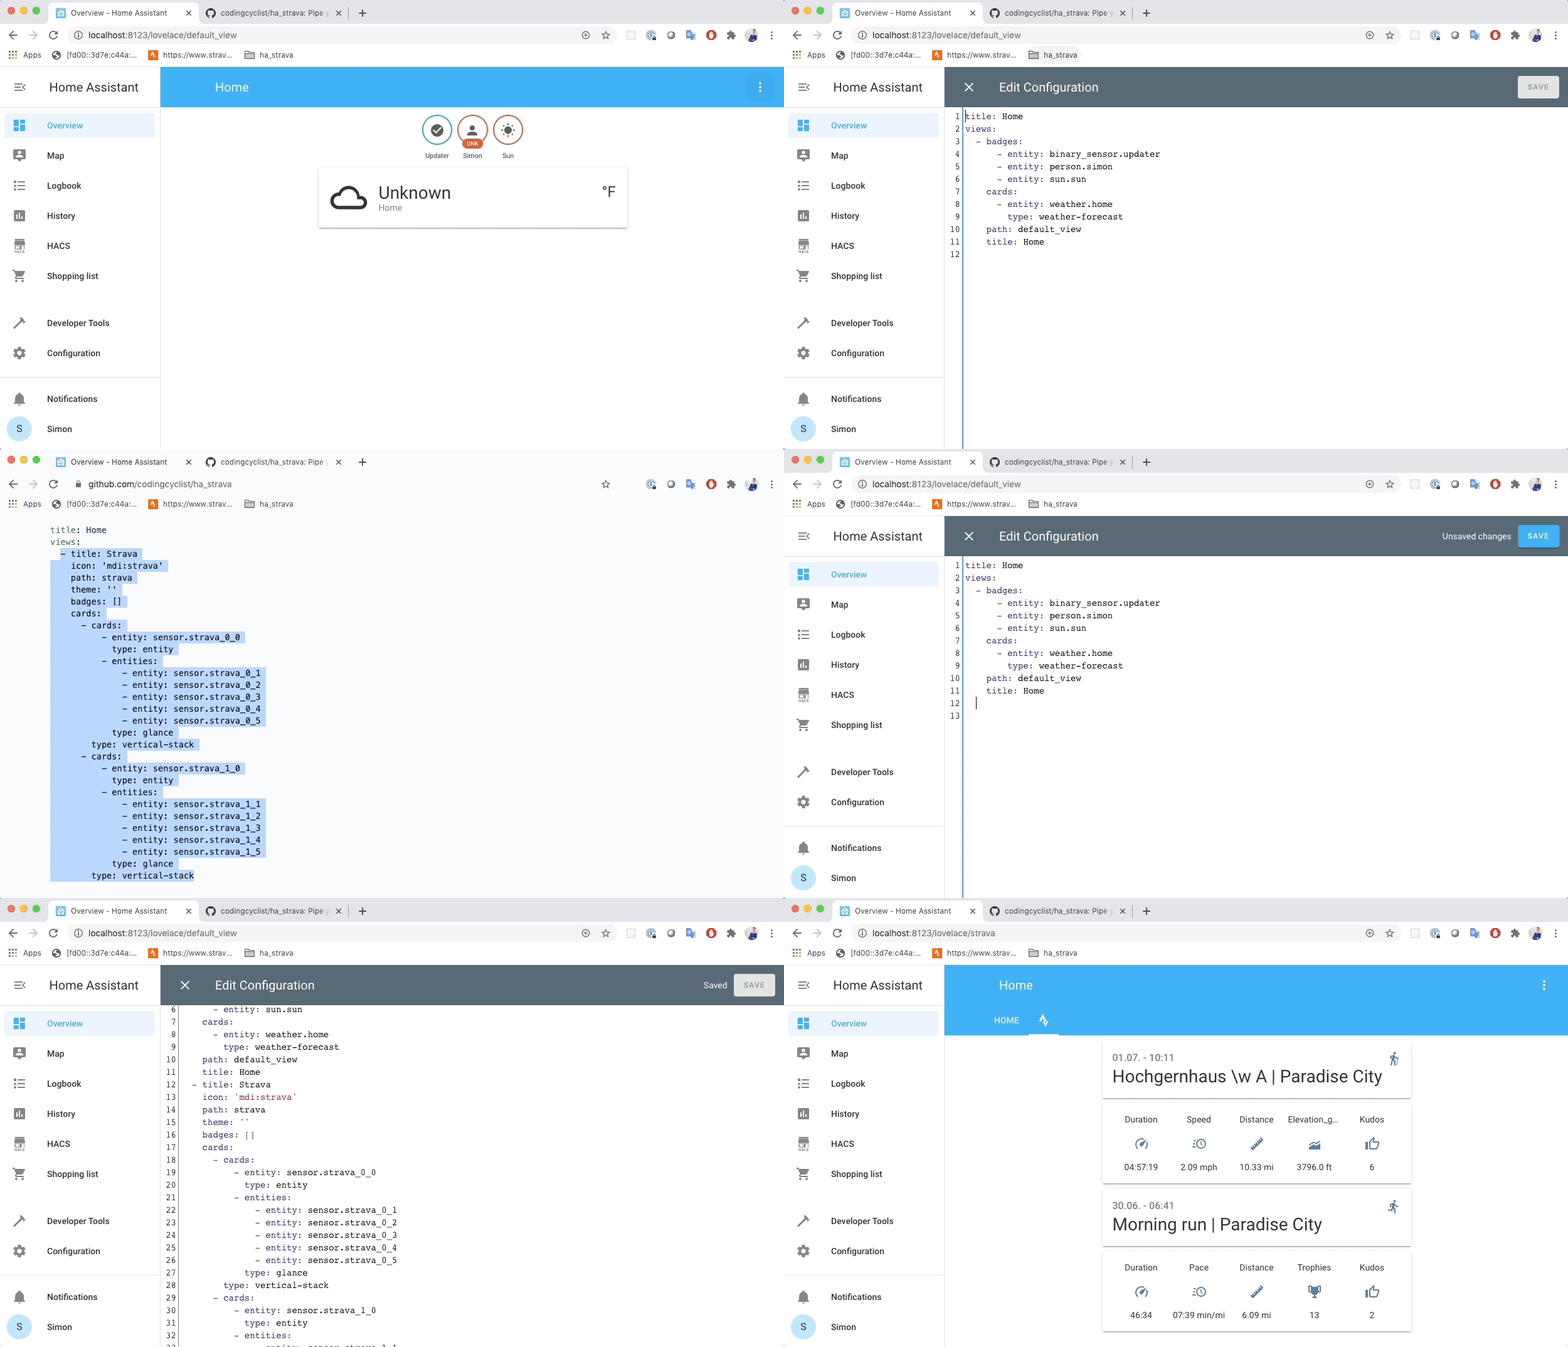
Since every Strava activity gets its own virtual device, you can use the underlying sensor data in your Dashboards and Automations, just as you'd use any other sensor data in Home Assistant. To learn how to display information about your most recent Strava Activities, please reference the UI-configuration example below.
To use the Strava Home Assitant integration, your Home Assistant Instance must be accessible from an External URL (i.e. Remote Access). Without remote access, the integration won't be able to pull data from Strava. To learn how to set up Remote Access for Home Assistant, please visit the Official Documentation
After you've set up remote access and configured the External URL for your Home Assistant instance, head over to your Strava Profile. Under "Settings", go to "My API Application", follow the steps in the configuration wizard, and eventually obtain your Strava API credentials (ID + secret). We need those credentials during the final installation step.
!!! IMPORTANT !!! It is essential that the Authorization Callback Domain which you set for your Strava API matches the domain of your Home Assistant External URL
As of now, the Strava Home Assistant Integration can only be installed as a custom repository through the Home Assistant Community Store (HACS). The installation process is super easy, check out my 5-minute tutorial on how to install Custom Components in HACS here
Now is the time to fire up the Strava Home Assitant Integration for the first time and make a connection between Strava and your Home Assistant Instance.
From within Home Assistant, head over to Configuration > Integrations and hit the "+"-symbol at the bottom. Search for "Strava Home Assistant" and click on the icon to add the Integration to Home Assistant. You'll automatically be prompted to enter your Strava API credentials. It'll take a few seconds to complete the set-up process after you've granted all the required permissions.
Strava Home Assistant only supports configuration through the Home Assitant UI. Configuration via. configuration.yaml will be deprecated official announcement to the HA community and is therefore not supported.
Upon completion of the installation process, the Strava Home Assistant integration automatically creates device- and sensor entities for you to access data from your most recent Strava activities. The number of sensor entities varies, depending on how many of your most recent Strava activities you whish to track from within Home Assistant (5 + 1 sensors per activity). Per default, only sensor entities for the two most recent Strava activities are visible in Home Assistant. Please read the section below to learn how to change the number of visible sensor entities for Strava Home Assistant.
You can always adjust the number of Strava activities you whish to track from within Home Assistant (min 1; max 10).
Just locate the Strava Home Assistant Integration under Configuration > Integrations, click on Options, and use the slider to adjust the number of activities. After you've saved your settings, it might take a few minutes for Home Assistant to create the corresponding sensor entities and fetch the underlying data. The activities available in Home Assistant always correspond to the most recent ones under your Strava profile.
Strava Home Assistant exposes five sensor entities for every Strava activity. You customize the Strava-KPI for each of those five sensors as follows:
- Go to
Configuration>Integrations - Locate the Strava Home Assistant Integration and click on
Options - Leave the number of concurrent Strava Activities as is and hit
SUBMITto proceed - Chose an activity type and configure the KPI-Sensor matching as you see fit
- Hit
SUBMITfor your changes to take effect
You can only change the sensor configuration for one activity type at a time. After you've completed the configuration for a given activity type, you can start over to change the sensor configuration for another activity type.
As of now, customization is only supported for Ride, Run, and Hike activities.
Below, you can find an example UI-configuration, which adds metrics from your two most recent Strava activities to a separate Lovelace Dashboard in Home Assitant.
title: Home
views:
  - title: Strava
    icon: 'mdi:strava'
    path: strava
    theme: ''
    badges: []
    cards:
      - cards:
          - entity: sensor.strava_0_0
            type: entity
          - entities:
              - entity: sensor.strava_0_1
              - entity: sensor.strava_0_2
              - entity: sensor.strava_0_3
              - entity: sensor.strava_0_4
              - entity: sensor.strava_0_5
            type: glance
        type: vertical-stack
      - cards:
          - entity: sensor.strava_1_0
            type: entity
          - entities:
              - entity: sensor.strava_1_1
              - entity: sensor.strava_1_2
              - entity: sensor.strava_1_3
              - entity: sensor.strava_1_4
              - entity: sensor.strava_1_5
            type: glance
        type: vertical-stack
      - type: picture-glance
        aspect_ratio: 0%
        camera_image: camera.strava_cam
        entities: []
        image: 'https://demo.home-assistant.io/stub_config/kitchen.png'
      - entities:
          - entity: sensor.strava_stats_summary_ytd_ride_distance
          - entity: sensor.strava_stats_summary_ytd_ride_moving_time
          - entity: sensor.strava_stats_summary_all_run_distance
          - entity: sensor.strava_stats_summary_all_run_moving_time
        title: Strava - Year to Date
type: entities- [] Add customization support for more activity types
- [] Add German language support
- [] Add support for more KPIs


