
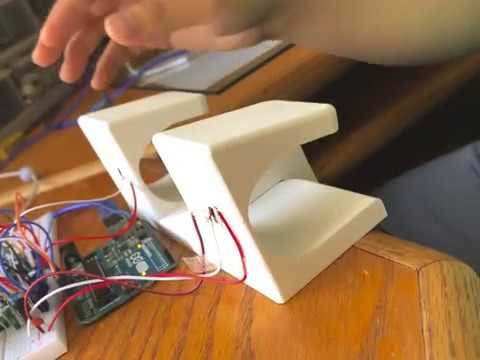
This project began as an experiment with strain guages which eventually became a drum. Here, using strain guages instead of the typical piezo sensor for drums enables more flexible design, such as making a 3d-printable model. It runs on an Arduino Uno, which has its serial interface turned into a MIDI input using LoopMIDI and Hairless MIDI running on the computer, and feeds into Ableton Live. Everything required to recreate this project is provided, but the code requires calibration due to variability in construction.
The "drum" is 3D printed with three functional sections: the base, the stem, and the face-plate. The base is clamped to a table, and while one taps out a rhythm on the face-plate, that force causes the stem to bend. That bending can be measured by the strain guages configured in a half bridge which is directly hooked into a differential amplifier. This signal is then fed into a simple peak detector in order to make a response curve that's easy to program for.
The program basically works like this:
- Because each input is bound to have a varied level of DC bias, the average of twenty samples is taken from each, which is subtracted from all future samples to compensate.
- Because the circuit is prone to some noise, anything that falls in a certain range is eliminated and replaced with a zero.
- All samples are fed into what is, in effect, a circular buffer with a size of ten, which the newest sample is compared against to determine if there has been a hit. This is set up for each input.
- Once a hit has been determined for a certain input, the Arduino continually polls that input to determine a maximum value for a specific amount of time.
- The maximum value is mapped within the MIDI specification then sent over serial, along with whatever note number that input is assigned and the NOTE_ON header.
The following are required per drum:
- 3D-printed model
- Strain guages (2) with lead wires
- LM358 (1 per two inputs) and 0.1uF capacitor
- 1N4148, or any standard diode
- 10mH inductor, or a 10k resistor
- 100 resistor (2)
- 10k resistor (3)
- 100k resisitor (2)
- 0.1uF capacitor (2)
- 10uF capacitor The following are required regardless of drum count:
- Arduino Uno
- 1000uF capacitor

- Port program to the Arduino Pro Micro, which can be configured as a class-compliant USB MIDI device (or attempt to figure out V-USB or the micronucleus bootloader, which can be configured to do the same)
- Eliminate peak detector with further programming
- Go from half-bridge to quarter-bridge if possible
- Update code to be more flexible with drums count up to six
- Migrate from breadboard to PCB or perfboard to mitigate possible crosstalk