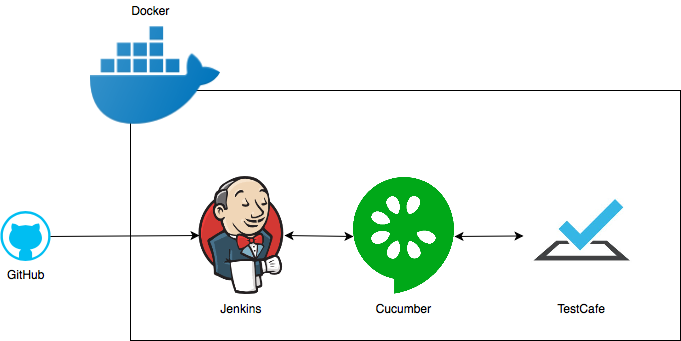


This project builds and runs e2e tests with TestCafe and Cucumber.js inside Jenkins pipeline
The project contains Docker files (for Jenkins master and slave), Jenkins configurations (plugins, jobs, setup), test code (js), feature files (gherkin), custom HTML report generator, many NPM scripts that make life easier (package.json)...
End-to-end testing is where you test your whole application from start to finish. It involves assuring that all the integrated pieces of an application function and work together as expected.
In this project we run e2e test upon Web Applications with "TestCafe" and "Cucumber.js".
TestCafe is a Node.js tool for automated e2e web testing. It is free and open source, easy to set up and it is working on all popular environments.
With TestCafe we can run tests on multiple browsers on multiple platforms, write stable tests in latest JS and TS versions and integrate our tests with CI pipelines (Jenkins).
- no web driver
- uses web proxy to run tests – URL rewrite
- automatic waiting for page loads
- run test on remote browsers including mobile native
- isolated testing – each time a browser is opened by TestCafe it behaves like a incognito window
- write test in the language you write you application – JS, TS
Cucumber.js is a JavaScript implementation of Cucumber and it is used for running automated tests written in plain language. We combine it with TestCafe, so we use Cucumber.js to automate the execution of tests written with TestCafe.
This project is pre-built here:
so you can take a look at the Pipeline without downloading or installing anything.
We run everything inside Docker so to be able to run the demo yourself you need to have Docker daemon running. If you don't have Docker installed you can get it here
Jenkins is built using the Jenkins LTS Docker Image. On top of that, we install Node and NPM so we can run JS helper scripts for parsing/updating data and generating HTML reports. More configuration is done using Groovy; we copy various configurations, install plugins, we set the default user for accessing Jenkins GUI and we also get rid of stuff like the CSP rules that block us from viewing our HTML reports.
In this project, Jenkins is not triggered by a Git Hook, but instead Jenkins checks for new commits on GitHub. Not necessary the best practice because we use resources on our master node every couple of minutes to scan for changes on GitHub but this way the project is made to run on each and every machine without the need to do any initial configuration.
Avoid running resource intensive stuff on your Jenkins master node, use slaves.
Jenkins has a default job configured that build this project, executed the e2e tests and produces HTML reports. You can add more job configurations here: src/config/jobs
After we start our preconfigured job manually or it gets triggered by a change in the code (Git) Jenkins will execute the Pipeline that's defined in the Jenkinsfile.
Jenkins will be setup up with all necessary plugins installed. You can update the list of plugins here: src/config/plugins.txt
You can also use this file to update your plugins. Just bump the version in the file and re-build the Docker Image.
To get to this point where Jenkins is set up and running the way we want it to run, we will simply install necessary npm modules
npm installWe are doing this locally on our workstation
and after that we will build the Docker images:
npm run buildContainersWith the previous command we actually run 2 npm scripts:
npm run buildBrowsers && npm run buildJenkinsThis command will build 2 containers. One being Jenkins and the other one being the container on which the test are actually executed (the Slave).
As you can see, many useful commands have been converted to npm scripts. Check them out in the package.json file
The "browsers" container also contains Node and NPM as well as 2 browsers, Chrome and Firefox. When the Jenkins Pipeline is triggered, the tests run in parallel in both browsers.
Details about the containers can be found in the Dockerfile:
Most of the code is well commented so you can use it as documentation.
npm run startJenkinsThis npm script will run the following command:
_pwd=\"$(pwd)\" && docker run -d -p 8080:8080 -p 50000:50000 --env JAVA_OPTS=\"-Dorg.jenkinsci.plugins.durabletask.BourneShellScript.HEARTBEAT_CHECK_INTERVAL=30\" -v $_pwd/jenkins_home:/var/jenkins_home -v /var/run/docker.sock:/var/run/docker.sock jenkinstescafe:latestFirst we store the current working folder so we can use that value for setting the correct path for the jenkins_home parameter. The tests take a long time to execute and Jenkins by default will think that the Cucumber process is hanging and will break the build. In our case we set the heart beat check option to a custom value to bypass the problem.
We also pass our local Docker socket to the container so the container it self can spawn new containers on the host machine. Since the Jenkins slave is also a Docker container the setup comes in quite handy.
If you want to stop the Jenkins container execute the following npm script:
npm run stopJenkinswill call up the following command:
docker stop $(docker ps -qa --filter ancestor=jenkinstescafe)and stop all running instances of the Jenkins container.
Access it on http://localhost:8080
with default username admin and password admin.
You can change the default admin password later through the Jenkins admin console or in the docker/jenkins/bin/security.groovy config file. Don't forget to build the Docker Image after you make a change.
Click on the testcafe-demo pipeline and start the build by clicking Build Now
npm installnpm run e2eHow to run the tests and slow down mouse and keyboard interaction so you can see what happens when the tests are executed?
npm run testSlow
