Aba makes it easier to install an OpenShift cluster - "Cluster Zero" - into a fully or partially disconnected environment, either onto vSphere, ESXi or bare-metal. Because Aba uses the Agent-based installer there is no need to configure a load balancer, a bootstrap node or even require DHCP.
Aba automatically completes the following:
- Makes use of any existing container registry or installs the Quay mirror registry appliance for you.
- Uses the registry's credentials and other inputs to generate the Agent-based configuration files.
- Triggers the generation of the agent-based boot ISO.
- Optionally creates the required VMs in ESXi or vSphere.
- Monitors the installation progress.
- Allows for adding more images (e.g. Operators) as a day 1 or 2 operation.
- Configures the OperatorHub integration with the internal container registry.
- Executes several workarounds for some typical issues with disconnected environments.
- Enables the integration with vSphere as a day 2 operation (day 1 coming with OCP v4.15+)
Use aba if you want to get OpenShift up and running quickly in an air-gapped environment without having to study the documentation in detail.
For the very impatient: clone this repo onto a connected RHEL VM, install and run 'make'. You will be guided through the process.
For those who are less impatient...
git clone https://github.com/sjbylo/aba.git
cd aba
./aba
- Clone the repo, install 'make' and configure high-level settings, e.g. target OCP version, your domain name, machine network CIDR etc.
- Decide if you want to use VMware/ESXi or not.
make install
- Configure and connect to your existing container registry or install a fresh quay appliance registry.
make sync
- Copy the required images directly to the mirror registry (for partially disconnected environments).
- Fully disconnected (air-gapped) environments are also supported with 'make save' (see below).
make sno
- Create a directory 'sno'. Create the Agent-based config files, generate the Agent-based iso file, create and boot the VMs.
- Install Single Node OpenShift. Others are 'make compact', 'make standard' or 'make cluster name=mycluster'
cd sno
make
- Monitor the installation progress.
make help
- See what other helper commands are available.
Read more for all the details.
The usual things you need to install OpenShift using the Agent-based installer.
- DNS
- with A records for OpenShift API, Ingress and the internal mirror registry.
- NTP
- OpenShift requires that NTP be available. Installation is possible without an NTP server. However, asynchronous server clocks will cause errors, which NTP server prevents.
- Private subnet (optional)
- One or two Bastion hosts
- Disconnected mode: A RHEL VM with connectivity to both the external (internet facing) and the internal networks.
- Fully disconnected mode (air-gapped): A RHEL VM in the private network and another RHEL VM (or a Fedora/RHEL laptop) in the internet facing network.
- A user account with sudo configured (i.e. with root access).
- 30 GB or more of disk space for the base OCP platform. Much more space is required if Operators will be installed (400+ GB).
- Internet access from your connected bastion (or laptop) to download the container images, CLI tools and RPMs.
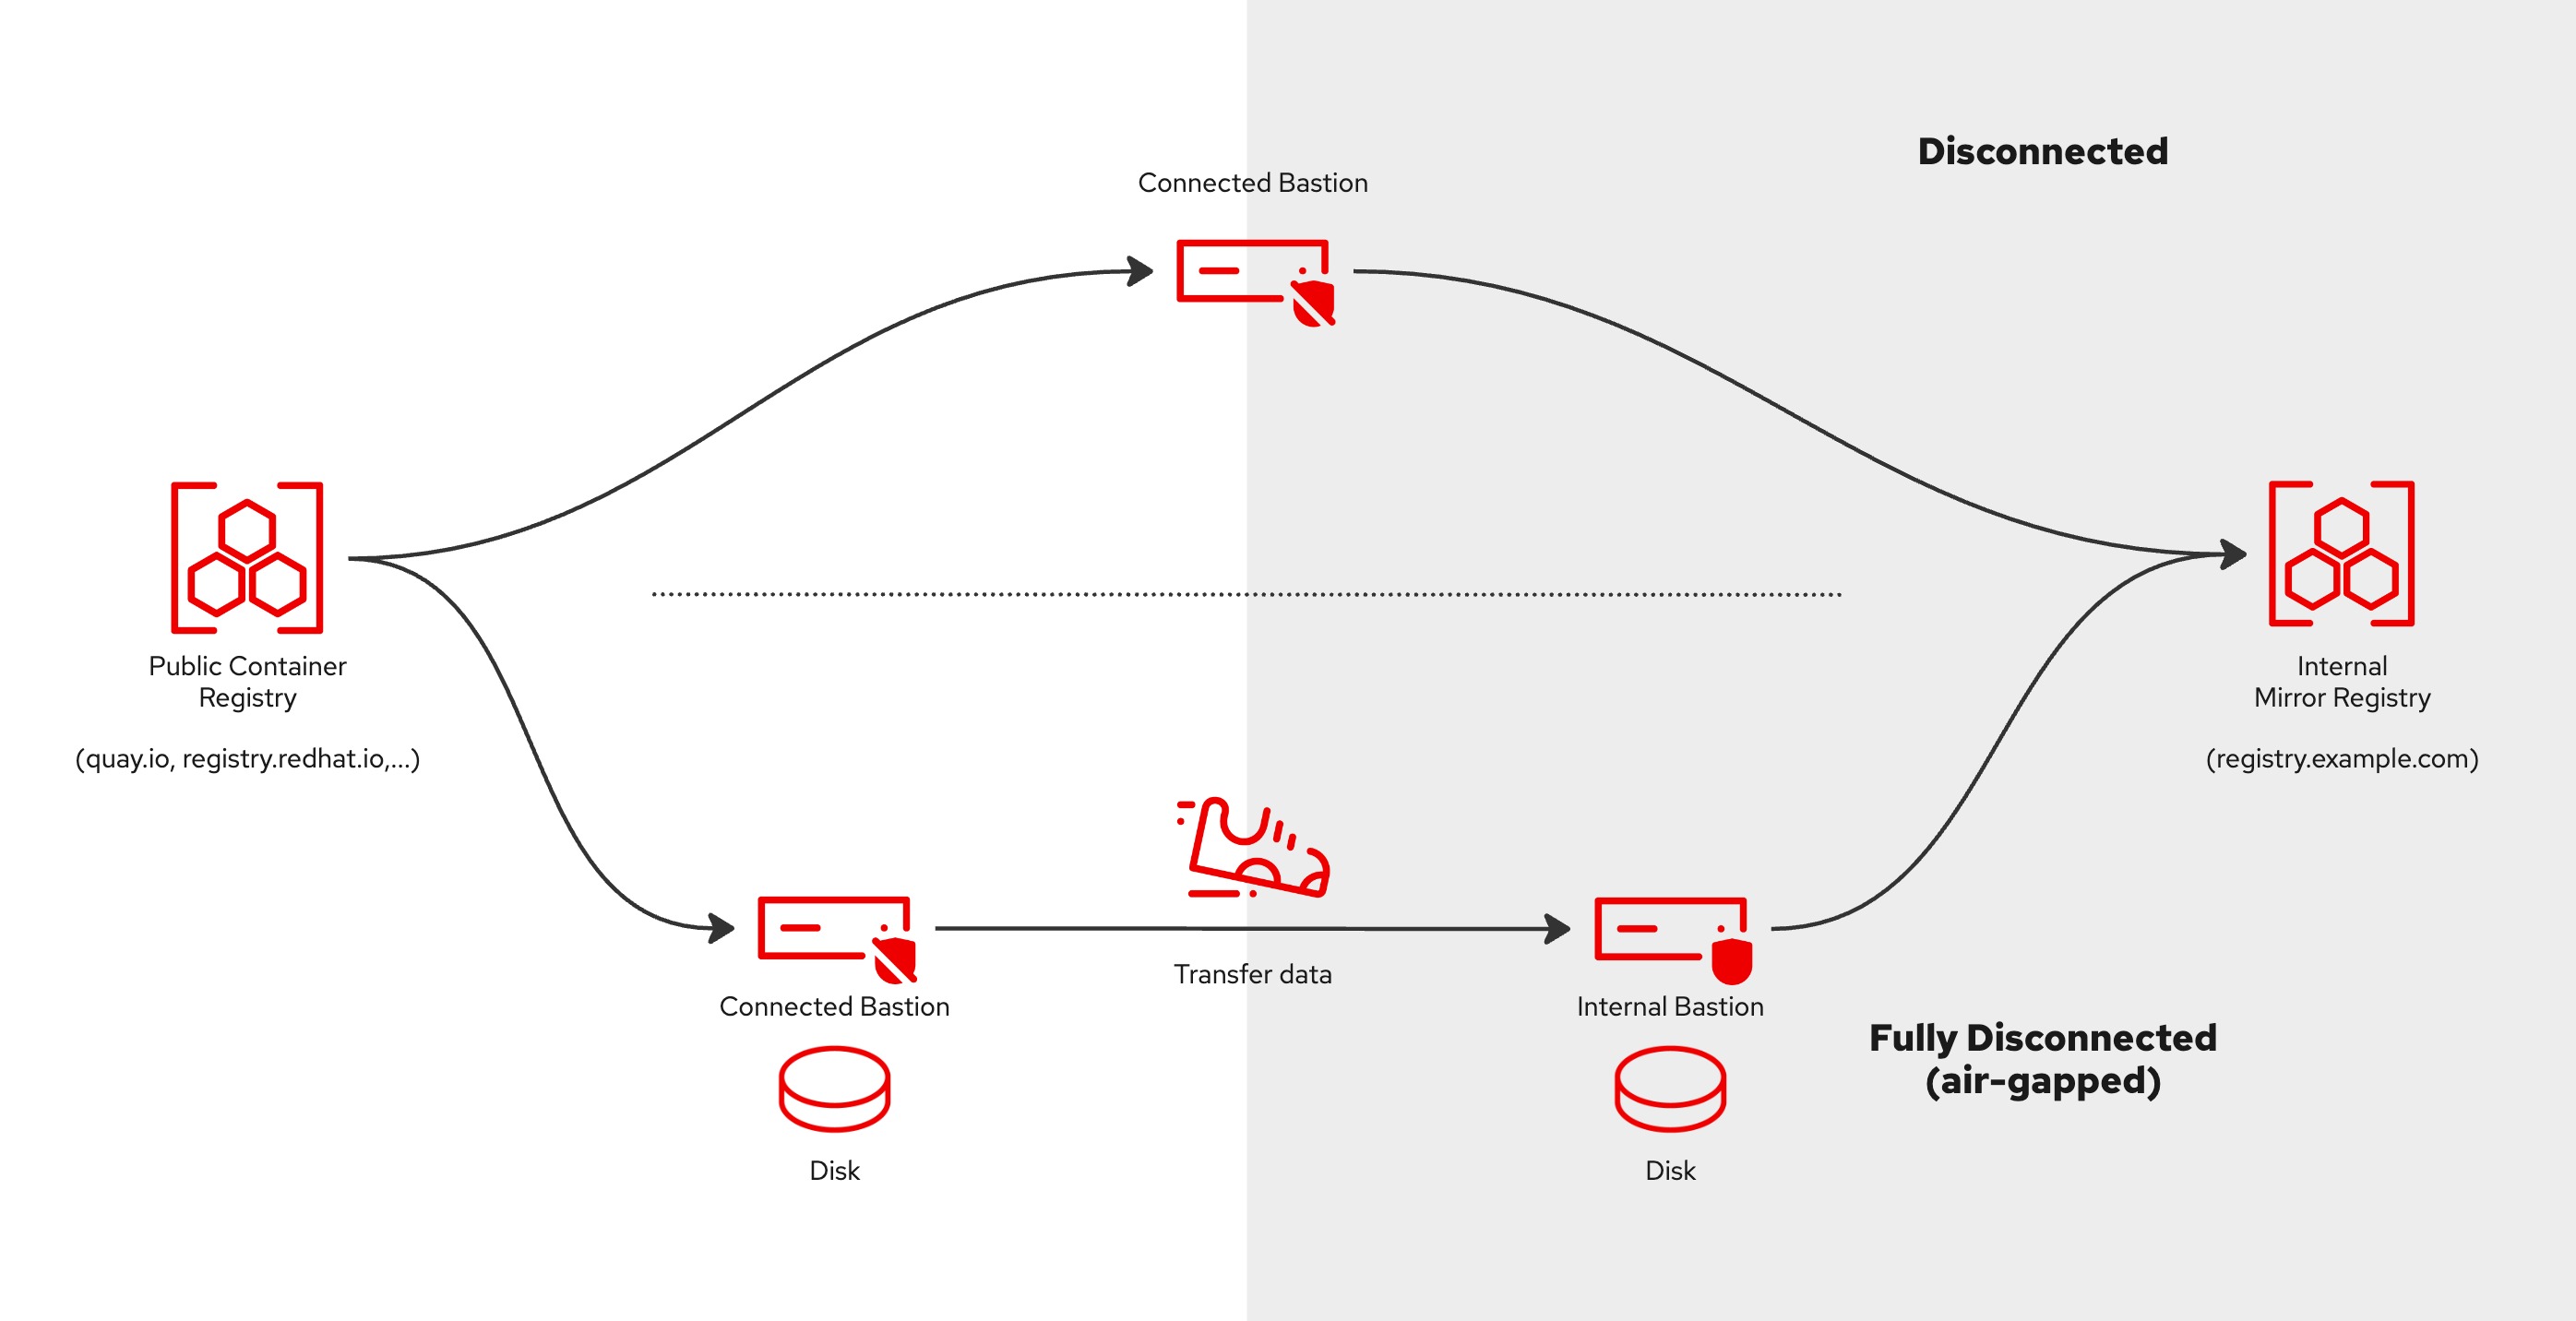
- A "partially disconnected environment" is supported. This means the bastion needs to have (temporary) Internet access to download the images and then it needs access to the private subnet to install OpenShift. See 'Disconnected mode' below.
- Fully air-gapped or "fully disconnected environment" is also supported. For this, two bastions (connected & internal) are required . See 'Fully disconnected mode' below.
- Platform (optional)
- vCenter or ESXi API access.
- Ensure enough privileges to vCenter. If you 'admin' privileges cannot be provided, see the vCenter account privileges documentation for more.
- Bare-metal
- Note that bare-metal nodes can be booted manually using the generated ISO. Mac addresses can be set in the 'install-config.yaml' file after running 'make install-config.yaml'.
- vCenter or ESXi API access.
- Bastion
- First, install a bastion with a fresh version of RHEL. Fedora can also be used except Quay mirror fails to install on it.
- a 'minimal install' of RHEL 9.3, RHEL 8.9 and Fedora 39 have been tested, other recent versions of RHEL/Fedora should work too.
- Note that on Fedora 39, the mirror registry failed to install due to an unexpected keyword argument 'cert_file' error, but remote installs of the Quay appliance (from Fedora) worked ok.
- Note that only RHEL 9 is supported for OCP v4.15+ as the latest version of oc-mirror only works on RHEL 9.
- Git repo
- Clone or copy this git repository (https://github.com/sjbylo/aba.git) to your home directory on the connected bastion (e.g. on a Fedora/RHEL laptop).
- Ensure sudo is configured. Password-less sudo is preferable.
- Pull Secret
- To install OpenShift, a secret is needed to allow access to and pull images from, Red Hat's registry. Copy your pull secret in JSON format to the file '~/.pull-secret.json' (in your $HOME directory).
- A pull secret can be downloaded from https://console.redhat.com/openshift/install/pull-secret
- It's a good idea to make the file user read-only, e.g.
chmod 600 ~/.pull-secret.json.
- To install OpenShift, a secret is needed to allow access to and pull images from, Red Hat's registry. Copy your pull secret in JSON format to the file '~/.pull-secret.json' (in your $HOME directory).
- DNS
- Create the required DNS A records, for example (use your domain!):
- OpenShift API: api.ocp1.example.com
- points to a free IP in your private subnet.
- OpenShift Ingress: *.apps.ocp1.example.com
- points to a free IP in your private subnet.
- Note: For Single Node OpenShift (SNO), the above records should point to a single IP address, used for the single OpenShift node.
- Quay mirror registry: registry.example.com
- points to the IP address of the registry. This can be either the one you want installed or your existing registry.
- OpenShift API: api.ocp1.example.com
- Create the required DNS A records, for example (use your domain!):
- Registry
- If you are using an existing registry:
- Copy your existing registry's credential files (pull secret and root CA) into the 'mirror/regcreds' directory, e.g.:
- mirror/regcreds/pull-secret-mirror.json (pull secret file for your registry)
- mirror/regcreds/rootCA.pem (root CA file for your registry)
- Later, when the images are pushed to the registry, these files will be used.
- Copy your existing registry's credential files (pull secret and root CA) into the 'mirror/regcreds' directory, e.g.:
- If you are using an existing registry:
- Finally
- run the ./aba command to initialize the installation process (see 'Getting Started' below).
To set the version of OpenShift to install and to download identical versions of oc, oc-mirror and openshift-install, run:
./aba
Note that this command will create the 'aba.conf' file which contains some values that you will want to change, e.g. your domain name, your network address etc.
Now, continue with either 'Disconnected mode' or 'Fully disconnected (air-gapped) mode' below.
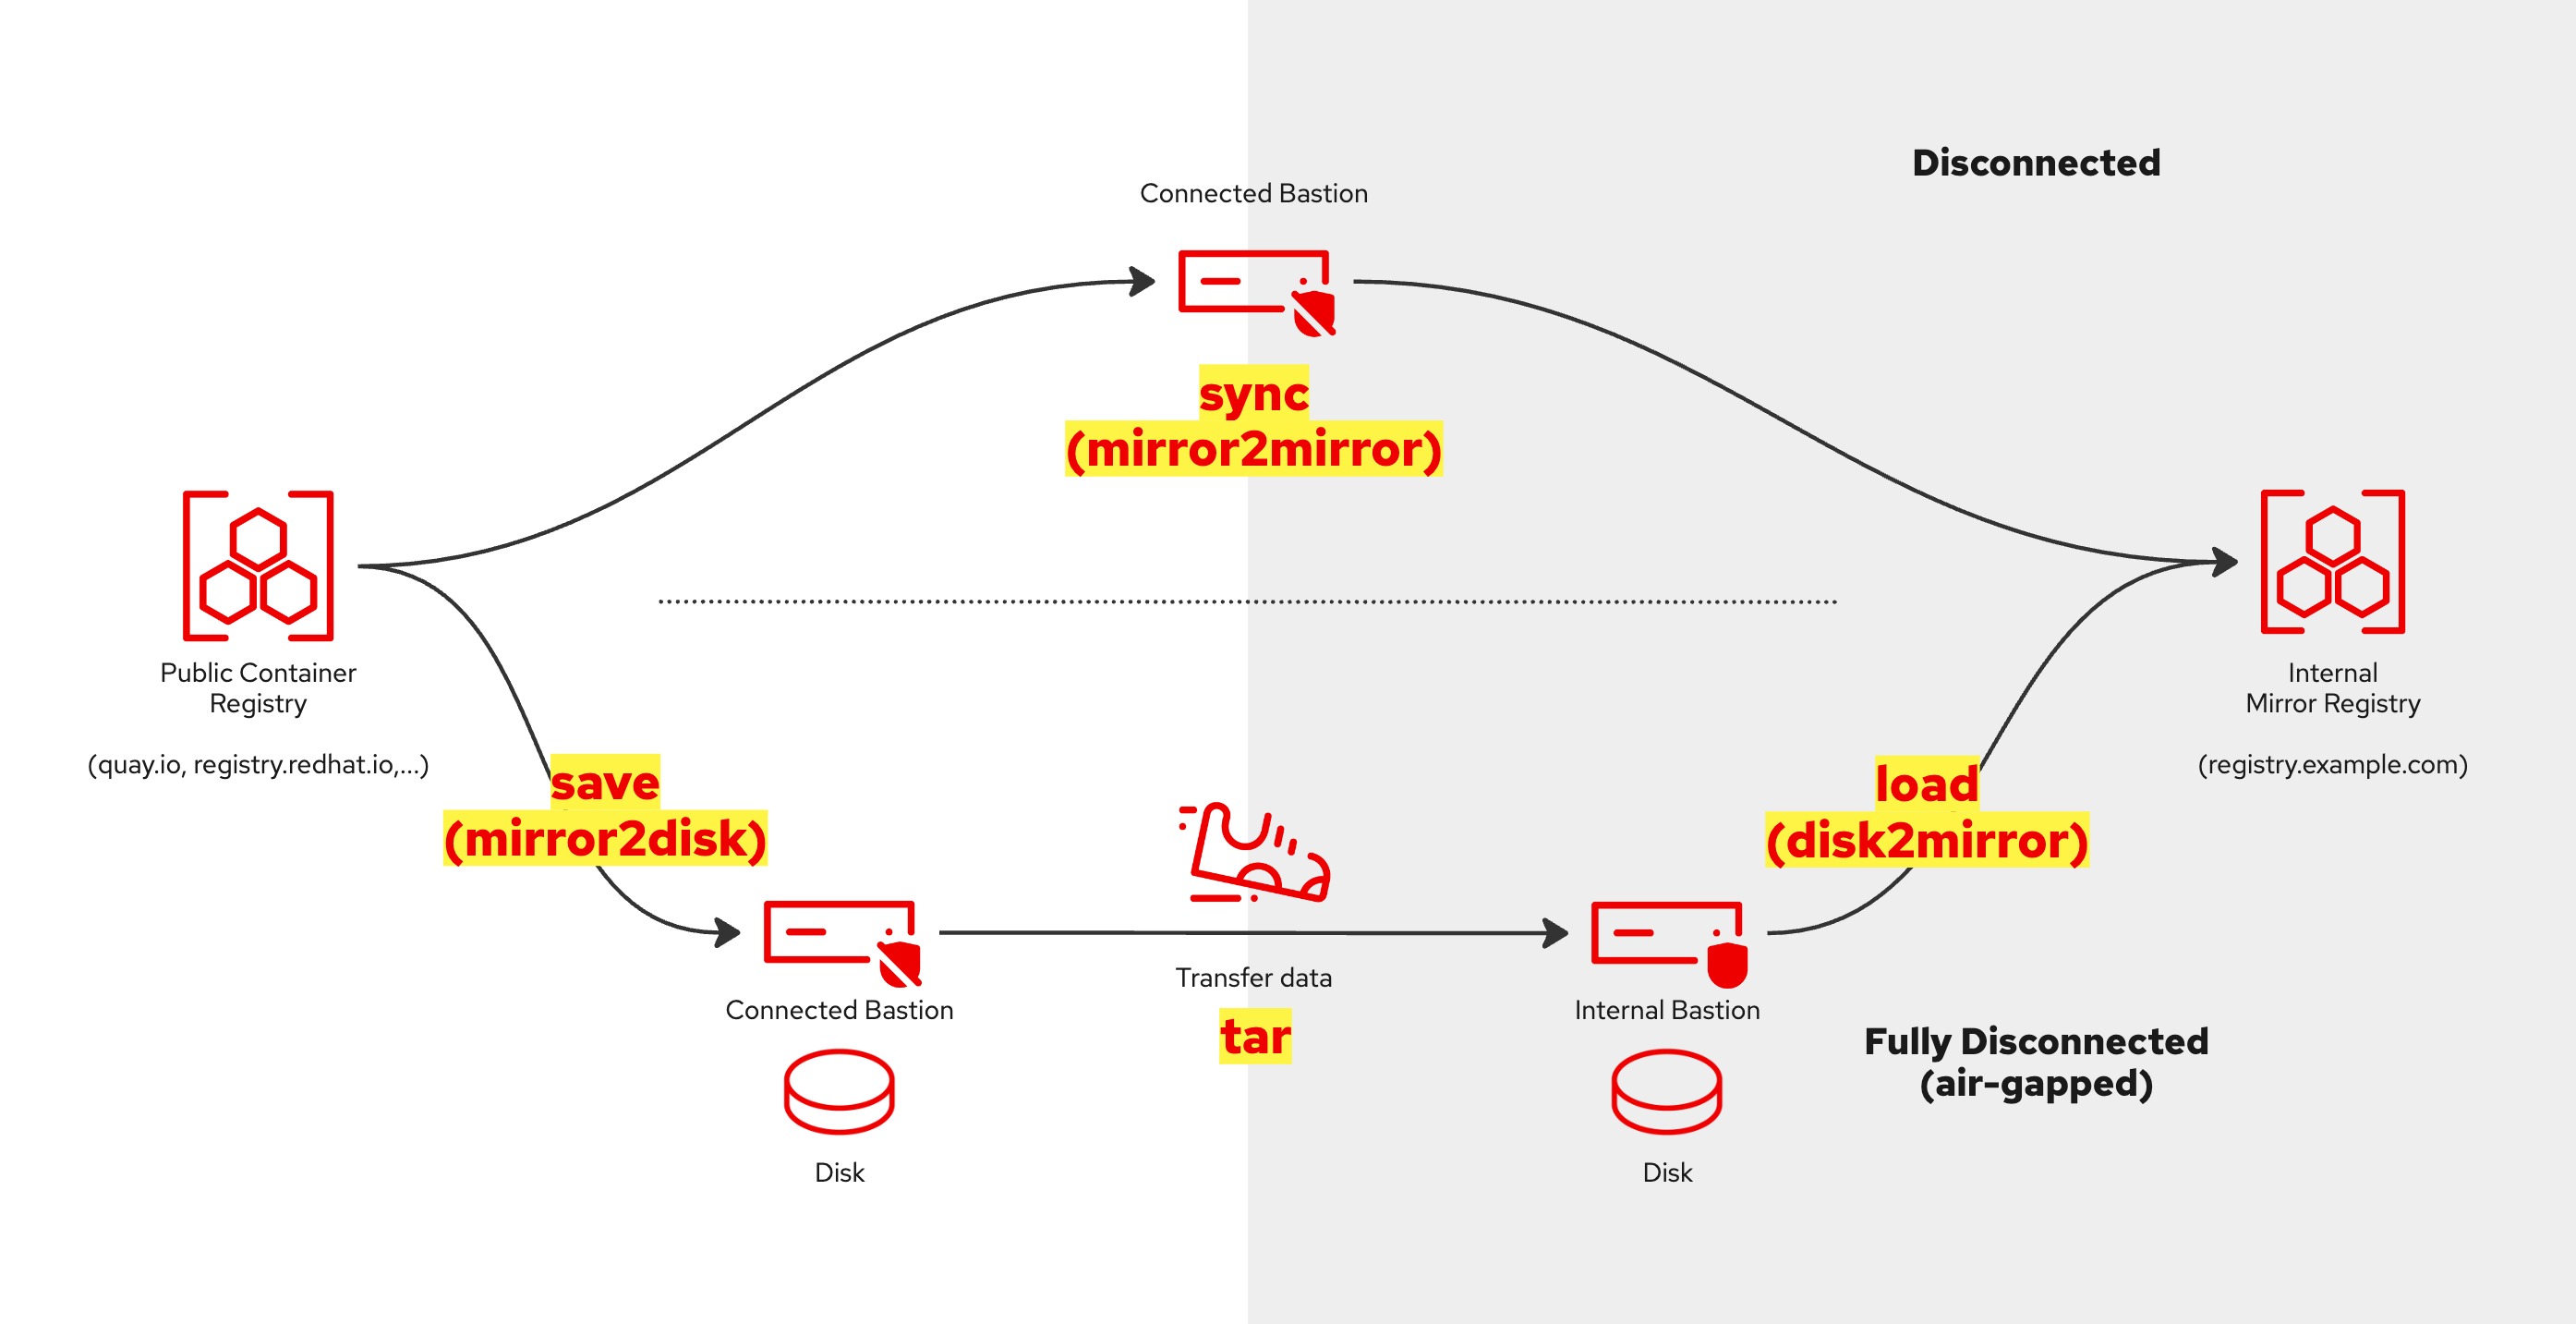
In this mode, the connected bastion has access to both the Internet and the private subnet (but not necessarily at the same time).
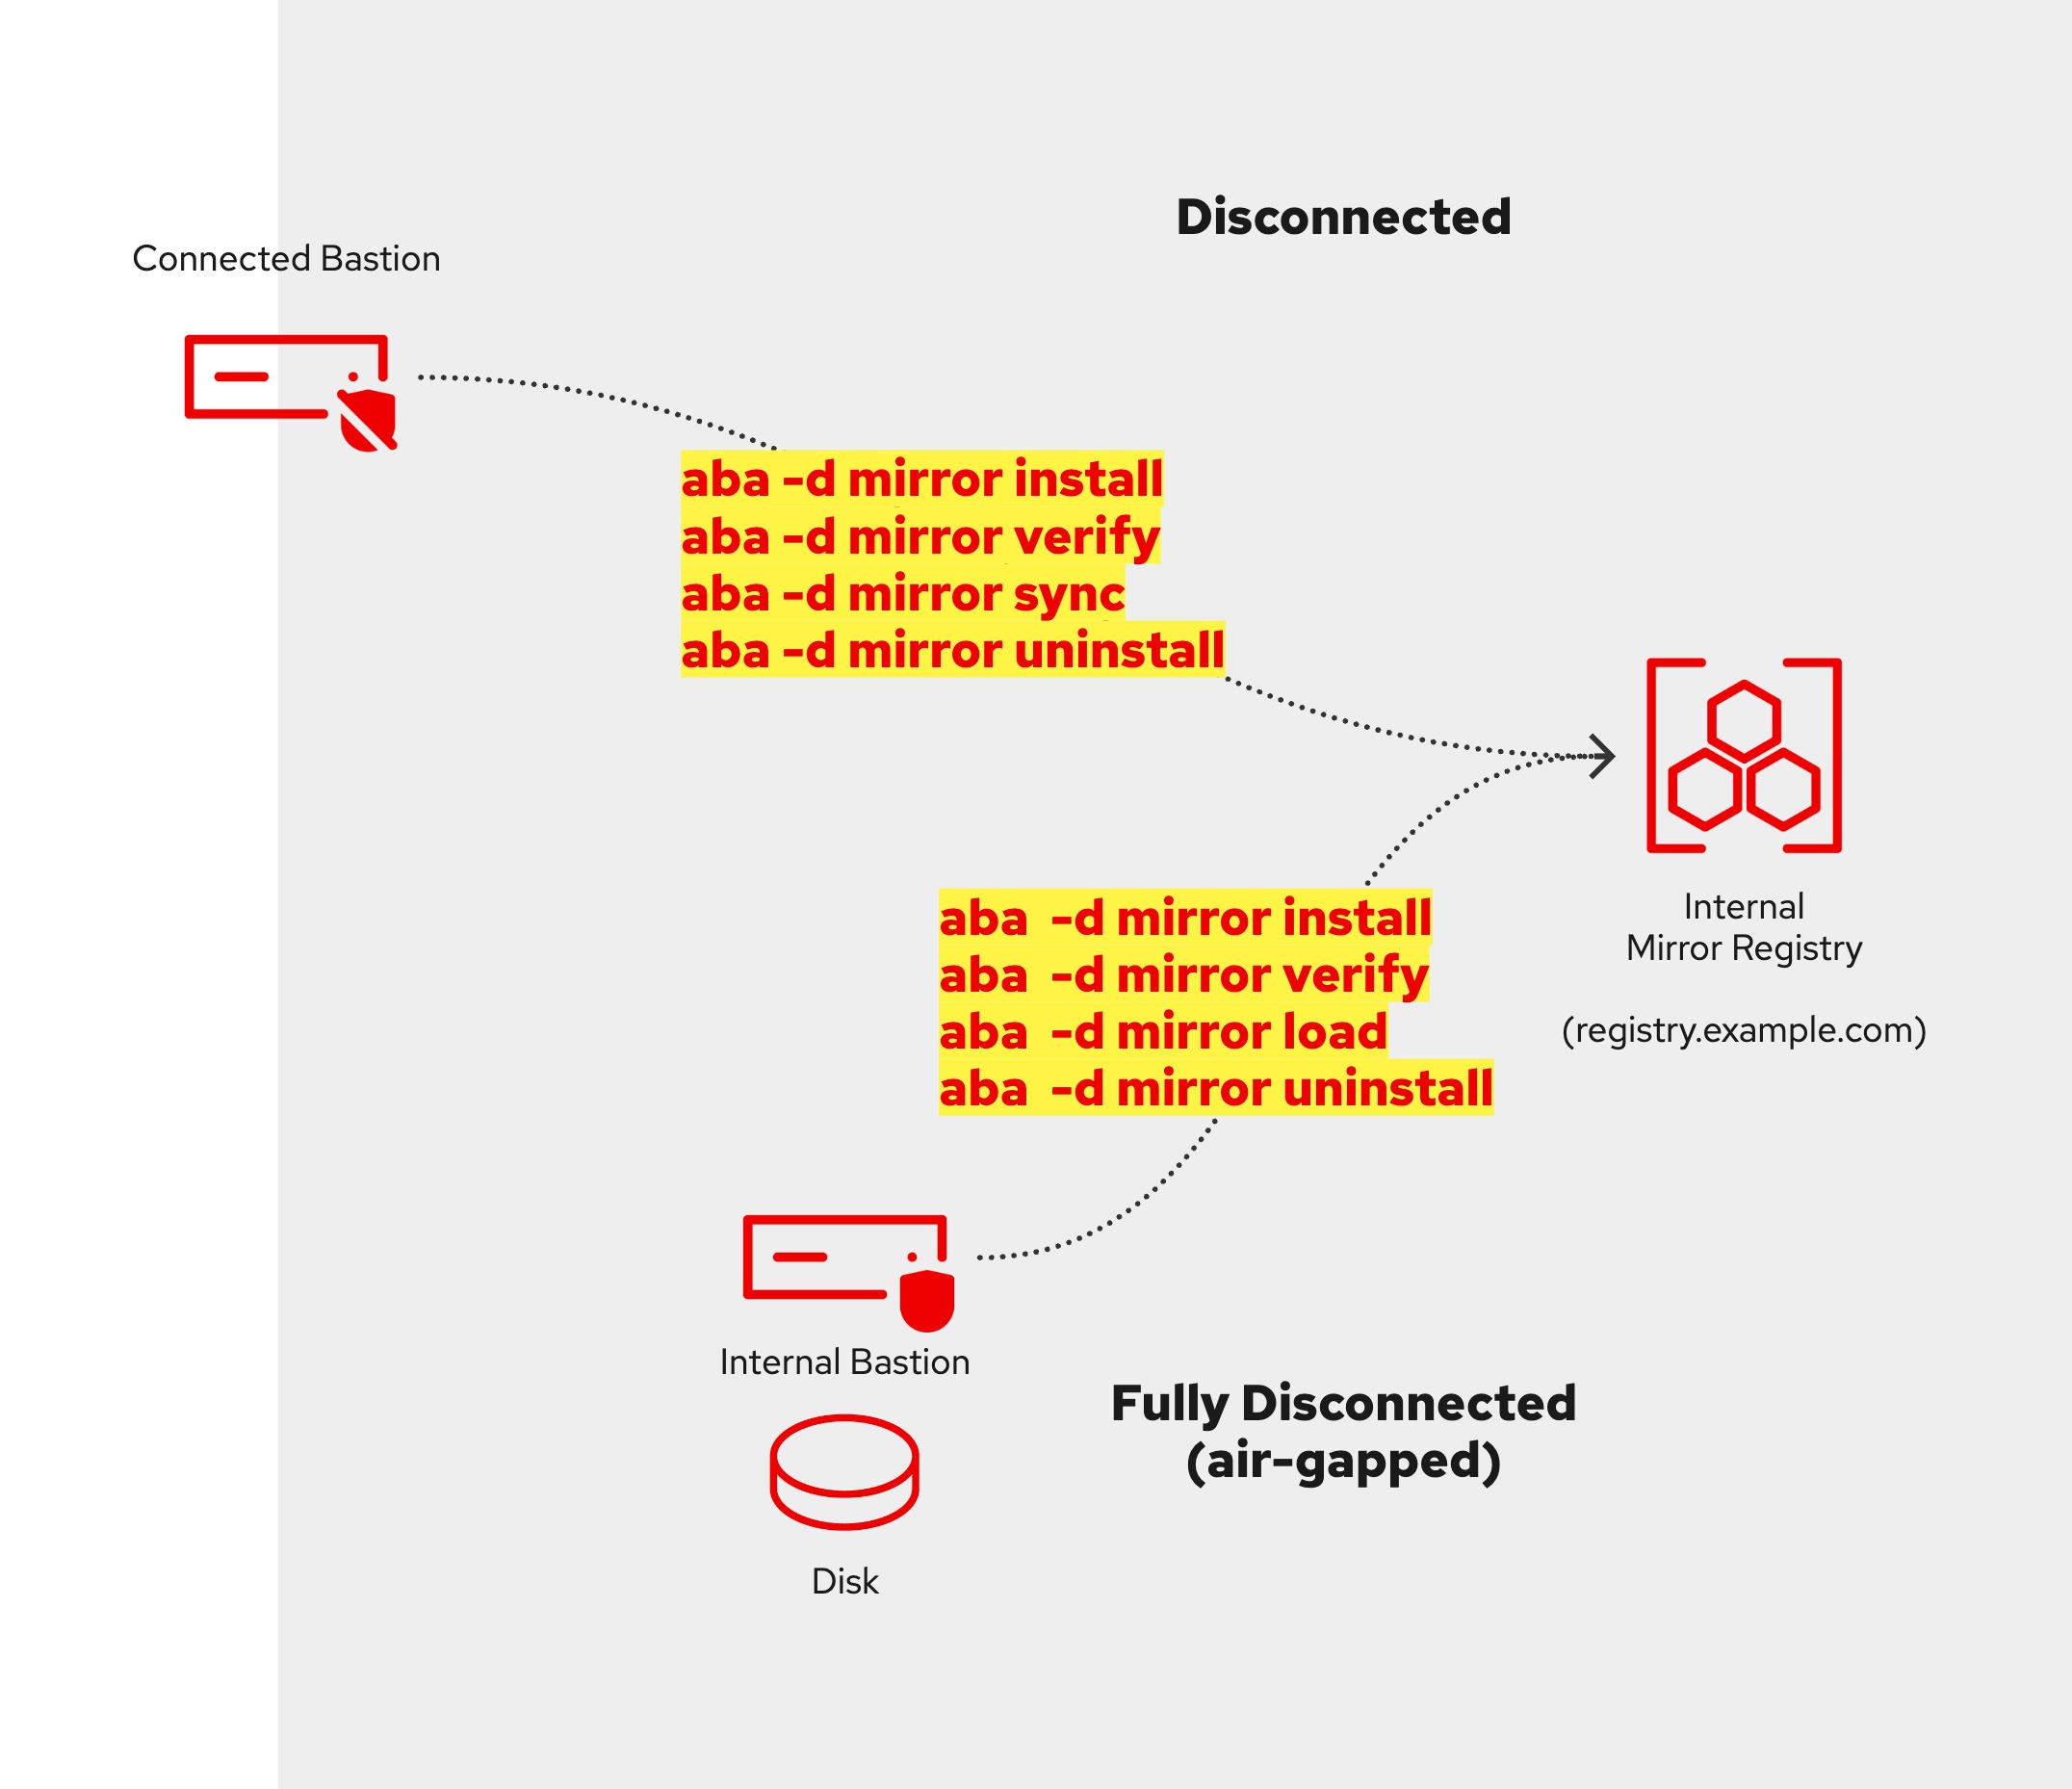
make sync
This command will:
- for an existing registry, check the connection is available and working (be sure to set up your registry credentials first! See above for more).
- or, installs Quay registry on the internal bastion (or remote internal bastion) and copies the generated pull secret and certificate into the 'mirror/regcreds' directory for later use.
- pull images from the Internet and store them in the registry.
Now continue with "Install OpenShift" below.
Note that the above 'disconnected mode' can be repeated, for example to install Operators or to upgrade OpenShift, by updating the 'sync/imageset-sync.yaml' file and running 'make sync' again.
In this mode, your connected bastion has access to the Internet but no access to the private network. There is also an internal bastion in a private subnet.
make save
- This will pull the images from the Internet and save them to the local directory "mirror/save". Make sure there is enough disk space (30+ GB or much more for Operators)!
Then, using 'make inc' (incremental backup), copy the whole aba/ repo (including images, CLIs & RPMs) to your internal bastion (in your private network) via a portable storage device, e.g. a thumb drive.
Example:
# On the connected bastion:
# Mount your thumb drive and:

make inc                                          # Write tar archive to /tmp
or
make inc out=/dev/path/to/drive/aba.tgz           # Write archive 'aba.tgz' to the device mounted at /dev/path/to/drive
or
make inc out=- | ssh user@host "cat > aba.tgz"    # Archive and write to internal host (if possible).

# Copy the file 'aba.tgz' to your internal bastion via your portable storage device.

# Then, on the internal bastion run:
cd
tar xvf aba.tgz                                   # Extract the tar file. Ensure file timestamps are kept the same as on the connected bastion.
cd aba
For such cases where it is not possible to write directly to a portable storage device, e.g. due to restrictions, an alternative command can be used.
Example:
make tarrepo out=/dev/path/to/drive/aba.tgz # Write archive 'aba.tgz' to the device mounted at /dev/path/to/drive, EXCEPT for the 'seq#' tar files under save/
- The 'seq#' tar files in the save/ directory and the repo tarball 'aba.tgz' can be copied separately to a non-portable storage device, e.g. S3 or other.
Load or download the tar files from storage to the internal mirror registry.
sudo dnf install make -y
make load
- This will (if required) install Quay (from the files and configuration that were archived & copied above) and then load the images into Quay.
- Note that the internal bastion will need to install RPMs from a suitable repository (for testing it's possible to configure 'dnf' to use a proxy).
- If rpms are not readily available in your private network, the command 'make rpms' can help by downloading the needed rpms, which can then be copied to the internal bastion and installed with 'dnf localinstall rpms/*.rpm'. Note this will only work if your external and internal bastions are running the same version of RHEL.
Now continue with "Install OpenShift" below.
Note that the above 'air-gapped workflow' can be repeated in the exact same way, for example to install Operators or to upgrade OpenShift.
For example, by:
- editing the 'save/imageset-save.yaml' file on the connected bastion to add more images or to fetch the latest images
- running 'make save'
- running 'make inc' to create an incremental tar archive (see above)
- unpacking the tar archive on the internal bastion
- running 'make load' to load the images into the internal registry.
Note that generated 'image sets' are sequential and must be pushed to the target mirror registry in order. You can derive the sequence number from the file name of the generated image set archive file in the save/ directory.
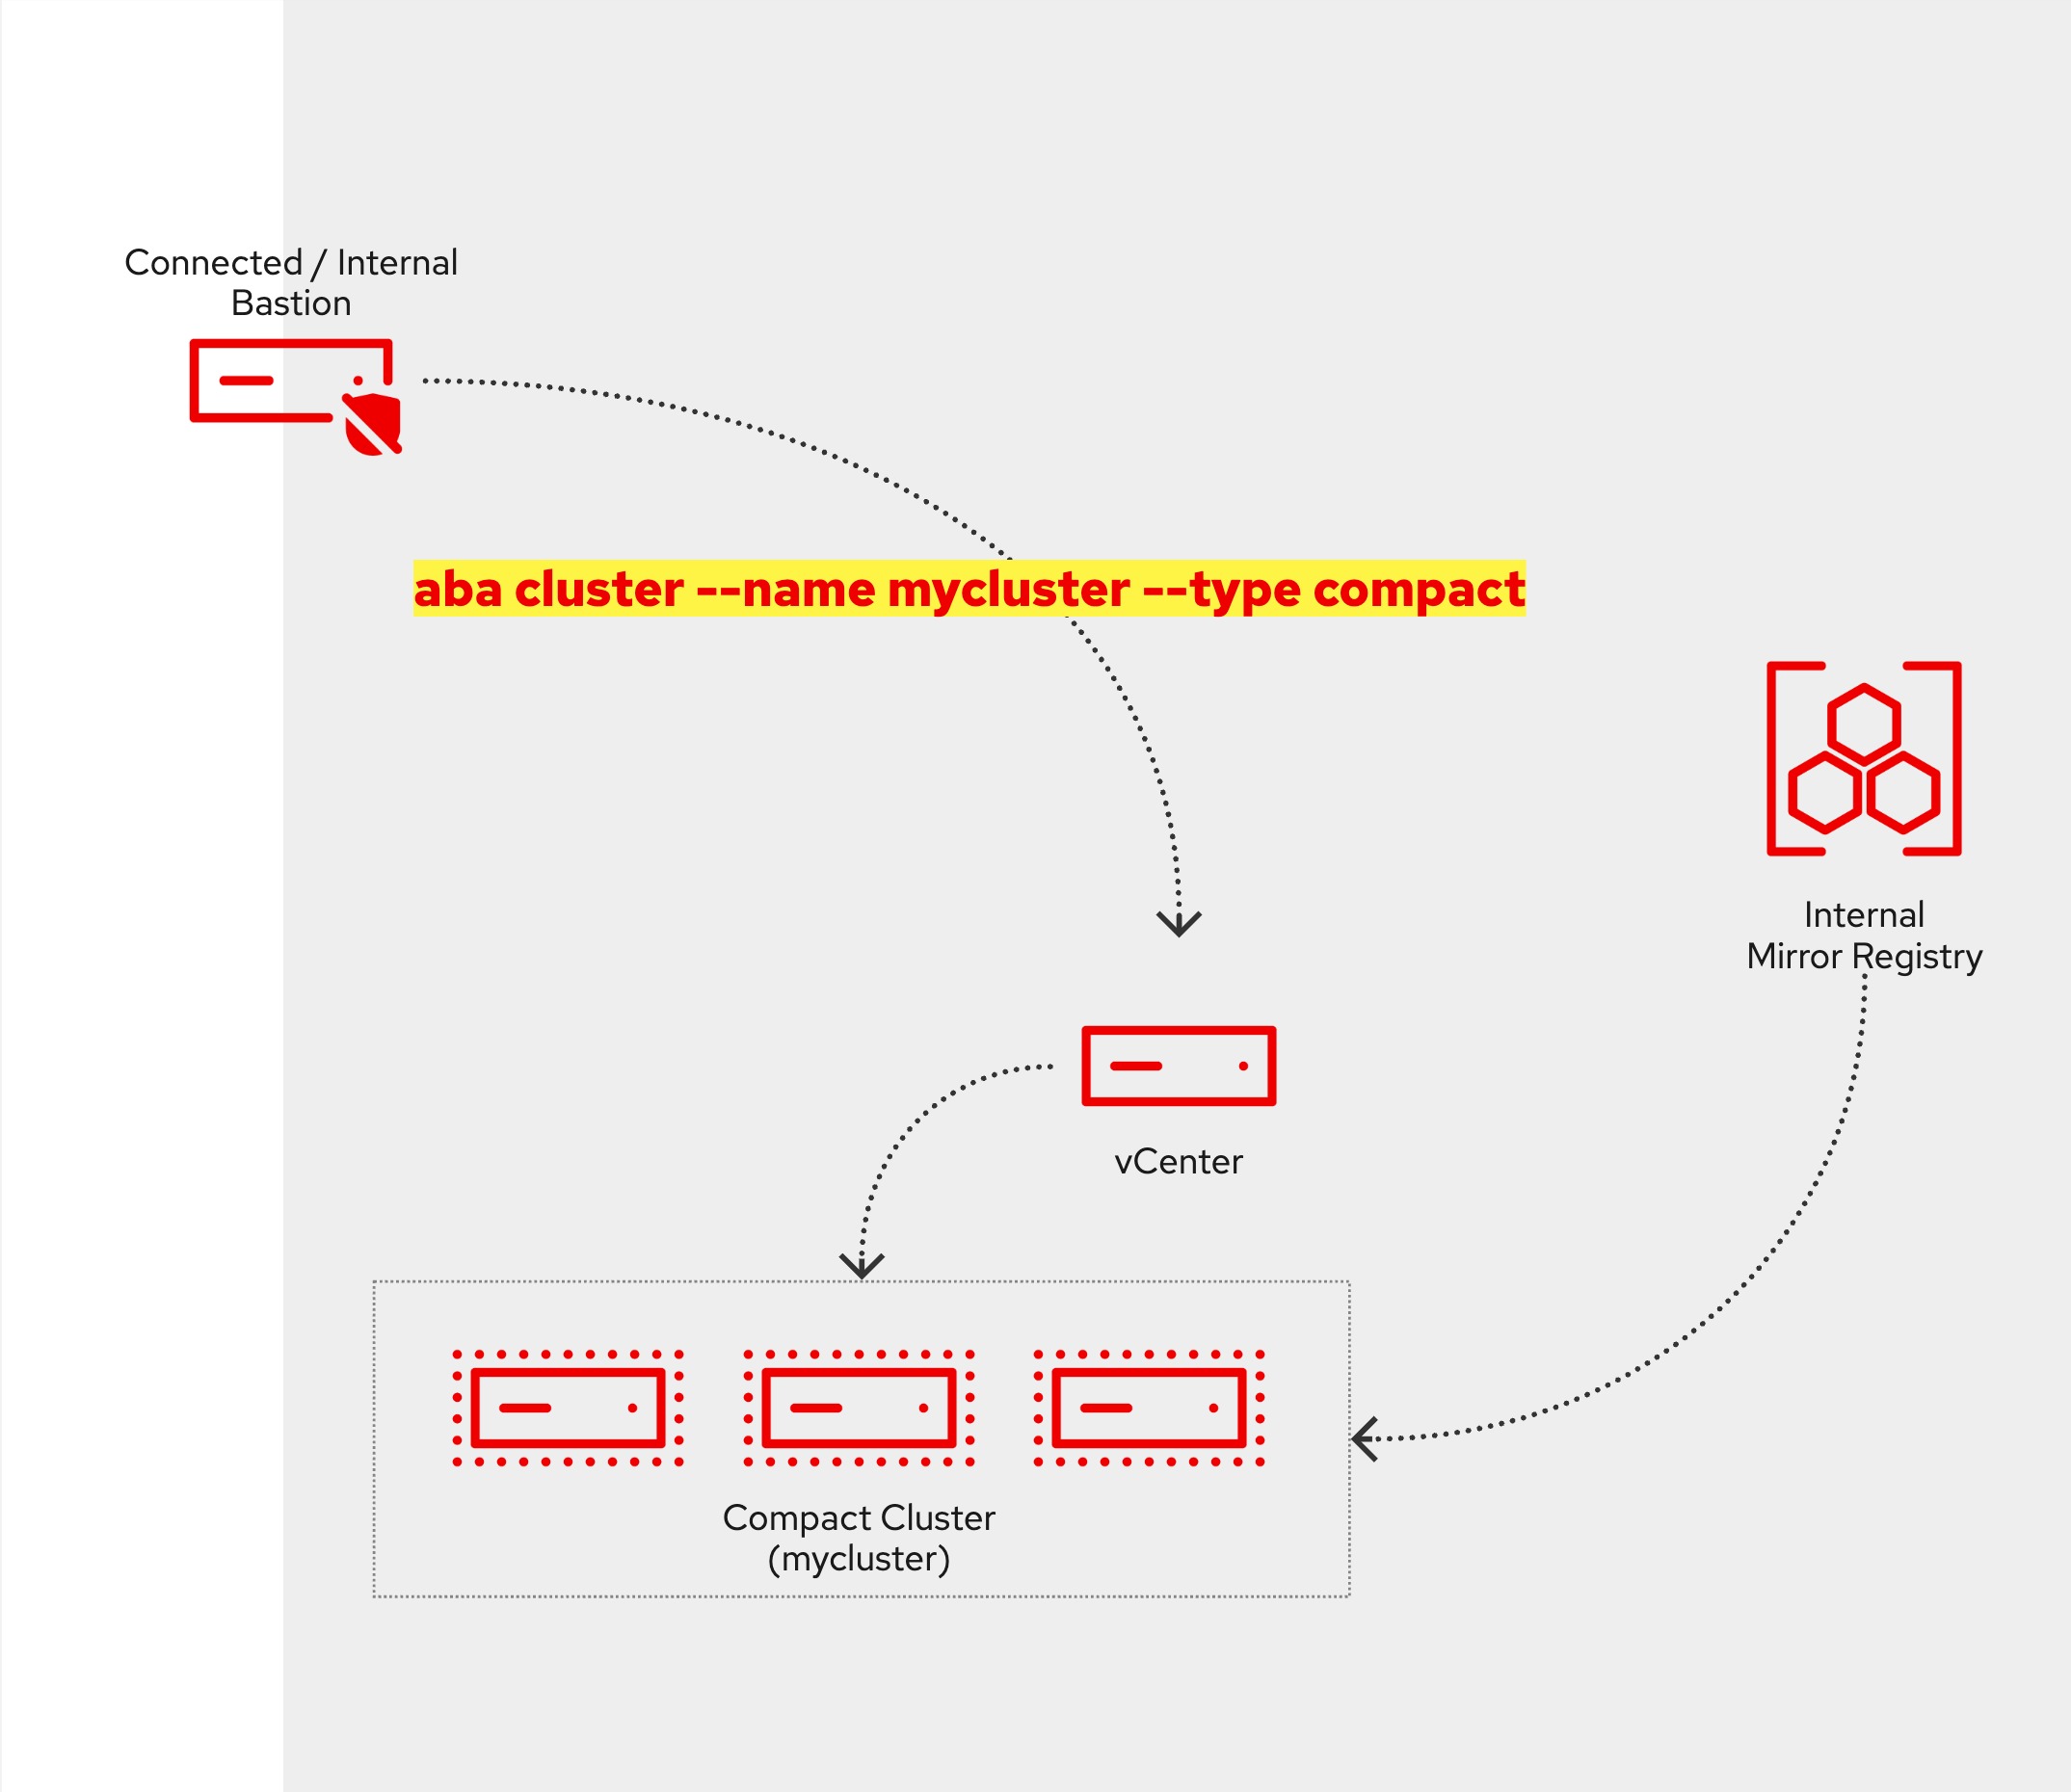
make sno
- This will create a directory 'sno' and then install SNO OpenShift using the Agent-based installer. If you are using VMware it will create the VMs for you.
- Be sure to go through all the values in 'aba/vmware.conf' and 'sno/cluster.conf'.
- Be sure to set up your DNS entries in advance. See above on Prerequisites.
- Aba will show you the installation progress. You can also run 'make ssh' to log into the rendezvous server to troubleshoot. If there are any issues - e.g. incorrect DNS records - fix them and try again. All commands are idempotent.
make compact    # for a 3 node cluster topology
make standard   # for a 3+2 topology
- Run this to create a compact cluster (works in a similar way to the above).
make ocp name=mycluster
- This command will create a directory 'mycluster', copy the Makefile into it and then run 'make'.
If needed, the following command can be used to monitor the progress of the Agent-based installer. For example:
cd <cluster dir>   # e.g. cd sno
make mon
Get help from a Makefile using 'make help'.
After OpenShift has been installed you will see the following:
INFO Install complete!
INFO To access the cluster as the system:admin user when using 'oc', run
INFO     export KUBECONFIG=/home/steve/aba/compact/iso-agent-based/auth/kubeconfig
INFO Access the OpenShift web-console here: https://console-openshift-console.apps.compact.example.com
INFO Login to the console with user: "kubeadmin", and password: "XXYZZ-XXYZZ-XXYZZ-XXYZZ"
You can get access to the cluster using the command:
. <(make shell)
oc whoami
You can run commands against the cluster, e.g. to show the installation progress:
watch make cmd cmd="get co"
If you only want to create the agent-based iso file, e.g. to boot bare-metal nodes, use:
cd sno
# then manually edit the 'agent-config.yaml' file to set the appropriate Mac addresses matching your bare-metal nodes
make iso
# boot the bare-metal node(s) with the generated ISO file.
If OpenShift fails to install, see the Troubleshooting readme.
Other examples of commands (make targets), when working with VMware/ESXi:
cd mycluster # change to the directory with the agent-based install files, using 'mycluster' as an example.
| Target | Description |
|---|---|
| make ls | Show list of VMs and their state. |
| make start | Power on all VMs |
| make stop | Gracefully shut down all VMs |
| make powerdown | Power down all VMs immediatelly |
| make kill | Same as 'powerdown' |
| make delete | Delete all VMs |
| make create | Create all VMs |
| make refresh | Delete & re-create the VMs causing the cluster to be re-installed. |
| make delete | Delete all the VMs |
| make login | Display the 'oc login' command for the cluster. Use: . <(make login) |
| make shell | Display the command to access the cluster using the kubeconfig file. Use: . <(make shell) |
| make help | Help is available in all Makefiles (in aba/Makefile aba/mirror/Makefile aba/cli/Makefile and aba//Makefile) |
-
Make it easier to install Operators (ImageContentSourcePolicy and CatalogSource) once OpenShift has been installed. -
Make it easier to integrate with vSphere, including storage. -
Configure htpasswd login, add users, disable kubeadmin.
-
Disable OperatorHub and configure the internal registry to serve images. -
Use PXE boot as alternative to ISO upload.
-
Make it easier to add the latest correct values into the imageset config file, i.e. fetch the values from the latest catalog.
| Config file | Description |
|---|---|
| aba/aba.conf | the 'global' config, used to set the target version of OpenShift, your domain name, private network address, DNS IP, choice of editor etc |
| aba/mirror/mirror.conf | describes your private/internal mirror registry (either existing or to-be-installed) |
aba/cluster-name/cluster.conf |
describes how to build an OpenShift cluster, e.g. number/size of master and worker nodes, ingress IPs etc |
| aba/vmware.conf | 'Govc' configuration for vCenter/ESXi access (optional) |
- Once a cluster config directory has been created (e.g. 'compact') and Agent-based configuration has been created, some changes can be made to the 'install-config.yaml' and 'agent-config.yaml' files if needed. 'make' can be run again to re-create the ISO and the VMs etc (if required). Aba should see the changes and try to preserve and use them. Simple changes to the files, e.g. IP/Mac address changes, default route changes, adding disk hints etc work fine.
The following script can be used to extract the cluster config from the agent-config yaml files. This script can be run to check that the correct information can be extracted to create the VMs.
Example:
cd sno
scripts/cluster-config.sh        # example execution to show the cluster configuration extracted from the Agend-based config files.
As an example, edit agent-config.yaml to include the following to direct agent-based installer to install RHCOS onto the 2nd disk, e.g. /dev/sdb:
    rootDeviceHints:
      deviceName: /dev/sdb
or, adding vSphere integration into 'install-config.yaml' (works from the OCP Console on day 2, with v4.14 and below)
platform:
  vsphere:
    apiVIP: "10.0.1.216"
    ingressVIP: "10.0.1.226"
Check 'cluster-config.sh' is able to parse all the data it needs to create the VMs:
scripts/cluster-config.sh # example execution to show the cluster configuration extracted from the Agend-based files.
Run make again to rebuild the agent-based ISO and refresh the VMs:
make
...
scripts/generate-image.sh
...
scripts/vmw-upload.sh
...
scripts/vmw-create.sh --start
...
scripts/monitor-install.sh
-
If you want to install workers with different CPU/MEM sizes (which can be used to install cluster infra sub-systems, e.g. Ceph and/or ES etc - infra nodes), change the VM resources (CPU/RAM) as needed after OpenShift is installed (if using VMs).
-
Govc is used to create and manage VMs on ESXi or vSphere.
Be sure to set the correct (govc) values to access vCenter in the vmware.conf file. Note that ESXi will also work.
Why 'make' was chosen to build Aba?
The UNIX/Linux command "make" is a utility for automating tasks based on rules specified in a Makefile. It enhances efficiency by managing dependencies, facilitating streamlined processes. Widely applied beyond software development, "make" proves versatile in system management, ensuring organized execution of diverse tasks through predefined rules!


