Create and configure a network in AWS.
This figure displays a sample layout created by this module.
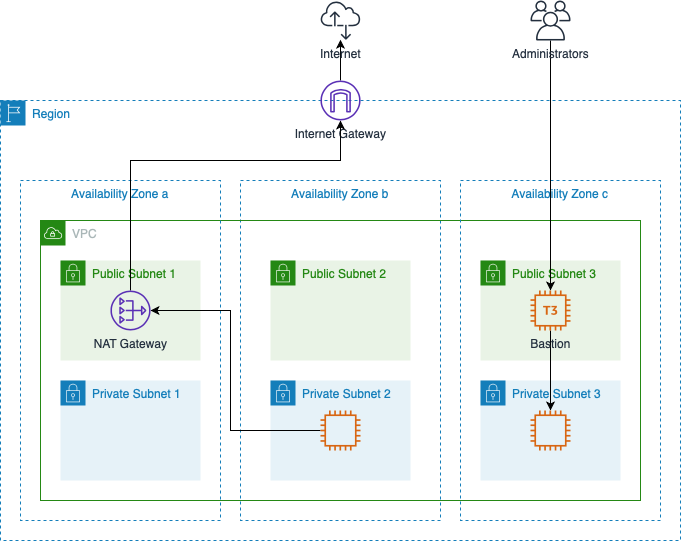
Given a VPC CIDR of 172.16.0.0/16 here is the address allocation:
| Item | CIDR |
|---|---|
| VPC | 172.16.0.0/16 |
| Public Subnet 1 | 172.16.0.0/20 |
| Public Subnet 2 | 172.16.16.0/20 |
| Public Subnet 3 | 172.16.32.0/20 |
| Unused | 172.16.48.0/20 |
| Private Subnet 1 | 172.16.64.0/18 |
| Private Subnet 2 | 172.16.128.0/18 |
| Private Subnet 3 | 172.16.192.0/18 |
Given a VPC CIDR and a list of availability zones, this module creates the following:
- VPC;
- public and private subnets;
- internet gateway;
- NAT gateways;
- route tables;
- security groups; and
- bastion hosts.
The following sub-sections describe these components in detail.
The module creates a VPC and public/private subnets in each availability zone. The subnets are sized using the VPC CIDR and the number of availability zones specified:
| Number of Availability Zones | Public Subnet Size (Fraction of VPC) | Private Subnet Size (Fraction of VPC) |
|---|---|---|
| 1 | 1/4 | 1/2 |
| 2,3 | 1/16 | 1/4 |
| 4,5,6 | 1/64 | 1/8 |
The module creates 1 internet gateway and one or more NAT gateways. The routing table for the public subnets directs outbound traffic to the internet gateway. The routing tables for each private subnet direct outbound traffic to a NAT gateway which in turn directs traffic to the internet gateway.
The default is to create one NAT gateway, but if a high level of traffic passes through the gateway data transfer costs can be excessive. To alleviate this more NAT gateways can be created to reduce traffic between availability zones. The rule of thumb is one NAT gateway costs the same as 1.6 TB/month of data transfer. For example, when traffic reaches 1.6 TB/month through the gateway then it pays to add a second one. When traffic reaches 3.2 TB/month then a third should be added. This continues until every availability zone has a NAT gateway, at which point the intra-region traffic for NAT gateways is zero.
The module also creates an elastic IP for every NAT gateway. Since the public
IP address is often shared with outside organizations to permit access from
your VPC, it would be extremely disruptive if the public IP address were to
accidentally be lost. For this reason the elastic IPs for NAT gateways cannot
be deleted through Terraform. If you must destroy the resources created by this
module, then you must first remove the elastic IPs from the Terraform state and
then run terraform destroy:
terraform state rm module.my-network.aws_eip.nat_gateways
terraform destroy -target module.my-network
You can then release the elastic IPs manually in the AWS console.
The module creates 2 security groups:
| Security Group | Description |
|---|---|
| bastion | Defines SSH access to the public bastion servers. Access should only be granted to gateways used by admins. |
| internal | Defines access within the VPC. This group should be updated when a VPC peering connection is established. The security group also contains an egress rule for all protocols and all addresses. |
To limit ssh access to specific users the only public servers with port 22 open
are the bastion servers. These servers are brought up with an AWS key pair.
To restrict access this key should not be shared. Instead users who are granted
access must submit a public ssh key. This key will allow access to a guest
user on the bastions. Doing this allows administrators to grant and revoke
access to users independently.
A shared ssh key should be used for internal access. With this type of
configuration, the ~/.ssh/config file can use the bastion as a proxy server.
For example suppose we define a VPC with the CIDR 172.16.0.0/16 and a bastion
host is created with a public IP address of 35.0.0.1. We want to use a personal
key file my-key.pem and a shared internal key of shared-key.pem. Finally,
assume all servers use Amazon Linux (which means the ssh user is ec2-user).
The following ssh config blocks would define proxy access:
HostName bastion
    Host 35.0.0.1
    User guest
    IdentityFile ~/.ssh/my-key.pem

HostName 172.16.*
    User ec2-user
    IdentityFile ~/.ssh/shared-key.pem
    ProxyCommand ssh -q bastion -W %h:%p
With this set up you can ssh directly to any internal server with a single command. For example if a web server had a private IP of 172.16.0.6, then you would simply enter:
ssh 172.16.0.6
This transparently authenticates you at the bastion and then tunnels through to the web server. There are many other tricks you can play with the bastion such as creating tunnels for other tools such as command line SQL clients or web browsers with the ssh -L option. Or do full on SOCKS proxy with the FoxyProxy plugin and the ssh -D option.