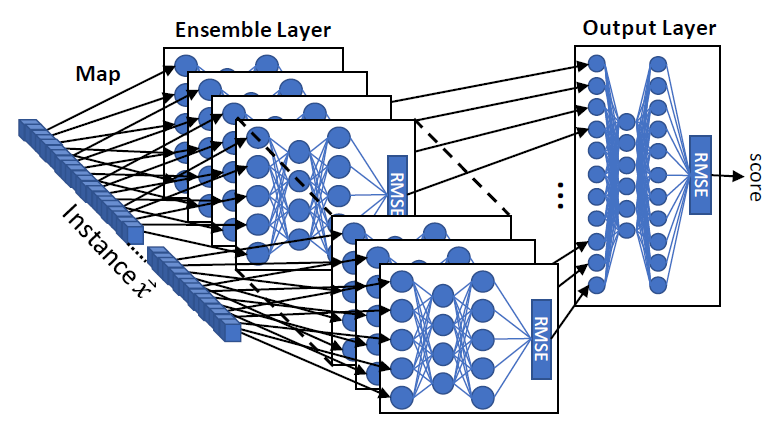
In this repository you will find a Python implementation of KitNET; an online anomaly detector, based on an ensemble of autoencoders. From,
Yisroel Mirsky, Tomer Doitshman, Yuval Elovici, and Asaf Shabtai, "Kitsune: An Ensemble of Autoencoders for Online Network Intrusion Detection", Network and Distributed System Security Symposium 2018 (NDSS'18)
This repo contains the anomaly detector only. For the full network intrusion detection system from the paper, please see https://github.com/ymirsky/Kitsune-py.
Anomaly detection in unbounded data-streams is a difficult problem since the observed instances cannot be stored for inducing newer models. This challenge becomes even more apparent when the data stream has many features (dimensions) and arrives at a high rate. Under these circumstances, the dataset is in essence "big-data" which makes the offline training of a machine learning algorithm prohibitively slow or expensive.
KitNET is an online, unsupervised, and efficient anomaly detector. A Kitsune, in Japanese folklore, is a mythical fox-like creature that has a number of tails, can mimic different forms, and whose strength increases with experience. Similarly, Kit-NET has an ensemble of small neural networks (autoencoders), which are trained to mimic (reconstruct) network traffic patterns, and whose performance incrementally improves overtime.
The architecture KitNET operates in the following way: First, the features of an instance are mapped to the visible neurons of the ensemble. This mapping is found using incremental correlative dimension clustering. Next, each autoencoder attempts to reconstruct the instance's features, and computes the reconstruction error in terms of root mean squared errors (RMSE). Finally, the RMSEs are forwarded to an output autoencoder, which acts as a non-linear voting mechanism for the ensemble. We note that while training KitNET, no more than one instance is stored in memory at a time. KitNET has one main parameter, which is the maximum number of inputs for any given autoencoder in the ensemble. This parameter is used to increase the algorithm's speed with a modest trade off in detection performance.
Some points about KitNET:
- It is completely plug-and-play.
- It is an unsupervised machine learning algorithm (it does not need label, just train it on normal data!)
- Its efficiency can be scaled with its input parameter m: the maximal size of any autoencoder in the ensemble layer (smaller autoencoders are exponentially cheaper to train and execute)
Here is a simple example of how to make a KitNET object:
import KitNET as kit

# KitNET params:
n = 100 # the number of features (dimensions) in your dataset/stream
maxAE = 10 #maximum size for any autoencoder in the ensemble layer
FMgrace = 5000 #the number of instances taken to incrementally learn the feature mapping (the ensemble's architecture)
ADgrace = 50000 #the number of instances used to incrementally train the anomaly detector (ensemble itself)

# Build KitNET
K = kit.KitNET(n,maxAE,FMgrace,ADgrace)
To use the KitNET object, simply process() one instance at a time. An instance should be in numpy array format with a length of n. The process() method will return the root mean squared error (RMSE) anomaly score (larger RMSE values are more anomalous). The process() method will automatically learn from the instance if the grace period (FMgrace+AMgrace) has not expired. During training, the method will return a RMSE value of zero.
Here is an example usage of the KitNET object:
for i in range(X.shape[0]): #X is a m-by-n dataset
    RMSE = K.process(X[i,]) #will train during the grace periods, then execute on all the rest.
    print(RMSE)
Alternatively, you can train on instances after the grace period by performing
K.train(x)
Although it's not recommended, you can also execute (predict an RMSE score) at any time as well, by performing
RMSE=K.execute(x)
Note that executing an instance before a feature map has been discovered will result in an error.
For advanced applications, you also have the option to provide you own feature map (i.e., which feature in your dataset goes to which autoencoder in the ensemble layer of KitNET). This also allows you to explicitly set the number and size of each autoencoder. To provide a mapping, use the feature_map argument in the constructor of KitNET. The map must be a list, where the i-th entry contains a list of the feature indices to be assigned to the i-th autoencoder in the ensemble. For example,
map = [[2,5,3],[4,0,1],[6,7]]
This example makes three autoencoders in the ensemble layer, where the first auto encoder receives features 2,5, and 3, etc... Other advanced configurations, which can be set via the constructor, are:
- The stochastic gradient descent learning rate of all autoencoders (default learning_rate=0.1)
- The ratio of hidden neurons to visible neurons in each autoencoder (default hidden_ratio=0.75)
As a quick start, a demo script is provided in example.py. You can either run it directly or enter the following into your python console
import example.py
The code was written and with the Python environment Anaconda: https://anaconda.org/anaconda/python For significant speedups, as shown in our paper, you must implement KitNET in C++, or using cython.
The full datasets used in our NDSS paper can be found by following this google drive link: https://goo.gl/iShM7E
This project is licensed under the MIT License - see the LICENSE.txt file for details
for more information or collaboration,
Name : Raj Sharma , CEO at CyberPulse Ltd and Course Director - AI For Cyber Security at Oxford University Email : raj.sharma@cyberpulseai.com , LinkedIn : www.linkedin.com/in/contact-raj-sharma
