Automated release management for maven projects
maven-semantic-release is a plugin for semantic-release v16+. This project will deploy a maven project to maven central instead of deploying a node.js project to npm. This tool is intended to be used on github projects that use a Travis-CI server.
The workflow this assumes is that your project will use Angular-style commit messages (theoretically you could override this and use a different style) and only merge to master when you want to create a new release. When a new release is generated, it will automatically be deployed to maven central.
Optionally, you can also use this enable this tool to create and push some commits and then merge those back into the development branch of your git repository.
This tool is intended to automate the releases of maven projects to maven central. However, a lot of manual steps unfortunately must be taken to get your maven project setup so it can work properly. Big thanks to Nathan Fischer for detailing how to do a lot of these steps in a blog post here.
If your project merely wants to take advantage of committing version numbers and creating nice release notes on your github project, you can skip steps 1-4. In step 5, the creation of the maven artifact signing key can be skipped and the skip-maven-deploy flag must be set.
Follow this guide.
See this example project for a sample pom.xml.
Your maven project needs to have at least the following items in your pom.xml:
name- the name of the projectdescription- a short descriptionurl- location where users can go to get more information about the librarylicences- self explanatoryscm- source control informationdevelopers- who worked on the projectdistributionManagement- the places where you want to distribute your project to
Your pom.xml file needs to have the following maven plugins included:
maven-gpg-pluginmaven-javadoc-pluginmaven-source-plugin
Your pom.xml file also needs the following sonatype plugin to automatically close and release your project from nexus.
nexus-staging-maven-plugin
See this example project for a sample pom.xml.
You can copy paste this file into your repository. The file must be called maven-settings.xml and must exist in the root directory of your project.
Follow the all steps from Create code signing cert to Encrypt cert and variables for travis in this guide. When adding keys to Travis you could also add them using the Travis-CI website in the settings of your repository instead of adding secure variables to your .travis.yml file.
We wish you good luck as this step is really easy to mess up and get exactly right. Adding your password to travis can be infuriating as you may need to escape parts of it if it has a space, @ symbol or something else.
See this example file. In your .travis.yml file you'll want the following items:
After the success of your CI Run, you'll want to run semantic-release with the maven-semantic-release plugins. At a minimum, you must include the following recommended configuration. This includes overriding the plugins so that the default npm plugin is not used.
after_success:
  - semantic-release --prepare @conveyal/maven-semantic-release --publish @semantic-release/github,@conveyal/maven-semantic-release --verify-conditions @semantic-release/github,@conveyal/maven-semantic-release --verify-release @conveyal/maven-semantic-release
If you want to enable the Conveyal workflow of making commits of the release version, snapshot version and then merging master into dev, use this configuration:
after_success:
  - semantic-release --prepare @conveyal/maven-semantic-release --publish @semantic-release/github,@conveyal/maven-semantic-release --verify-conditions @semantic-release/github,@conveyal/maven-semantic-release --verify-release @conveyal/maven-semantic-release --use-conveyal-workflow --dev-branch=dev
It is also possible to skip deploying to maven central, but still incrementing the version in pom.xml by setting the flag skip-maven-deploy. For example:
after_success:
  - semantic-release --prepare @conveyal/maven-semantic-release --publish @semantic-release/github,@conveyal/maven-semantic-release --verify-conditions @semantic-release/github,@conveyal/maven-semantic-release --verify-release @conveyal/maven-semantic-release --use-conveyal-workflow --dev-branch=dev --skip-maven-deploy
By default the commit message contains the appendix '[ci skip]' that skips the pipeline to run when the pom.xml is pushed. This can be disabled for snapshot and final versions if needed by providing the flag disable-snapshot-skip-ci or disable-final-skip-ci. For example:
after_success:
  - semantic-release --prepare @conveyal/maven-semantic-release --publish @semantic-release/github,@conveyal/maven-semantic-release --verify-conditions @semantic-release/github,@conveyal/maven-semantic-release --verify-release @conveyal/maven-semantic-release --use-conveyal-workflow --dev-branch=dev --disable-snapshot-skip-ci --disable-final-skip-ci
If you use the conveyal workflow just the updated pom.xml will be part of the commit. To add more files to the commit (e.g. a CHANGELOG.md generated by a different plugin) you can specify those via the parameter --additionalFilesToCommit. This parameter accepts a list of filenames and will include them in the commit. Example:
after_success:
  - semantic-release --prepare @conveyal/maven-semantic-release --publish @semantic-release/github,@conveyal/maven-semantic-release --verify-conditions @semantic-release/github,@conveyal/maven-semantic-release --verify-release @conveyal/maven-semantic-release --use-conveyal-workflow --dev-branch=dev --additionalFilesToCommit CHANGELOG.md,readme.txt
Be sure to include the import of your signing keys. If you followed everything correctly in step 4 you should have something like the following added to your .travis.yml file:
before_install: |
  # only install signing keys under the same circumstances we do a mvn deploy later
  if [[ "$TRAVIS_PULL_REQUEST" = false ]] && [[ "$TRAVIS_BRANCH" = master ]]; then
    openssl aes-256-cbc -K $encrypted_### -iv $encrypted_### -in maven-artifact-signing-key.asc.enc -out maven-artifact-signing-key.asc -d
    gpg --import --batch maven-artifact-signing-key.asc
  fi
This should help speed up the installation of maven-semantic-release. You'll want to include the m2 directory as well.
cache:
  directories:
    - $HOME/.m2
    - $HOME/.yarn-cache
Also, you'll want to install maven-semantic-release and semantic-release in a step before the build because travis caches immediately after the build.
before_script:
  - yarn global add @conveyal/maven-semantic-release semantic-release
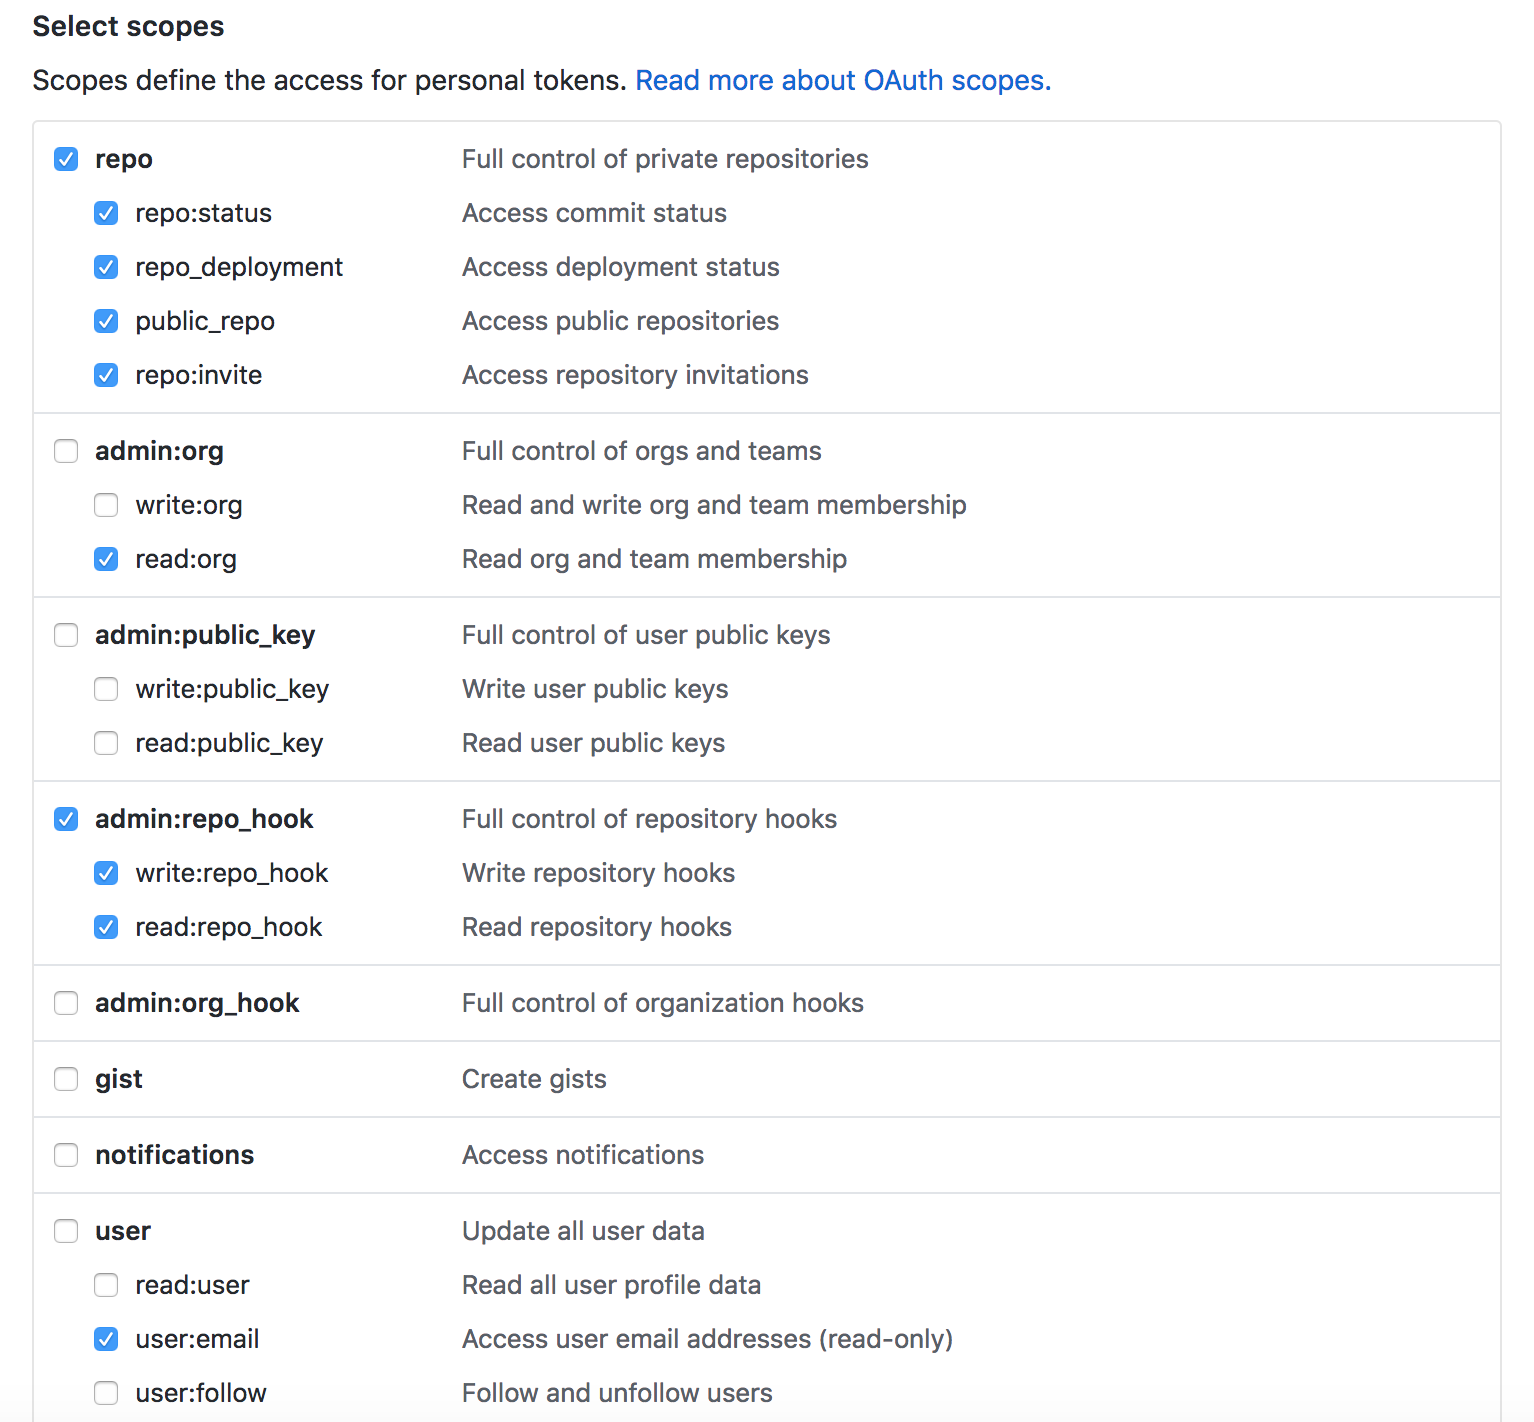
Create a Github token that will be used to make commits and create releases. Add the token to your travis environment variables as either GH_TOKEN or GITHUB_TOKEN. Add the following permissions to your token:
This plugin uses the mvn command in your PATH. If you have maven-wrapper script at the project root directory, this plugin will use that instead.
