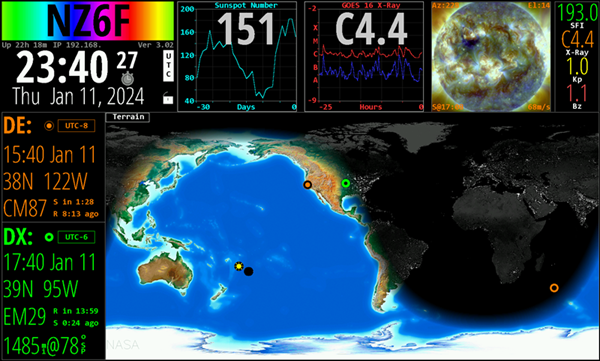
A Dockerized build of HamClock by Elwood Downey, WB0OEW.
Thanks also to Julius Zeidler @zeidos for his work on a Dockerized version of HamClock. I wanted to take some different approaches, so this is my take on it, but I ran HamClock initially from his image and I thank him for his work.
You will need to have a computer running Docker. Once installed, you can verify it's running with docker run --rm hello-world (docs).
This application will work in Docker running on:
- ✅ Linux x86/64
- ✅ Windows 10/11 (with WSL2)
- ✅ Raspberry Pi (confirmed on Pi 3b+ running Raspbian 11)
- ❓ Mac OS should work but I don't have one to test.
If you run into problems getting it to run, please log an issue. Please be detailed about your platform and any errors!
If you're already lost, may I recommend buying a prebulit HamClock?
You can run this app by either by pulling the container from the prebuilt container in this repository, or pulling the source and building the container locally. Both approaches are documented here.
To run containers with Docker you can use the command line docker run argument, or use Docker Compose. I find for most users the Docker Compose option is easiest, as it encapuslates all of the arguments in one place in a nice, repeatable manner. This is also the version that some NAS devices expect, like QNAP.
To run:
- Install Prerequisites.
- (Optional) Create a directory somewhere called hamclock or hamclock-docker.
- Download examples/docker-compose.yaml and save to that folder.
- Run
docker-compose up -dfrom inside of the folder wheredocker-compose.yamllives. - If you didn't receive any errors, see Accessing HamClock below for next steps.
Or you can paste this YAML into a docker-compose.yaml file yourself:
version: "3"
services:
  web:
    image: ghcr.io/chrisromp/hamclock-docker:latest
    ports:
      - "8080:8080/tcp"
      - "8081:8081/tcp"
    volumes:
      - data:/root/.hamclock
    restart: unless-stopped

volumes:
  data:
Note
If your Docker host computer is already hosting an application which is using TCP ports 8080 (used by HamClock's API) or 8081 (used by the HamClock web UI), then you can modify them in the Dockerfile using the syntax HOST:CONTAINER.
For example, to change the web UI from port 8081 to port 80, you would change the 8081:8081/tcp port to 80:8081/tcp.
See the Docker Compose documentation for more information.
To run, change to the folder with your Dockerfile and docker-compose.yaml and execute: docker compose up -d
If you prefer to use docker run, the equivalent commands to the above would be to first create a Docker volume if you have not already:
docker volume create hamclockThen pass the appropriate arguments to run the container:
docker run --detach -p 8080:8080 -p 8081:8081 --name hamclock -v hamclock:/root/.hamclock ghcr.io/chrisromp/hamclock-docker:latestYou can clone or download the source code to this repository, or just copy/paste the contents of the Dockerfile into a text file on your local machine called Dockerfile.
Here is a docker-compose.yaml file ready to go:
version: "3"
services:
  web:
    build:
      context: .
      dockerfile: Dockerfile
      args:
        # HamClock supported resolutions are 800x480, 1600x960, 2400x1440 and 3200x1920 as of v3.02
        HAMCLOCK_RESOLUTION: 1600x960
    ports:
      - "8080:8080/tcp"
      - "8081:8081/tcp"
    volumes:
      - data:/root/.hamclock
    restart: unless-stopped

volumes:
data:The default Docker image will build HamClock for a screen resolution of 1600x960. If you wish to use another resolution, the Dockerfile takes a build argument which you can specify in docker-compose.yaml. Note that HamClock only supports specific resolutions, so be sure to choose only a supported resolution.
To access the running HamClock, you will need to know the hostname or IP address of your Docker host computer. That may be in the format of 192.168.x.x on some networks, or you may be able to access it by the computer name. I will use the hostname dockerhost for these examples.
Open a web browser to: http://dockerhost:8081/live.html
Likely you will see HamClock running but without your call sign, or if you were fast enough you may see it prompting for setup. If not, leave this browser window open and open another tab/window and enter: http://dockerhost:8080/restart. Switch back to the first tab and you should see HamClock prompting you to enter setup. Click your mouse anywhere and configure HamClock.
Please refer to the HamClock User Guide for detailed instructions, but here are a couple of settings I want to highlight:
- WiFi: No need to set this up; HamClock on Docker will use your Docker network to connect to the internet.
- NTP: If you want to skip the NTP (time server) latency/ping test on HamClock startup, you can set the NTP server to
OSand HamClock will pull the time from your Docker host system.
You should be able to update HamClock in place through the web UI. It will prompt you when there's an update available, and you can apply it.
I may occasionally build updated images here, but that will not be the primary way to keep your application up to date.
This application is provided with no guarantees it will work for anything. But if you're having problems, please open a new issue and I will try and provide some advice or a fix as my time allows.
