This README is a summary of the following article: https://www.jessym.com/articles/a-complete-introduction-to-java-ee
- Wildfly 20 (https://www.wildfly.org/downloads/, simply download and extract)
- Java 11 (reason: Wildfly 20 doesn't officially support newer versions)
- Docker
- IntelliJ
- Via the command line, navigate to the
binfolder of your Wildfly distributioncd ~/Downloads/wildfly-20.0.0.Final/bin/ - Create a management user via the
./add-user.shscript where you'll be asked to provide a username and password - Once the Wildfly server is running (see next steps), you'll be able to manage the application server via the console at http://localhost:9990, using the credentials you've picked in the previous step
- Create an index.html welcome page inside
src/main/webapp/, containing a simple H1 header tag - Create a web.xml file inside
src/main/webapp/WEB-INF/to whitelist theindex.htmlfile so it can be accessed - Create a jboss-web.xml file inside
src/main/webapp/WEB-INF/to set the application's context root to something like/store, for example
- Add the
org.apachage.maven.plugins : maven-war-pluginto your pom.xml file - Run
mvn package(or./mvnw package) and note down the location of yourwarfile (something liketarget/store-1.0.0.war) - Navigate to the
binfolder of your Wildfly distributioncd ~/Downloads/wildfly-20.0.0.Final/bin/ - Start the application server via the
./standalone.shscript - From the same
binfolder, (re-)deploy the latest version of your application via the command./jboss-cli.sh -c --command="deploy ~/dir/to/store-1.0.0.war --force" - Visit http://localhost:8080/store to view your HTML welcome page (here,
/storerefers to the context root configured earlier)
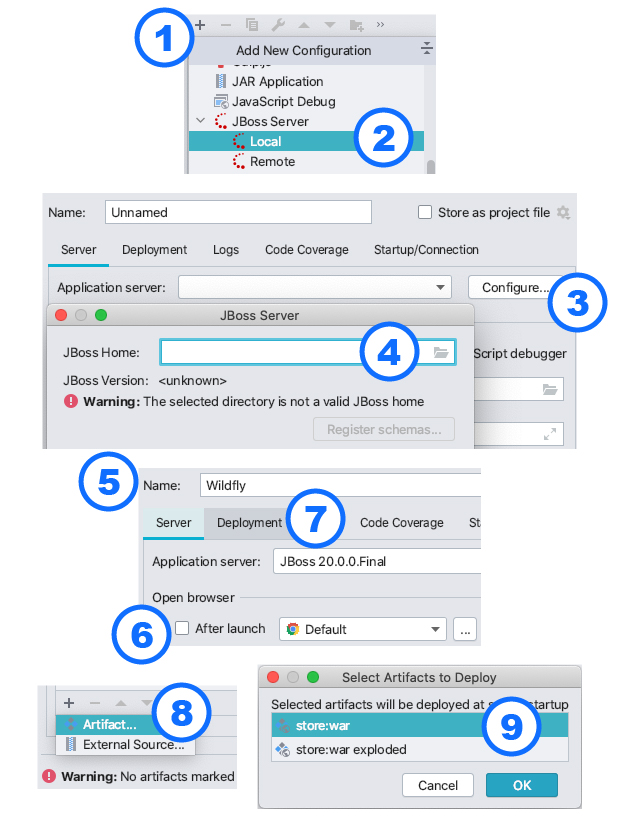
- Create a new Run/Debug configuration via the menu "Run" -> "Edit Configurations..." and click the little plus (+) sign
- Choose JBoss Server (Local)
- Click to "Configure..." button to configure the application server
- Click the directory icon to select your unzipped Wildfly distribution (e.g.:
~/Downloads/wildfly-20.0.0.Final/) - Specify a name for the Run/Debug configuration (optional)
- Untick the open-browser-after-launch box (optional)
- Open the "Deployment" tab
- In the bottom-left corner, click the plus (+) sign and click "Artifact..." to select a deployment artifact
- Select the (non-exploded) "war" module of your application and click "OK"
- Click "Apply" and "Run/Debug" to start the application server and deploy your application
- Visit http://localhost:8080/store to view your HTML welcome page (here,
/storerefers to the context root configured earlier)
- Applications running in a Java EE application server (like Wildfly) might contain:
- frontend components (i.e.: web / HTTP components, like JSP pages)
- backend components (i.e.: business logic in the form of EJBs)
- The frontend (web) components and resources will be accessible via some URL at a certain
context-root(specified via the jboss-web.xml file) - The backend (business logic) components will be made available to frontend components, but wouldn't be directly available over some URL themselves (think for example: backend scheduling systems, business report generation systems, etc.)
- Traditionally:
- all frontend (web / HTTP) components would be packaged into a .war file (Web Application Archive)
- all backend (business logic / EJB) components would be packaged into a .jar file (Java Archive)
- the .war and .jar files would be put together into a .ear file (Enterprise Application Archive)
- The .ear format was originally created for the application server to provide isolation at the classloader-level between frontend and backend components; Wildfly makes sure that frontend classes can access backend classes, but not the other way around (business logic is not allowed to depend on view logic)
- I recommend only using the .war deployment artifact, and never using the .ear deployment artifact:
- proper frontend/backend isolation can be achieved just as easily with a proper Maven module setup
- pretty much all Java EE features can be used from a single .war deployment artifact (EJBs, CDI, JPA, JMS, etc.)
- Create a class like this which extends
javax.ws.rs.core.Application - Annotate the class with
@javax.ws.rs.ApplicationPath("/api") - Note that all HTTP endpoints will now be placed under
http://localhost:8080/store/api/**, where/storerefers to the context root, and/apirefers to the application path we've just configured - Follow the example of this class to create a simple ping endpoint
- To return JSON from a JAX-RS endpoint, annotate the class or method with
@javax.ws.rs.Produces(MediaType.APPLICATION_JSON) - To accept incoming JSON at a POST, PUT, PATCH or DELETE endpoint, annotate the class or method with
@javax.ws.rs.Consumes(MediaType.APPLICATION_JSON)
- For
@POST-annotated JSON-consuming HTTP endpoints, the incoming request argument should be annotated with@Validto have incoming request bodies automatically validated - As shown by this example, a custom request POJO can have its properties decorated by (a combination of) annotations like
@NotBlank,@Max(120)and@Email
Recommended CDI Scopes (not automatically part of Wildfly's container-wide transaction management):
@javax.enterprise.RequestScoped(each bean instance is tied to a single HTTP request)@javax.enterprise.SessionScoped(each bean instance is tied to a single HTTP session)@javax.enterprise.ApplicationScoped(there's a single bean instance in the entire application)
Recommended EJB Scopes (automatically part of Wildfly's container-wide transaction management):
@javax.ejb.Stateless(there's a pool of bean instances, without any guarantee about which particular instance will be invoked)@javax.ejb.Singleton(there's a single bean instance in the entire application)
- Make sure you have both
dockeranddocker-composeinstalled - Create a docker-compose.yaml file at the root of your project
- Run
docker-compose upfrom the root of your project to create and start a new Postgres instance with the configured credentials
- Download the PostgreSQL driver (jar file) from https://jdbc.postgresql.org/download.html
- Navigate to the
binfolder of your Wildfly distribution (cd ~/Downloads/wildfly-20.0.0.Final/bin/) - Start a JBoss CLI session by running the
./jboss-cli.sh -ccommand (make sure the server is running) - Register Postgres as a module and data source by executing the following three commands inside the CLI session:
module add --name=org.postgresql --resources=~/Downloads/postgresql-42.2.16.jar --dependencies=javax.api,javax.transaction.api/subsystem=datasources/jdbc-driver=postgres:add(driver-name="postgres",driver-module-name="org.postgresql",driver-class-name="org.postgresql.Driver")data-source add --jndi-name=java:jboss/datasources/PostgresDS --name=PostgresDS --connection-url=jdbc:postgresql://localhost:5432/postgres --driver-name=postgres --user-name=admin --password=password- Make note of the data source's JNDI name (
java:jboss/datasources/PostgresDS), so you'll be able to reference it from your persistence unit and/or Java beans later on - All of these settings can be found and edited inside the
standalone/configuration/standalone.xmlconfiguration file of your Wildfly distribution
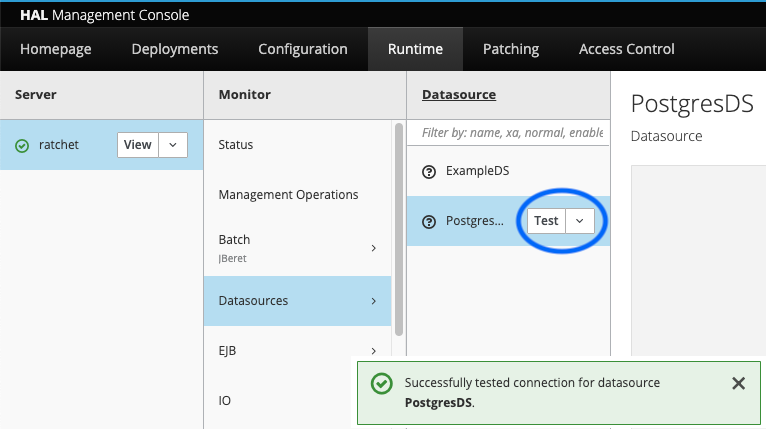
- To verify the connection, make sure Postgres is running and open the Wildfly management console at http://localhost:9990 (using the credentials configured earlier via the
./add-user.shscript) - Under the "Runtime" tab, click the name of your machine (under "Server"), click on "Datasources", click on "PostgresDS" and then click on the small "Test" button to verify your connection
- Create a persistence.xml file inside the
src/main/resources/META-INF/folder - Create a new
<persistence-unit>and decide on:- a
namefor it (used for referencing the unit from Java beans) - a
transaction-type, eitherJTA(if you want this unit to hook into Wildfly's container-wide transaction management) orRESOURCE_LOCAL(if you want this unit to manage its own JDBC-level transactions in isolation)
- a
- To link this persistence unit to a particular data source, add the
<jta-data-source>tag to the unit's XML configuration, and reference the data source by JNDI name - Certain Hibernate-specific (non-JPA-standard) properties can be added to the persistence unit XML configuration, for things like:
- Setting the dialect to
PostgreSQL95Dialect, for example - Setting the default Postgres schema for the data source's database to
public, for example
- Setting the dialect to
- Create a JPA entity like this by using the
@Entityannotation - Inject an
EntityManagerinstance into one of your (repository or DAO) beans via the@PersistenceContext(unitName = "PostgresPU")annotation (making sure to reference the correct unit defined in your persistence.xml file) - To persist an entity into the database, simply use the entity manager's
persistmethod, as shown by this example - Keep in mind that this won't work and Wildfly won't find the database table, unless you do one of the following:
- manually create the right Postgres tables with the right columns for your entities
- add the
hibernate.hbm2ddl.autoproperty with valueupdate(see documentation) to your persistence.xml file, in order to automatically generate and update the database tables (based on your Java/JPA entities) during application startup - recommended: use a tool like Flyway for managing your database migration files and executing them during application startup, so the full database schema is kept under version control as well
- Flyway is a tool for automatically executing database migration files against your database upon application startup
- Add a Maven compile dependency on the
org.flywaydb : flyway-corelibrary to pom.xml - Create some kind of FlywayMigrationExecutor which hooks into the application startup lifecycle (via the
@javax.ejb.Singletonand@javax.ejb.Startupannotations) and uses the Flyway API to migrate the database - Make sure to inject the correct data source via a JNDI resource lookup, supplying the same JNDI name which was used when registering the data source
- Place your actual .SQL migration files (following the necessary naming conventions) in the
src/main/resources/db/migration/folder, which Flyway will automatically scan by default
- By default, all EJBs (defined by annotations like
@javax.ejb.Statelessand@javax.ejb.Singleton) are automatically part of Wildfly's container-wide transaction management - This means that all EJB operations (public methods) are executed in a transactional context, and, if an exception were to occur, will be rolled back
- So if an EJB successfully saves a new entity into the database and successfully publishes a message to some JMS broker, but later (in the same thread of execution) fails on a
NullPointerException, both the database operation and the JMS publication will be rolled back - By default, transactional execution is only enabled for EJBs, and not for (ordinary) CDI beans
- To disable transactional execution for an EJB, add the class-level
@TransactionManagement(TransactionManagementType.BEAN)annotation - To enable transactional execution for CDI beans (defined by annotations like
@RequestScoped,@SessionScopedand@ApplicationScoped), add the class or method-level@javax.transaction.Transactionalannotation

