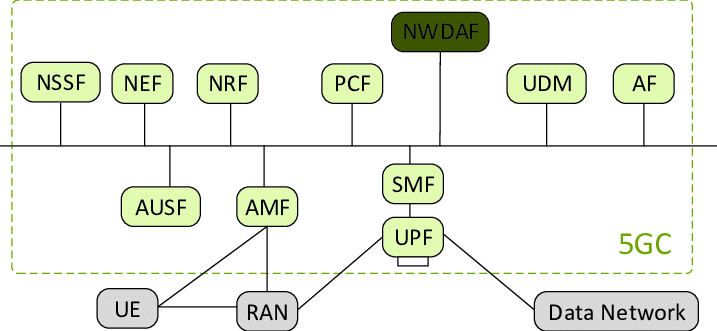
In this project we will see how to configure and run a 5G end-to-end setup using SDRs and Openairinterface5G, an Open Source software. For this reason, we will need to configure:
-
OAI CN5G. The core network of the 5G Network that we will be setting up. Hence, a database will be required to be able to register SIM's as a normally done in cellular networks for controlling data, traffic, and so on. -
OAI gNB. The 3GPP 5G Next Generation base station which supports the 5G NR (5G New Radio). Hence, we will setup the base station and configure it to be able to integrate the SDR, specifically, an URSPB200-mini. -
Quectel RM500Q-GL + Quectel 5G-M2 EVB. A 5G module will be required to test the 5G Network Setup, being able to test the association between the 5G module (with a SIM) and the gNB (base station). this module and evaluation board will be used as UE (user equipment).
For the project, we will need to configure and run a 5G end-to-end setup using SDRs and Openairinterface5G, an Open Source software. For this reason, we will need to configure:
-
OAI CN5G. The core network of the 5G Network that we will be setting up. Hence, a database will be required to be able to register SIM's as a normally done in cellular networks for controlling data, traffic, and so on.
-
OAI gNB. The 3GPP 5G Next Generation base station which supports the 5G NR (5G New Radio). Therefore, we will setup the base station and configure it to be able to integrate the SDR, specifically, an URSPB200-mini.
-
Quectel RM500Q-GL + Quectel 5G-M2 EVB. A 5G module will be required to test the 5G Network Setup, being able to test the association between the 5G module (with a SIM) and the gNB (base station). This module and evaluation board will be used as UE (user equipment).
Warning It is crucial to work within a native python3 environment. For example, testing OAI within an Anaconda environment the setup could not be completed due to multiple environment dependencies errors.
First of all, we will need to install the necessary tools and dependencies:
sudo apt install -y git net-tools putty

sudo apt install -y apt-transport-https ca-certificates curl software-properties-common
curl -fsSL https://download.docker.com/linux/ubuntu/gpg | sudo apt-key add -
sudo add-apt-repository "deb [arch=amd64] https://download.docker.com/linux/ubuntu $(lsb_release -cs) stable"
sudo apt update
sudo apt install -y docker docker-ce

# Add your username to the docker group, otherwise you will have to run in sudo mode.
sudo usermod -a -G docker $(whoami)
reboot

# https://docs.docker.com/compose/install/
sudo curl -L "https://github.com/docker/compose/releases/download/v2.12.2/docker-compose-$(uname -s)-$(uname -m)" -o /usr/local/bin/docker-compose
sudo chmod +x /usr/local/bin/docker-composeThen, we need to clone the oai-cn5g-fed repository and pull and tag
all the docker images. All these containers represent the
components/modules defined at the 5G architecture:
# Git oai-cn5g-fed repository
git clone https://gitlab.eurecom.fr/oai/cn5g/oai-cn5g-fed.git ~/oai-cn5g-fed

# Pull docker images
docker pull oaisoftwarealliance/oai-amf:develop
docker pull oaisoftwarealliance/oai-nrf:develop
docker pull oaisoftwarealliance/oai-smf:develop
docker pull oaisoftwarealliance/oai-udr:develop
docker pull oaisoftwarealliance/oai-udm:develop
docker pull oaisoftwarealliance/oai-ausf:develop
docker pull oaisoftwarealliance/oai-spgwu-tiny:develop
docker pull oaisoftwarealliance/trf-gen-cn5g:latest

# Tag docker images
docker image tag oaisoftwarealliance/oai-amf:develop oai-amf:develop
docker image tag oaisoftwarealliance/oai-nrf:develop oai-nrf:develop
docker image tag oaisoftwarealliance/oai-smf:develop oai-smf:develop
docker image tag oaisoftwarealliance/oai-udr:develop oai-udr:develop
docker image tag oaisoftwarealliance/oai-udm:develop oai-udm:develop
docker image tag oaisoftwarealliance/oai-ausf:develop oai-ausf:develop
docker image tag oaisoftwarealliance/oai-spgwu-tiny:develop oai-spgwu-tiny:develop
docker image tag oaisoftwarealliance/trf-gen-cn5g:latest trf-gen-cn5g:latest
Lastly, we copy a pair of configuration files (the main configuration file and the database) to their respective paths.
-
Copy
docker-compose-basic-nfr.yamlto/oai-cn5g-fed/docker-composewget -O ~/oai-cn5g-fed/docker-compose/docker-compose-basic-nrf.yaml https://gitlab.eurecom.fr/oai/openairinterface5g/-/raw/develop/doc/tutorial_resources/docker-compose-basic-nrf.yaml?inline=false
-
Copy
oai_db.sqlto/oai-cn5g-fed/docker-compose/databasewget -O ~/oai-cn5g-fed/docker-compose/database/oai_db.sql https://gitlab.eurecom.fr/oai/openairinterface5g/-/raw/develop/doc/tutorial_resources/oai_db.sql?inline=false
Note In the event of having a SIM Card Programmer, we can modify its internal parameters using the application uicc-v2.6 from Open Cells Project. Otherwise, we will need to have an already programmed SIM and modify the CN database values to fit into SIM ones:
sudo ./program_uicc --adm 12345678 --imsi 001010000000001 --isdn 00000001 --acc 0001 --key fec86ba6eb707ed08905757b1bb44b8f --opc C42449363BBAD02B66D16BC975D77CC1 --spn "OpenAirInterface" --authenticateOnce having OAI CN5G installed with the default setup, we will need to change the default configuration with our specific configuration. Briefly, OpenAirInterface5G has virtualized all the components/modules of the 5G system architecture, in specific, every component has been implemented in its own docker container. Hence, its is important not only to configure the 5G network (MCC, MNC, ...) but we also need to check the connection between the docker containers, each with its own configuration file.
From now on, we will consider that we have an already programmed SIM and we need to adapt the CN5G to it.
First, we will modify the main configuration file
(docker-compose-basic-nfr.yaml) to:
-
[Change MCC and MNC values according to the programmed SIM card]{.underline}. In our case,
<MCC_SIM>and<MNC_SIM>are 208 and 92, respectively.From the
oai-amfandoai-spgwuservices, we will need to set properly the following fields:-
oai-amf:-
MCC = <MCC_SIM> -
MNC = <MNC_SIM> -
SERVED_GUAMI_MCC_0 = <MCC_SIM> -
SERVED_GUAMI_MNC_0 = <MNC_SIM> -
PLMN_SUPPORT_MCC = <MCC_SIM> -
PLMN_SUPPORT_MNC = <MNC_SIM>
-
-
oai-spgwu:-
MCC = <MCC_SIM> -
MNC = <MNC_SIM>
-
-
-
For the authentication procedure to suceed we need to add the information of our SIM card to the database. We can follow two strategies:
-
Before starting the CN5G and creating the docker containers, we can modify the default configuration file ( /oai-cn5g-fed/docker-compose/oai_db.sql):
-
If the docker containers have already been created, we can access the
mysqlcontainer and update or insert new UE subscriptions to the database. The info can be inserted using the mysql command line client:::: listing
    sudo mysql -h 192.168.70.131 -u test -p
    Enter password: test

    mysql> USE oai_db;

    mysql> INSERT INTO `AuthenticationSubscription` (`ueid`,
`authenticationMethod`, `encPermanentKey`, `protectionParameterId`,
`sequenceNumber`, `authenticationManagementField`, `algorithmId`,
`encOpcKey`, `encTopcKey`, `vectorGenerationInHss`, `n5gcAuthMethod`,
`rgAuthenticationInd`, `supi`) VALUES (...);

    mysql> INSERT INTO `SessionManagementSubscriptionData` (`ueid`,
    `servingPlmnid`, `singleNssai`, `dnnConfigurations`) VALUES (...);

    mysql> exit;
:::
-
Lastly, we can run the CN5G executing the following commands:
cd ~/oai-cn5g-fed/docker-compose
python3 core-network.py --type start-basic --scenario 1The gNB (base station) must also be installed and configured. We installed it on the same PC as the core network, to facilitate the communication between them.
There are some prerequisites to set up the base station. First of all, we need to build the UHD drivers (free & open-source software driver and API for the Universal Software Radio Peripheral SDR platform). This can be done using the following commands:
sudo apt install -y libboost-all-dev libusb-1.0-0-dev doxygen python3-docutils python3-mako python3-numpy python3-requests python3-ruamel.yaml python3-setuptools cmake build-essential

git clone https://github.com/EttusResearch/uhd.git ~/uhd
cd ~/uhd
git checkout v4.3.0.0
cd host
mkdir build
cd build
cmake ../
make -j \$(nproc)
make test # This step is optional
sudo make install
sudo ldconfig
sudo uhd\_images\_downloader
Once this step has been completed, we can proceed and build the OAI gNB:
# Get openairinterface5g source code
git clone https://gitlab.eurecom.fr/oai/openairinterface5g.git ~/openairinterface5g
cd ~/openairinterface5g
git checkout develop

# Install OAI dependencies
cd ~/openairinterface5g
source oaienv
cd cmake\_targets
./build\_oai -I

# Build OAI gNB
cd ~/openairinterface5g
source oaienv
cd cmake\_targets
./build\_oai -w USRP --ninja --nrUE --gNB --build-lib all -cIn order to get the base station to work, some changes must be made to
the default configuration, so we modified the
gnb.sa.band78.fr1.106PRB.usrpb210.conf file. This configuration file
changes depending on the band and SDR being used. In our case we are
using the n78 band and the USRP B200 SDR, and we modified some extra
settings:
-
Set the proper MCC and MNC, in this case 208 and 92, respectively.
-
Check that the gNB and AMF IPs are properly set. In our case, we had to change the gNB IPs shown in the file to
$192.168.1.129/24$ . The AMF IP was already set correctly by default ($192.168.1.132/24$ , the IP of the AMF docker container).
The starting procedure depends on the SDR used and the band. In our case, for the USRP B200 and band 78 we used the following commands:
cd ~/openairinterface5g
source oaienv
cd cmake_targets/ran_build/build
sudo ./nr-softmodem -O ../../../targets/PROJECTS/GENERIC-NR-5GC/CONF/gnb.sa.band78.fr1.106PRB.usrpb210.conf --sa -E --continuous-txThe Quectel RM500Q-GL is a 5G module optimized specially for IoT/eMBB applications. It supports both 5G NSA and SA modes, and it comes with an evaluation board for testing and debugging purposes. The important things that the EVB has are:
-
USB-C port to provide power and connection to the serial port. It is used to send AT commands to configure the module. For power it also has a DC barrel jack input. Both must be connected, as the USB does not provide enough power to the evaluation board.
-
Ethernet expansion card. It allows us to use the board as a modem through an Ethernet cable.
-
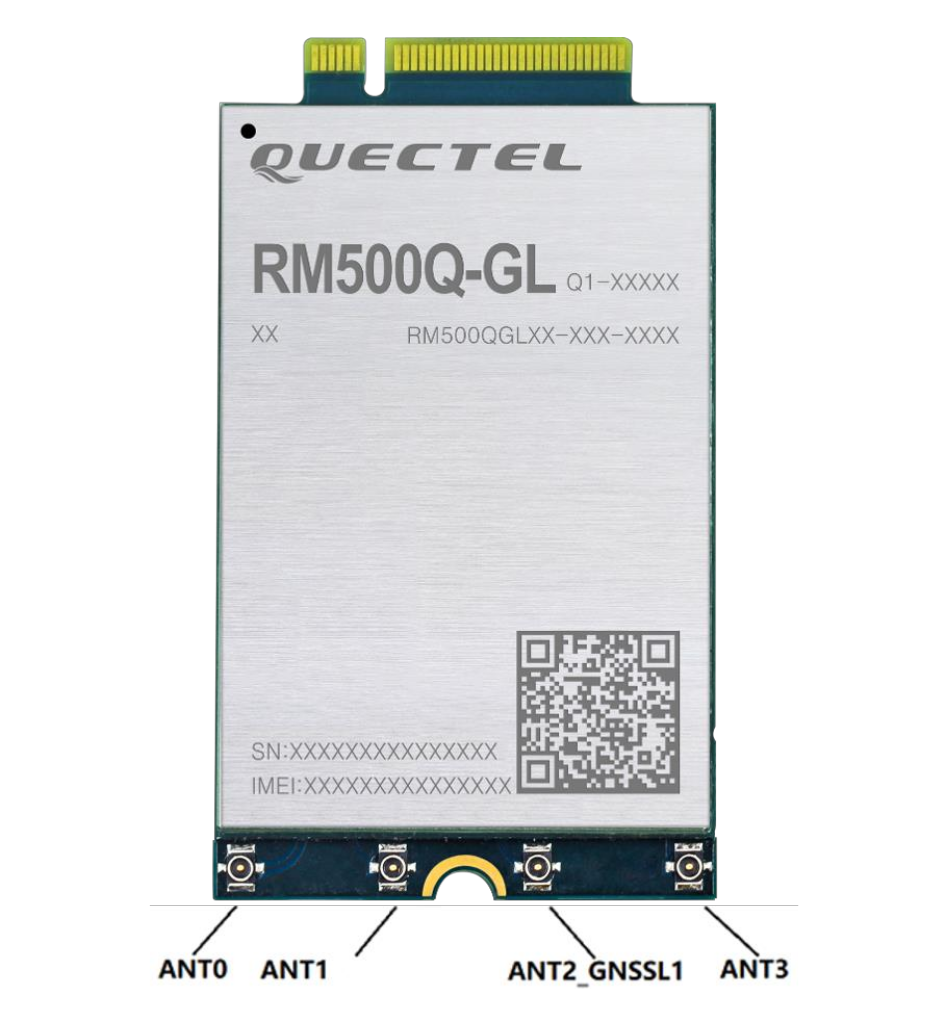
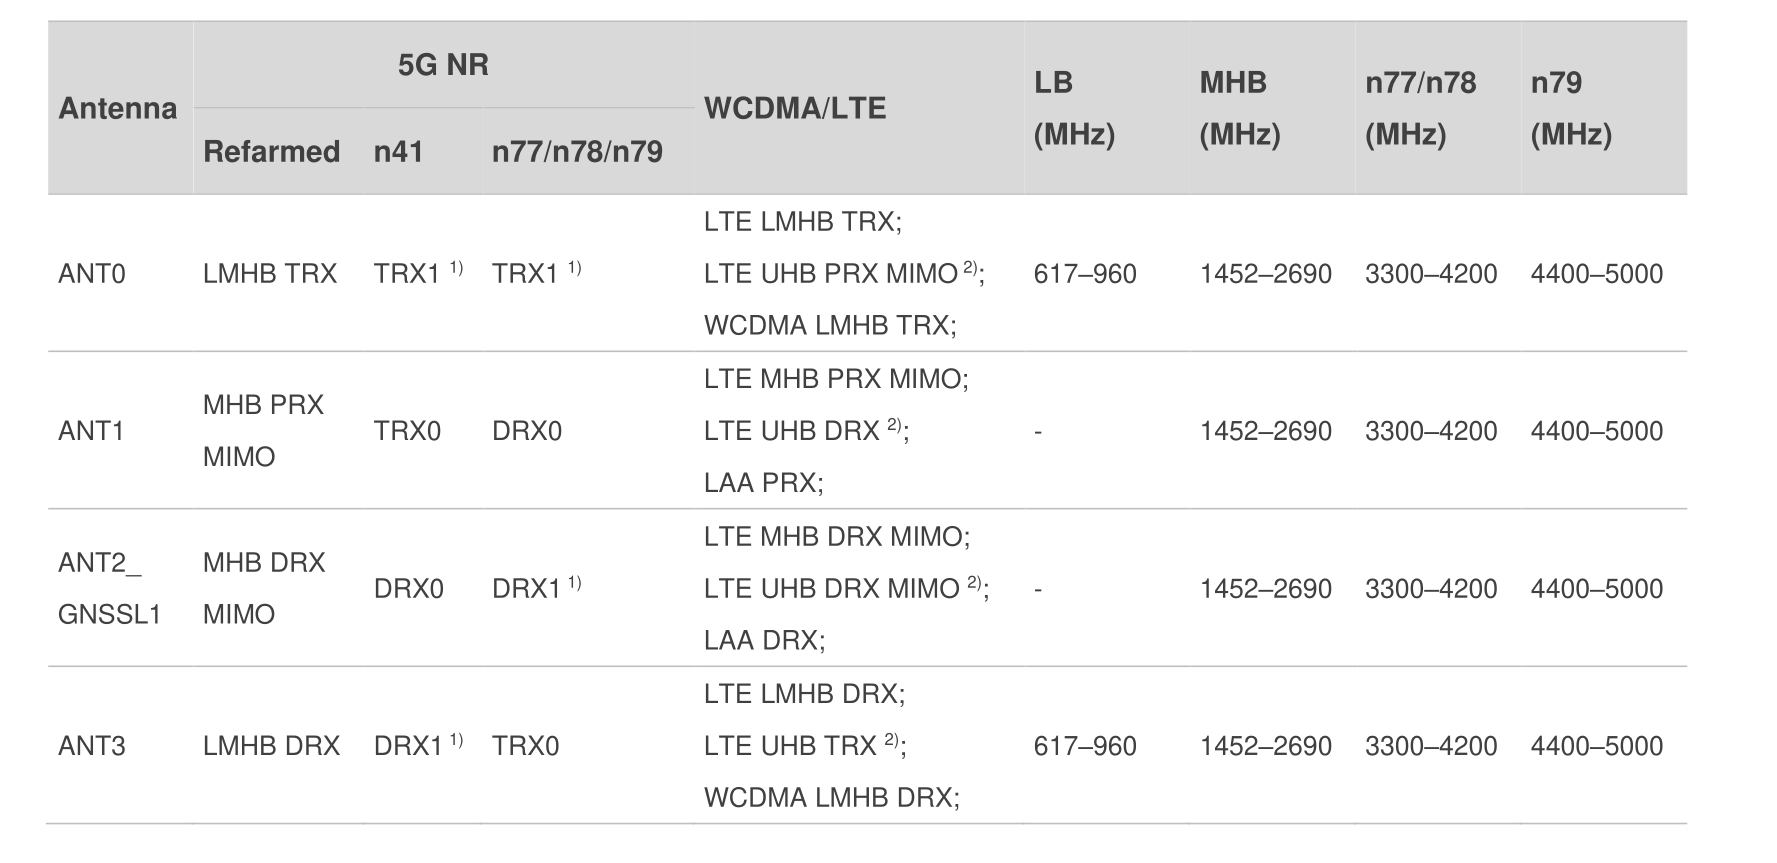
Coaxial connectors and cables for up to 6 antennas. In this case, the module only uses four of them. The antenna pins must be connected to the antennas using the cables provided by the evaluation board cables.
RM500Q-GL antenna pins. RM500Q-GL antenna mapping.
If it is meant to be used in Windows, we need all the drivers that are available to download in the Quectel official web.
Although Windows is recommended by OpenAirInterface5G, it is also possible to setup the module with Ubuntu, and it doesn't even need special drivers to work with.
All the AT commands have to be sent through the serial port with 115200 baudrate and 1 stop bit. It is recommended to use "Cutecom", a graphical serial terminal.
# MUST be sent at least once everytime there is a firmware upgrade!
AT+QMBNCFG="Select","ROW_Commercial"
AT+QMBNCFG="AutoSel",0
AT+CFUN=1,1
AT+CGDCONT=1,"IP","oai"
AT+CGDCONT=2
AT+CGDCONT=3

# (Optional, debug only, AT commands) Activate PDP context, retrieve IP address and test with ping
AT+CGACT=1,1
AT+CGPADDR=1
AT+QPING=1,"openairinterface.org"
First of all, we need to configure which SIM slot will be used. The command to change the slot is "AT+QUIMSLOT=$<$num$>$", in which "$<$num$>$" has to be the number of the slot to be used (1 or 2).
Then we need to enable both the SIM card detection and insertion status report with the commands "AT+QSIMDET=1,1" and "AT+QSIMSTAT=1" respectively. This is needed in order to force a reconnection from the UE to the base station by removing and inserting the SIM.
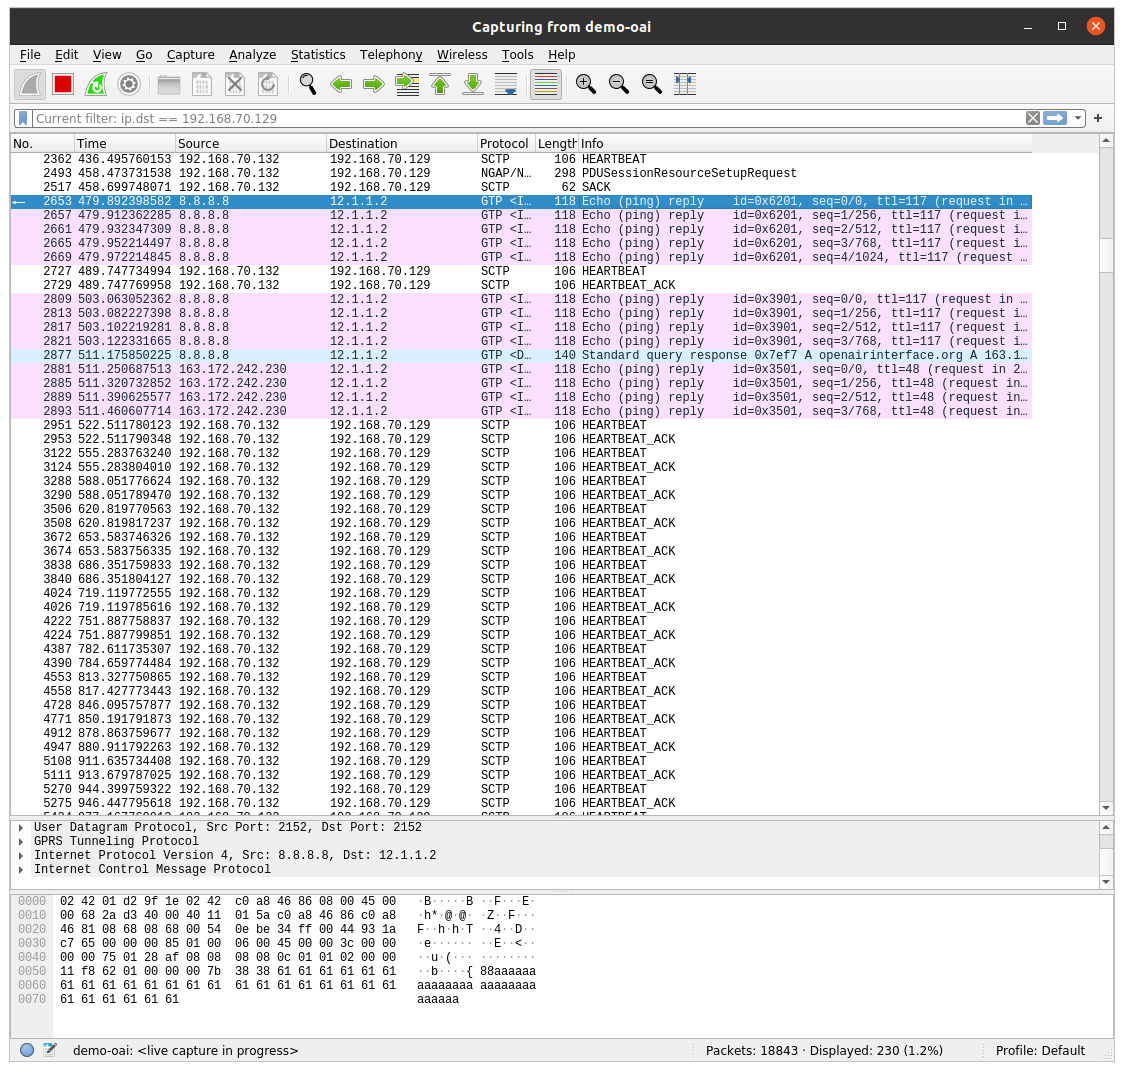
Finally, once enabling and setting up everything, as we can see, we have been able to successfully setup a 5G network.
Warning If the default OAI Quectel setup does not work, for example, an error
561in aQPINGAT command, it is most likely to be an error with the activation of thePDP CONTEXT. Hence, usingAT+QIACT=1,1it solved the problem, activating thePDPCONTEXT. TheAT+CGACT=1,1command shown in the previous listing should work exactly the same way.
Once having the Quectel succesfully connected to the base station and
being able to establish a communication, we will configure the Quectel
module as a 5G modem for a host machine. Hence, we will have to
configure NetworkManager (nmcli) to add a new GSM connection.
Briefly, we will create a new configuration file in
/etc/NetworkManager/system-connections with the *.nmconnection
extension. Specifically, using PPP (Point-to-Point Protocol) for
establishing a connection with the Quectel module over the GSM network
via serial interface between the modem and th host machine. As a result, we have successfully established a connection between a host machine via the Quectel modem to the base station.
[connection]
id=quectel-oai-ppp
type=gsm
autoconnect=false

[gsm]
apn=oai
device=/dev/ttyUSB0

[ppp]
lcp-echo-failure=5
lcp-echo-interval=30
user=
password=

[ipv4]
method=auto

[ipv6]
addr-gen-mode=stable-privacy
method=autoNote We encountered issues when connecting the Quectel RM500Q-GL modem to a regular laptop. Despite checking the compatibility of kernel versions and operating systems, the modem was never detected on the laptops for unknown reasons.
In research studies, having a controlled environment and the ability to manipulate conditions is important. However, when working within a 5G network that operates through radiofrequency, it is evident that interferences can occur, and the behavior of the network may not remain constant. Consequently, the environment becomes practically uncontrolled.
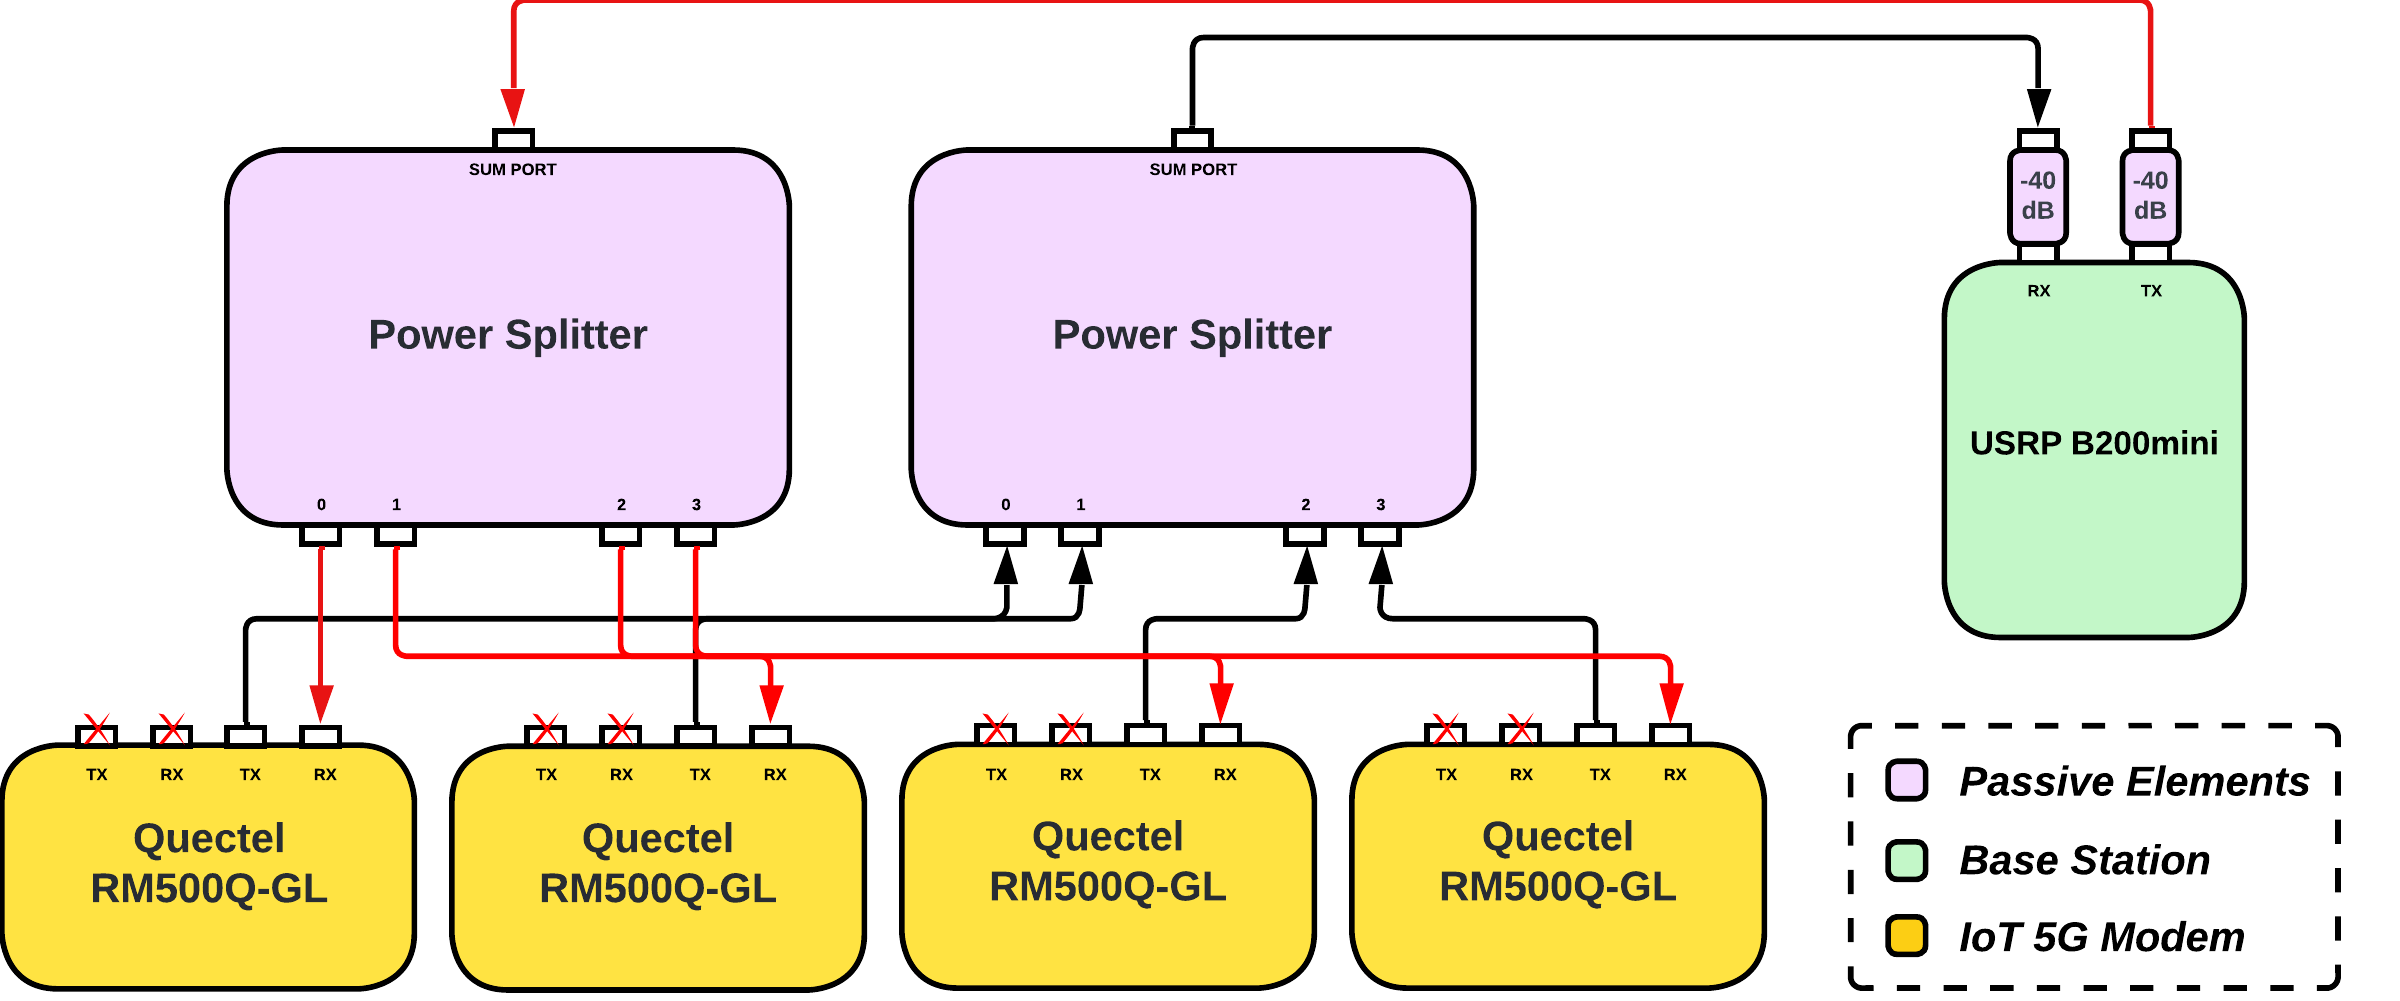
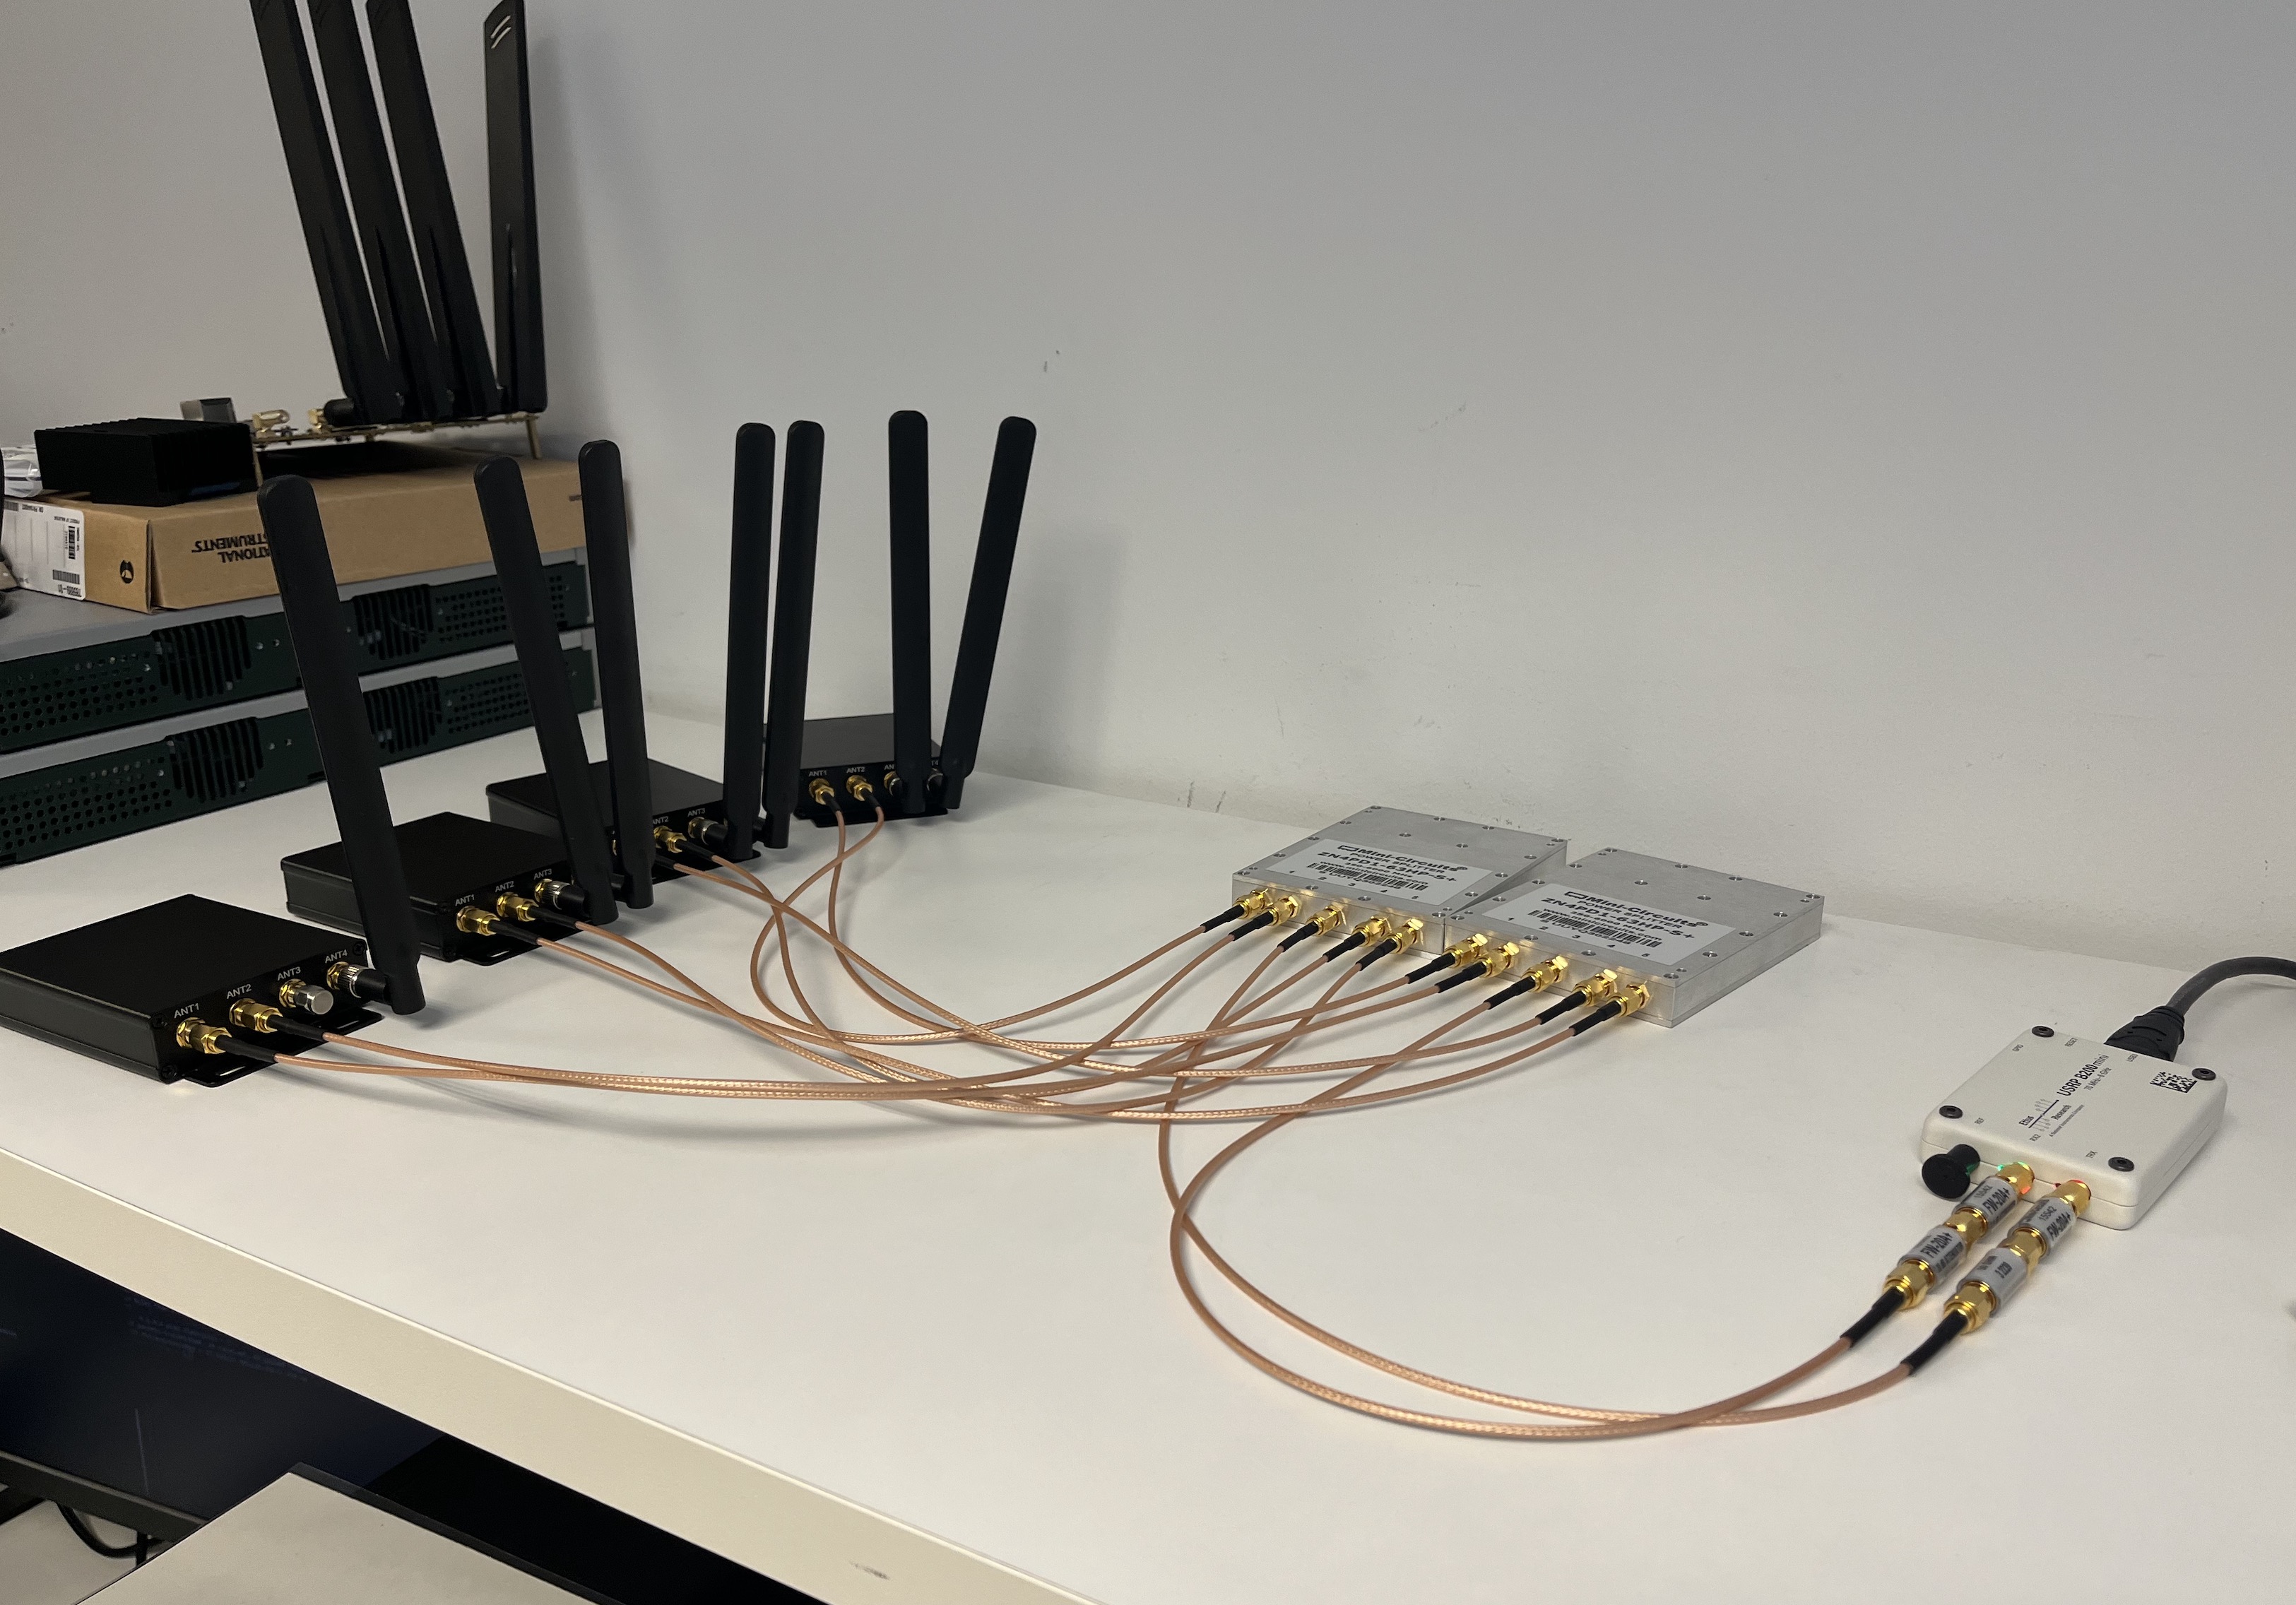
Hence, the previous figure represents a wired 5G network with a base station (based on the platform USRP B200mini) along with multiple 5G IoT modems (Quectel RM500Q-GL) that will establish connections with clients. This particular 5G network, provides us a complete control over the network, also minimizing external interference. This configuration allows us to modify individual client conditions, such as manipulating the modulation of each client by attenuating the received signal, among other possibilities. As a result, we can see the final 5G network setup, with the corresponding signal attenuation and power splitting across all the 5G IoT modems.
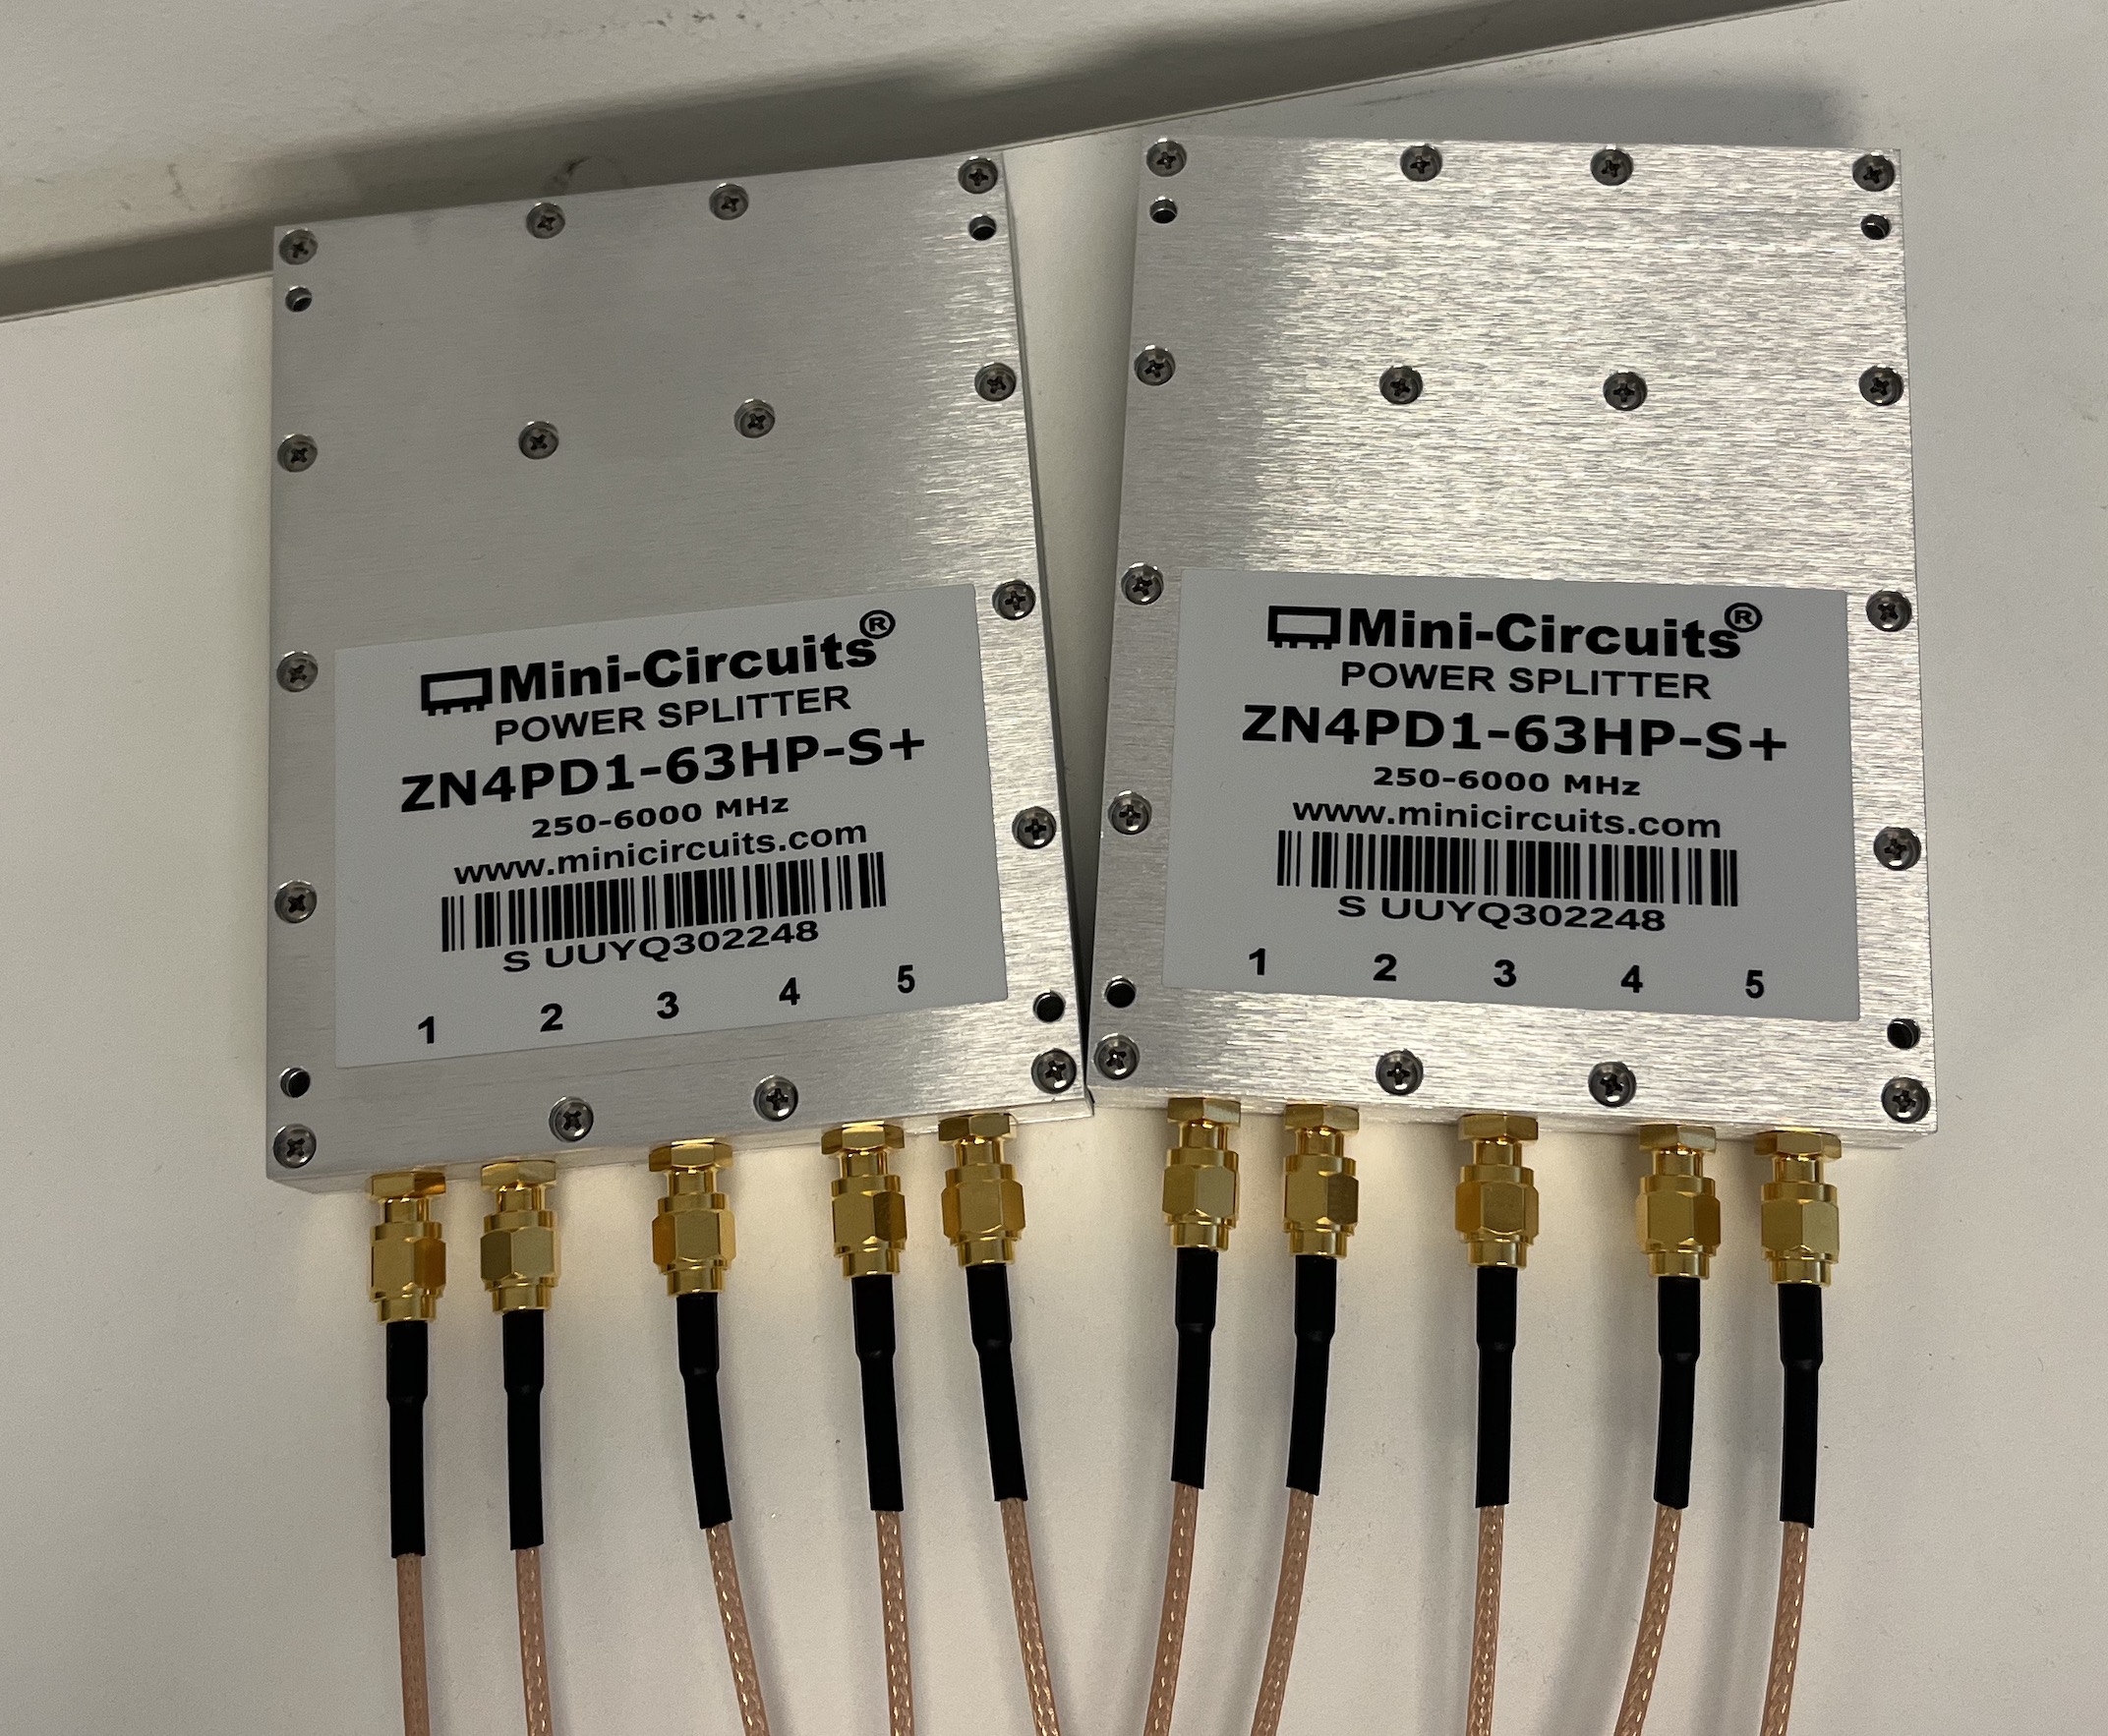
Finally, while the setup mentioned earlier provides an environment with absolute control, it also lacks the flexibility and realism of a typical 5G network. In this setup, all clients must be in close proximity to each other. Additionally, the complexity of the setup increases as it requires additional equipment such as power splitters, attenuators, and coaxial cables. These components are necessary to establish the wired connections and manipulate the conditions of each client. The addition of such equipment adds to the overall complexity and infrastructure requirements of the setup.
