This project is all about accuratly driving brushless motors, for cheap. The aim is to make it possible to use inexpensive brushless motors in high performance robotics projects.
Like this (click for video):
This repository contains the firmware that runs on the board. The other related repositories are:
- ODriveHardware: Circuit board design. Also, the pinout from the microcontroller to the board is documented here.
- ODrive: Configuration and analysis scripts that runs on a PC.
There is also ODriveFPGA, which contains the FPGA logic and software that runs on the FPGA based ODrive. This is not currently in development, but may be resumed at some later date.
- Configuring parameters
- Compiling and downloading firmware
- Communicating over USB
- Generating startup code
- Setting up Eclipse development environment
To correctly operate the ODrive, you need to supply some parameters. Some are mandatory, and if supplied incorrectly will cause the drive to malfunction. To get good performance you must also tune the drive.
Currently, all the parameters are at the top of the MotorControl/low_level.c file. Please note that many parameters occur twice, once for each motor. In it's current state, the motor structs contain both tuning parameters, meant to be set by the developer, and static variables, meant to be modified by the software. Unfortunatly these are mixed together right now, but cleaning this up is a high priority task.
It may be helpful to know that the entry point of each of the motor threads is void motor_thread at the bottom of MotorControl/low_level.c. This is like main for each motor, and is probably where you should start reading the code.
You must set:
ENCODER_CPR: Encoder Count Per Revolution (CPR). This is 4x the Pulse Per Revolution (PPR) value.POLE_PAIRS: This is the number of magnet poles in the rotor, divided by two. You can simply count the number of magnets in the rotor, if you can see them.brake_resistance: This is the resistance of the brake resistor. If you are not using it, you may set it to 0.0f.
The most important parameters are the limits:
- The current limit:
.current_lim = 75.0f, //[A] // Note: consistent with 40v/v gain. The default current limit, for safety reasons, is set to 10A. This is quite weak, and good for making sure the drive is stable. Once you have tuned the drive, you should increase this to 75A to get some performance. Note that above 75A, you must change the current amplifier gains. - The velocity limit:
.vel_limit = 20000.0f, // [counts/s]. Does what it says on the tin.
The motion control gains are currently manually tuned:
.pos_gain = 20.0f, // [(counts/s) / counts].vel_gain = 15.0f / 10000.0f, // [A/(counts/s)].vel_integrator_gain = 10.0f / 10000.0f, // [A/(counts/s * s)]
An upcoming feature will enable automatic tuning. Until then, here is a rough tuning procedure:
- Set the integrator gain to 0
- Make sure you have a stable system. If it is not, decrease all gains until you have one.
- Increase
vel_gainby around 30% per iteration until the motor exhibits some vibration. - Back down
vel_gainto 50% of the vibrating value. - Increase
pos_gainby around 30% per iteration until you see some overshoot. - Back down
pos_gainuntil you do not have overshoot anymore. - The integrator is not easily tuned, nor is it strictly required. Tune at your own discression.
By default both motors are enabled, and the default control mode is position control.
If you want a different mode, you can change .control_mode. To disable a motor, set .enable_control and .do_calibration to false.
Get a programmer that supports SWD (Serial Wire Debugging) and is ST-link v2 compatible. You can get them really cheap on eBay or many other places.
To compile the program, you first need to install the prerequisite tools:
gcc-arm-none-eabi: GCC compilation toolchain for ARM microcontrollers.- Installing on Ubuntu:
sudo apt-get install gcc-arm-none-eabi
- Installing on Ubuntu:
gdb-arm-none-eabi: GNU project debugger for ARM microcontrollers.- Installing on Ubuntu:
sudo apt-get install gdb-arm-none-eabi
- Installing on Ubuntu:
OpenOCD: Open On-Chip Debugging tools. This is what we use to flash the code onto the microcontroller.- Installing on Ubuntu:
sudo apt-get install openocd
- Installing on Ubuntu:
- No additional USB CDC driver should be required on Linux.
Install the following:
- Git for windows. This intalls the Git Bash, which is a unix style command line interface that we will be using.
- GNU ARM Embedded Toolchain. The cross-compiler used to compile the code. Download and install the "Windows 32-bit" version. Make sure to tick the "add to path" option.
- Make for Windows. Make is used to script the compilation process. Download and run the complete package setup program. Add the path of the binaries to your PATH environment variable. For me this was at
C:\Program Files (x86)\GnuWin32\bin. - OpenOCD. Follow the instructions at GNU ARM Eclipse - How to install the OpenOCD binaries, including the part about ST-LINK/V2 drivers. Add the path of the binaries to your PATH environment variable. For me this was at
C:\Program Files\GNU ARM Eclipse\OpenOCD\0.10.0-201704182147-dev\bin.
After installing all of the above, open a Git Bash shell. Continue at section Building the firmware.
TODO
- Make sure you have cloned the repository.
- Navigate your terminal (bash/cygwin) to the ODriveFirmware dir.
- Run
makein the root of this repository.
- Make sure you have configured the parameters first
- Connect
SWD,SWC, andGNDon connector J2 to the programmer. - You need to power the board by only ONE of the following: VCC(3.3v), 5V, or the main power connection (the DC bus). The USB port (J1) does not power the board.
- Run
make flashin the root of this repository.
Run make gdb. This will reset and halt at program start. Now you can set breakpoints and run the program. If you know how to use gdb, you are good to go.
If you prefer to debug from eclipse, see Setting up Eclipse development environment.
There is currently a very primitive method to read/write configuration, commands and errors from the ODrive over the USB.
Please use the ODriveFirmware/tools/test_bulk.py python script for this.
On Windows you need to set the driver for ODrive to libusb using Zadig.
The most accurate way to understand the commands is to read the code that parses the commands.
p motor position velocity_ff current_ff
pfor positionmotoris the motor number,0or1.positionis the desired position, in encoder counts.velocity_ffis the velocity feed-forward term, in counts/s.current_ffis the current feed-forward term, in A.
Note that if you don't know what feed-forward is or what it's used for, simply set it to 0.
v motor velocity current_ff
vfor velocitymotoris the motor number,0or1.velocityis the desired velocity in counts/s.current_ffis the current feed-forward term, in A.
Note that if you don't know what feed-forward is or what it's used for, simply set it to 0.
c motor current
cfor currentmotoris the motor number,0or1.currentis the desired current in A.
g type index
s type index value
gfor get,sfor settypeis the data type as follows: **0is float **1is int **2is boolindexis the index in the corresponding exposed variable table.
For example
g 0 12will return the phase resistance of M0s 0 8 10000.0will set the velocity limit on M0 to 10000 counts/sg 1 3will return the error status of M0g 1 7will return the error status of M1
The error status corresponds to the Error_t enum in low_level.h.
Note that the links in this section are to a specific commits to make sure that the line numbers are accurate. That is, they don't link to the newest master, but to an old version. Please check the corresponding lines in the code you are using. This is especially important to get the correct indicies in the exposed variable tables, and the error enum values.
You can set up variables in monitoring slots, and then have them (or a subset of them) repeatedly printed upon request. Please see the code for this.
Note: You do not need to run this step to program the board. This is only required if you wish to update the auto generated code.
This project uses the STM32CubeMX tool to generate startup code and to ease the configuration of the peripherals. We also use a tool to generate the Makefile. The steps to do this are as follows.
stm32cubeMX: Tool from STM to automatically generate setup routines and configure libraries, etc.- Available here
- Run stm32cubeMX and load the
stm32cubemx/Odrive.iocproject file. - Press
Project -> Generate code - You may need to let it download some drivers and such.
There is an excellent project called CubeMX2Makefile, originally from baoshi. This project is included as a submodule.
- Initialise and clone the submodules:
git submodule init; git submodule update - Generate makefile:
python2 CubeMX2Makefile/CubeMX2Makefile.py .
- Install Eclipse IDE for C/C++ Developers
- Install the OpenOCD Eclipse plugin
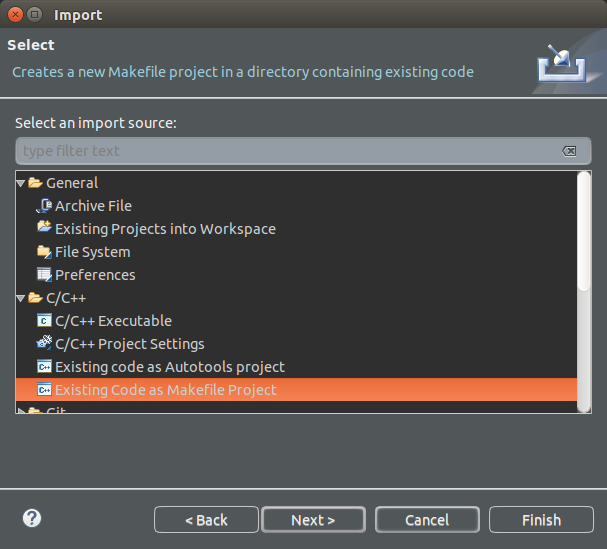
- File -> Import -> C/C++ -> Existing Code as Makefile Project
- Browse for existing code location, find the OdriveFirmware root.
- In the Toolchain options, select
Cross GCC - Hit Finish
- Build the project (press ctrl-B)
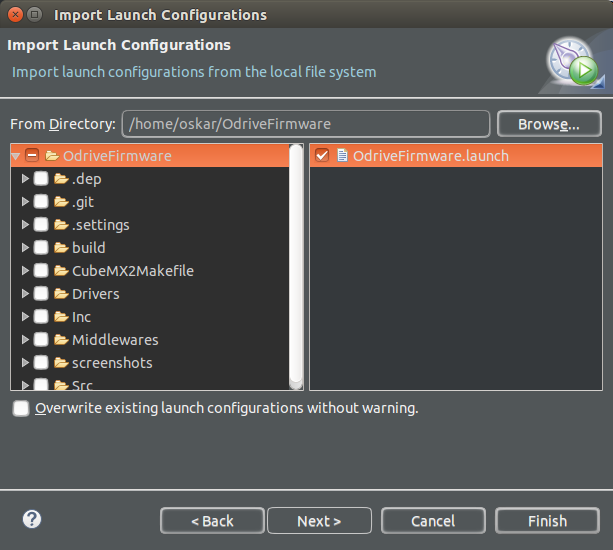
- File -> Import -> Run/Debug -> Launch Configurations -> Next
- Highlight (don't tick) the OdriveFirmare folder in the left column
- Tick OdriveFirmware.launch in the right column
- Hit Finish
- Make sure the programmer is connected to the board as per Flashing the firmware.
- Press the down-arrow of the debug symbol in the toolbar, and hit Debug Configurations
- You can also hit Run -> Debug Configurations
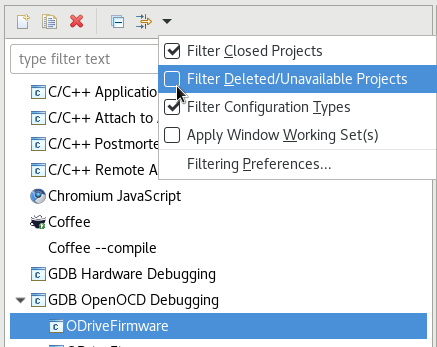
- Highlight the debug configuration you imported, called OdriveFirmware. If you do not see the imported launch configuration rename your project to
ODriveFirmwareor edit the launch configuration to match your project name by unfiltering unavailable projects:
- Hit Debug
- Eclipse should flash the board for you and the program should start halted on the first instruction in
Main - Set beakpoints, step, hit Resume, etc.
- Make some cool features! ;D
The cortex M4F processor has hardware single precision float unit. However double precision operations are not accelerated, and hence should be avoided. The following regex is helpful for cleaning out double constants:
find: ([-+]?[0-9]+\.[0-9]+(?:[eE][-+]?[0-9]+)?)([^f0-9e])
replace: \1f\2


