Implementation of a restful service to obtain the current price of Bitcoin.
RESTful API built on Kotlin version 1.7.0 as a microservice using the SpringBoot Framework version 2.7.2 as a base and compiled to a fat-jar file.
An extensive implementation is made in the code of the framework's own annotations, dependency injection and intermediation with storage services such as PostgresSQL are done through the JPA library. External services such as the CoinDesk API are used Spring Cloud OpenFeign.
- Autor: Cristiam Mercado
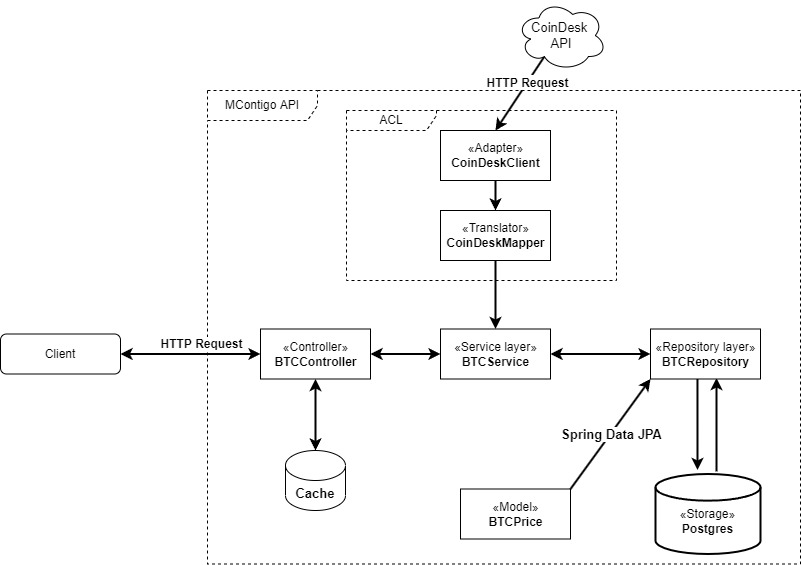
For this exercise I have decided to use a layered architecture. The layered architecture consists of dividing the application into several layers, with the intention that each layer has a well-defined role, in this particular case, a rule control layer and REST validations, a business rules layer (services ) and a data access layer (Repository), this with the purpose of achieving a more natural and objective separation of responsibilities within the API.
I have also made use of the anti-corruption layer pattern (ACL). Using an adapter layer between the CloudDesk API system that don't share the same semantics as our API. This layer translates requests that API makes to the other system. Use this pattern to ensure that an application's design is not limited by dependencies on outside subsystems.
Don't forget to set the system variables:
JAVA_HOMEpointing to the JDK installation folder.- Add the
binfolder of the Gradle installation to the OS environment path.
The source code is in a Gradle project using Kotlin DSL that can be opened with any IDE that supports this type of project (IntelliJ IDEA recommended).
To start coding, remember that GitHub Flow is used for handling Git branches, so make sure it's located in the develop branch before you make any changes, executes git pull command to update your local repository, and then verify you can build the project locally. Create a feature/{change-name} branch from develop where to make the corresponding changes.
Do not make changes directly to the develop branch or to the master branch, always create a new feature branch and once you have git pushed your changes to the server, create a pull request with the changes to develop so that someone else on the team reviews and approves the PR changes.
Consider installing Gradle globally on your operating system for convenience. To find out if it was installed correctly globally, simply open a command console and run:
gradle -vThis should return something similar to the following (example on Windows):
------------------------------------------------------------
Gradle 7.5
------------------------------------------------------------

Build time:   2022-07-14 12:48:15 UTC
Revision:     c7db7b958189ad2b0c1472b6fe663e6d654a5103

Kotlin:       1.6.21
Groovy:       3.0.10
Ant:          Apache Ant(TM) version 1.10.11 compiled on July 10 2021
JVM:          17.0.4 (Azul Systems, Inc. 17.0.4+8-LTS)
OS:           Windows 11 10.0 amd64
However, it is also possible to use the wrapper that comes built into the root of the project using the gradlew.bat exec file on Windows or ./gradlew script on Linux/Unix based systems.
To install PostgreSQL database engine locally you must install Docker. If you are on Windows, it is recommended to use the Docker Desktop integration with WSL 2 so that running the commands below is supported, you can for example install Ubuntu LTS from the Microsoft Store. For Linux/Unix systems, you can just run them from a terminal:
docker run --name postgresql -p 5432:5432 -e POSTGRES_PASSWORD=s3cr3tp4ssw0rd -e POSTGRES_DB=mcontigo -d postgres:latestAfter a few seconds, PostgreSQL will start with the default user postgres and password s3cr3tp4ssw0rd. This docker container is already configured for development, text encoding and time zone.
Once all previous configurations have been made, access the Postgres server with any SQL client or by console.
Keep in mind that the access credentials to enter the Postgres server are for the development environment. For testing and production environments, the properties must be rewritten according to application.yml.
You can run the project in two ways: directly from the specific Gradle command for this, or from the compiled jar file.
To run the source code from Gradle, simply run the command:
gradlew.bat clean run # Windows./gradlew clean run # Linux/UnixTo run the source code from the jar file, you must first build the project with the following command (unit tests will run):
gradlew.bat clean build # Windows./gradlew clean build # Linux/UnixOnce the project is compiled, a file will be generated in the build/libs directory called mcontigo-api.jar. This file should already run with the JRE installed on your computer. The simple way to do it would be:
cd build/libs
java -jar mcontigo-api.jar
This command would start the application with the default configuration (development).
In the source code you can find the commented classes and methods. You can also use the compiled jar referring to the javadoc.
