The artist is the creator of beautiful things. — Oscar Wilde, The Picture of Dorian Gray
This class exercise continues the development of a GUI app using the JavaFX library. Students will continue to create an interactive GUI that loads an image from a specified URL and allows the user to perform different resizing operations. Construction of this app requires students to utilize API documentation and their knowledge of inheritance, polymorphism, and interfaces.
- LO2.e: (Partial) Utilize existing generic methods, interfaces, and classes in a software solution.
- LO7.a: (Partial) Design and implement a graphical user interface in a software project.
Answer the following questions in your notes. These instructions assume that you are logged into the Odin server.
NOTE: If a step requires you to enter a command, please provide in your notes the full command that you typed to make the related action happen. If context is necessary (e.g., the command depends on your present working directory), then please note that context as well.
-
Use Git to clone the repository for this exercise onto Odin into a subdirectory called
cs1302-hw7.6:$ git clone --depth 1 https://github.com/cs1302uga/cs1302-hw7.6.git
-
Execute
tree srcfrom within thecs1302-hw7.6directory you created to see the provided source files. Then, take a few minutes to look through the code and understand what you were given. -
Compile and run the code using the provided compile script (
compile.sh). -
Enter an invalid URL into the
TextFieldand click the load button. The starter code includes a method calledalertErrorthat displays an error message within anAlertwindow. Take a minute to look over the code in that method. -
Consider the following screenshot and associated containment hierarchy:
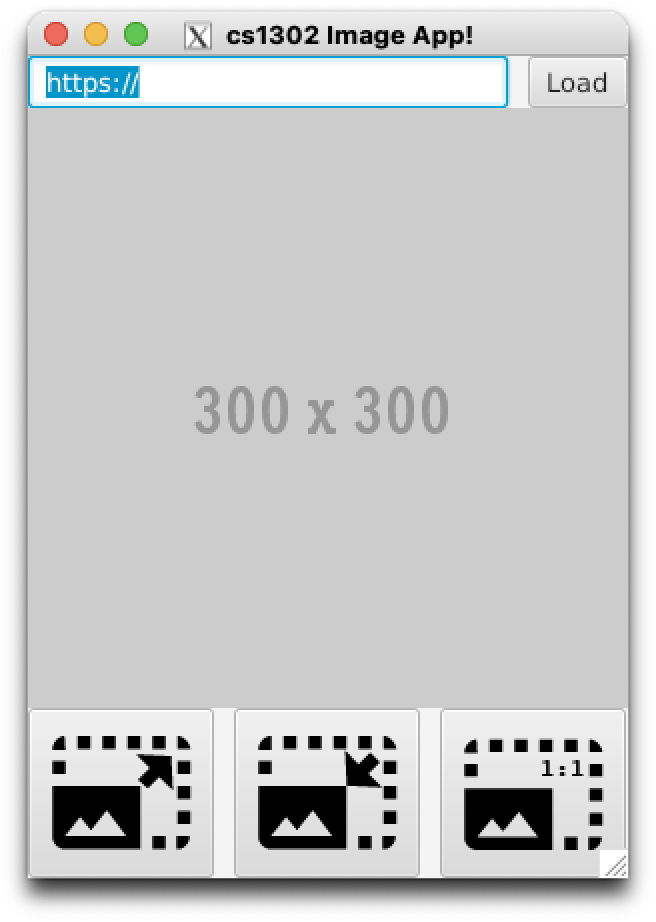
            Stage
              |
            Scene
              |
            VBox
              |
            /---\---------\
           /     \         \
         HBox  ImageView  HBox
         / \               |
        /   \            /---\-----\
 TextField  Button      /     \     \
                   Button Button Button
                   /      /           \
              ImageView ImageView ImageView
Each node corresponds to an object of some class under the
javafxpackage. The diagram for the scene graph assumes that child nodes are added to their parents in a left-to-right order. Here are some additional notes:-
All images will be loaded into the application with a width and height of
300. Even if the original image is not perfectly square, it will show up that way in the app. This is expected behavior and this functionality is already built into the starter code. You can see this in the call to theImageconstructor. -
The text field will already grow with its parent
HBoxin the starter code. -
The three buttons at the bottom should grow to fill their enclosing
HBox. Buttons require an extra step that was not needed with text fields. To get this to work, make sure you read and understand all of the starter code in theHboxDocumentation. -
The three
ImageViewobjects are associated with theButtonobjects via eachButtonobject'sgraphicproperty. -
The icons for the associated images are contained in the
resourcesdirectory provided with this exercise. To use these local files in yourImageView, you can use a relativefile:URL, e.g.,file:resources/image.png— this will only work if theresourcesdirectory is in the present working directory when the app is run. There is an example of this in theinitmethod in the starter code. There, we initialize the default image from theresourcesdirectory.
-
-
Update your code so that it has the same scene graph and visual appearance provided in the previous step. The three new buttons below the main
ImageViewobject are not supposed to function for this checkpoint. Recompile before continuing. Also, make sure your code passes thecheckstyleaudit, then stage and commit all changes.

If you completed the steps correctly, your app should look similar to the screenshot provided above. Congratulations on a good-looking app!
-
Now that you have your app looking good, let's make it do stuff. Add the functionality listed below to your app.
You will need to consult the API documentation for the
ImageViewandButton.While reading the documentation, carefully consider how the following properties impact an
ImageView:-
After creating the
ImageViewobject, you will need to set thepreserveRatioproperty totrueand set both thefitWidthandfitHeightproperties to match the width and height of the default image (found in theresourcesfolder). -
When resizing the image view, you should update the
fitWidthandfitHeightproperties of theImageViewby a fixed amount (discussed in more detail below). You should not modify the width/height of the image. -
Here are some URLs to try when testing your program:
http://csweb.cs.uga.edu/~mec/cs1302/gui/pikachu.pnghttp://csweb.cs.uga.edu/~mec/cs1302/gui/brad.jpghttp://csweb.cs.uga.edu/~mec/cs1302/gui/SuccessKid.jpg
Please read all of the bullet points below as well as the recommendations before writing any code.
-
Increase Size (Enlarge): The first button (i.e., the one with
photo_size_enlarge.png) should increase the size of the mainImageViewobject by some fixed amount.- If clicking this button causes the size to increase to an amount such that a
subsequent click would cause the
ImageViewsize to exceed twice the size of the underlyingImage, then disable the button. - If the second button (i.e., the one for decreasing size) is disabled, then enable it.
- If clicking this button causes the size to increase to an amount such that a
subsequent click would cause the
-
Decrease Size (Shrink): The second button (i.e., the one with
photo_size_shrink.png) should decrease the size of the mainImageViewobject by some fixed amount.- If clicking this button causes the size to decrease to an amount such that a
subsequent click would cause the
ImageViewsize to become zero (or negative), then disable the button. In other words, do not let the size of theImageViewreach zero (or less). - If the first button (i.e., the one for increasing size) is disabled, then enable it.
- If clicking this button causes the size to decrease to an amount such that a
subsequent click would cause the
-
Actual Size: The third button (i.e., the one with
photo_size_actual.png) should return the mainImageViewobject to its default size. This can be accomplished by changing the size of theImageViewobject to the same size as theImageobject it displays.- If either of the other buttons (for increasing/decreasing size) are disabled, then enable them.
Recommendations:
-
Instead of writing the increase/decrease size logic entirely in separate lambda expressions, write a
privateresize method that takes your fixed resize amount as a positive or negativedoubleand simply have the lambdas for your event handlers call that method with the appropriate value. For example:someButton.setOnAction(e -> resize(+25));
-
Recompile before continuing. Also, make sure your code passes the
checkstyleaudit, then stage and commit all changes.
If you completed the steps correctly, your app should not only look similar to the screenshot provided above, but it has the desired functionality. Congratulations on a good-looking, functional app!
Each student needs to individually submit their work.
-
Create a plain text file called
SUBMISSION.mddirectly inside thecs1302-hw7.6directory with the following information:- Your name and UGA ID number
Here is an example of the contents of
SUBMISSION.md.Sally Smith (811-000-999) -
Change directories to the parent of
cs1302-hw7.6(e.g.,cd ..fromcs1302-hw7.6). If you would like to make a backup.tarfile, the instructions are in the submission steps for hw01. We won't repeat those steps here and you can view them as optional. -
Use the
submitcommand to submit this exercise tocsci-1302:$ submit cs1302-hw7.6 csci-1302Read the output of the submit command very carefully. If there is an error while submitting, then it will displayed in that output. Additionally, if successful, the
submitcommand creates a new receipt file in the directory you submitted. The receipt file begins with "rec" and contains a detailed list of all files that were successfully submitted. Look through the contents of the receipt file and always remember to keep that file in case there is an issue with your submission.Note: You must be on Odin to submit.