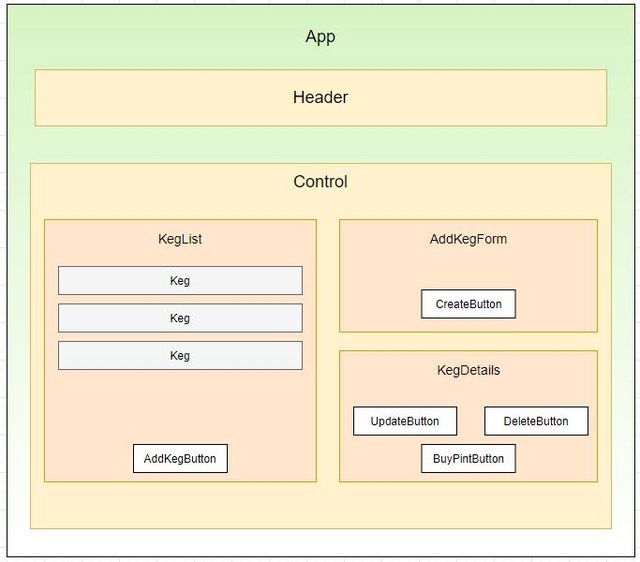
This application displays the landing page for Got The Booch Kombucha Taproom. A user may add, view, and delete kegs. A user may also purchase a pint from a keg.
This project was bootstrapped with Create React App.
VS Code
HTML
CSS
JavaScript
React
Redux
None.
Expand to show specs
| Test # | Expected Behavior | Input | Output |
|---|---|---|---|
| 1 | formVisibleReducer should return default state if no action type is recognized | formVisibleReducer(false, { type: null }) | false |
| 2 | formVisibleReducer should toggle form visibility state to true | formVisibleReducer(false, { type: 'TOGGLE_FORM' }) | true |
| 3 | kegListReducer should return default state if no action type is recognized | kegListReducer({}, { type: 'null' }) | {} |
| 4 | kegListReducer should successfully add new keg data to masterKegList | kegListReducer({}, { type: 'ADD_KEG' }) | {"keg object containing all required properties"} |
| 5 | kegListReducer should successfully delete keg data from masterKegList | kegListReducer({}, { type: 'DELETE_KEG' }) | Chosen keg will be removed, leaving all remaining kegs in masterKegList |
| 6 | rootReducer should return default state if no action type is recognized | rootReducer({}, { type: null }) | masterKegList: {}, formVisibleOnPage: false |
| 7 | Initial state of kegListReducer matches rootReducer | expect(store.getState().masterKegList).toEqual(kegListReducer(undefined, { type: null })) | True |
| 8 | Initial state of formVisibleReducer matches rootReducer | expect(store.getState().formVisibleOnPage).toEqual(formVisibleReducer(undefined, { type: null })) | True |
| 9 | ADD_KEG action works for kegListReducer and rootReducer | expect(store.getState().masterKegList).toEqual(kegListReducer(undefined, action)) | True |
| 10 | TOGGLE_FORM action works for formVisibleReducer and rootReducer | expect(store.getState().formVisibleOnPage).toEqual(formVisibleReducer(undefined, action)) | True |
| 11 | Action creator 'deleteKeg' should create DELETE_KEG action | actions.deleteKeg(1) | type: 'DELETE_KEG', id: 1 |
| 12 | Action creator toggleForm should create TOGGLE_FORM action | actions.toggleForm() | type: 'TOGGLE_FORM' |
| 13 | Action creator addKeg should create ADD_KEG action | actions.addKeg() | type: 'ADD_KEG' |
| 14 | toggleEditReducer should return default state if no action type is recognized | toggleEditReducer(false, { type: 'null' }) | false |
| 15 | toggleEditReducer should toggle form visibility state to true | toggleEditReducer(false, { type: 'TOGGLE_EDIT' }) | True |
| 16 | TOGGLE_EDIT action works for editReducer and rootReducer | expect(store.getState().editing).toEqual(editReducer(undefined, action)) | True |
| 17 | Action creator toggleEdit should create TOGGLE_EDIT action | actions.toggleEdit() | type: 'TOGGLE_EDIT' |
To open the project on your local machine, you will need to download and install a code editor. The most popular choices are Atom and Visual Studio Code. Visual Studio Code is the code editor used to create this application.
- Follow above steps to install necessary software.
- Open web browser and go to https://github.com/cschweig2/kombucha-taproom-redux.
- After clicking the green "code" button, you can copy the URL for the repository.
- Open a terminal window, such as Command Prompt or Git Bash, and navigate to the folder you wish to keep this project in.
4a. Type in this command:git clone, followed by the URL you just copied. The full command should look like this:git clone https://github.com/cschweig2/kombucha-taproom-redux. - View the code on your favorite text editor.
- Click here to view project repository.
- Click "Clone or download" to find the "Download ZIP" option.
- Click "Download ZIP" and extract files.
- Open the project in a text editor by clicking on any file in the project folder.
In the project directory, you can run:
Installs node modules required to get started.
Runs the app in the development mode.
Open http://localhost:3000 to view it in the browser.
The page will reload if you make edits.
You will also see any lint errors in the console.
Launches the test runner in the interactive watch mode.
See the section about running tests for more information.
Builds the app for production to the build folder.
It correctly bundles React in production mode and optimizes the build for the best performance.
The build is minified and the filenames include the hashes.
Your app is ready to be deployed!
See the section about deployment for more information.
Note: this is a one-way operation. Once you eject, you can’t go back!
If you aren’t satisfied with the build tool and configuration choices, you can eject at any time. This command will remove the single build dependency from your project.
Instead, it will copy all the configuration files and the transitive dependencies (webpack, Babel, ESLint, etc) right into your project so you have full control over them. All of the commands except eject will still work, but they will point to the copied scripts so you can tweak them. At this point you’re on your own.
You don’t have to ever use eject. The curated feature set is suitable for small and middle deployments, and you shouldn’t feel obligated to use this feature. However we understand that this tool wouldn’t be useful if you couldn’t customize it when you are ready for it.
You can learn more in the Create React App documentation.
To learn React, check out the React documentation.
If you run into any issues, you can contact the creator at chelraebecker@gmail.com, or make contributions to the code on GitHub via forking and creating a new branch.
| Author | GitHub Profile | Contact Email |
|---|---|---|
| Chelsea Becker | https://github.com/cschweig2 | chelraebecker@gmail.com |
This software is licensed under the MIT license.
Copyright (c) 2021 Chelsea Becker